celeba数据集_轻松学 Pytorch 使用DCGAN实现数据复制
点击上方蓝字关注我们微信公众号:OpenCV学堂关注获取更多计算机视觉与深度学习知识DCGANIan J. Goodfellow首次提出了GAN之后,生成对抗只是神经网络还不是深度卷积神经网络,所以有人提出一种基于深度神经网络的生成对抗网络,这个就是DCGAN。相比之前的GAN,DCGAN在生成者与判别者网络上的改进如下:1.使用步长卷积与反卷积替代池化实现上下采样2.在生成者与判别者网...

点击上方蓝字关注我们
微信公众号:OpenCV学堂
关注获取更多计算机视觉与深度学习知识
DCGAN
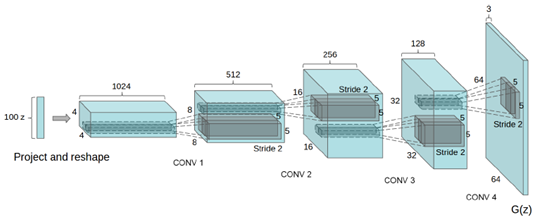
Ian J. Goodfellow首次提出了GAN之后,生成对抗只是神经网络还不是深度卷积神经网络,所以有人提出一种基于深度神经网络的生成对抗网络,这个就是DCGAN。相比之前的GAN,DCGAN在生成者与判别者网络上的改进如下:
1.使用步长卷积与反卷积替代池化实现上下采样2.在生成者与判别者网络使用BN层3.删除全链接层4.在生成者网络使用ReLU作为激活函数,最后一层使用tanh5.在判别者网络使用LeakyReLU作为激活函数生成者网络如下:
使用celebA人脸数据集,20W张人脸数据,完成DCGAN的训练,最终保存生成者模型。下面是DCGAN的代码实现与,训练与基于生成者实现人脸数据的复制。
DCGAN代码实现与训练
01
生成者
生成者卷积神经网络的代码实现如下:
class Generator(nn.Module): def __init__(self, ngpu): super(Generator, self).__init__() self.ngpu = ngpu self.main = nn.Sequential( # input is Z, going into a convolution nn.ConvTranspose2d(nz, ngf * 8, 4, 1, 0, bias=False), nn.BatchNorm2d(ngf * 8), nn.ReLU(True), # state size. (ngf*8) x 4 x 4 nn.ConvTranspose2d(ngf * 8, ngf * 4, 4, 2, 1, bias=False), nn.BatchNorm2d(ngf * 4), nn.ReLU(True), # state size. (ngf*4) x 8 x 8 nn.ConvTranspose2d( ngf * 4, ngf * 2, 4, 2, 1, bias=False), nn.BatchNorm2d(ngf * 2), nn.ReLU(True), # state size. (ngf*2) x 16 x 16 nn.ConvTranspose2d( ngf * 2, ngf, 4, 2, 1, bias=False), nn.BatchNorm2d(ngf), nn.ReLU(True), # state size. (ngf) x 32 x 32 nn.ConvTranspose2d( ngf, nc, 4, 2, 1, bias=False), nn.Tanh() # state size. (nc) x 64 x 64 ) def forward(self, input): return self.main(input)02
判别者
判别者卷积神经网络代码实现如下:
 1class Discriminator(nn.Module):
 2    def __init__(self, ngpu):
 3        super(Discriminator, self).__init__()
 4        self.ngpu = ngpu
 5        self.main = nn.Sequential(
 6            # input is (nc) x 64 x 64
 7            nn.Conv2d(nc, ndf, 4, 2, 1, bias=False),
 8            nn.LeakyReLU(0.2, inplace=True),
 9            # state size. (ndf) x 32 x 32
10            nn.Conv2d(ndf, ndf * 2, 4, 2, 1, bias=False),
11            nn.BatchNorm2d(ndf * 2),
12            nn.LeakyReLU(0.2, inplace=True),
13            # state size. (ndf*2) x 16 x 16
14            nn.Conv2d(ndf * 2, ndf * 4, 4, 2, 1, bias=False),
15            nn.BatchNorm2d(ndf * 4),
16            nn.LeakyReLU(0.2, inplace=True),
17            # state size. (ndf*4) x 8 x 8
18            nn.Conv2d(ndf * 4, ndf * 8, 4, 2, 1, bias=False),
19            nn.BatchNorm2d(ndf * 8),
20            nn.LeakyReLU(0.2, inplace=True),
21            # state size. (ndf*8) x 4 x 4
22            nn.Conv2d(ndf * 8, 1, 4, 1, 0, bias=False),
23            nn.Sigmoid()
24        )
25
26    def forward(self, input):
27        return self.main(input)
03
模型训练
初始化与模型训练
  1# Create the Discriminator
  2netD = Discriminator(ngpu).to(device)
  3
  4# Handle multi-gpu if desired
  5if (device.type == 'cuda') and (ngpu > 1):
  6    netD = nn.DataParallel(netD, list(range(ngpu)))
  7
  8# Apply the weights_init function to randomly initialize all weights
  9#  to mean=0, stdev=0.2.
 10netD.apply(weights_init)
 11
 12# Print the model
 13print(netD)
 14
 15
 16# Initialize BCELoss function
 17criterion = nn.BCELoss()
 18
 19# Create batch of latent vectors that we will use to visualize
 20#  the progression of the generator
 21fixed_noise = torch.randn(64, nz, 1, 1, device=device)
 22
 23# Establish convention for real and fake labels during training
 24real_label = 1.
 25fake_label = 0.
 26
 27# Setup Adam optimizers for both G and D
 28optimizerD = optim.Adam(netD.parameters(), lr=lr, betas=(beta1, 0.999))
 29optimizerG = optim.Adam(netG.parameters(), lr=lr, betas=(beta1, 0.999))
 30
 31
 32# Training Loop
 33
 34# Lists to keep track of progress
 35img_list = []
 36G_losses = []
 37D_losses = []
 38iters = 0
 39
 40if __name__ == "__main__":
 41    print("Starting Training Loop...")
 42    # For each epoch
 43    for epoch in range(num_epochs):
 44        # For each batch in the dataloader
 45        for i, data in enumerate(dataloader, 0):
 46
 47            ############################ 48            # (1) Update D network: maximize log(D(x)) + log(1 - D(G(z))) 49            ###########################
 50            ## Train with all-real batch
 51            netD.zero_grad()
 52            # Format batch
 53            real_cpu = data[0].to(device)
 54            b_size = real_cpu.size(0)
 55            label = torch.full((b_size,), real_label, dtype=torch.float, device=device)
 56            # Forward pass real batch through D
 57            output = netD(real_cpu).view(-1)
 58            # Calculate loss on all-real batch
 59            errD_real = criterion(output, label)
 60            # Calculate gradients for D in backward pass
 61            errD_real.backward()
 62            D_x = output.mean().item()
 63
 64            ## Train with all-fake batch
 65            # Generate batch of latent vectors
 66            noise = torch.randn(b_size, nz, 1, 1, device=device)
 67            # Generate fake image batch with G
 68            fake = netG(noise)
 69            label.fill_(fake_label)
 70            # Classify all fake batch with D
 71            output = netD(fake.detach()).view(-1)
 72            # Calculate D's loss on the all-fake batch
 73            errD_fake = criterion(output, label)
 74            # Calculate the gradients for this batch
 75            errD_fake.backward()
 76            D_G_z1 = output.mean().item()
 77            # Add the gradients from the all-real and all-fake batches
 78            errD = errD_real + errD_fake
 79            # Update D
 80            optimizerD.step()
 81
 82            ############################ 83            # (2) Update G network: maximize log(D(G(z))) 84            ###########################
 85            netG.zero_grad()
 86            label.fill_(real_label)  # fake labels are real for generator cost
 87            # Since we just updated D, perform another forward pass of all-fake batch through D
 88            output = netD(fake).view(-1)
 89            # Calculate G's loss based on this output
 90            errG = criterion(output, label)
 91            # Calculate gradients for G
 92            errG.backward()
 93            D_G_z2 = output.mean().item()
 94            # Update G
 95            optimizerG.step()
 96
 97            # Output training stats
 98            if i % 50 == 0:
 99                print('[%d/%d][%d/%d]\tLoss_D: %.4f\tLoss_G: %.4f\tD(x): %.4f\tD(G(z)): %.4f / %.4f'
100                      % (epoch, num_epochs, i, len(dataloader),
101                         errD.item(), errG.item(), D_x, D_G_z1, D_G_z2))
102
103            # Save Losses for plotting later
104            G_losses.append(errG.item())
105            D_losses.append(errD.item())
106
107            # Check how the generator is doing by saving G's output on fixed_noise
108            if (iters % 500 == 0) or ((epoch == num_epochs-1) and (i == len(dataloader)-1)):
109                with torch.no_grad():
110                    fake = netG(fixed_noise).detach().cpu()
111            iters += 1
112
113        # save model
114        netG.eval()
115        torch.save(netG, 'generate_model.pt')
请大家原谅我,因为我比较懒,就直接把pytorch官方教程中的代码,经过一番粘贴复制然后一通猛改就成了这个例子了!所以注释都是英文的,大家自己慢慢看吧,基于celebA人脸数据集训练,我的机器是GTX1050Ti,所以只训练了3个epoch就over了,主要是为了省电跟环保@_@!然后保存了生成者模型。
模型使用
基于DCGAN的生成者模型,直接加载,生成100个随机数作为输入样本,生成的人脸图像如下:
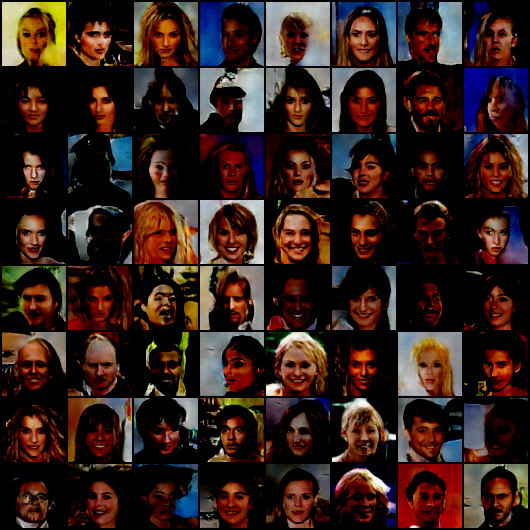
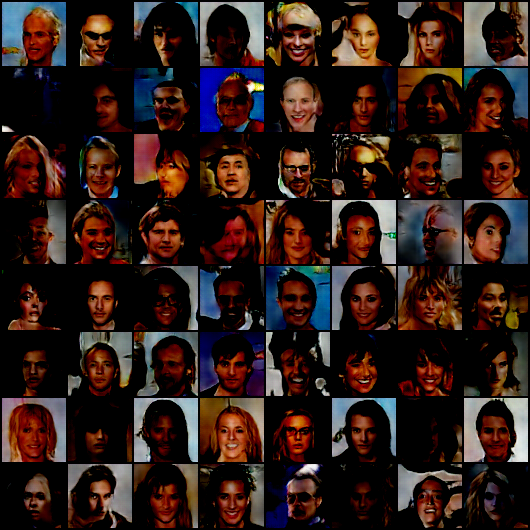
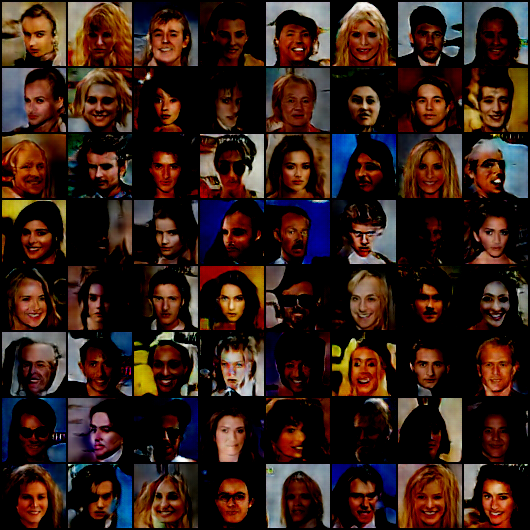
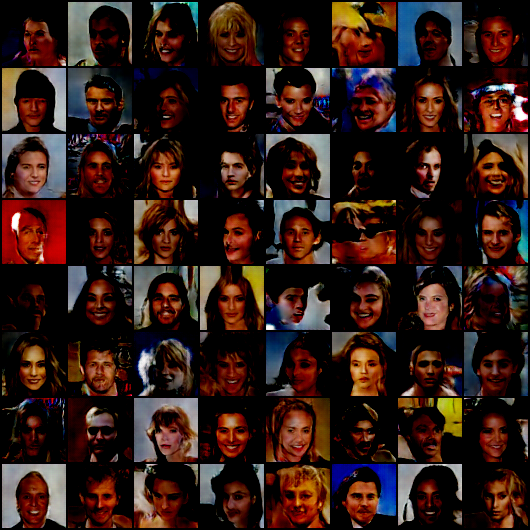
从上图可以看出已经有点效果了,感兴趣可以继续训练,演示代码如下:
 1import torch
 2import cv2 as cv
 3import numpy as np
 4from dcgan_model import Generator
 5from torchvision.utils import save_image
 6
 7
 8def dcgan_generate_face_demo():
 9    netG = torch.load("./generate_model.pt")
10    netG.cuda()
11    for i in range(4):
12        noise = torch.randn(64, 100, 1, 1, device="cuda")
13        # Generate fake image batch with G
14        generated = netG(noise)
15        print(generated.size())
16        save_image(generated.view(generated.size(0), 3, 64, 64), 'D:/sample_%d'%i + '.png')
17
18
19if __name__ == "__main__":
20    dcgan_generate_face_demo()
君子藏器于身,待时而动
推荐阅读
OpenCV4系统化学习路线图-视频版本!
Tensorflow + OpenCV4 安全帽检测模型训练与推理
汇总 | OpenCV DNN模块中支持的分类网络
OpenCV中支持的人脸检测方法整理与汇总
详解ENet | CPU可以实时的道路分割网络
从Pytorch 的ONNX到OpenVINO中IR中间层
OpenVINO中的FCOS人脸检测模型代码演示
详解OpenVINO 模型库中的人脸检测模型
效果特好 | OpenVINO手写数字识别
OpenVINO+OpenCV 文本检测与识别
OpenVINO + OpenCV实现点头与摇头识别验证
OpenVINO + OpenCV实现车辆检测与道路分割
OpenCV二值图像分析之寻找缺失与靶心
OpenCV 基于Inception模型图像分类
OpenCV4.4 + YOLOv4 真的可以运行了…..

魔乐社区(Modelers.cn) 是一个中立、公益的人工智能社区,提供人工智能工具、模型、数据的托管、展示与应用协同服务,为人工智能开发及爱好者搭建开放的学习交流平台。社区通过理事会方式运作,由全产业链共同建设、共同运营、共同享有,推动国产AI生态繁荣发展。
更多推荐


 0
0 0
0- 0


 已为社区贡献1条内容

所有评论(0)