tensorflow2.3实现猫狗数据集图像语义分割(一)
tensorflow2.3实现图像语义分割(semantic segmentation)对图像而言,常见的任务是:图像分类:提取类别特征,如:VGG19网络目标检测:提取类别,位置特征,如:YOLO网络语义分割(实例分割):提取类别,位置特征,针对每个像素,如:Deeplab网络U-Net网络可以利用较少的数据集进行端到端训练,医学领域应用较多(医学领域的标注数据获取成本很高)。为了更有效的利用标
tensorflow2.3实现猫狗数据集图像语义分割
语义分割(semantic segmentation)
对图像而言,常见的任务是:
- 图像分类:提取类别特征,如:VGG19网络
- 目标检测:提取类别,位置特征,如:YOLO网络
- 语义分割(实例分割):提取类别,位置特征,针对每个像素,如:Deeplab网络
U-Net网络可以利用较少的数据集进行端到端训练,医学领域应用较多(医学领域的标注数据获取成本很高)。
为了更有效的利用标注数据,采用数据增强的方法(训练样本进行随机弹性形变)
网络由收缩路径获取上下文信息以及一个对称的扩张路径用以精确定位。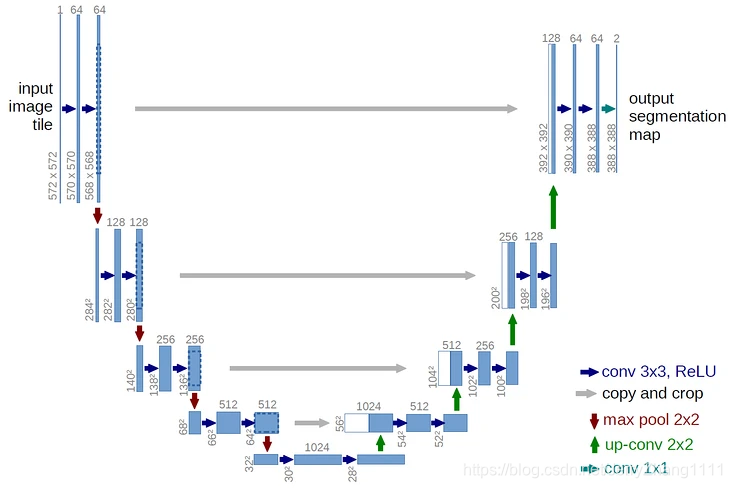
图像语义分割是对图像中每一个像素点进行分类,确定每个点的类别(属于背景,边缘,或身体等)
语义分割的目标,一般是将一张RGB图像或是灰度图像作为输入,输出的是分割图,其中每一个像素包含了其类别的标签。
代码
导入包
import tensorflow as tf
import matplotlib.pyplot as plt
import numpy as np
import random
import glob
import os
显存自适应分配,查看tensorflow 的版本
os.environ["CUDA_VISIBLE_DEVICES"] = "1"
tf.__version__
- ‘2.3.0’
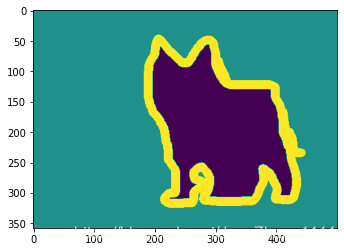
读取一张语义分割图像
img = tf.io.read_file('./dataset/annotations/trimaps/yorkshire_terrier_99.png')
img = tf.image.decode_png(img)
img = tf.squeeze(img)
print(img.shape)
plt.imshow(img)
- (358, 500, 1)
img.numpy().max(), img.numpy().min()
np.unique(img.numpy())
-
(3, 1) 语义分割的最大与最小值
-
array([1, 2, 3], dtype=uint8) 由此看来语义分割结果分类只有1,2,3三个整数值。
读取一张图像
img = tf.io.read_file('./dataset/images/yorkshire_terrier_99.jpg')
img = tf.image.decode_jpeg(img)
plt.imshow(img)
- TensorShape([358, 500, 3])

读取数据
为了把图像数据和标签数据是一一对应的,所以按照名称进行排序。
images = glob.glob('./dataset/images/*.jpg')
images.sort(key=lambda x: x.split('/images/')[-1].split('.jpg')[0])
print(images[:5])
anno = glob.glob('./dataset/annotations/trimaps/*.png')
anno.sort(key=lambda x: x.split('/trimaps/')[-1].split('.png')[0])
print(anno[:5])
- [’./dataset/images/Abyssinian_1.jpg’,
‘./dataset/images/Abyssinian_10.jpg’,
‘./dataset/images/Abyssinian_100.jpg’,
‘./dataset/images/Abyssinian_101.jpg’,
‘./dataset/images/Abyssinian_102.jpg’] - [’./dataset/annotations/trimaps/Abyssinian_1.png’,
‘./dataset/annotations/trimaps/Abyssinian_10.png’,
‘./dataset/annotations/trimaps/Abyssinian_100.png’,
‘./dataset/annotations/trimaps/Abyssinian_101.png’,
‘./dataset/annotations/trimaps/Abyssinian_102.png’]
训练输入乱序
设置随机数种子生成的随机数将会是同一个
np.random.seed(2021)
index = np.random.permutation(len(images))
images = np.array(images)[index]
anno = np.array(anno)[index]
print(images[:5])
print(anno[:5])
- [’./dataset/images/staffordshire_bull_terrier_111.jpg’
‘./dataset/images/english_cocker_spaniel_163.jpg’
‘./dataset/images/British_Shorthair_218.jpg’
‘./dataset/images/keeshond_81.jpg’ ‘./dataset/images/leonberger_4.jpg’] - [’./dataset/annotations/trimaps/staffordshire_bull_terrier_111.png’
‘./dataset/annotations/trimaps/english_cocker_spaniel_163.png’
‘./dataset/annotations/trimaps/British_Shorthair_218.png’
‘./dataset/annotations/trimaps/keeshond_81.png’
‘./dataset/annotations/trimaps/leonberger_4.png’]
乱序后保持图像和标签还是一一对应的。
创建dataset
dataset = tf.data.Dataset.from_tensor_slices((images, anno))
设置训练和测试数据的比例
test_count = int(len(images) * 0.2)
train_count = len(images) - test_count
print(train_count, test_count)
- 5912 1478
划分训练数据和测试数据
train_dataset = dataset.skip(test_count)
test_dataset = dataset.take(test_count)
封装加载图片 jpg格式的解码函数,
def read_jpg(path):
    img = tf.io.read_file(path)
    img = tf.image.decode_jpeg(img, channels=3)
    return img
封装加载标签数据 png格式的解码函数
def read_png(path):
    img = tf.io.read_file(path)
    img = tf.image.decode_png(img, channels=1)
    return img
图像数据变换
def normal_img(input_images, input_anno):
    input_images = tf.cast(input_images, tf.float32)
    input_images = input_images / 127.5 - 1   #归一化
    input_anno = input_anno - 1    #目标值由1,2,3变为 0,1,2
    return input_images, input_anno
封装图像和标签数据预处理过程
def load_images(input_images_path, input_anno_path):
    input_image = read_jpg(input_images_path)
    input_anno = read_png(input_anno_path)
    input_image = tf.image.resize(input_image, [224, 224])
    input_anno = tf.image.resize(input_anno, [224, 224])
    return normal_img(input_image, input_anno)
AUTOTUNE是根据计算机内存自动加载数据
AUTOTUNE = tf.data.experimental.AUTOTUNE
构建训练集和测试集
train_dataset = train_dataset.map(load_images, num_parallel_calls=AUTOTUNE)
test_dataset = test_dataset.map(load_images, num_parallel_calls=AUTOTUNE)
设置输入数据的状态
BATCHSIZE = 32
train_dataset = train_dataset.repeat().shuffle(100).batch(BATCHSIZE)
test_dataset = test_dataset.batch(BATCHSIZE)
print(train_dataset)
print(test_dataset)
- <BatchDataset shapes: ((None, 224, 224, 3), (None, 224, 224, 1)),
types: (tf.float32, tf.float32)> - <BatchDataset shapes: ((None, 224,
224, 3), (None, 224, 224, 1)), types: (tf.float32, tf.float32)>
dataset_train
- <PrefetchDataset shapes: ((None, 224, 224, 3), (None, 224, 224, 1)),
types: (tf.float32, tf.float32)>
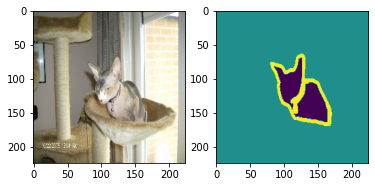
for img, mask in dataset_train.take(1):
    plt.subplot(1,2,1)
    plt.imshow(tf.keras.preprocessing.image.array_to_img(img[0]))
    plt.subplot(1,2,2)
    plt.imshow(tf.keras.preprocessing.image.array_to_img(mask[0]))
加载预训练模型VGG16
conv_base = tf.keras.applications.VGG16(weights='imagenet', input_shape=(224, 224, 3), include_top=False)
conv_base.summary()
由conv_base的输入与最后一层输出建立模型
conv_base.get_layer('block5_conv3').output   #获取block5_conv3的输出
sub_model = tf.keras.models.Model(inputs=conv_base.input, outputs=conv_base.get_layer('block5_conv3').output)  #设置模型的输入与输出
sub_model.summary()
#获取中间层的输出
layer_names = ['block5_conv3', 'block4_conv3',  'block3_conv3', 'block5_pool']  #模型的最后四曾
 #最后四层,每层的输出
layers_output = [conv_base.get_layer(layer_name).output for layer_name in layer_names]
创建一个多输出模型
multi_out_model = tf.keras.models.Model(inputs=conv_base.input, outputs=layers_output)#
multi_out_model.trainable = False
多输出模型结果形状状态
inputs = tf.keras.layers.Input(shape=(224, 224, 3))
out_block5_conv3, out_block4_conv3, out_block3_conv3, out = multi_out_model(inputs)
print(out.shape)
print(out_block5_conv3.shape)
print(out_block4_conv3.shape)
print(out_block3_conv3.shape)
- (None, 7, 7, 512)
- (None, 14, 14, 512)
- (None, 28, 28, 512)
- (None, 56, 56, 256)
上采样, 由(None, 7, 7, 512) 进行上采样
x1 = tf.keras.layers.Conv2DTranspose(512, (3, 3), strides=2, padding='same', activation='relu')(out)
print(x1.shape)
x1 = tf.keras.layers.Conv2D(512, (3, 3), padding='same', activation='relu')(x1)
print(x1.shape)
x2 = tf.add(x1, out_block5_conv3)
print(x2.shape)
- (None, 14, 14, 512)
- (None, 14, 14, 512)
- (None, 14, 14, 512)
x2进行上采样(None, 14, 14, 512)
```bash
x2 = tf.keras.layers.Conv2DTranspose(512, (3, 3), strides=2, padding='same', activation='relu')(x2)
x2 = tf.keras.layers.Conv2D(512, (3, 3), padding='same', activation='relu')(x2)
x3 = tf.add(x2, out_block4_conv3)
print(x3.shape)
- (None, 28, 28, 512)
x3进行上采样(None, 28, 28, 512)

```bash
x3 = tf.keras.layers.Conv2DTranspose(256, (3, 3), strides=2, padding='same', activation='relu')(x3)
x3 = tf.keras.layers.Conv2D(256, (3, 3), padding='same', activation='relu')(x3)
x4 = tf.add(x3, out_block3_conv3)
print(x4.shape)
- (None, 56, 56, 256)
x4进行上采样(None, 56, 56, 256)
x5 = tf.keras.layers.Conv2DTranspose(128, (3, 3), strides=2, padding='same', activation='relu')(x4)
x5 = tf.keras.layers.Conv2D(128, (3, 3), padding='same', activation='relu')(x5)
print(x5.shape)
- (None, 112, 112, 128)
x5进行上采样(None, 112, 112, 128)得到最后一层的输出
prediction = tf.keras.layers.Conv2DTranspose(3, (3, 3), strides=(2, 2), padding='same', activation='softmax')(x5)
print(prediction.shape)
- (None, 224, 224, 3)
丛输入到输出创建模型
model = tf.keras.models.Model(inputs=inputs, outputs=prediction)
model.summary()
模型配置和训练
model.compile(optimizer='adam', loss='sparse_categorical_crossentropy', metrics=['acc'])
history = model.fit(train_dataset, epochs=10, steps_per_epoch=train_count//BATCHSIZE, validation_data=test_dataset, validation_steps=test_count//BATCHSIZE)
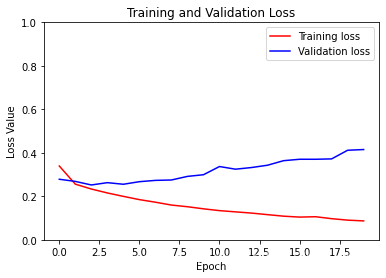
模型训练过程
plt.plot(history.epoch, history.history.get('acc'))
plt.plot(history.epoch, history.history.get('val_acc'))
plt.plot(history.epoch, history.history.get('loss'))
plt.plot(history.epoch, history.history.get('val_loss'))
plt.show()
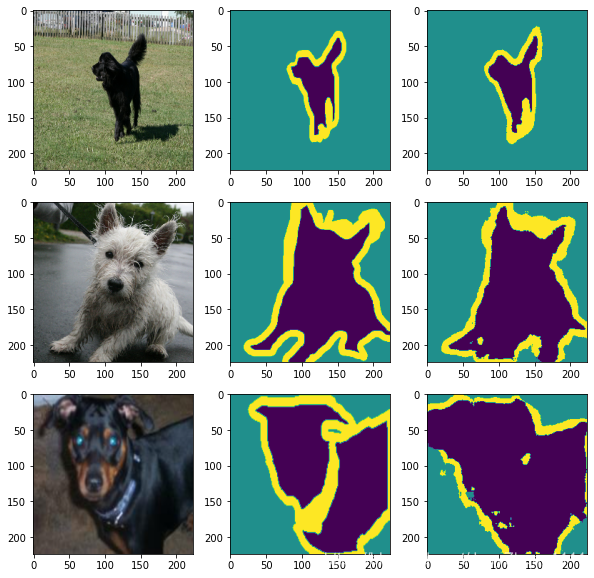
预测,预测与实际的对比
num = 3
for image, mask in dataset_test.take(1):
    pred_mask = model.predict(image)
    pred_mask = tf.argmax(pred_mask, axis=-1)
    pred_mask = pred_mask[..., tf.newaxis]

    plt.figure(figsize=(10, 10))
    for i in range(num):
        plt.subplot(num, 3, i*num+1)
        plt.imshow(tf.keras.preprocessing.image.array_to_img(image[i]))
        plt.subplot(num, 3, i*num+2)
        plt.imshow(tf.keras.preprocessing.image.array_to_img(mask[i]))
        plt.subplot(num, 3, i*num+3)
        plt.imshow(tf.keras.preprocessing.image.array_to_img(pred_mask[i]))
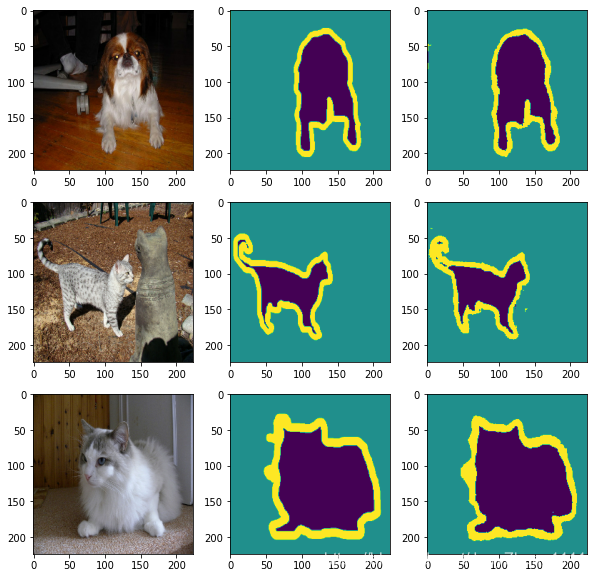
for image, mask in dataset_train.take(1):
    pred_mask = model.predict(image)
    pred_mask = tf.argmax(pred_mask, axis=-1)
    pred_mask = pred_mask[..., tf.newaxis]

    plt.figure(figsize=(10, 10))
    for i in range(num):
        plt.subplot(num, 3, i*num+1)
        plt.imshow(tf.keras.preprocessing.image.array_to_img(image[i]))
        plt.subplot(num, 3, i*num+2)
        plt.imshow(tf.keras.preprocessing.image.array_to_img(mask[i]))
        plt.subplot(num, 3, i*num+3)
        plt.imshow(tf.keras.preprocessing.image.array_to_img(pred_mask[i]))

魔乐社区(Modelers.cn) 是一个中立、公益的人工智能社区,提供人工智能工具、模型、数据的托管、展示与应用协同服务,为人工智能开发及爱好者搭建开放的学习交流平台。社区通过理事会方式运作,由全产业链共同建设、共同运营、共同享有,推动国产AI生态繁荣发展。
更多推荐


 1
1 0
0- 0


 已为社区贡献1条内容

所有评论(0)