pytorch中的torch.compile是如何加速vLLM大模型推理的?
torch.compile 通过将 PyTorch 代码 JIT(just in time) 编译为优化的内核,使 PyTorch 代码运行得更快,同时只需极少的代码更改。简单来说,torch.compile 利用 PyTorch 2.0 引入的动态图捕获(TorchDynamo)和图形编译(TorchInductor 等后端)技术,将模型的前向计算图转换为高度优化的低级代码(包括融合的GPU内核
torch.compile如何赋能vLLM?
什么是torch.compile?
torch.compile 通过将 PyTorch 代码 JIT(just in time) 编译为优化的内核,使 PyTorch 代码运行得更快,同时只需极少的代码更改。简单来说,torch.compile 利用 PyTorch 2.0 引入的动态图捕获(TorchDynamo)和图形编译(TorchInductor 等后端)技术,将模型的前向计算图转换为高度优化的低级代码(包括融合的GPU内核等),从而减少解释执行的开销。这种编译在模型第一次运行时会进行:它捕获模型的计算图并进行编译优化,因此初次运行开销较高,但随后的运行将使用已编译的高效代码,显著提高性能。
实际效果上,启用 torch.compile 后的加速主要来自于减少 Python 解释器开销和GPU内存读写开销。因此,复杂模型、小批量等场景下减速的部分(如Python调度、逐算子kernel启动)被大幅优化,模型推理速度可明显提升。需要注意的是,加速幅度取决于模型结构和输入规模:如果模型本身计算非常简单或GPU计算已是瓶颈,则性能提升会相对有限。另外,由于编译本身需要一些时间,首次运行时延会增加,但多次运行后即可摊销初始编译成本,综合来看总体吞吐可以得到提升。
torch.compile的基本用法
可以将可调用对象传递给 torch.compile 来优化任意 Python 函数。然后,我们可以调用返回的优化函数来替代原函数:
def foo(x, y):
    a = torch.sin(x)
    b = torch.cos(y)
    return a + b
opt_foo1 = torch.compile(foo)
print(opt_foo1(torch.randn(10, 10), torch.randn(10, 10)))
或者使用装饰器来修饰函数:
t1 = torch.randn(10, 10)
t2 = torch.randn(10, 10)

@torch.compile
def opt_foo2(x, y):
    a = torch.sin(x)
    b = torch.cos(y)
    return a + b
print(opt_foo2(t1, t2))
还可以优化torch.nn.Module 的实例:
t = torch.randn(10, 100)

class MyModule(torch.nn.Module):
    def __init__(self):
        super().__init__()
        self.lin = torch.nn.Linear(100, 10)

    def forward(self, x):
        return torch.nn.functional.relu(self.lin(x))

mod = MyModule()
opt_mod = torch.compile(mod)
print(opt_mod(t))
注意:当你使用 torch.compile 时,编译器会尝试递归地编译目标函数或模块内部不在跳过列表(skip list)(例如内置函数、torch.* 命名空间中的一些函数)中的每一个函数调用。
简单的例子展示torch.compile的加速效果(对比eager模式)
定义几个工具函数
# Returns the result of running `fn()` and the time it took for `fn()` to run,
# in seconds. We use CUDA events and synchronization for the most accurate
# measurements.
def timed(fn):
    start = torch.cuda.Event(enable_timing=True)
    end = torch.cuda.Event(enable_timing=True)
    start.record()
    result = fn()
    end.record()
    torch.cuda.synchronize()
    return result, start.elapsed_time(end) / 1000

# Generates random input and targets data for the model, where `b` is batch size.
def generate_data(b):
    return (
        torch.randn(b, 3, 128, 128).to(torch.float32).cuda(),
        torch.randint(1000, (b,)).cuda(),
    )

N_ITERS = 10

from torchvision.models import densenet121
def init_model():
    return densenet121().to(torch.float32).cuda()
使用以下代码来验证模型推理的加速效果
model = init_model()

# Reset since we are using a different mode.
import torch._dynamo
torch._dynamo.reset()

model_opt = torch.compile(model, mode="reduce-overhead")

inp = generate_data(16)[0]
with torch.no_grad():
    print("eager:", timed(lambda: model(inp))[1])
    print("compile:", timed(lambda: model_opt(inp))[1])
运行结果如下:
eager: 0.34501324462890626
/var/lib/ci-user/.local/lib/python3.10/site-packages/torch/_inductor/compile_fx.py:236: UserWarning:

TensorFloat32 tensor cores for float32 matrix multiplication available but not enabled. Consider setting `torch.set_float32_matmul_precision('high')` for better performance.

compile: 67.4805234375
注意到,torch.compile 完成所需的时间比 eager 模式长得多。这是因为 torch.compile 在执行时将模型编译为优化的内核。在我们的示例中,模型的结构没有改变,因此不需要重新编译。所以如果我们将优化后的模型再运行几次,应该会看到相对于 eager 模式的显著改进:
运行以下代码:
eager_times = []
for i in range(N_ITERS):
    inp = generate_data(16)[0]
    with torch.no_grad():
        _, eager_time = timed(lambda: model(inp))
    eager_times.append(eager_time)
    print(f"eager eval time {i}: {eager_time}")

print("~" * 10)

compile_times = []
for i in range(N_ITERS):
    inp = generate_data(16)[0]
    with torch.no_grad():
        _, compile_time = timed(lambda: model_opt(inp))
    compile_times.append(compile_time)
    print(f"compile eval time {i}: {compile_time}")
print("~" * 10)

import numpy as np
eager_med = np.median(eager_times)
compile_med = np.median(compile_times)
speedup = eager_med / compile_med
assert(speedup > 1)
print(f"(eval) eager median: {eager_med}, compile median: {compile_med}, speedup: {speedup}x")
print("~" * 10)
运行结果如下:
eager eval time 0: 0.017486879348754883
eager eval time 1: 0.015920127868652344
eager eval time 2: 0.01597542381286621
eager eval time 3: 0.016075775146484374
eager eval time 4: 0.01580031967163086
eager eval time 5: 0.015770624160766602
eager eval time 6: 0.015754240036010742
eager eval time 7: 0.01593855953216553
eager eval time 8: 0.01576857566833496
eager eval time 9: 0.015785823822021483
~~~~~~~~~~
compile eval time 0: 0.6994595947265625
compile eval time 1: 0.00880742359161377
compile eval time 2: 0.009005056381225587
compile eval time 3: 0.008050687789916992
compile eval time 4: 0.0081080322265625
compile eval time 5: 0.008088576316833495
compile eval time 6: 0.008187904357910156
compile eval time 7: 0.008077312469482421
compile eval time 8: 0.008122367858886719
compile eval time 9: 0.008196096420288086
~~~~~~~~~~
(eval) eager median: 0.015860223770141603, compile median: 0.008155136108398436, speedup: 1.9448141097005365x
~~~~~~~~~~
我们可以看到使用 torch.compile 运行模型会带来显著加速(约2x)。加速主要来自于减少 Python 开销和 GPU 读写,因此观察到的加速效果可能会因模型架构和批量大小等因素而异。例如,如果模型的架构简单且数据量很大,那么瓶颈将是 GPU 计算,观察到的加速效果可能不太显著。
你可能还会注意到,第二次使用 torch.compile 运行模型的时间比其他运行要慢得多,尽管它比第一次运行快很多。这是因为 “reduce-overhead” 模式会为 CUDA graphs 运行几次热身迭代。
vLLM中的torch.compile
在vLLM的V1架构中,torch.compile是默认开启的,也就是说,当使用 vLLM 加载模型时,内部会自动对模型的前向传播进行 torch.compile 编译优化(除非显式关闭)。如果需要强制关闭编译以使用纯 eager 模式(例如出于调试或兼容性考虑),可以通过增加参数 --enforce-eager 来实现。
编译缓存与冷启动/热启动:由于编译需要一定时间,vLLM 引入了编译缓存机制来减少重复编译开销。首次运行模型时(“冷启动”阶段),vLLM 会使用 torch.compile() 对模型进行图捕获、编译优化并生成高效代码。这个过程可能耗时数秒到数十秒,在此期间模型无法提供服务。因此,vLLM 特别保证:必须在接收请求前完成全部编译,不会等到有请求时才触发编译。一旦编译完成,得到的优化代码会缓存在本地目录(默认 ~/.cache/vllm/torch_compile_cache)中,当下次加载同一模型时,如果检测到存在匹配的已编译缓存,vLLM 将直接加载缓存中的优化代码而无需重新编译——这就是“热启动”。通过热启动,模型实例的启动时间可大幅缩短。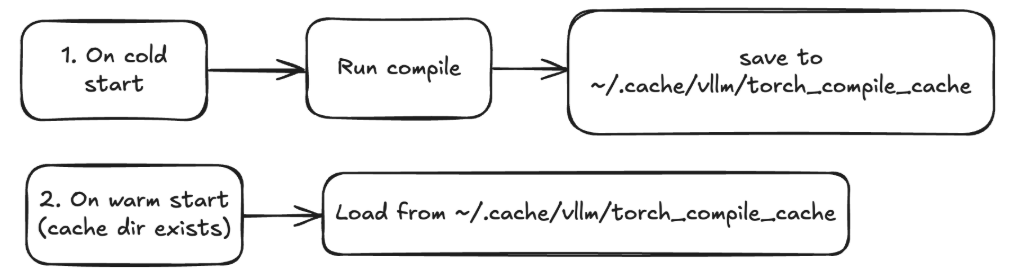
计算图捕获与编译:在加载模型时,vLLM 会隐式调用 torch.compile 来编译模型的 forward。
从调试日志可以看出,vLLM 在启动时开始编译模型的 forward 函数(在vllm/model_executor/models/llama.py中),并由 TorchDynamo 捕获其计算图。
例如下图,编译Llama模型时日志显示:Start compiling function <code object forward at … vllm/model_executor/models/llama.py, line 339>。TorchDynamo 在捕获 forward 过程中,会跟踪所有被调用的子函数和模块,包括PyTorch库函数(如 nn.Module 内部方法)以及vLLM实现的注意力、通信等自定义组件。上述所有被跟踪到的代码文件路径都会记录下来,并参与决定缓存的哈希,一旦这些文件中的任何代码有改动就会导致缓存失效以触发重新编译。
DEBUG 03-07 03:06:52 [decorators.py:203] Start compiling function <code object forward at 0x7f08acf40c90, file "xxx/vllm/model_executor/models/llama.py", line 339>

DEBUG 03-07 03:06:54 [backends.py:370] Traced files (to be considered for compilation cache):
DEBUG 03-07 03:06:54 [backends.py:370] xxx/torch/_dynamo/polyfills/builtins.py
DEBUG 03-07 03:06:54 [backends.py:370] xxx/torch/nn/modules/container.py
DEBUG 03-07 03:06:54 [backends.py:370] xxx/torch/nn/modules/module.py
DEBUG 03-07 03:06:54 [backends.py:370] xxx/vllm/attention/layer.py
DEBUG 03-07 03:06:54 [backends.py:370] xxx/vllm/distributed/communication_op.py
DEBUG 03-07 03:06:54 [backends.py:370] xxx/vllm/distributed/parallel_state.py
DEBUG 03-07 03:06:54 [backends.py:370] xxx/vllm/model_executor/custom_op.py
DEBUG 03-07 03:06:54 [backends.py:370] xxx/vllm/model_executor/layers/activation.py
DEBUG 03-07 03:06:54 [backends.py:370] xxx/vllm/model_executor/layers/layernorm.py
DEBUG 03-07 03:06:54 [backends.py:370] xxx/vllm/model_executor/layers/linear.py
DEBUG 03-07 03:06:54 [backends.py:370] xxx/vllm/model_executor/layers/rotary_embedding.py
DEBUG 03-07 03:06:54 [backends.py:370] xxx/vllm/model_executor/layers/vocab_parallel_embedding.py
DEBUG 03-07 03:06:54 [backends.py:370] xxx/vllm/model_executor/models/llama.py

DEBUG 03-07 03:07:07 [backends.py:462] Computation graph saved to ~/.cache/vllm/torch_compile_cache/1517964802/rank_0_0/computation_graph.py
DEBUG 03-07 03:07:07 [wrapper.py:105] Dynamo transformed code saved to ~/.cache/vllm/torch_compile_cache/1517964802/rank_0_0/transformed_code.py
Dynamo 编译的结果是一个新函数,存储在transformed_code.py 中。通常,这个函数会从模块中解包张量,然后将其传递给跟踪的计算图。计算图存储在computation_graph.py中:
以下是vLLM中的vllm/worker/model_runner.py中的代码片段: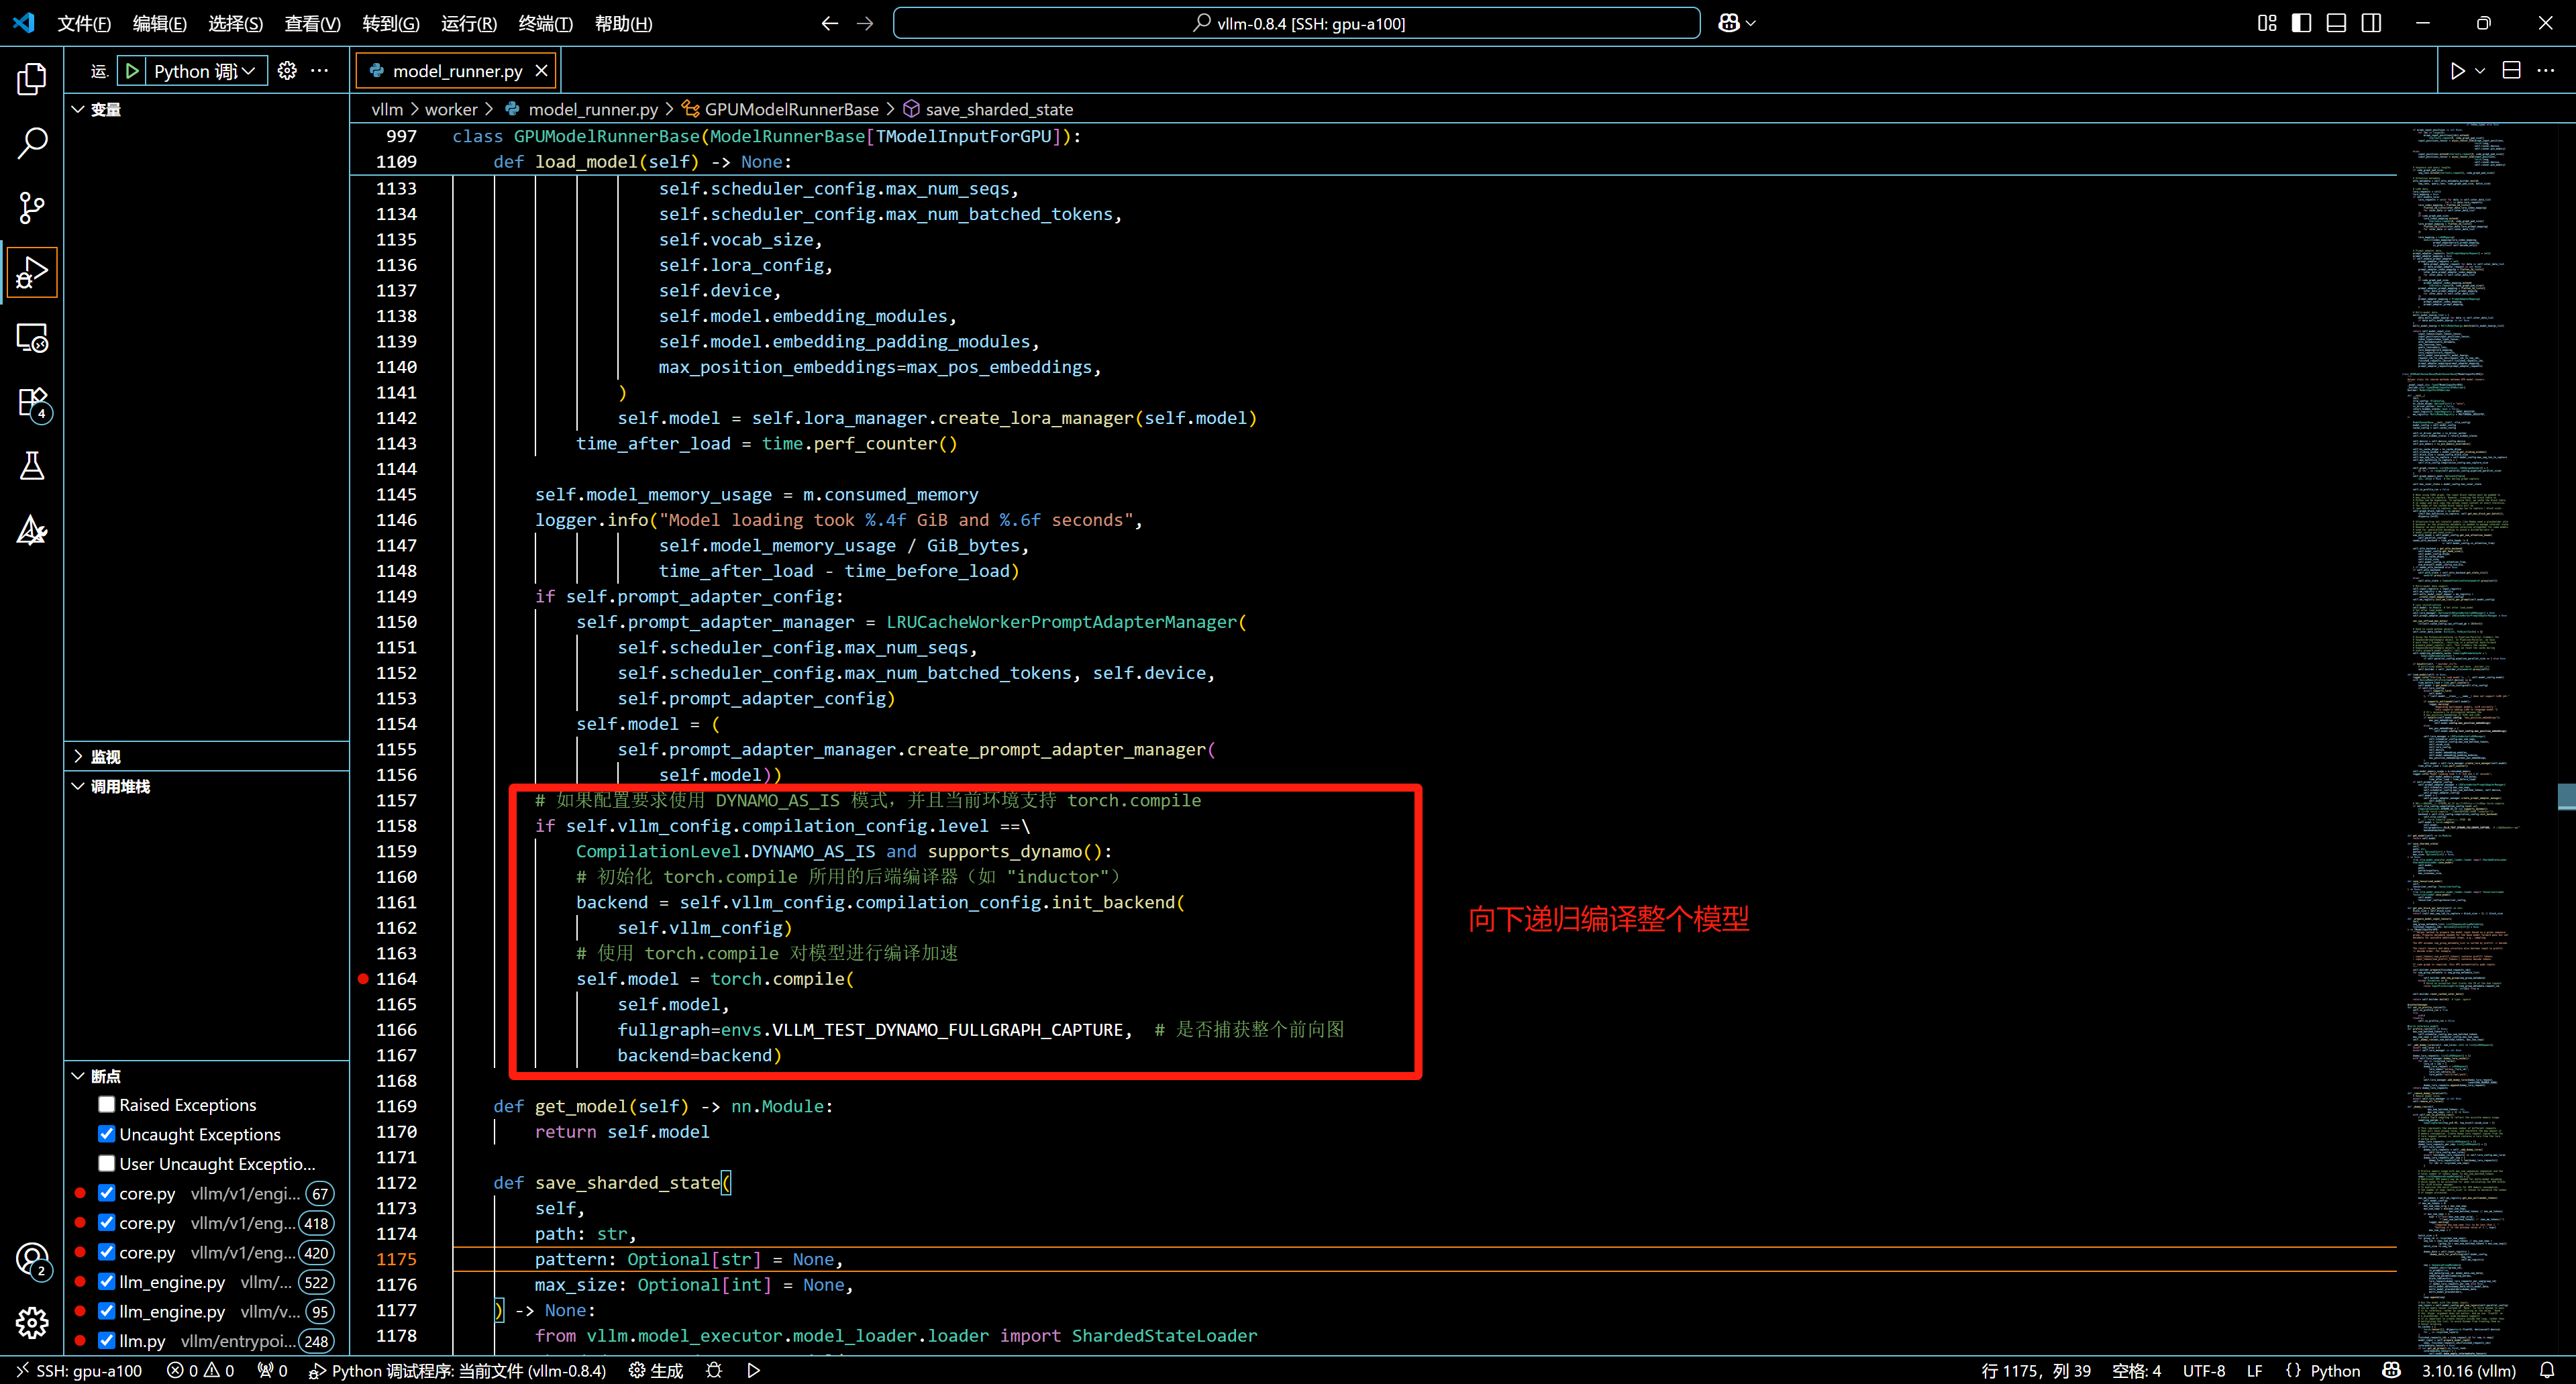
参考

魔乐社区(Modelers.cn) 是一个中立、公益的人工智能社区,提供人工智能工具、模型、数据的托管、展示与应用协同服务,为人工智能开发及爱好者搭建开放的学习交流平台。社区通过理事会方式运作,由全产业链共同建设、共同运营、共同享有,推动国产AI生态繁荣发展。
更多推荐


 27
27 0
0- 0


 已为社区贡献3条内容

所有评论(0)