【完整源码+数据集+部署教程】花卉图像分割系统: yolov8-seg-dyhead-DCNV3
【完整源码+数据集+部署教程】花卉图像分割系统: yolov8-seg-dyhead-DCNV3
背景意义
研究背景与意义
随着计算机视觉技术的快速发展,图像分割作为其中的重要任务之一,已经在多个领域中得到了广泛应用,尤其是在农业、生态监测和园艺等领域。花卉图像分割不仅可以帮助研究人员更好地理解植物的生长特性,还能为园艺设计、植物识别和病虫害监测提供重要支持。近年来,深度学习技术的进步,尤其是YOLO(You Only Look Once)系列模型的出现,使得图像分割的精度和效率得到了显著提升。YOLOv8作为该系列的最新版本,凭借其高效的特征提取能力和实时处理能力,成为了图像分割任务中的热门选择。
本研究旨在基于改进的YOLOv8模型,构建一个高效的花卉图像分割系统。所使用的数据集包含1800张花卉图像,涵盖了六个不同的花卉类别,包括加利福尼亚脆枝灌木、荆棘花、花园矮牵牛、麝香玫瑰、朝鲜蓟和盾形旱金莲。这些花卉的多样性为模型的训练和评估提供了丰富的样本,有助于提高模型的泛化能力和鲁棒性。通过对这些花卉图像的精确分割,研究者可以更深入地分析不同花卉的形态特征、生态适应性以及生长环境的影响。
在当前的研究背景下,花卉图像分割面临着许多挑战。首先,花卉的形态和颜色变化多样,光照条件和背景环境的差异也会对分割效果产生影响。其次,传统的图像分割方法往往难以处理复杂的场景,容易出现分割不准确或漏分的情况。因此,基于深度学习的改进YOLOv8模型,能够通过学习大量的图像特征,自动提取花卉的边界和形状,从而实现更为精准的分割。
本研究的意义在于,通过改进YOLOv8模型,不仅可以提升花卉图像分割的准确性和效率,还能够为相关领域的研究提供有力的技术支持。具体而言,准确的花卉图像分割可以为植物分类、物种识别和生态监测提供基础数据,进而推动生物多样性保护和生态环境的可持续发展。此外,该系统的成功应用还可以为智能农业和精准园艺提供数据支持,帮助农民和园艺师更好地管理作物,提高产量和质量。
综上所述,基于改进YOLOv8的花卉图像分割系统不仅具有重要的理论价值,还有着广泛的实际应用前景。通过深入研究和开发该系统,能够为花卉图像处理领域的技术进步贡献力量,同时也为相关学科的交叉研究提供新的思路和方法。
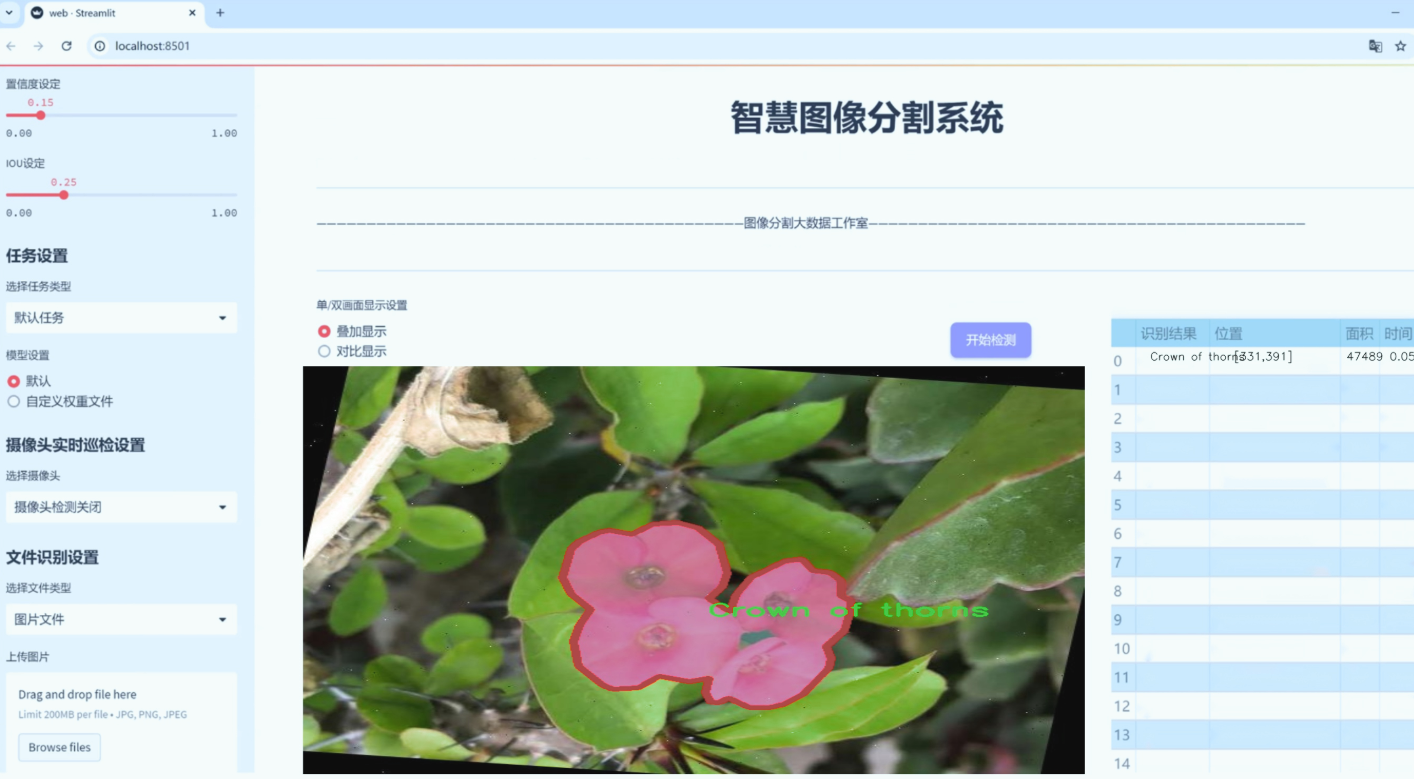
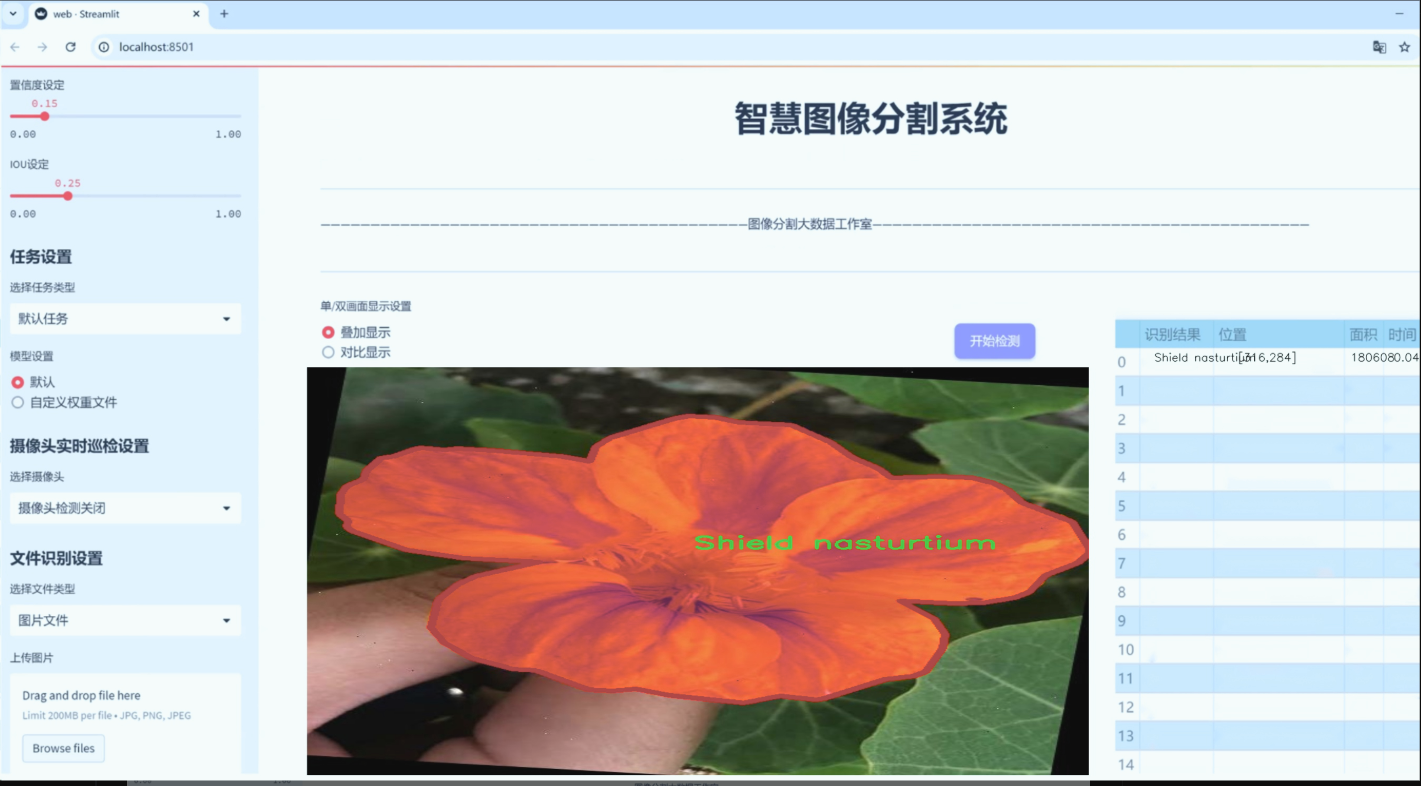
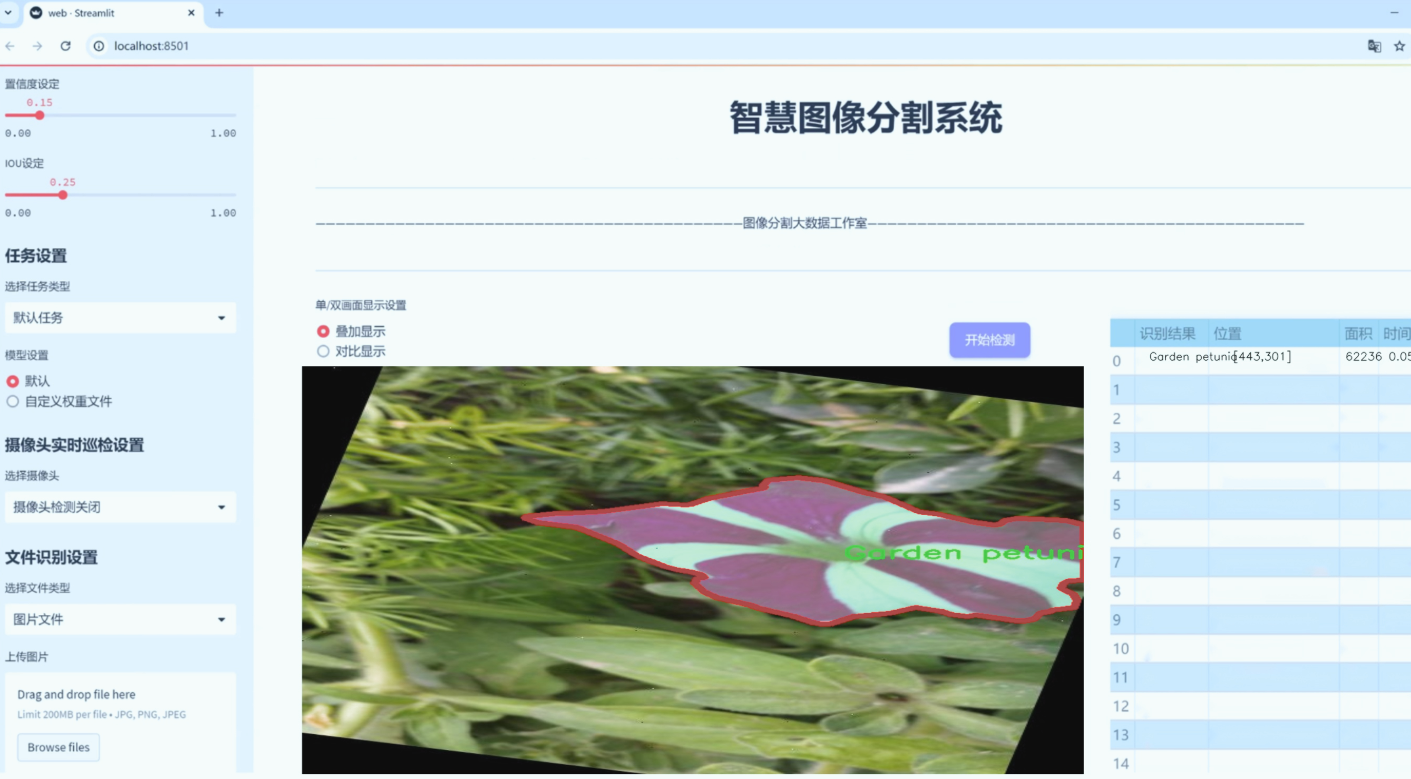
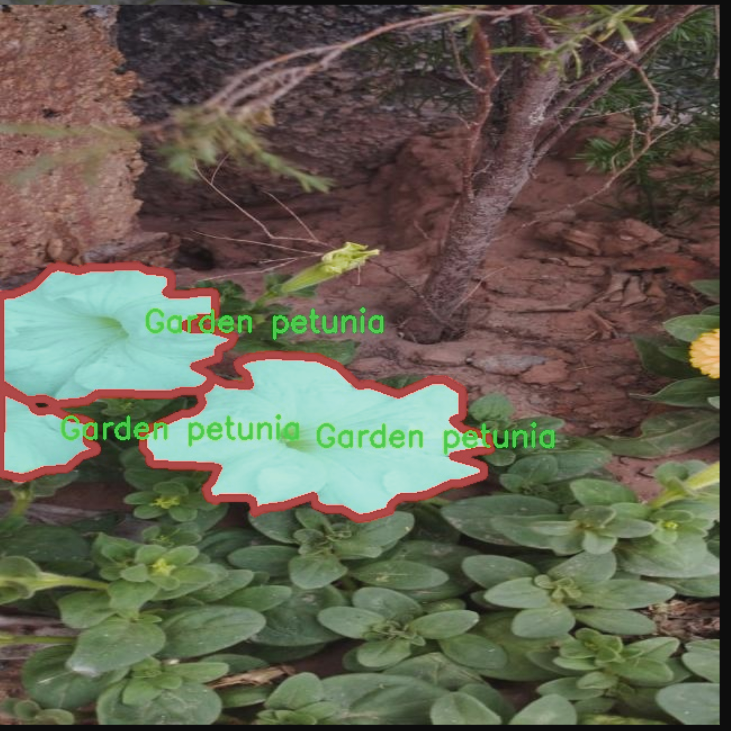
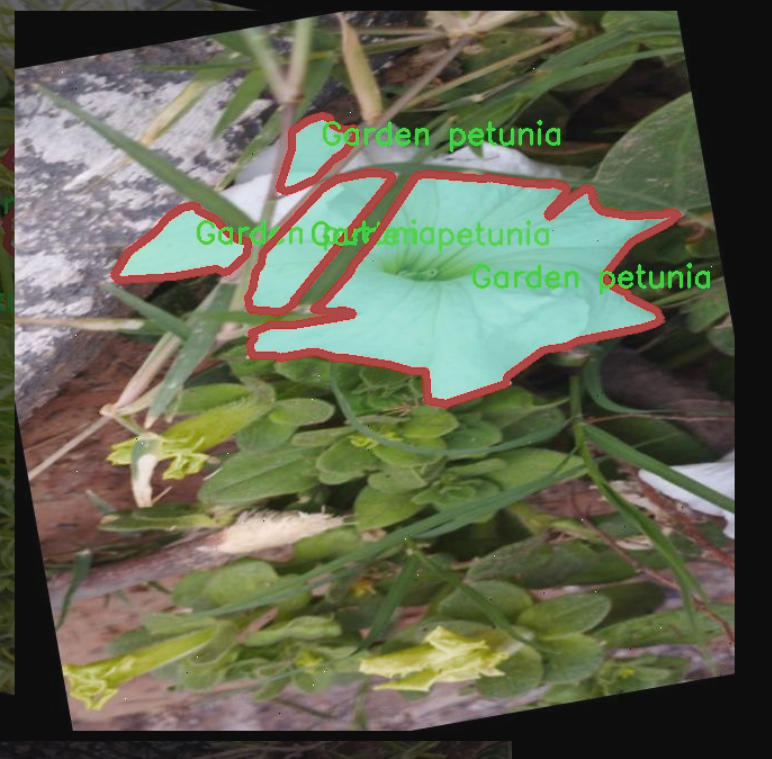
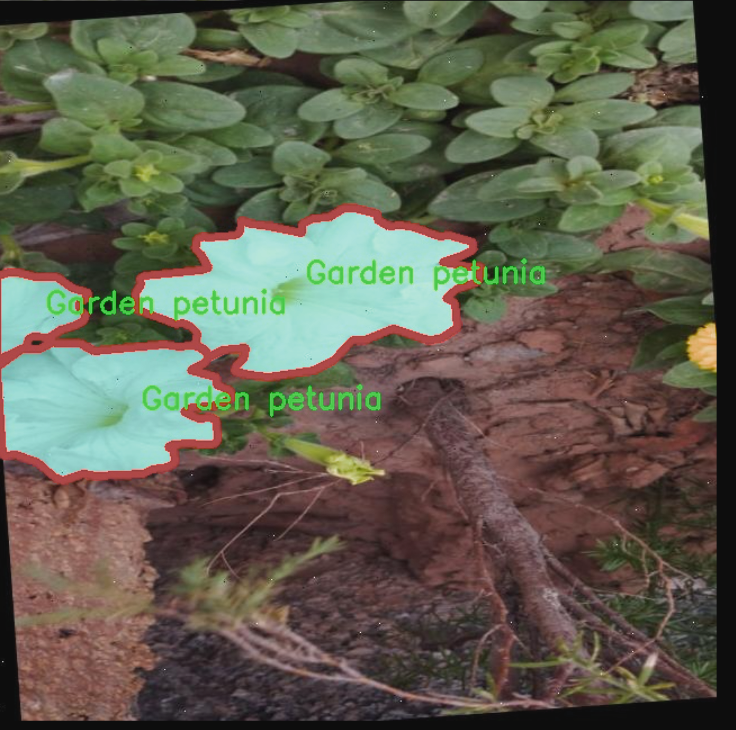
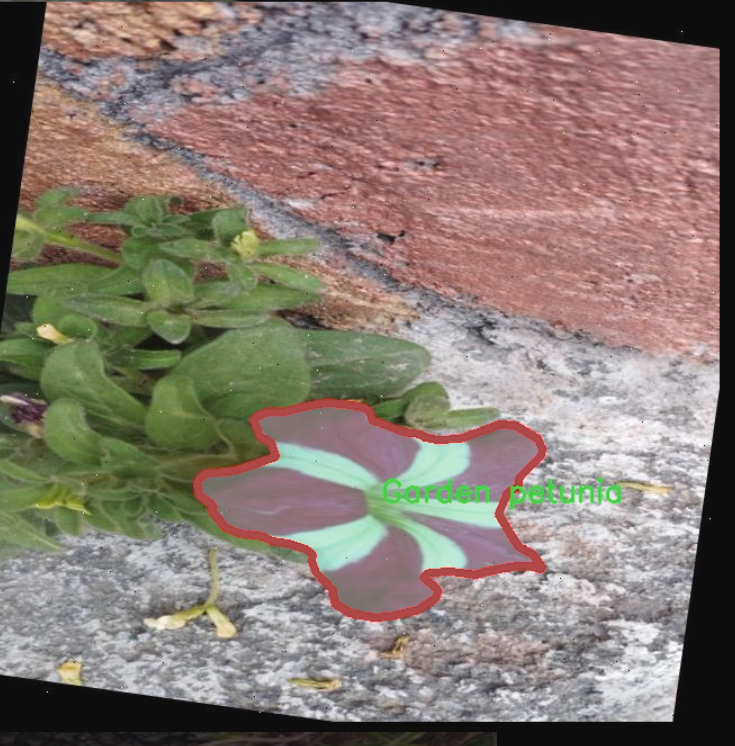
图片效果
数据集信息
数据集信息展示
在现代计算机视觉领域,图像分割技术正日益成为一种重要的研究方向,尤其是在植物分类和识别的应用中。为了有效地训练和改进YOLOv8-seg模型,我们采用了名为“Flowerss”的数据集,该数据集专门用于花卉图像的分割任务。通过对这一数据集的深入分析,我们可以更好地理解其在模型训练中的重要性和应用潜力。
“Flowerss”数据集包含六个不同的花卉类别,具体包括:加利福尼亚脆枝灌木(California brittlebush)、荆棘花(Crown of thorns)、花园波斯菊(Garden petunia)、麝香玫瑰(Musk Rose)、佩雷格里纳(Peregrina)和盾形旱金莲(Shield nasturtium)。这些类别不仅在视觉特征上具有显著的差异性,而且在生态环境和生长习性上也各具特色,为模型的学习提供了丰富的样本。
数据集中的每个类别均包含大量高质量的图像,这些图像经过精心标注,确保了每个花卉的轮廓和细节都得到了准确的描绘。这种高质量的标注对于YOLOv8-seg模型的训练至关重要,因为它能够帮助模型学习到更为细致的特征,从而在实际应用中实现更高的分割精度。通过对这些花卉图像的分析,模型不仅能够识别出花卉的种类,还能准确地分割出花卉的各个部分,例如花瓣、叶子和茎等。
在数据集的构建过程中,特别注重了图像的多样性和代表性。每个类别的图像均来自不同的拍摄环境和光照条件,这使得模型在训练时能够接触到各种可能的场景变化,从而提高其泛化能力。例如,加利福尼亚脆枝灌木的图像可能在阳光明媚的环境中拍摄,而荆棘花的图像则可能是在阴影下拍摄。这种多样性不仅增强了数据集的实用性,也为模型在实际应用中的表现奠定了基础。
此外,数据集还考虑到了不同花卉的生长阶段和状态,包括盛开的花朵、含苞待放的花蕾以及枯萎的花瓣等。这种多样化的样本选择使得模型能够更全面地理解花卉的特征变化,进而在实际应用中更好地应对不同的识别和分割任务。
总之,“Flowerss”数据集为改进YOLOv8-seg的花卉图像分割系统提供了丰富而多样的训练素材。通过对这一数据集的充分利用,我们期待能够提升模型在花卉识别和分割任务中的表现,进而推动计算机视觉技术在植物科学和生态保护等领域的应用。随着研究的深入,我们相信这一数据集将为相关领域的学术研究和实际应用提供重要的支持和参考。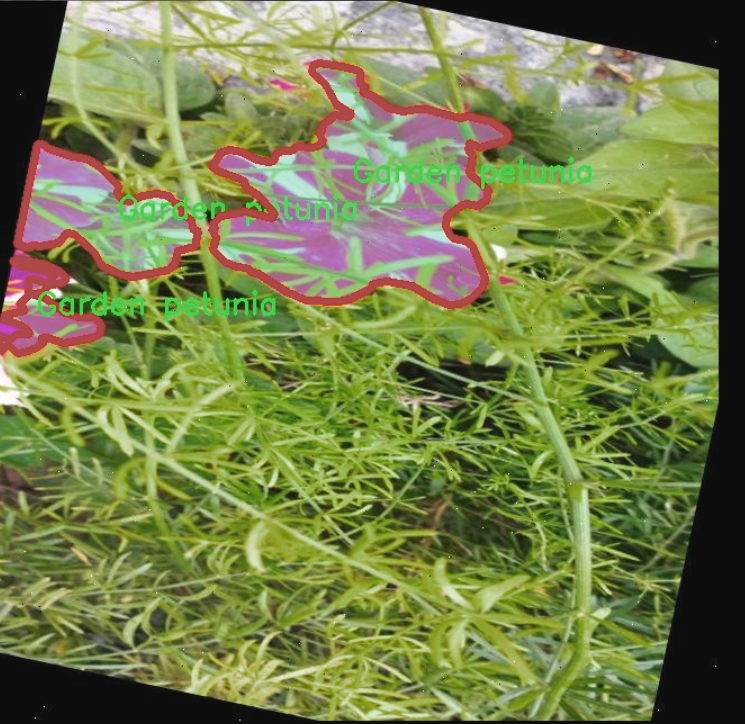
核心代码
以下是代码中最核心的部分,并附上详细的中文注释:
import torch
import torch.nn as nn
import torch.nn.functional as F
class Attention(nn.Module):
def init(self, in_planes, reduction, num_static_cell, num_local_mixture, norm_layer=nn.BatchNorm1d,
cell_num_ratio=1.0, nonlocal_basis_ratio=1.0, start_cell_idx=None):
super(Attention, self).init()
# 计算隐藏层的通道数
hidden_planes = max(int(in_planes * reduction), 16)
self.kw_planes_per_mixture = num_static_cell + 1 # 每个混合的通道数
self.num_local_mixture = num_local_mixture # 本地混合的数量
self.kw_planes = self.kw_planes_per_mixture * num_local_mixture # 总的通道数
    # 计算本地和非本地单元的数量
    self.num_local_cell = int(cell_num_ratio * num_local_mixture)
    self.num_nonlocal_cell = num_static_cell - self.num_local_cell
    self.start_cell_idx = start_cell_idx

    # 定义网络层
    self.avgpool = nn.AdaptiveAvgPool1d(1)  # 自适应平均池化
    self.fc1 = nn.Linear(in_planes, hidden_planes, bias=(norm_layer is not nn.BatchNorm1d))  # 全连接层
    self.norm1 = norm_layer(hidden_planes)  # 归一化层
    self.act1 = nn.ReLU(inplace=True)  # 激活函数

    # 定义映射到单元的方式
    if nonlocal_basis_ratio >= 1.0:
        self.map_to_cell = nn.Identity()  # 直接映射
        self.fc2 = nn.Linear(hidden_planes, self.kw_planes, bias=True)  # 第二个全连接层
    else:
        self.map_to_cell = self.map_to_cell_basis  # 使用基函数映射
        self.num_basis = max(int(self.num_nonlocal_cell * nonlocal_basis_ratio), 16)  # 基函数数量
        self.fc2 = nn.Linear(hidden_planes, (self.num_local_cell + self.num_basis + 1) * num_local_mixture, bias=False)
        self.fc3 = nn.Linear(self.num_basis, self.num_nonlocal_cell, bias=False)  # 处理非本地单元的全连接层
        self.basis_bias = nn.Parameter(torch.zeros([self.kw_planes]), requires_grad=True).float()  # 基函数偏置

    self.temp_bias = torch.zeros([self.kw_planes], requires_grad=False).float()  # 温度偏置
    self.temp_value = 0  # 温度值
    self._initialize_weights()  # 初始化权重

def _initialize_weights(self):
    # 初始化网络层的权重
    for m in self.modules():
        if isinstance(m, nn.Linear):
            nn.init.kaiming_normal_(m.weight, mode='fan_out', nonlinearity='relu')  # Kaiming初始化
            if m.bias is not None:
                nn.init.constant_(m.bias, 0)  # 偏置初始化为0
        if isinstance(m, nn.BatchNorm1d):
            nn.init.constant_(m.weight, 1)  # 批归一化权重初始化为1
            nn.init.constant_(m.bias, 0)  # 偏置初始化为0

def forward(self, x):
    # 前向传播
    x = self.avgpool(x.reshape(*x.shape[:2], -1)).squeeze(dim=-1)  # 自适应池化
    x = self.act1(self.norm1(self.fc1(x)))  # 线性变换 -> 归一化 -> 激活
    x = self.map_to_cell(self.fc2(x)).reshape(-1, self.kw_planes)  # 映射到单元
    x = x / (torch.sum(torch.abs(x), dim=1).view(-1, 1) + 1e-3)  # 归一化
    x = (1.0 - self.temp_value) * x.reshape(-1, self.kw_planes) + self.temp_value * self.temp_bias.to(x.device).view(1, -1)
    return x.reshape(-1, self.kw_planes_per_mixture)[:, :-1]  # 返回结果
class KWconvNd(nn.Module):
def init(self, in_planes, out_planes, kernel_size, stride=1, padding=0, dilation=1, groups=1,
bias=False, warehouse_id=None, warehouse_manager=None):
super(KWconvNd, self).init()
self.in_planes = in_planes # 输入通道数
self.out_planes = out_planes # 输出通道数
self.kernel_size = kernel_size # 卷积核大小
self.stride = stride # 步幅
self.padding = padding # 填充
self.dilation = dilation # 膨胀
self.groups = groups # 分组卷积
self.bias = nn.Parameter(torch.zeros([self.out_planes]), requires_grad=True).float() if bias else None # 偏置
self.warehouse_id = warehouse_id # 仓库ID
self.warehouse_manager = [warehouse_manager] # 仓库管理器
def forward(self, x):
    # 前向传播
    kw_attention = self.attention(x).type(x.dtype)  # 获取注意力权重
    batch_size = x.shape[0]  # 批大小
    x = x.reshape(1, -1, *x.shape[2:])  # 调整输入形状
    weight = self.warehouse_manager[0].take_cell(self.warehouse_id).reshape(self.cell_shape[0], -1).type(x.dtype)  # 获取权重
    aggregate_weight = torch.mm(kw_attention, weight)  # 加权
    output = self.func_conv(x, weight=aggregate_weight, bias=None, stride=self.stride, padding=self.padding,
                            dilation=self.dilation, groups=self.groups * batch_size)  # 卷积操作
    output = output.view(batch_size, self.out_planes, *output.shape[2:])  # 调整输出形状
    if self.bias is not None:
        output = output + self.bias.reshape(1, -1, *([1]*self.dimension))  # 添加偏置
    return output  # 返回输出
class Warehouse_Manager(nn.Module):
def init(self, reduction=0.0625, cell_num_ratio=1, cell_inplane_ratio=1,
cell_outplane_ratio=1, sharing_range=(), nonlocal_basis_ratio=1,
norm_layer=nn.BatchNorm1d, spatial_partition=True):
super(Warehouse_Manager, self).init()
self.sharing_range = sharing_range # 共享范围
self.warehouse_list = {} # 仓库列表
self.reduction = reduction # 降维比例
self.spatial_partition = spatial_partition # 空间分区
self.cell_num_ratio = cell_num_ratio # 单元数量比例
self.cell_outplane_ratio = cell_outplane_ratio # 输出通道比例
self.cell_inplane_ratio = cell_inplane_ratio # 输入通道比例
self.norm_layer = norm_layer # 归一化层
self.nonlocal_basis_ratio = nonlocal_basis_ratio # 非本地基函数比例
self.weights = nn.ParameterList() # 权重列表
def reserve(self, in_planes, out_planes, kernel_size=1, stride=1, padding=0, dilation=1, groups=1,
            bias=True, warehouse_name='default', enabled=True, layer_type='conv2d'):
    # 创建动态卷积层并记录其信息
    if not enabled:
        return nn.Conv2d(in_planes, out_planes, kernel_size, stride=stride, padding=padding, dilation=dilation,
                         groups=groups, bias=bias)  # 返回普通卷积层
    else:
        weight_shape = [out_planes, in_planes // groups, *kernel_size]  # 权重形状
        if warehouse_name not in self.warehouse_list.keys():
            self.warehouse_list[warehouse_name] = []  # 初始化仓库
        self.warehouse_list[warehouse_name].append(weight_shape)  # 记录权重形状
        return KWConv2d(in_planes, out_planes, kernel_size, stride=stride, padding=padding,
                         dilation=dilation, groups=groups, bias=bias,
                         warehouse_id=int(list(self.warehouse_list.keys()).index(warehouse_name)),
                         warehouse_manager=self)  # 返回自定义卷积层

def store(self):
    # 存储权重
    for idx, warehouse_name in enumerate(self.warehouse_list.keys()):
        warehouse = self.warehouse_list[warehouse_name]
        # 计算输入输出通道的最大公约数
        out_plane_gcd, in_plane_gcd = warehouse[0][0], warehouse[0][1]
        for layer in warehouse:
            out_plane_gcd = math.gcd(out_plane_gcd, layer[0])
            in_plane_gcd = math.gcd(in_plane_gcd, layer[1])

        # 计算单元的输入输出通道数
        cell_in_plane = max(int(in_plane_gcd * self.cell_inplane_ratio), 1)
        cell_out_plane = max(int(out_plane_gcd * self.cell_outplane_ratio), 1)

        # 计算每个阶段的总混合数
        num_total_mixtures = 0
        for layer in warehouse:
            groups_channel = int(layer[0] // cell_out_plane * layer[1] // cell_in_plane)
            num_layer_mixtures = groups_channel  # 计算混合数
            num_total_mixtures += num_layer_mixtures

        self.weights.append(nn.Parameter(torch.randn(
            max(int(num_total_mixtures * self.cell_num_ratio), 1),
            cell_out_plane, cell_in_plane), requires_grad=True))  # 初始化权重

def take_cell(self, warehouse_idx):
    return self.weights[warehouse_idx]  # 返回指定仓库的权重
代码核心部分解释
Attention类:实现了一个注意力机制,用于动态调整卷积层的权重。它通过自适应池化、全连接层和激活函数来处理输入,并生成注意力权重。
KWconvNd类:这是一个通用的卷积层类,支持多维卷积(1D、2D、3D)。它在前向传播中使用注意力权重来加权卷积操作。
Warehouse_Manager类:管理卷积层的权重,支持动态创建卷积层并记录其信息。它可以根据需要调整输入输出通道的比例,并存储卷积层的权重。
这些核心部分共同构成了一个动态卷积网络的基础,能够根据输入的特征动态调整卷积核的权重,从而提高模型的表达能力和性能。
这个程序文件 kernel_warehouse.py 是一个用于实现卷积神经网络中核仓库管理的模块,主要包括自定义的卷积层和注意力机制。代码中使用了 PyTorch 框架,主要涉及到的类和函数包括 KWConv、Warehouse_Manager 和 Attention 等。
首先,文件导入了必要的库,包括 PyTorch 的神经网络模块、功能模块和一些数学函数。接着,定义了一个 parse 函数,用于处理输入参数,确保其格式符合要求。
Attention 类是实现注意力机制的核心部分。它的构造函数接受多个参数,包括输入通道数、缩减比例、静态单元数量、局部混合数量等。类中定义了多个层,包括线性层和归一化层,并在 _initialize_weights 方法中初始化这些层的权重。注意力机制的主要功能是在 forward 方法中实现,通过对输入进行池化、线性变换和归一化,最终输出一个经过处理的张量。
KWconvNd 类是一个自定义的卷积层基类,包含了卷积操作的基本参数设置和前向传播逻辑。它的构造函数接收输入和输出通道数、卷积核大小、步幅、填充、扩张、分组等参数,并根据这些参数初始化卷积层。init_attention 方法用于初始化注意力机制,forward 方法则实现了卷积操作的具体逻辑。
KWConv1d、KWConv2d 和 KWConv3d 类分别继承自 KWconvNd,实现了一维、二维和三维卷积操作。每个类都定义了适合其维度的 permute 和 func_conv。
KWLinear 类则是对线性层的封装,使用了一维卷积层来实现线性变换。
Warehouse_Manager 类是整个模块的核心,负责管理卷积核的仓库。它的构造函数接受多个参数,包括缩减比例、单元数量比例、共享范围等。该类提供了 reserve 方法,用于创建动态卷积层并记录其信息,store 方法用于存储卷积核的权重,allocate 方法则负责分配权重并初始化。
最后,KWConv 类是对卷积操作的进一步封装,结合了卷积层、批归一化和激活函数。get_temperature 函数用于计算温度值,主要用于控制注意力机制中的温度参数。
整体来看,这个文件实现了一个灵活的卷积核管理系统,能够动态地创建和管理卷积层,结合注意力机制来提升模型的表现。
12.系统整体结构(节选)
整体功能和构架概括
Ultralytics YOLO项目是一个用于目标检测和计算机视觉任务的深度学习框架。该项目采用模块化设计,允许用户灵活地构建和扩展模型。主要包含以下几个模块:
模型定义:model.py 文件定义了 YOLO-NAS 模型的接口,支持加载预训练模型并进行预测。
头部模块:head.py 文件实现了 YOLOv8 的检测、分割、姿态估计和分类等任务的头部模块,负责处理输入特征并生成输出。
初始化模块:init.py 文件用于组织和导出与 NAS 相关的功能模块,提供统一的接口。
骨干网络:repvit.py 文件实现了 RepViT 模型,主要用于图像分类,采用了视觉变换器架构。
卷积核管理:kernel_warehouse.py 文件实现了自定义卷积层和注意力机制,提供了卷积核的动态管理和优化。
通过这些模块的协同工作,Ultralytics YOLO能够高效地处理各种计算机视觉任务,提供灵活的模型构建和训练接口。
文件功能整理表
文件路径 功能描述
ultralytics/models/nas/model.py 定义 YOLO-NAS 模型的接口,支持加载预训练模型并进行预测。
ultralytics/nn/modules/head.py 实现 YOLOv8 的检测、分割、姿态估计和分类等任务的头部模块,处理输入特征并生成输出。
ultralytics/models/nas/init.py 组织和导出与 NAS 相关的功能模块,提供统一的接口。
ultralytics/nn/backbone/repvit.py 实现 RepViT 模型,主要用于图像分类,采用视觉变换器架构。
ultralytics/nn/extra_modules/kernel_warehouse.py 实现自定义卷积层和注意力机制,提供卷积核的动态管理和优化。
这个表格总结了每个文件的主要功能,帮助理解整个项目的结构和各个模块之间的关系。
13.图片、视频、摄像头图像分割Demo(去除WebUI)代码
在这个博客小节中,我们将讨论如何在不使用WebUI的情况下,实现图像分割模型的使用。本项目代码已经优化整合,方便用户将分割功能嵌入自己的项目中。 核心功能包括图片、视频、摄像头图像的分割,ROI区域的轮廓提取、类别分类、周长计算、面积计算、圆度计算以及颜色提取等。 这些功能提供了良好的二次开发基础。
核心代码解读
以下是主要代码片段,我们会为每一块代码进行详细的批注解释:
import random
import cv2
import numpy as np
from PIL import ImageFont, ImageDraw, Image
from hashlib import md5
from model import Web_Detector
from chinese_name_list import Label_list
根据名称生成颜色
def generate_color_based_on_name(name):
…
计算多边形面积
def calculate_polygon_area(points):
return cv2.contourArea(points.astype(np.float32))
…
绘制中文标签
def draw_with_chinese(image, text, position, font_size=20, color=(255, 0, 0)):
image_pil = Image.fromarray(cv2.cvtColor(image, cv2.COLOR_BGR2RGB))
draw = ImageDraw.Draw(image_pil)
font = ImageFont.truetype(“simsun.ttc”, font_size, encoding=“unic”)
draw.text(position, text, font=font, fill=color)
return cv2.cvtColor(np.array(image_pil), cv2.COLOR_RGB2BGR)
动态调整参数
def adjust_parameter(image_size, base_size=1000):
max_size = max(image_size)
return max_size / base_size
绘制检测结果
def draw_detections(image, info, alpha=0.2):
name, bbox, conf, cls_id, mask = info[‘class_name’], info[‘bbox’], info[‘score’], info[‘class_id’], info[‘mask’]
adjust_param = adjust_parameter(image.shape[:2])
spacing = int(20 * adjust_param)
if mask is None:
    x1, y1, x2, y2 = bbox
    aim_frame_area = (x2 - x1) * (y2 - y1)
    cv2.rectangle(image, (x1, y1), (x2, y2), color=(0, 0, 255), thickness=int(3 * adjust_param))
    image = draw_with_chinese(image, name, (x1, y1 - int(30 * adjust_param)), font_size=int(35 * adjust_param))
    y_offset = int(50 * adjust_param)  # 类别名称上方绘制,其下方留出空间
else:
    mask_points = np.concatenate(mask)
    aim_frame_area = calculate_polygon_area(mask_points)
    mask_color = generate_color_based_on_name(name)
    try:
        overlay = image.copy()
        cv2.fillPoly(overlay, [mask_points.astype(np.int32)], mask_color)
        image = cv2.addWeighted(overlay, 0.3, image, 0.7, 0)
        cv2.drawContours(image, [mask_points.astype(np.int32)], -1, (0, 0, 255), thickness=int(8 * adjust_param))

        # 计算面积、周长、圆度
        area = cv2.contourArea(mask_points.astype(np.int32))
        perimeter = cv2.arcLength(mask_points.astype(np.int32), True)
        ......

        # 计算色彩
        mask = np.zeros(image.shape[:2], dtype=np.uint8)
        cv2.drawContours(mask, [mask_points.astype(np.int32)], -1, 255, -1)
        color_points = cv2.findNonZero(mask)
        ......

        # 绘制类别名称
        x, y = np.min(mask_points, axis=0).astype(int)
        image = draw_with_chinese(image, name, (x, y - int(30 * adjust_param)), font_size=int(35 * adjust_param))
        y_offset = int(50 * adjust_param)

        # 绘制面积、周长、圆度和色彩值
        metrics = [("Area", area), ("Perimeter", perimeter), ("Circularity", circularity), ("Color", color_str)]
        for idx, (metric_name, metric_value) in enumerate(metrics):
            ......

return image, aim_frame_area
处理每帧图像
def process_frame(model, image):
pre_img = model.preprocess(image)
pred = model.predict(pre_img)
det = pred[0] if det is not None and len(det)
if det:
det_info = model.postprocess(pred)
for info in det_info:
image, _ = draw_detections(image, info)
return image
if name == “main”:
cls_name = Label_list
model = Web_Detector()
model.load_model(“./weights/yolov8s-seg.pt”)
# 摄像头实时处理
cap = cv2.VideoCapture(0)
while cap.isOpened():
    ret, frame = cap.read()
    if not ret:
        break
    ......

# 图片处理
image_path = './icon/OIP.jpg'
image = cv2.imread(image_path)
if image is not None:
    processed_image = process_frame(model, image)
    ......

# 视频处理
video_path = ''  # 输入视频的路径
cap = cv2.VideoCapture(video_path)
while cap.isOpened():
    ret, frame = cap.read()
    ......
源码文件
源码获取
欢迎大家点赞、收藏、关注、评论啦 、查看👇🏻获取联系方式👇🏻

魔乐社区(Modelers.cn) 是一个中立、公益的人工智能社区,提供人工智能工具、模型、数据的托管、展示与应用协同服务,为人工智能开发及爱好者搭建开放的学习交流平台。社区通过理事会方式运作,由全产业链共同建设、共同运营、共同享有,推动国产AI生态繁荣发展。
更多推荐


 20
20 0
0- 0


 已为社区贡献8条内容

所有评论(0)