python 实现xml转json GUI工具
原始 XML 简要说明XML 是一种树形结构的数据格式,适合表示层级嵌套的数据。下面这个例子描述了一个公司的组织架构、员工信息、项目情况等,包含:
📝 面试求职: 「面试试题小程序」 ,内容涵盖 测试基础、Linux操作系统、MySQL数据库、Web功能测试、接口测试、APPium移动端测试、Python知识、Selenium自动化测试相关、性能测试、性能测试、计算机网络知识、Jmeter、HR面试,命中率杠杠的。(大家刷起来…)
📝 职场经验干货:
原始 XML 简要说明
XML 是一种树形结构的数据格式,适合表示层级嵌套的数据。下面这个例子描述了一个公司的组织架构、员工信息、项目情况等,包含:
元素(节点)
属性
CDATA 片段
命名空间(可选)
注释(不影响解析)
XML 转 JSON 的基本规则
在使用 Python 的 xml.etree.ElementTree 解析后,我们将每个 XML 元素递归地转换为字典,最终整个结构变成一个 JSON 对象。以下是通用的转换规则:
✅ 示例:XML 转换后的 JSON 结构解析
原始 XML 节选:
<?xml version="1.0" encoding="UTF-8"?>
<department id="D101" name="研发部">
    <manager id="EMP2001">张伟</manager>
    <employees>
        <employee id="EMP1001" role="高级开发工程师">
            <fullname>李娜</fullname>
            <skills>
                <skill level="expert">Python</skill>
            </skills>
        </employee>
    </employees>
</department>
转换为 JSON 后:
{
    "department": {
        "@attributes": {
            "id": "D101",
            "name": "研发部"
        },
        "manager": {
            "@attributes": {
                "id": "EMP2001"
            },
            "text": "张伟"
        },
        "employees": {
            "employee": {
                "@attributes": {
                    "id": "EMP1001",
                    "role": "高级开发工程师"
                },
                "fullname": {
                    "text": "李娜"
                },
                "skills": {
                    "skill": {
                        "@attributes": {
                            "level": "expert"
                        },
                        "text": "Python"
                    }
                }
            }
        }
    }
}
关键点解释
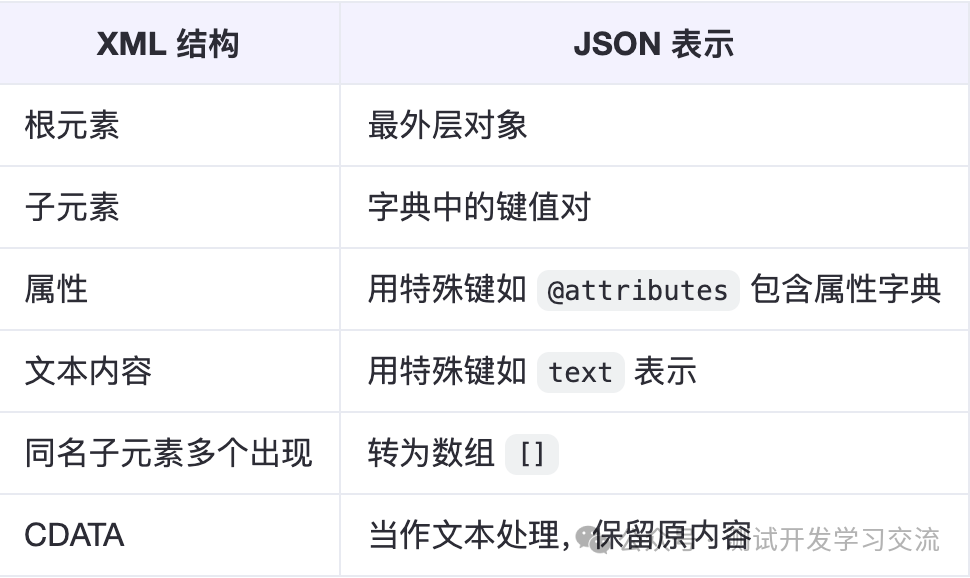
1. 根元素
是整个 JSON 的最外层对象。
所有内容都包裹在这个 key 下。
2. 属性
比如
转换为:
"@attributes": {
    "id": "D101",
    "name": "研发部"
}
3. 文本内容
如ABC科技有限公司
转换为:
"name": {
    "text": "ABC科技有限公司"
}
4. 同名标签重复出现
如多个或
第一次出现时是对象,后续相同标签会自动转成数组:
"projects": {
    "project": [
        {
            "@attributes": { "status": "进行中" },
            ...
        },
        {
            "@attributes": { "status": "已完成" },
            ...
        }
    ]
}
5. CDATA 内容
如:
被当作普通文本处理:
"description": {
    "text": "一个基于深度学习的对话式 AI 系统"
}
6. 命名空间
如:
在 ElementTree 中会被保留为完整命名空间形式:
"@attributes": {
    "{http://example.com/hr}id": "EMP2001"
}
如果你希望简化命名空间,可以在解析前预处理或替换掉命名空间。
代码实现
左右布局:清晰地展示输入(XML)和输出(JSON)
错误高亮:在 XML 输入中直接标出解析错误的位置
按钮突出显示:使“转换为 JSON”按钮更加显眼
额外功能:包括清空内容、自动调整大小等
# xml_str_to_json_gui_final.py
import tkinter as tk
from tkinter import messagebox, ttk
import xml.etree.ElementTree as ET
import json
def xml_to_dict(element):
"""递归将 XML 元素转为字典"""
node = {}
if element.attrib:
node['@attributes'] = element.attrib
if element.text and element.text.strip():
node['text'] = element.text.strip()
for child in element:
child_data = xml_to_dict(child)
if child.tag in node:
if not isinstance(node[child.tag], list):
node[child.tag] = [node[child.tag]]
node[child.tag].append(child_data)
else:
node[child.tag] = child_data
return node
def convert_xml_str_to_json(xml_str):
try:
root = ET.fromstring(xml_str)
data = {root.tag: xml_to_dict(root)}
return json.dumps(data, indent=4, ensure_ascii=False)
except ET.ParseError as pe:
# 捕获错误并返回异常对象
return {'error': str(pe), 'exception': pe}
except Exception as e:
return {'error': f"转换失败: {e}"}
def on_convert():
xml_input = xml_text.get("1.0", tk.END).strip()
if not xml_input:
messagebox.showwarning("警告", "请输入有效的 XML 内容")
return
result = convert_xml_str_to_json(xml_input)
if isinstance(result, dict) and 'error' in result:
# 显示错误信息
error_msg = result['error']
messagebox.showerror("解析错误", error_msg)
# 如果是 ParseError,则提取定位信息
if 'exception' in result and isinstance(result['exception'], ET.ParseError):
exc = result['exception']
line, column = exc.position
# 高亮错误位置
try:
# Tkinter 的 Text 控件行从 1 开始,列也从 0 开始
start_index = f"1.0 + {line - 1} lines + {column} chars"
end_index = f"{start_index} + 1 chars"
# 删除之前的错误标记
xml_text.tag_remove("error", "1.0", tk.END)
# 添加新标记
xml_text.tag_add("error", start_index, end_index)
xml_text.tag_config("error", background="yellow", foreground="red")
# 自动滚动到错误位置
xml_text.see(start_index)
except tk.TclError:
pass # 忽略索引超出范围等异常
return
else:
# 清除错误标记
xml_text.tag_remove("error", "1.0", tk.END)
# 输出 JSON
json_text.delete("1.0", tk.END)
json_text.insert(tk.END, result)
def on_clear():
xml_text.delete("1.0", tk.END)
json_text.delete("1.0", tk.END)
xml_text.tag_remove("error", "1.0", tk.END)
# 创建主窗口
app = tk.Tk()
app.title("XML 转 JSON 工具 - 完整版")
app.geometry("1200x700")
# 使用 ttk.Style 自定义按钮样式
style = ttk.Style()
style.configure("Convert.TButton",
font=("微软雅黑", 12, "bold"), # 设置字体和大小
foreground="white", # 文字颜色设为白色
background="#2E7D32", # 背景颜色
padding=10, # 内边距
relief="flat") # 扁平化设计
style.map("Convert.TButton",
background=[('active', '#1B5E20')], # 鼠标悬停时背景颜色
foreground=[('active', 'white')]) # 鼠标悬停时文字颜色保持白色
# 分割面板:左右结构
paned_window = tk.PanedWindow(app, orient=tk.HORIZONTAL, sashrelief=tk.SUNKEN)
paned_window.pack(fill="both", expand=True, padx=10, pady=10)
# 左侧面板 - XML 输入区域
left_frame = ttk.Frame(paned_window)
tk.Label(left_frame, text="输入 XML 内容:", font=("微软雅黑", 12)).pack(anchor="w", padx=5, pady=5)
xml_text = tk.Text(left_frame, wrap="word", font=("Consolas", 12), undo=True)
xml_text.pack(fill="both", expand=True, padx=5, pady=5)
paned_window.add(left_frame, width=600)
# 右侧面板 - JSON 输出区域
right_frame = ttk.Frame(paned_window)
tk.Label(right_frame, text="JSON 输出内容:", font=("微软雅黑", 12)).pack(anchor="w", padx=5, pady=5)
json_text = tk.Text(right_frame, wrap="word", font=("Consolas", 12))
json_text.pack(fill="both", expand=True, padx=5, pady=5)
paned_window.add(right_frame, width=600)
# 按钮区域
btn_frame = ttk.Frame(app)
btn_frame.pack(pady=10)
convert_btn = ttk.Button(btn_frame, text="🔄 转换为 JSON", width=20, command=on_convert, style="Convert.TButton")
convert_btn.grid(row=0, column=0, padx=10)
clear_btn = ttk.Button(btn_frame, text="🧹 清空内容", width=15, command=on_clear)
clear_btn.grid(row=0, column=1, padx=10)
app.mainloop()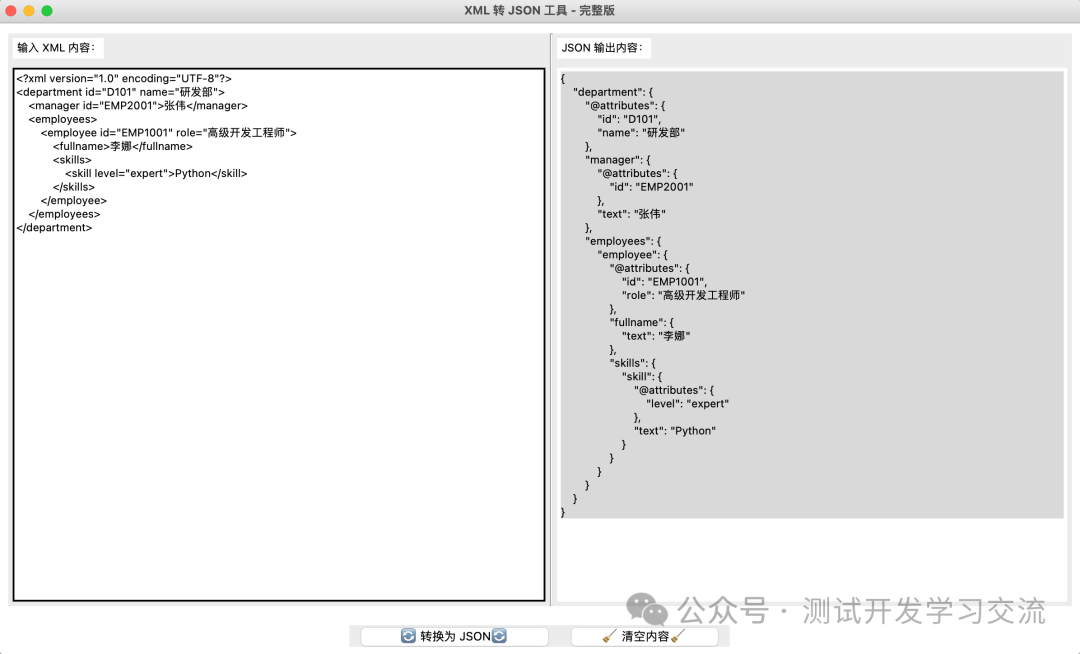
📌 总结

最后: 下方这份完整的软件测试视频教程已经整理上传完成,需要的朋友们可以自行领取【保证100%免费】


魔乐社区(Modelers.cn) 是一个中立、公益的人工智能社区,提供人工智能工具、模型、数据的托管、展示与应用协同服务,为人工智能开发及爱好者搭建开放的学习交流平台。社区通过理事会方式运作,由全产业链共同建设、共同运营、共同享有,推动国产AI生态繁荣发展。
更多推荐


 22
22 0
0- 0


 已为社区贡献6条内容

所有评论(0)