使用YOLOv8来训练一个包含1206张图像的施工安全数据集。这个数据集包含5个类别,已标注为YOLO格式,可以直接用于模型训练
使用YOLOv8来训练一个包含1206张图像的施工安全数据集。这个数据集包含5个类别,已标注为YOLO格式,可以直接用于模型训练。数据集描述数据量:1206张图像类别:0: 头盔(helmet)1: 无头盔(no-helmet)2: 无背心(no-vest)3: 人(person)4: 背心(vest)数据划分:训练集:997张验证集:119张测试集:90张标注格式:YOLO格式应用场景:施工安全
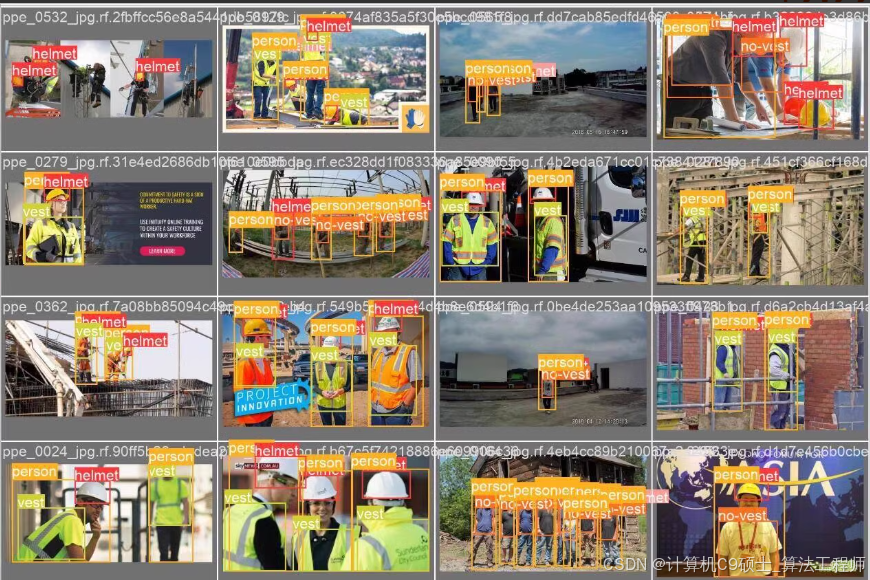
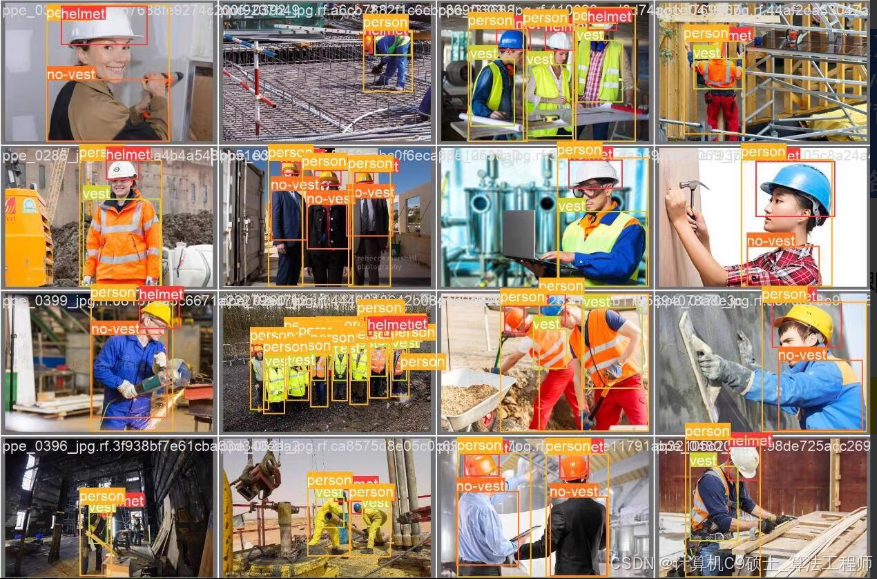
使用YOLOv8来训练一个包含1206张图像的施工安全数据集。这个数据集包含5个类别,已标注为YOLO格式,可以直接用于模型训练。
数据集描述
数据量:1206张图像
类别:
0: 头盔(helmet)
1: 无头盔(no-helmet)
2: 无背心(no-vest)
3: 人(person)
4: 背心(vest)
数据划分:
训练集:997张
验证集:119张
测试集:90张
标注格式:YOLO格式
应用场景:施工安全检测
数据集组织
假设你的数据集目录结构如下:
深色版本
construction_safety_dataset/
├── images/
│ ├── train/
│ │ ├── 000001.jpg
│ │ ├── 000002.jpg
│ │ └── …
│ ├── val/
│ │ ├── 000001.jpg
│ │ ├── 000002.jpg
│ │ └── …
│ └── test/
│ ├── 000001.jpg
│ ├── 000002.jpg
│ └── …
├── labels/
│ ├── train/
│ │ ├── 000001.txt
│ │ ├── 000002.txt
│ │ └── …
│ ├── val/
│ │ ├── 000001.txt
│ │ ├── 000002.txt
│ │ └── …
│ └── test/
│ ├── 000001.txt
│ ├── 000002.txt
│ └── …
└── data.yaml # 数据配置文件
数据配置文件
创建或确认data.yaml文件是否正确配置了数据集路径和类别信息:
yaml
深色版本
train: ./images/train/ # 训练集图像路径
val: ./images/val/ # 验证集图像路径
test: ./images/test/ # 测试集图像路径
Classes
nc: 5 # 类别数量
names:
- helmet
- no-helmet
- no-vest
- person
- vest # 类别名称列表
数据划分代码
如果你需要自己划分数据集,可以使用以下Python代码:
python
深色版本
import os
import random
from shutil import copyfile
定义源目录和目标目录
source_images_dir = ‘./construction_safety_dataset/images’
source_labels_dir = ‘./construction_safety_dataset/labels’
target_train_dir = ‘./construction_safety_dataset/images/train’
target_val_dir = ‘./construction_safety_dataset/images/val’
target_test_dir = ‘./construction_safety_dataset/images/test’
target_train_labels_dir = ‘./construction_safety_dataset/labels/train’
target_val_labels_dir = ‘./construction_safety_dataset/labels/val’
target_test_labels_dir = ‘./construction_safety_dataset/labels/test’
创建目标目录
os.makedirs(target_train_dir, exist_ok=True)
os.makedirs(target_val_dir, exist_ok=True)
os.makedirs(target_test_dir, exist_ok=True)
os.makedirs(target_train_labels_dir, exist_ok=True)
os.makedirs(target_val_labels_dir, exist_ok=True)
os.makedirs(target_test_labels_dir, exist_ok=True)
获取所有图像文件
all_images = [f for f in os.listdir(source_images_dir) if f.endswith(‘.jpg’)]
random.shuffle(all_images)
划分数据集
train_ratio = 0.8
val_ratio = 0.1
test_ratio = 0.1
train_split = int(train_ratio * len(all_images))
val_split = train_split + int(val_ratio * len(all_images))
train_images = all_images[:train_split]
val_images = all_images[train_split:val_split]
test_images = all_images[val_split:]
复制图像文件
for img in train_images:
copyfile(os.path.join(source_images_dir, img), os.path.join(target_train_dir, img))
label = img.replace(‘.jpg’, ‘.txt’)
copyfile(os.path.join(source_labels_dir, label), os.path.join(target_train_labels_dir, label))
for img in val_images:
copyfile(os.path.join(source_images_dir, img), os.path.join(target_val_dir, img))
label = img.replace(‘.jpg’, ‘.txt’)
copyfile(os.path.join(source_labels_dir, label), os.path.join(target_val_labels_dir, label))
for img in test_images:
copyfile(os.path.join(source_images_dir, img), os.path.join(target_test_dir, img))
label = img.replace(‘.jpg’, ‘.txt’)
copyfile(os.path.join(source_labels_dir, label), os.path.join(target_test_labels_dir, label))
安装YOLOv8
如果你还没有安装YOLOv8,可以使用以下命令安装:
bash
深色版本
pip install ultralytics
训练模型
使用YOLOv8训练模型的命令非常简单,你可以直接使用以下命令开始训练:
bash
深色版本
cd path/to/construction_safety_dataset/
克隆YOLOv8仓库
git clone https://github.com/ultralytics/ultralytics.git
cd ultralytics
开始训练
python yolo.py detect train data=…/data.yaml model=yolov8n.pt epochs=100 imgsz=640 batch=16
在这个命令中:
data=…/data.yaml:指定数据配置文件。
model=yolov8n.pt:指定预训练权重,这里使用的是YOLOv8的小模型。
epochs=100:训练轮数。
imgsz=640:输入图像的大小。
batch=16:批量大小。
模型评估
训练完成后,可以使用以下命令评估模型在验证集上的表现:
bash
深色版本
python yolo.py detect val data=…/data.yaml model=runs/detect/train/weights/best.pt imgsz=640
这里的runs/detect/train/weights/best.pt是训练过程中产生的最佳模型权重文件。
模型预测
你可以使用训练好的模型对新图像进行预测:
bash
深色版本
python yolo.py detect predict source=path/to/your/image.jpg model=runs/detect/train/weights/best.pt imgsz=640 conf=0.4 iou=0.5
查看训练结果
训练过程中的日志和结果会保存在runs/detect/目录下,你可以查看训练过程中的损失、精度等信息。
数据增强
为了进一步提高模型性能,可以使用数据增强技术。以下是一个简单的数据增强示例:
安装albumentations库:
bash
深色版本
pip install -U albumentations
在yolo.py中添加数据增强:
python
深色版本
import albumentations as A
from albumentations.pytorch import ToTensorV2
import cv2
定义数据增强
transform = A.Compose([
A.RandomSizedBBoxSafeCrop(width=640, height=640, erosion_rate=0.2),
A.HorizontalFlip(p=0.5),
A.VerticalFlip(p=0.5),
A.Rotate(limit=10, p=0.5, border_mode=cv2.BORDER_CONSTANT),
A.ColorJitter(brightness=0.2, contrast=0.2, saturation=0.2, hue=0.2, p=0.5),
A.GaussNoise(var_limit=(10.0, 50.0), p=0.5),
A.Normalize(mean=[0.485, 0.456, 0.406], std=[0.229, 0.224, 0.225]),
ToTensorV2()
], bbox_params=A.BboxParams(format=‘yolo’, label_fields=[‘class_labels’]))
在数据加载器中应用数据增强
def collate_fn(batch):
images, targets = zip(*batch)
transformed_images = []
transformed_targets = []
for img, target in zip(images, targets):
    bboxes = target['bboxes']
    class_labels = target['labels']
    augmented = transform(image=img, bboxes=bboxes, class_labels=class_labels)
    transformed_images.append(augmented['image'])
    transformed_targets.append({
        'bboxes': augmented['bboxes'],
        'labels': augmented['class_labels']
    })

return torch.stack(transformed_images), transformed_targets
注意事项
数据集质量:确保数据集的质量,包括清晰度、标注准确性等。
模型选择:可以选择更强大的模型版本(如YOLOv8m、YOLOv8l等)以提高性能。
超参数调整:根据实际情况调整超参数,如批量大小(batch)、图像大小(imgsz)等。
监控性能:训练过程中监控损失函数和mAP指标,确保模型收敛。
通过上述步骤,你可以使用YOLOv8来训练一个施工安全数据集,并使用训练好的模型进行预测。

魔乐社区(Modelers.cn) 是一个中立、公益的人工智能社区,提供人工智能工具、模型、数据的托管、展示与应用协同服务,为人工智能开发及爱好者搭建开放的学习交流平台。社区通过理事会方式运作,由全产业链共同建设、共同运营、共同享有,推动国产AI生态繁荣发展。
更多推荐

 14
14 0
0- 0


 已为社区贡献22条内容

所有评论(0)