实例分割 | yolov11训练自己的数据集
因为项目还没完成,主要精力在此项目中,过程写的有点仓促,后面会慢慢优化文章质量,补全没完成的部分。
前言
因工作需求,我主要使用的是YOLOv5和YOLOv7系列模型。今天决定学习并尝试最先进的YOLOv11模型,并记录下环境配置及训练过程,以便后续参考和优化。。
1 项目下载及环境安装
项目位置:yolov11
可以看到,这里官网的要求python版本大于等于3.8,我这里安装python3.10.
conda create -n yolov11 python=3.10
conda activate yolov11
pip install ultralytics -i https://pypi.tuna.tsinghua.edu.cn/simple
2 标注自己的数据集
标注实例分割数据集的工具有很多,这里建议labelme和AnyLabeling任意选一个。
如图所示,标注后的数据集是json格式的:
我们需要将其转成yolo系列需要的txt格式。
json转txt格式转化代码:
# json2txt.py
import cv2
import os
import json
import glob
import numpy as np

class_names = ["cls1_name", "cls2_name", "cls3_name", "cls4_name", "cls5_name"]


def convert_json_label_to_yolov_seg_label():
    json_path = "F:/Desktop/hand/labels"  # 本地json路径
    json_files = glob.glob(json_path + "/*.json")
    # print(json_files)

    # 指定输出文件夹
    output_folder = "F:/Desktop/hand/labels_txt"  # txt存放路径
    if not os.path.exists(output_folder):
        os.makedirs(output_folder)

    for json_file in json_files:
        # print(json_file)
        with open(json_file, 'r') as f:
            json_info = json.load(f)

        img = cv2.imread(os.path.join(json_path, json_info["imagePath"]))
        height, width, _ = img.shape
        np_w_h = np.array([[width, height]], np.int32)

        txt_file = os.path.join(output_folder, os.path.basename(json_file).replace(".json", ".txt"))

        with open(txt_file, "w") as f:
            for point_json in json_info["shapes"]:
                txt_content = ""
                np_points = np.array(point_json["points"], np.int32)
                label = point_json["label"]
                index = class_names.index(label)
                # print(type(label))
                norm_points = np_points / np_w_h
                norm_points_list = norm_points.tolist()
                txt_content += str(index) + " " + " ".join(
                    [" ".join([str(cell[0]), str(cell[1])]) for cell in norm_points_list]) + "\n"
                f.write(txt_content)


convert_json_label_to_yolov_seg_label()
转换后是这样的:
分割数据集,我们需要将转化成txt的数据集分割成训练集、验证集和测试集,这是分割代码:
# txt_split.py
# txt_split.py
# 将图片和标注数据按比例切分为 训练集和测试集
import shutil
import random
import os

# 原始路径
image_original_path = "F:/FingerDataset/Clearing/Cleared/All/images/"
label_original_path = "F:/FingerDataset/Clearing/Cleared/All/labels/"

cur_path = os.getcwd()
# cur_path = 'D:/image_denoising_test/denoise/'
# 训练集路径
train_image_path = os.path.join(cur_path, "datasets/images/train/")
train_label_path = os.path.join(cur_path, "datasets/labels/train/")

# 验证集路径
val_image_path = os.path.join(cur_path, "datasets/images/val/")
val_label_path = os.path.join(cur_path, "datasets/labels/val/")

# 测试集路径
test_image_path = os.path.join(cur_path, "datasets/images/test/")
test_label_path = os.path.join(cur_path, "datasets/labels/test/")

# 训练集目录
list_train = os.path.join(cur_path, "datasets/train.txt")
list_val = os.path.join(cur_path, "datasets/val.txt")
list_test = os.path.join(cur_path, "datasets/test.txt")

train_percent = 0.8
val_percent = 0.1
test_percent = 0.1


def check_file_exists(file_path, alternative_file):
    # 检测文件是否存在
    if os.path.exists(file_path):
        return file_path
    else:
        return alternative_file

def del_file(path):
    for i in os.listdir(path):
        file_data = path + "\\" + i
        os.remove(file_data)


def mkdir():
    if not os.path.exists(train_image_path):
        os.makedirs(train_image_path)
    else:
        del_file(train_image_path)
    if not os.path.exists(train_label_path):
        os.makedirs(train_label_path)
    else:
        del_file(train_label_path)

    if not os.path.exists(val_image_path):
        os.makedirs(val_image_path)
    else:
        del_file(val_image_path)
    if not os.path.exists(val_label_path):
        os.makedirs(val_label_path)
    else:
        del_file(val_label_path)

    if not os.path.exists(test_image_path):
        os.makedirs(test_image_path)
    else:
        del_file(test_image_path)
    if not os.path.exists(test_label_path):
        os.makedirs(test_label_path)
    else:
        del_file(test_label_path)


def clearfile():
    if os.path.exists(list_train):
        os.remove(list_train)
    if os.path.exists(list_val):
        os.remove(list_val)
    if os.path.exists(list_test):
        os.remove(list_test)


def main():
    mkdir()
    clearfile()

    file_train = open(list_train, 'w')
    file_val = open(list_val, 'w')
    file_test = open(list_test, 'w')

    total_txt = os.listdir(label_original_path)
    num_txt = len(total_txt)
    list_all_txt = range(num_txt)

    num_train = int(num_txt * train_percent)
    num_val = int(num_txt * val_percent)
    num_test = num_txt - num_train - num_val

    train = random.sample(list_all_txt, num_train)
    # train从list_all_txt取出num_train个元素
    # 所以list_all_txt列表只剩下了这些元素
    val_test = [i for i in list_all_txt if not i in train]
    # 再从val_test取出num_val个元素,val_test剩下的元素就是test
    val = random.sample(val_test, num_val)

    print("训练集数目:{}, 验证集数目:{}, 测试集数目:{}".format(len(train), len(val), len(val_test) - len(val)))
    for i in list_all_txt:
        name = total_txt[i][:-4]

        srcImage = image_original_path + name + '.jpg'
        if not os.path.exists(srcImage):
            srcImage = image_original_path + name + '.png'

        srcLabel = label_original_path + name + ".txt"

        if i in train:
            dst_train_Image = train_image_path + name + '.jpg'
            dst_train_Label = train_label_path + name + '.txt'
            shutil.copyfile(srcImage, dst_train_Image)
            shutil.copyfile(srcLabel, dst_train_Label)
            file_train.write(dst_train_Image + '\n')
        elif i in val:
            dst_val_Image = val_image_path + name + '.jpg'
            dst_val_Label = val_label_path + name + '.txt'
            shutil.copyfile(srcImage, dst_val_Image)
            shutil.copyfile(srcLabel, dst_val_Label)
            file_val.write(dst_val_Image + '\n')
        else:
            dst_test_Image = test_image_path + name + '.jpg'
            dst_test_Label = test_label_path + name + '.txt'
            shutil.copyfile(srcImage, dst_test_Image)
            shutil.copyfile(srcLabel, dst_test_Label)
            file_test.write(dst_test_Image + '\n')

    file_train.close()
    file_val.close()
    file_test.close()


if __name__ == "__main__":
    main()
3 编写训练代码并训练
我这里习惯使用代码训练,还有命令训练,如果感兴趣的朋友可以去官网了解。
# train.py
from ultralytics import YOLO

if __name__ == '__main__':

    # model = YOLO(r'ultralytics/cfg/models/11/yolo11-seg.yaml')
    model = YOLO('yolo11s-seg.pt')
    model.train(data=r'config.yaml',
                imgsz=640,
                epochs=800,
                single_cls=True,
                batch=16,
                workers=10,
                device='0',
                )
注意,这里我使用的是分割模型,所以选yolo11-seg.yaml,以下是配置文件对应的模型:
yolo11.yaml:普通检测模型
yolo11-cls.yaml:高效图像分类模型
yolo11-obb.yaml: 定向边界框检测
yolo11-pose.yaml:姿势检测
配置文件:
# config.yaml
path: ../datasets/images  # 数据集所在路径
train: train  # 数据集路径下的train.txt
val: val  # 数据集路径下的val.txt
test: test  # 数据集路径下的test.txt

# Classes
names:
  0: class1_name
  1: class2_name
  2: class3_name
  3: class4_name
  4: class5_name
这里的path改成你的数据集位置,如果txt_split.py在项目根目录下运行则不需要修改路径,只需要修改类别即可。
修改之后,只需要python train.py运行即可。
测试代码:
# test.py
from ultralytics import YOLO
# 加载训练好的模型,改为自己的路径
model = YOLO('runs/train/exp22/weights/best.pt')  #修改为训练好的路径
source = '11.jpg' #修改为自己的图片路径及文件名
# 运行推理,并附加参数
model.predict(source, save=True, imgsz=640)
转成onnx模型并运行:
yolo export model=runs/segment/train11/weights/best.pt imgsz=640 format=onnx opset=12 simplify
python examples/YOLOv8-Segmentation-ONNXRuntime-Python/main.py --model runs/segment/train5n/weights/bestv8.onnx
4 常见报错
4.1 遇到的错误1
RuntimeError: Trying to create tensor with negative dimension -37: [0, -37]
运行YOLOv8-Segmentation-ONNXRuntime-Python时报错,修改配置文件

配置文件位置在ultralytics/cfg/datasets/,如果这里一直报错can't find file,就直接写绝对路径。
4.2 遇到的错误2
ValueError: Invalid CUDA 'device=0' requested. Use 'device=cpu' or pass valid CUDA device(s) if available, i.e. 'device=0' or 'device=0,1,2,3' for Multi-GPU.
查看你的torch版本,大概率是cpu版本,换成gpu版本即可。
#方法1,进入python环境查看
conda activate yolov11
import torch
print(torch.__version__)
#方法2 ,无需无需进入Python环境
python -c "import torch; print(torch.__version__)"
如图所示:
报错的原因为你的torch版本不对。
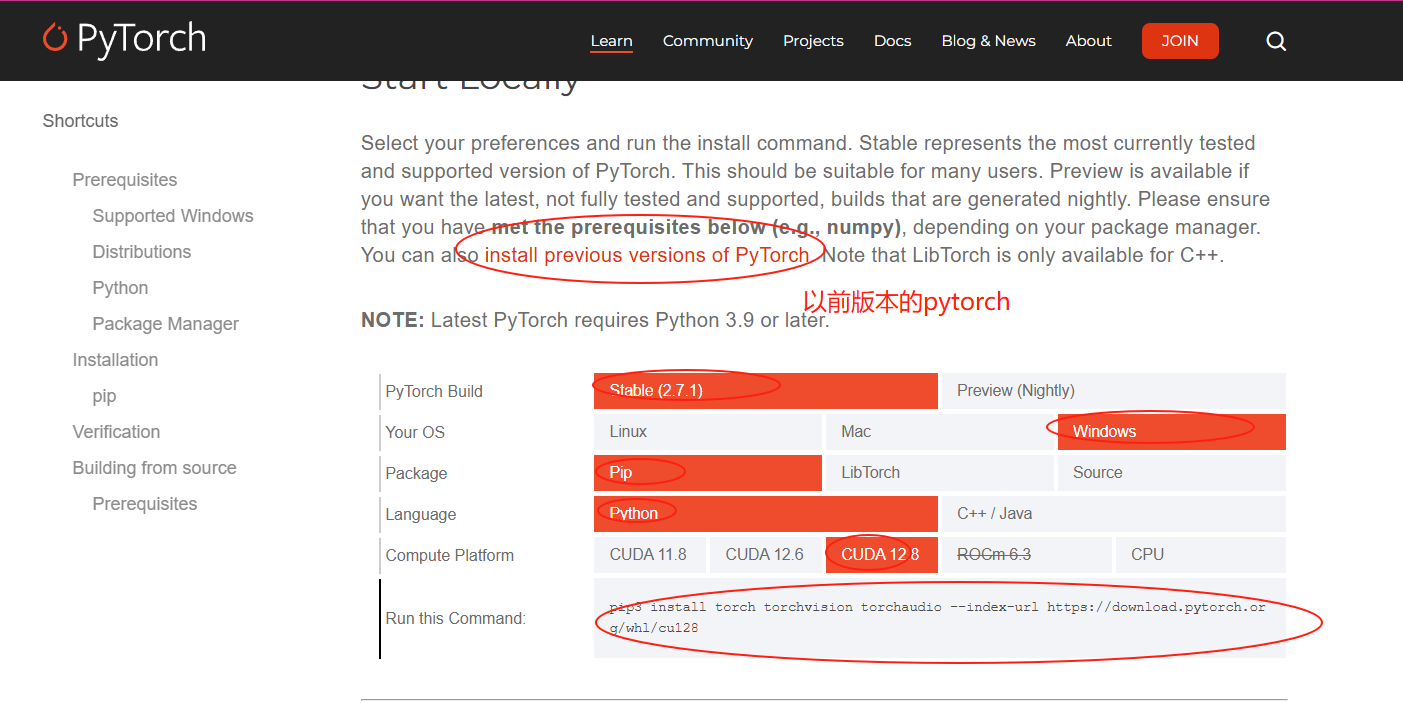
切换gpu版本的torch,下载网站:PyTorch官网
4.3 遇到的错误3
```Could not run ‘torchvision::nms’ with arguments from the ‘CUDA’ backen xxx…``
大概率是 你的torchvision版本出问题了,不是cuda版本,或者与你的torch版本不匹配,需要使用conda重新安装一遍环境。
conda install pytorch==2.5.1 torchvision==0.20.1 torchaudio==2.5.1 pytorch-cuda=12.1 -c pytorch -c nvidia
这里具体怎么下载可以看上一个错误。
参考
语义分割:YOLOv11的分割模型训练自己的数据集(从代码下载到实例测试)
总结
因为项目还没完成,主要精力在此项目中,过程写的有点仓促,后面会慢慢优化文章质量,补全没完成的部分。

魔乐社区(Modelers.cn) 是一个中立、公益的人工智能社区,提供人工智能工具、模型、数据的托管、展示与应用协同服务,为人工智能开发及爱好者搭建开放的学习交流平台。社区通过理事会方式运作,由全产业链共同建设、共同运营、共同享有,推动国产AI生态繁荣发展。
更多推荐


 5
5 0
0- 0


 已为社区贡献1条内容

所有评论(0)