HTML导出为word:jquery.exportWord.js
通过使用jquery.exportWord.js,将HTML导出为word,手动控制分页。
文章目录
HTML导出为word:jquery.exportWord.js
1.需求分析
原来只有一个打印功能,打印好几个table,现在要求可以将这些table导出为word,业务中涉及手动分页。
2.解决方案
使用jquery.exprtWord.js将需要导出的table导出为word。
3.jquery.wordExport.js
3.1 引入js文件
引入wordExport之前必须引入jQuery和FileSaver.js。
引入wordExport进入官方github下载jquery.wordexport.js即可。
3.2 基本使用
1.界面中引入js
<!--jQuery-->
<script src="./jquery-3.6.0.min.js"></script>
<!--FileSaver-->
<script src="./FileSaver.min.js"></script>
<!--wordExport-->
<script src="./jquery.wordexport.js"></script>
2.编写需要输出到word的多个table
<div id="printFiled">
	<table id="table1" >
		<tr>
			<th>姓名</th>
			<th>年龄</th>
		</tr>
		<tr>
			<td>hhn</td>
			<td>21</td>
		</tr>
		<tr>
			<td>jyt</td>
			<td>18</td>
		</tr>
	</table>
	<table id="table2" >
		<tr>
			<th>姓名</th></th>
			<th>学号</th>
		</tr>
		<tr>
			<td>hhn</td>
			<td>1231213</td>
		</tr>
		<tr>
			<td>jyt</td>
			<td>11515151</td>
		</tr>
	</table>
</div>
3.编写按钮
<button id="wordExport">单击将html导出word</button>
4.编写导出事件
$('#wordExport').click(()=>{
	// wordExport()中的参数为文件名
	$('#printFiled').wordExport('filename');
})
5.界面效果![![[Pasted image 20220421181237.png]]](https://i-blog.csdnimg.cn/blog_migrate/a4e948fc2ac0f992abeb3fb09c9daf61.png)
6.单击按钮导出word![![[Pasted image 20220421181406.png]]](https://i-blog.csdnimg.cn/blog_migrate/c7b641f593620feff981f77e63ad1284.png)
3.3 解决导出的表格没有边框的问题
给table添加
border="1" style="border-collapse:collapse;"的属性即可。
1.添加属性
<div id="printFiled">
	<table id="table1" border="1" style="border-collapse:collapse;">
		<tr>
			<th>姓名</th>
			<th>年龄</th>
		</tr>
		<tr>
			<td>hhn</td>
			<td>21</td>
		</tr>
		<tr>
			<td>jyt</td>
			<td>18</td>
		</tr>
	</table>
	<table id="table2" border="1"  style="border-collapse:collapse;">
		<tr>
			<th>姓名</th></th>
			<th>学号</th>
		</tr>
		<tr>
			<td>hhn</td>
			<td>1231213</td>
		</tr>
		<tr>
			<td>jyt</td>
			<td>11515151</td>
		</tr>
	</table>
</div>
2.界面显示![![[Pasted image 20220421182027.png]]](https://i-blog.csdnimg.cn/blog_migrate/a04dbfe1e2be3c24cc5056f1cba7e962.png)
3.导出的word
可以看到导出的word里面就多了边框。![![[Pasted image 20220421182052.png]]](https://i-blog.csdnimg.cn/blog_migrate/1c319319a52b4959ea6edb1822c880f1.png)
3.4 导出的表格分页
1.通过css控制分页:
参考文档:JS 实现分页打印 - 折翼的飞鸟 - 博客园 (cnblogs.com)
在调用window.print()时,可以实现打印效果,但内容太多时要进行分页打印。
在样式中有规定几个打印的样式page-break-before和page-break-after CSS属性并不会修改网页在屏幕上的显示,这两个属性是用来控制文件的打印方式。
每个打印属性都可以设定4种设定值:auto、always、left和right。其中Auto是默认值,只有在有需要时,才需设定分页符号 (Page breaks)。page-break-before若设定成always,则是在遇到特定的组件时,打印机会重新开始一个新的打印页。page-break-before若设定成left,则会插入分页符号,直到指定的组件出现在一个左边的空白页上。page-break-before若设定成right,则会插入分页符号,直到指定的组件出现在一个右边的空白页上。page-break-after属性会将分页符号加在指定组件后,而非之前。
所以我们可以用一个空的标签来控制分页,只需要在需要分页的位置加上:
<!--在指定组件之后加上分页符号-->
<h1 style="page-break-after: always;"></h1>
这个在打印的时候能起到作用,但是在导出word的时候不起作用!
2.导出成word的时候控制分页:
参考文档:关于HTML转Word文档后的分页问题(page-break-after:always 无效?)的解决方案
在需要分页的位置加上:
<span><br clear=all style = "page-break-before:always;" ></span>
3.演示
<div id="printFiled">
	<table id="table1" border="1" style="border-collapse:collapse;">
		<tr>
			<th>姓名</th>
			<th>年龄</th>
		</tr>
		<tr>
			<td>hhn</td>
			<td>21</td>
		</tr>
		<tr>
			<td>jyt</td>
			<td>18</td>
		</tr>
	</table>

	<!-- 分页 -->
	<span><br clear=all style = "page-break-before:always;" ></span>


	<table id="table2" border="1"  style="border-collapse:collapse;">
		<tr>
			<th>姓名</th></th>
			<th>学号</th>
		</tr>
		<tr>
			<td>hhn</td>
			<td>1231213</td>
		</tr>
		<tr>
			<td>jyt</td>
			<td>11515151</td>
		</tr>
	</table>
</div>
导出的word如下:![![[Pasted image 20220421183632.png]]](https://i-blog.csdnimg.cn/blog_migrate/cce271b3c8885fb6d5bb19ca86edcd8a.png)
可以看到分页成功了。
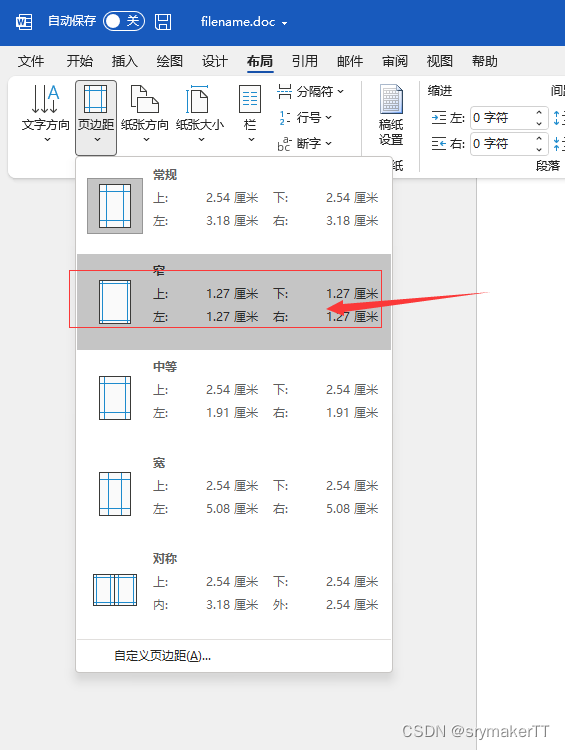
3.5 通过window.print的样式和导出的word格式不太一样的情况
word的布局中设置页边距为窄即可。

魔乐社区(Modelers.cn) 是一个中立、公益的人工智能社区,提供人工智能工具、模型、数据的托管、展示与应用协同服务,为人工智能开发及爱好者搭建开放的学习交流平台。社区通过理事会方式运作,由全产业链共同建设、共同运营、共同享有,推动国产AI生态繁荣发展。
更多推荐
 13
13 0
0- 0


 已为社区贡献4条内容

所有评论(0)