YOLOv8医学图像分割
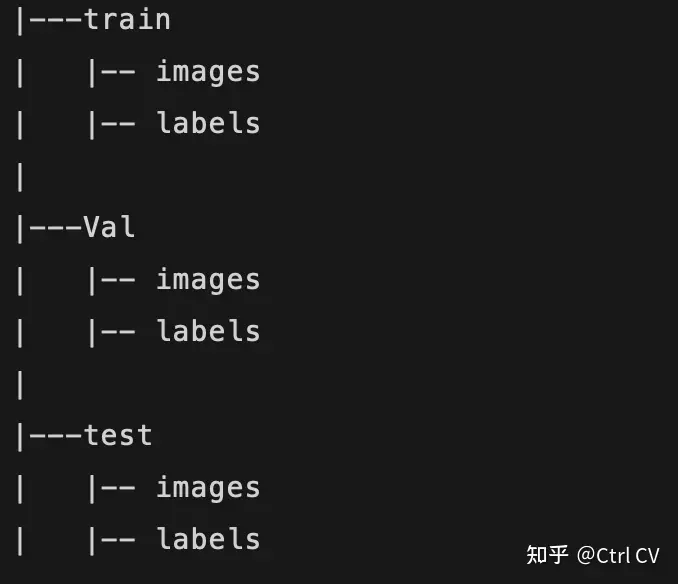
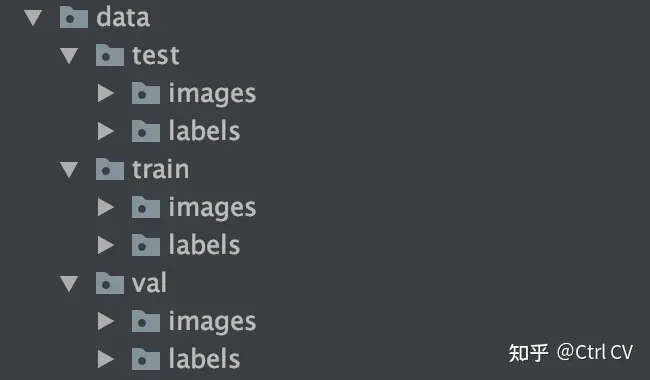
步骤2:将 .png(或任何类型)掩膜(标签)转换为labels标签文件夹中的 .txt 文件。以下是将标签(.png、.jpg)转换为 .txt 文件的Python代码。步骤1:请按照以下结构组织您的数据集(图像和掩膜):理想情况下,训练、测试和验证(val)的比例为8:1:1。只需在Python中运行下面的代码,它将为YOLOv8创建 'data.yaml' 文件。现在你会看到一个 'runs
原文:YOLOv8医学图像分割 - 知乎 (zhihu.com)
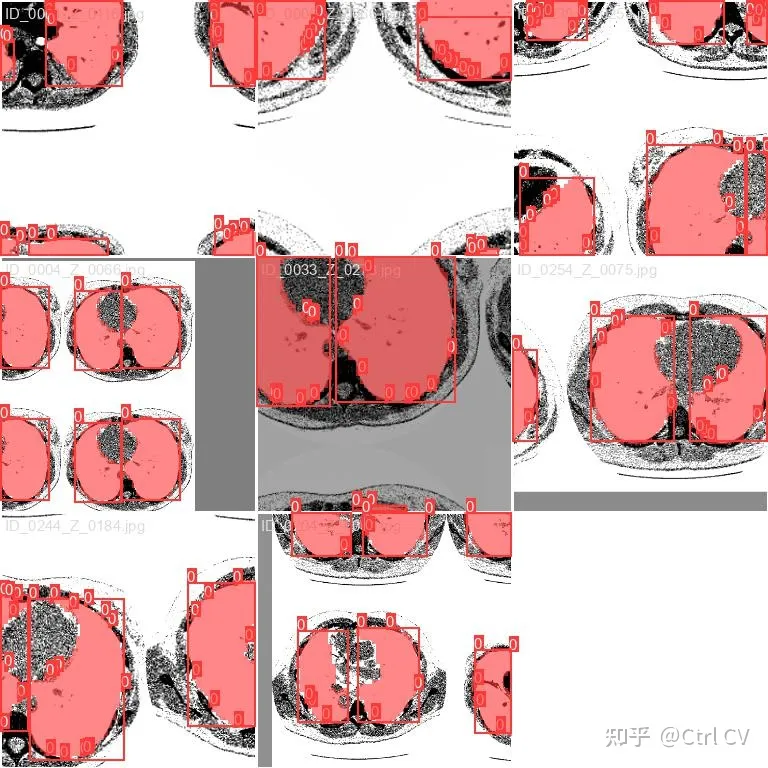
一、肺部CT图像数据
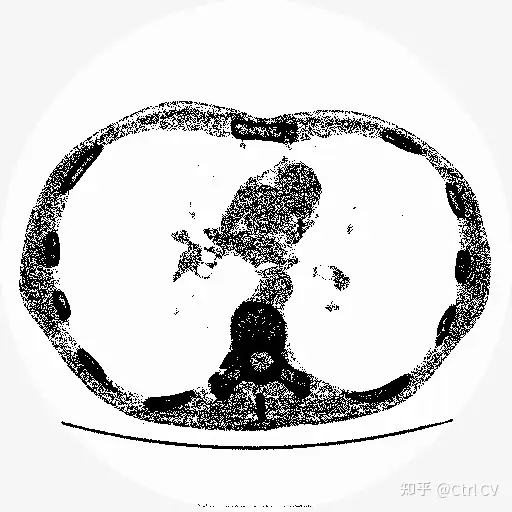
image
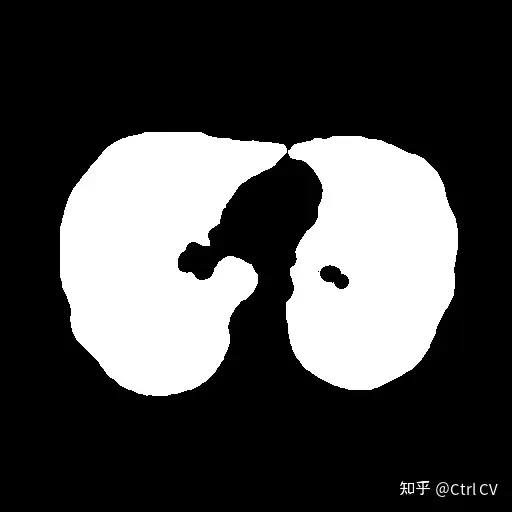
mask
数据集准备
数据集需要进行两个步骤的处理:
步骤1:请按照以下结构组织您的数据集(图像和掩膜):理想情况下,训练、测试和验证(val)的比例为8:1:1。数据集文件夹的安排如下:
步骤2:将 .png(或任何类型)掩膜(标签)转换为labels标签文件夹中的 .txt 文件。以下是将标签(.png、.jpg)转换为 .txt 文件的Python代码。
import os, json, numpy as np
from tqdm import tqdm
from imantics import Mask, Image, Category, Dataset, Polygons
import cv2
import matplotlib.pyplot as plt
import glob


for x in ['train', 'valid', 'test']:
    if not os.path.exists('new_data/' + x + '/labels'):
        os.makedirs('new_data/' + x + '/labels')

    lst_img=glob.glob('new_data/' + x+ '/masks/'+ "*.jpg")

    # print(lst_img)

    for img in tqdm(lst_img):
        # print(img)
        array = cv2.imread(img, cv2.IMREAD_GRAYSCALE)
        h, w = array.shape

        txt_path = img.replace('masks', 'labels').replace('.jpg', '.txt')
        # print(txt_path)

        # Construct some test data
        poly = Mask(array).polygons()
        segmentation = poly.segmentation
        seg = sorted(segmentation, key=len, reverse=True)
        n = 0
        for i in seg:
            # print(len(seg))
            x = i[0::2]
            y = i[1::2]
            classid = "0"
            seg_out = classid + " "
            for cord_x, cord_y in zip(x, y):
                if cord_x < 0:
                    cord_x = 0
                if cord_y < 0:
                    cord_y = 0
                cord_x = cord_x / w
                cord_y = cord_y / h

                seg_out += str(cord_x) + " " + str(cord_y) + " "
            with open(txt_path, "a") as file:
                file.write(seg_out[:-1] + "\n")
            n += 1
训练准备
为训练创建 'data.yaml' 文件。只需在Python中运行下面的代码,它将为YOLOv8创建 'data.yaml' 文件。
train: ultralytics-main/LungsCT/new_data/train/images
val: ultralytics-main/LungsCT/new_data/valid/images
test: ultralytics-main/LungsCT/new_data/test/images

# number of classes
nc: 1

# class names
names:
  0: lung
训练模型
一旦数据准备好,其余的非常简单,只需运行以下代码。
import matplotlib.pyplot as plt
from ultralytics import YOLO

model = YOLO("yolov8n-seg.pt")

results = model.train(
        batch=8,
        device="cpu",
        data="data.yaml",
        epochs=100,
        imgsz=512)
训练成功了。现在你会看到一个 'runs' 文件夹,你可以在其中找到所有的训练矩阵和图表。
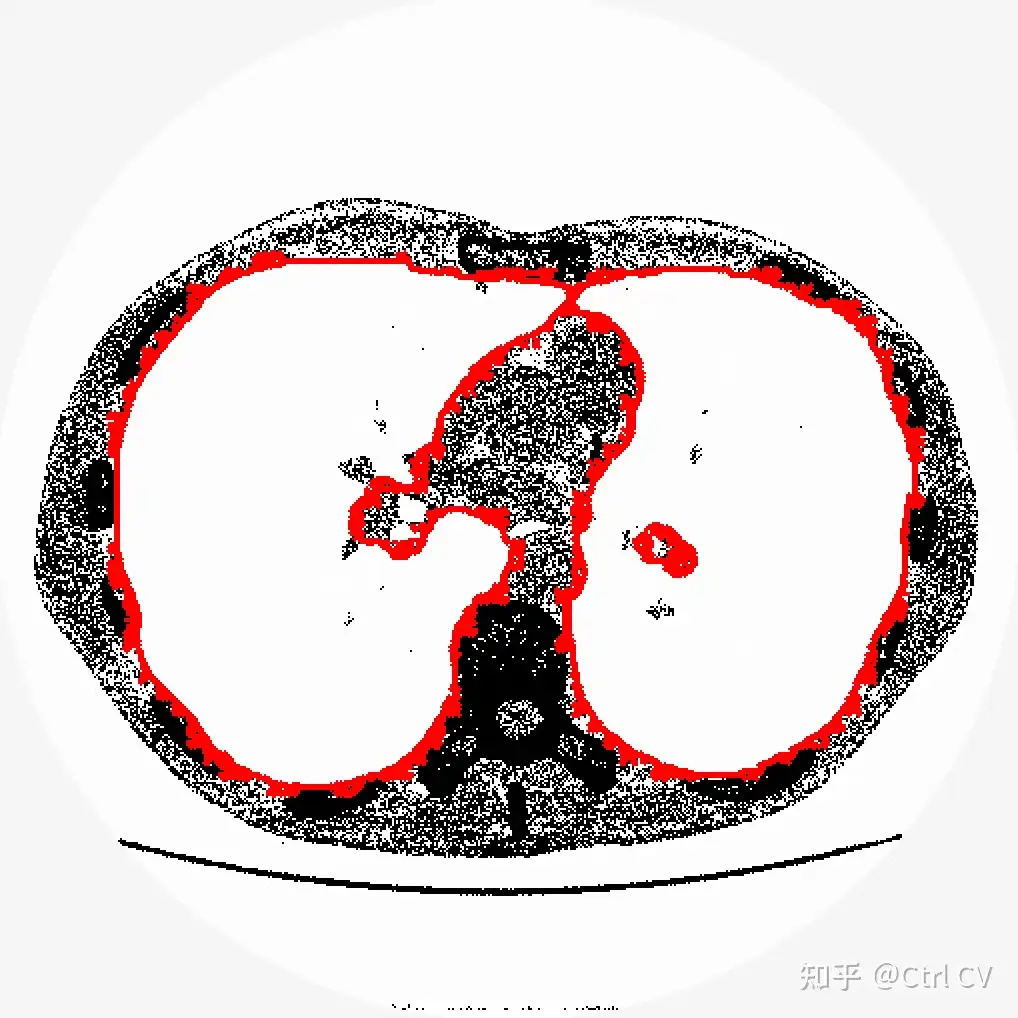
在测试数据上检查结果:
model = YOLO("runs/segment/train/weights/best.pt") # load the model

file = glob.glob('datasets/test/images/*') # let's get the images

# lets run the model over every image
for i in range(len(file)):
    result = model(file[i], save=True, save_txt=True)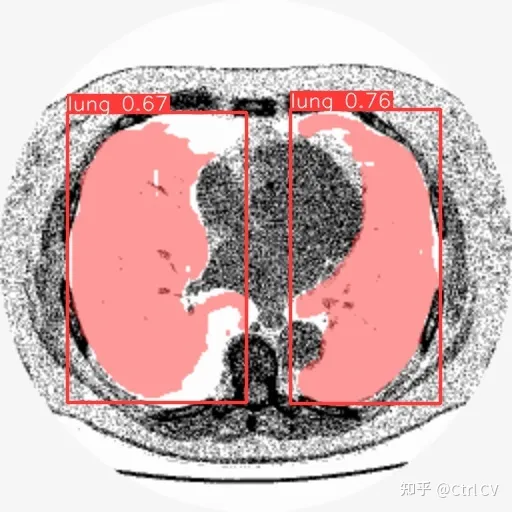
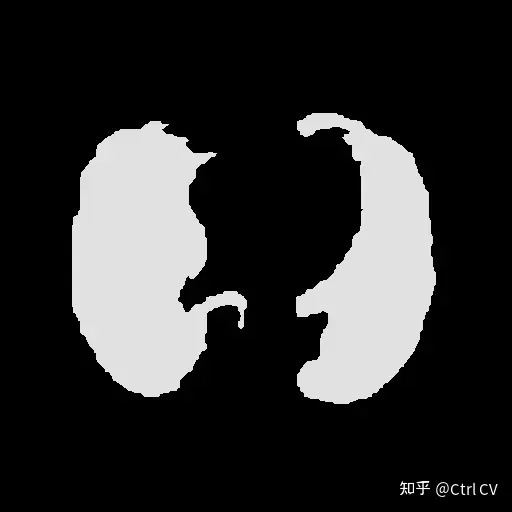
将预测出的txt文件转换为对应的 mask.png
import numpy as np
import cv2

def convert_label_to_image(label_path, image_path):
    # Read the .txt label file
    with open(label_path, 'r') as f:
        label_line = f.readline()

    # Parse the label line to extract the normalized coordinates
    coords = label_line.strip().split()[1:]  # Remove the class label (assuming it's always 0)

    # Convert normalized coordinates to pixel coordinates
    width, height = 256, 256  # Set the dimensions of the output image
    coordinates = [(float(coords[i]) * width, float(coords[i+1]) * height) for i in range(0, len(coords), 2)]
    coordinates = np.array(coordinates, dtype=np.int32)

    # Create a blank image
    image = np.zeros((height, width, 3), dtype=np.uint8)

    # Draw the polygon using the coordinates
    cv2.fillPoly(image, [coordinates], (255, 255, 255))  # Fill the polygon with white color
    print(image.shape)
    # Save the image
    cv2.imwrite(image_path, image)
    print("Image saved successfully.")

# Example usage
label_path = 'runs/segment/predict4/val_labels/img_105.txt'
image_path = 'runs/segment/predict4/val_labels/img_105.jpg'
convert_label_to_image(label_path, image_path)


file = glob.glob('runs/segment/predict11/labels/*.txt')
for i in range(len(file)):
    label_path = file[i]
    image_path = file[i][:-3]+'jpg'
    convert_label_to_image(label_path, image_path)
#############################################################################
yolov8自定义分割数据
一、制作数据
import numpy as np
from PIL import Image
from skimage import draw
import random
from pathlib import Path
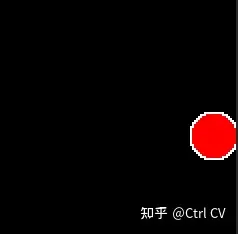
def create_image(path, img_size, min_radius):
path.parent.mkdir( parents=True, exist_ok=True )
arr = np.zeros((img_size, img_size, 3)).astype(np.uint8)
center_x = random.randint(min_radius, (img_size-min_radius))
center_y = random.randint(min_radius, (img_size-min_radius))
max_radius = min(center_x, center_y, img_size - center_x, img_size - center_y)
radius = random.randint(min_radius, max_radius)
row_indxs, column_idxs = draw.ellipse(center_x, center_y, radius, radius, shape=arr.shape)
arr[row_indxs, column_idxs] = 255
im = Image.fromarray(arr)
im.save(path)
def create_images(data_root_path, train_num, val_num, test_num, img_size=640, min_radius=10):
data_root_path = Path(data_root_path)
for i in range(train_num):
create_image(data_root_path / 'train' / 'images' / f'img_{i}.png', img_size, min_radius)
for i in range(val_num):
create_image(data_root_path / 'val' / 'images' / f'img_{i}.png', img_size, min_radius)
for i in range(test_num):
create_image(data_root_path / 'test' / 'images' / f'img_{i}.png', img_size, min_radius)
create_images('data', train_num=120, val_num=40, test_num=40, img_size=120, min_radius=10)

二、制作标签
from rasterio import features # pip install rasterio
import numpy as np
from PIL import Image
from skimage import draw
import random
from pathlib import Path

def create_label(image_path, label_path):
    arr = np.asarray(Image.open(image_path).convert('L'))

    # print(arr)

    # There may be a better way to do it, but this is what I have found so far

    print(list(features.shapes(arr, mask=(arr >0))))
    cords = list(features.shapes(arr, mask=(arr >0)))[0][0]['coordinates'][0]
    label_line = '0 ' + ' '.join([f'{int(cord[0])/arr.shape[0]} {int(cord[1])/arr.shape[1]}' for cord in cords])

    label_path.parent.mkdir( parents=True, exist_ok=True )
    with label_path.open('w') as f:
        f.write(label_line)

for images_dir_path in [Path(f'data/{x}/images') for x in ['train', 'val', 'test']]:
    for img_path in images_dir_path.iterdir():
        label_path = img_path.parent.parent / 'labels' / f'{img_path.stem}.txt'
        label_line = create_label(img_path, label_path)
标签信息:
0 0.8666666666666667 0.49166666666666664 0.9416666666666667 0.49166666666666664 0.9416666666666667 0.5 0.9583333333333334 0.5 0.9583333333333334 0.5083333333333333 0.9666666666666667 0.5083333333333333 0.9666666666666667 0.5166666666666667 0.975 0.5166666666666667 0.975 0.525 0.9833333333333333 0.525 0.9833333333333333 0.5333333333333333 0.9916666666666667 0.5333333333333333 0.9916666666666667 0.55 1.0 0.55 1.0 0.625 0.9916666666666667 0.625 0.9916666666666667 0.6416666666666667 0.9833333333333333 0.6416666666666667 0.9833333333333333 0.65 0.975 0.65 0.975 0.6583333333333333 0.9666666666666667 0.6583333333333333 0.9666666666666667 0.6666666666666666 0.9583333333333334 0.6666666666666666 0.9583333333333334 0.675 0.9416666666666667 0.675 0.9416666666666667 0.6833333333333333 0.8666666666666667 0.6833333333333333 0.8666666666666667 0.675 0.85 0.675 0.85 0.6666666666666666 0.8416666666666667 0.6666666666666666 0.8416666666666667 0.6583333333333333 0.8333333333333334 0.6583333333333333 0.8333333333333334 0.65 0.825 0.65 0.825 0.6416666666666667 0.8166666666666667 0.6416666666666667 0.8166666666666667 0.625 0.8083333333333333 0.625 0.8083333333333333 0.55 0.8166666666666667 0.55 0.8166666666666667 0.5333333333333333 0.825 0.5333333333333333 0.825 0.525 0.8333333333333334 0.525 0.8333333333333334 0.5166666666666667 0.8416666666666667 0.5166666666666667 0.8416666666666667 0.5083333333333333 0.85 0.5083333333333333 0.85 0.5 0.8666666666666667 0.5 0.8666666666666667 0.49166666666666664三、标签可视化
data/
├── test
│   ├── images
│   │   ├── img_0.png
│   │   ├── img_1.png
│   │   ├── img_2.png
│   │   ├── ...
│   └── labels
│       ├── img_0.txt
│       ├── img_1.txt
│       ├── img_2.txt
│       ├── ...
├── train
│   ├── images
│   │   ├── img_0.png
│   │   ├── img_1.png
│   │   ├── img_2.png
│   │   ├── ...
│   └── labels
│       ├── img_0.txt
│       ├── img_1.txt
│       ├── img_2.txt
│       ├── ...
|── val
|   ├── images
│   │   ├── img_0.png
│   │   ├── img_1.png
│   │   ├── img_2.png
│   │   ├── ...
|   └── labels
│       ├── img_0.txt
│       ├── img_1.txt
│       ├── img_2.txt
│       ├── ...
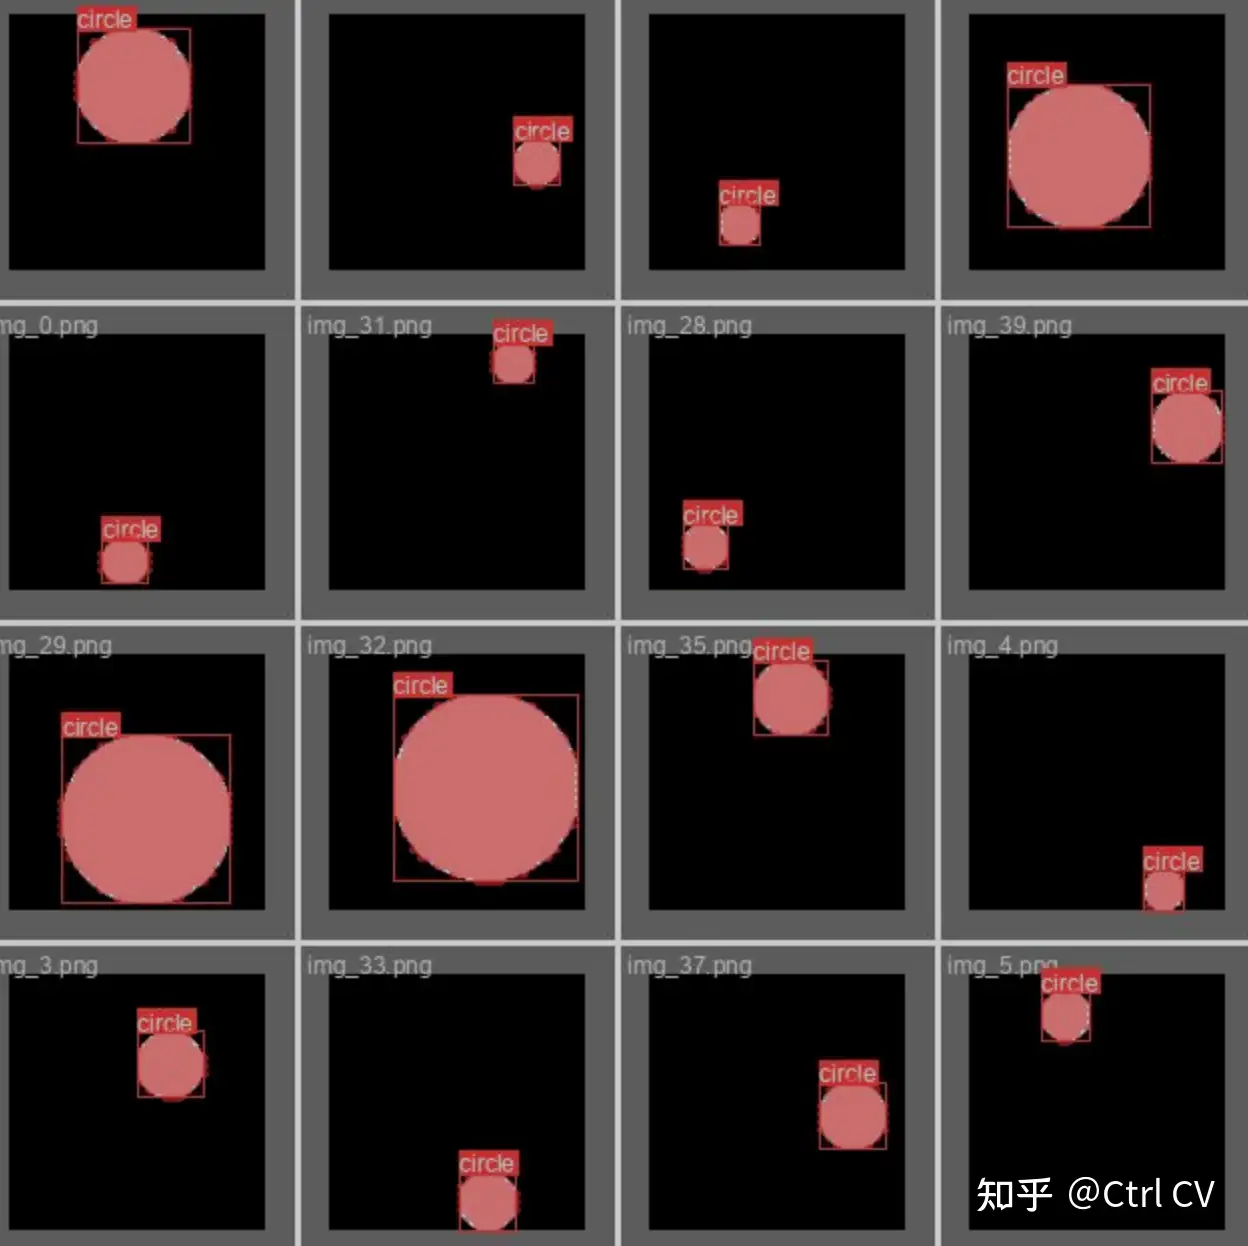
有了图像和标签,我们可以开始训练模型
pip install ultralytics==8.0.38开始训练:
from ultralytics import YOLO

model = YOLO("yolov8n-seg.pt")

results = model.train(
        batch=8,
        device="cpu",
        data="data.yaml",
        epochs=7,
        imgsz=120,
    )

魔乐社区(Modelers.cn) 是一个中立、公益的人工智能社区,提供人工智能工具、模型、数据的托管、展示与应用协同服务,为人工智能开发及爱好者搭建开放的学习交流平台。社区通过理事会方式运作,由全产业链共同建设、共同运营、共同享有,推动国产AI生态繁荣发展。
更多推荐
 10
10 0
0- 0


 已为社区贡献12条内容

所有评论(0)