mmsegmentation: 安装并使用自定义数据集进行训练
本文从实际的案例出发,介绍了如何在mmsegmentation使用自定义数据集和添加自定义模块,并介绍了安装过程的一些坑;供大家学习交流。

MMSegmentation 是一个基于 PyTorch 的语义分割开源工具箱。它是 OpenMMLab 项目的一部分。
主分支代码目前支持 PyTorch 1.5 以上的版本。
目录
1. 环境配置
官网提供了极简的安装流程(详见:https://github.com/open-mmlab/mmsegmentation/blob/master/docs/zh_cn/get_started.md#installation),不过亲测会有些问题,下面简单说一下。
首先,conda的安装以及python的安装没啥问题:
conda create --name openmmlab python=3.8 -y
conda activate openmmlab
然后,需要安装torch,这里直接使用官方提供的安装方式,会默认安装最新版torch(2024.06安装时,torch已经是2.3了) ,实测选择1.13版本的可以正常使用,安装方式为(各种版本的torch安装见:Previous PyTorch Versions | PyTorch):
pip install torch==1.13.1+cu117 torchvision==0.14.1+cu117 torchaudio==0.13.1 --extra-index-url https://download.pytorch.org/whl/cu117使用上面的方式安装时,如果过慢,可以从控制台上打印的链接手动下载,然后再使用离线安装方式。
接着就可以按照官方的流程安装了。
安装后,如果报mmcv版本不匹配的问题,形如:'MMCV==X.X.X is used but incompatible. Please install mmcv>=2.0.0rc4.' 则需要重新安装mmcv:
mim install "mmcv==2.0.0rc4"注意:安装这个版本的mmcv时,会遇到和torch2.x不兼容的情况,这也是为什么上面我们先安装一个低版本的torch。
最后,贴出我的基础环境,供大家参考(使用命令:python mmseg/utils/collect_env.py):
sys.platform: linux
Python: 3.8.0 (default, Nov  6 2019, 21:49:08) [GCC 7.3.0]
CUDA available: True
MUSA available: False
numpy_random_seed: 2147483648
GPU 0: NVIDIA GeForce RTX 3070 Ti
CUDA_HOME: :/usr/local/cuda
GCC: gcc (Ubuntu 11.4.0-1ubuntu1~22.04) 11.4.0
PyTorch: 1.13.1+cu117
PyTorch compiling details: PyTorch built with:
  - GCC 9.3
  - C++ Version: 201402
  - Intel(R) oneAPI Math Kernel Library Version 2021.4-Product Build 20210904 for Intel(R) 64 architecture applications
  - Intel(R) MKL-DNN v2.6.0 (Git Hash 52b5f107dd9cf10910aaa19cb47f3abf9b349815)
  - OpenMP 201511 (a.k.a. OpenMP 4.5)
  - LAPACK is enabled (usually provided by MKL)
  - NNPACK is enabled
  - CPU capability usage: AVX2
  - CUDA Runtime 11.7
  - NVCC architecture flags: -gencode;arch=compute_37,code=sm_37;-gencode;arch=compute_50,code=sm_50;-gencode;arch=compute_60,code=sm_60;-gencode;arch=compute_70,code=sm_70;-gencode;arch=compute_75,code=sm_75;-gencode;arch=compute_80,code=sm_80;-gencode;arch=compute_86,code=sm_86
  - CuDNN 8.9.7  (built against CUDA 11.8)
    - Built with CuDNN 8.5
  - Magma 2.6.1
  - Build settings: BLAS_INFO=mkl, BUILD_TYPE=Release, CUDA_VERSION=11.7, CUDNN_VERSION=8.5.0, CXX_COMPILER=/opt/rh/devtoolset-9/root/usr/bin/c++, CXX_FLAGS= -fabi-version=11 -Wno-deprecated -fvisibility-inlines-hidden -DUSE_PTHREADPOOL -fopenmp -DNDEBUG -DUSE_KINETO -DUSE_FBGEMM -DUSE_QNNPACK -DUSE_PYTORCH_QNNPACK -DUSE_XNNPACK -DSYMBOLICATE_MOBILE_DEBUG_HANDLE -DEDGE_PROFILER_USE_KINETO -O2 -fPIC -Wno-narrowing -Wall -Wextra -Werror=return-type -Werror=non-virtual-dtor -Wno-missing-field-initializers -Wno-type-limits -Wno-array-bounds -Wno-unknown-pragmas -Wunused-local-typedefs -Wno-unused-parameter -Wno-unused-function -Wno-unused-result -Wno-strict-overflow -Wno-strict-aliasing -Wno-error=deprecated-declarations -Wno-stringop-overflow -Wno-psabi -Wno-error=pedantic -Wno-error=redundant-decls -Wno-error=old-style-cast -fdiagnostics-color=always -faligned-new -Wno-unused-but-set-variable -Wno-maybe-uninitialized -fno-math-errno -fno-trapping-math -Werror=format -Werror=cast-function-type -Wno-stringop-overflow, LAPACK_INFO=mkl, PERF_WITH_AVX=1, PERF_WITH_AVX2=1, PERF_WITH_AVX512=1, TORCH_VERSION=1.13.1, USE_CUDA=ON, USE_CUDNN=ON, USE_EXCEPTION_PTR=1, USE_GFLAGS=OFF, USE_GLOG=OFF, USE_MKL=ON, USE_MKLDNN=ON, USE_MPI=OFF, USE_NCCL=ON, USE_NNPACK=ON, USE_OPENMP=ON, USE_ROCM=OFF,

TorchVision: 0.14.1+cu117
OpenCV: 4.10.0
MMEngine: 0.10.4
MMSegmentation: 1.2.2+b040e14
2. 数据准备
关于数据集如何标注制作,可以参考我之前的博客:手把手实战教学!语义分割从0到1:一、数据集制作_语义分割教程-CSDN博客。
现在,默认你已经有了自己的数据集,我们直接开始讲解如何在mmsegmentation使用。
由于我们是使用自定义数据集的方式来使用我们的数据,而非使用已有的一些格式(coco, voc等),因此我们先将自己的数据整理成指定目录结构,我这里采用了官方示例的结构:
        ├── data
        │   ├── my_dataset
        │   │   ├── img_dir
        │   │   │   ├── train
        │   │   │   │   ├── xxx{img_suffix}
        │   │   │   │   ├── yyy{img_suffix}
        │   │   │   │   ├── zzz{img_suffix}
        │   │   │   ├── val
        │   │   ├── ann_dir
        │   │   │   ├── train
        │   │   │   │   ├── xxx{seg_map_suffix}
        │   │   │   │   ├── yyy{seg_map_suffix}
        │   │   │   │   ├── zzz{seg_map_suffix}
        │   │   │   ├── val
然后,在mmsegmentation的根目录下新建一个文件夹,我这里命名为data,再将数据集软链接到data下;当然,你也可以使用其他名称,或者不软链接过来,都可以,只要最后在定义数据集的config时指定你自己的路径即可。
3. 添加自定义内容
3.1. 数据集定义
在mmsegmentation/mmseg/datasets中,新增一个文件(我这里定义了一个crack的数据集,命名为“crack.py”),在里面定义你的数据集的信息,比如METAINFO里面定义类别和颜色,img_suffix和seg_map_suffix定义图片和标注的后缀:
# Copyright (c) OpenMMLab. All rights reserved.
import os.path as osp
from abc import ABC
import mmengine.fileio as fileio

from mmseg.registry import DATASETS
from .basesegdataset import BaseSegDataset


@DATASETS.register_module()
class CRACKDataset(BaseSegDataset):
    """My Crack dataset.

    Args:
        split (str): Split txt file
    """

    METAINFO = dict(
        classes=('background', 'crack'),
        palette=[[0, 0, 0], [128, 0, 0]]
    )

    def __init__(self, **kwargs):
        super(CRACKDataset, self).__init__(
            img_suffix='.jpg', seg_map_suffix='.png', **kwargs)
        # assert osp.exists(self.img_dir)
        assert fileio.exists(self.data_prefix['img_path'], self.backend_args)
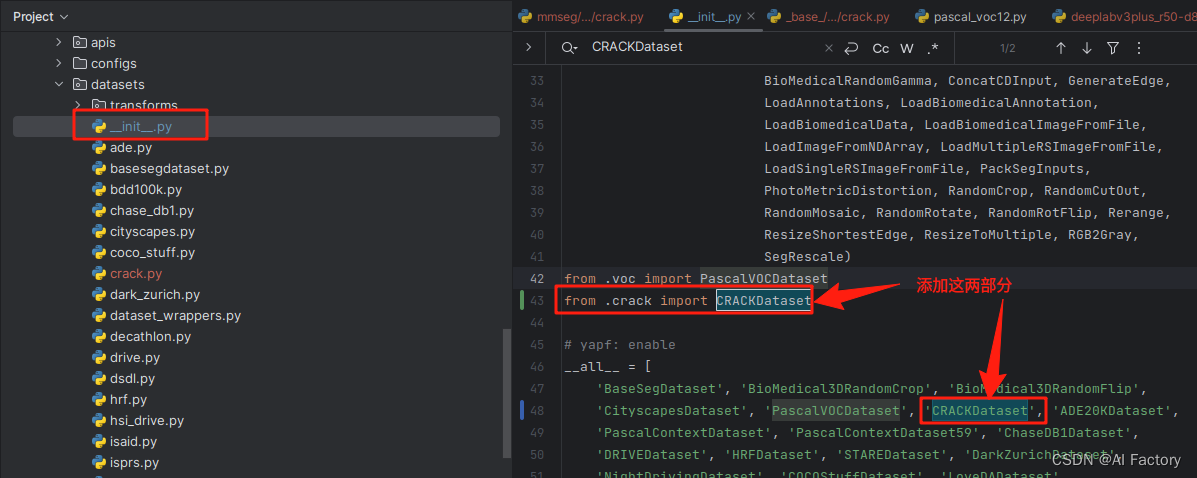
然后,需要在mmsegmentation/mmseg/datasets/__init__.py中将数据的信息添加进去:
3.2. 添加base dataset 配置
在mmsegmentation/configs/_base_/datasets中,添加一个文件,命名为crack.py(注意,这里的命名不一定和上面数据集的定义一样,可以用不同的名称),里面定义数据集的一些基本信息,以及训练验证的pipeline,还有dataloader等:
# dataset settings
dataset_type = 'CRACKDataset'
data_root = 'data/crack_mmseg'
img_norm_cfg = dict(
    mean=[124.9359, 129.4836, 130.7541], std=[25.1936, 25.0194, 25.0923], to_rgb=True)
crop_size = (256, 256)
img_scale = (256, 256)

train_pipeline = [
    dict(type='LoadImageFromFile'),
    dict(type='LoadAnnotations'),
    dict(
        type='RandomResize',
        scale=img_scale,
        ratio_range=(0.5, 2.0),
        keep_ratio=True),
    dict(type='RandomCrop', crop_size=crop_size, cat_max_ratio=0.75),
    dict(type='RandomFlip', prob=0.5),
    dict(type='PhotoMetricDistortion'),
    dict(type='PackSegInputs')
]
test_pipeline = [
    dict(type='LoadImageFromFile'),
    dict(type='Resize', scale=(1024, 256), keep_ratio=True),
    # dict(type='Resize', scale=img_scale, keep_ratio=True),
    # add loading annotation after ``Resize`` because ground truth
    # does not need to do resize data transform
    dict(type='LoadAnnotations'),
    dict(type='PackSegInputs')
]
train_dataloader = dict(
    batch_size=4,
    num_workers=4,
    persistent_workers=True,
    sampler=dict(type='InfiniteSampler', shuffle=True),
    dataset=dict(
        type=dataset_type,
        data_root=data_root,
        data_prefix=dict(
            img_path='img_dir/train',
            seg_map_path='ann_dir/train'),
        pipeline=train_pipeline))
val_dataloader = dict(
    batch_size=1,
    num_workers=4,
    persistent_workers=True,
    sampler=dict(type='DefaultSampler', shuffle=False),
    dataset=dict(
        type=dataset_type,
        data_root=data_root,
        data_prefix=dict(
            img_path='img_dir/val',
            seg_map_path='ann_dir/val'),
        pipeline=test_pipeline))
test_dataloader = val_dataloader

val_evaluator = dict(type='IoUMetric', iou_metrics=['mIoU'])
test_evaluator = val_evaluator
上面的dataset_type指定了数据集的定义名称,data_root指定了数据集的根目录。
3.3. 添加模型配置
进入你想要使用的模型目录,比如我这里训练一个deeplabv3+,就需要进入:mmsegmentation/configs/deeplabv3plus,在里面添加一个配置文件deeplabv3plus_r50-d8_1x32_256x256_20k_crack.py(命名规则见官方文档命名规则的说明):
_base_ = [
    '../_base_/models/deeplabv3plus_r50-d8.py',
    '../_base_/datasets/crack.py', '../_base_/default_runtime.py',
    '../_base_/schedules/schedule_20k.py'
]
crop_size = (256, 256)
data_preprocessor = dict(size=crop_size)

model = dict(
    decode_head=dict(num_classes=2), auxiliary_head=dict(num_classes=2),
    data_preprocessor=data_preprocessor,
)

data = dict(
    samples_per_gpu=4,
    workers_per_gpu=1,
)
4. 训练
数据和配置都准备OK之后,就可以开始训练了(注意:需要将后面的congfig替换为你自己的训练配置文件):
python tools/train.py configs/deeplabv3plus/deeplabv3plus_r50-d8_1x32_256x256_20k_crack.py在控制台就可以看到正常的训练过程了:

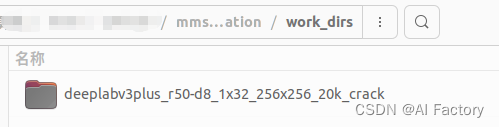
在mmsegmentation/work_dirs中也能看到训练的结果:
参考:
https://github.com/open-mmlab/mmsegmentation/tree/master
Welcome to MMSegmentation’s documentation! — MMSegmentation 1.2.2 documentation

魔乐社区(Modelers.cn) 是一个中立、公益的人工智能社区,提供人工智能工具、模型、数据的托管、展示与应用协同服务,为人工智能开发及爱好者搭建开放的学习交流平台。社区通过理事会方式运作,由全产业链共同建设、共同运营、共同享有,推动国产AI生态繁荣发展。
更多推荐


 25
25 0
0- 0


 已为社区贡献23条内容

所有评论(0)