ubuntu22.04新装系统开启root账户登录,设置静态IP
#仅作学习记录,树莓派3B安装ubuntu 22.04server下操作。
一、开启root账户
1.新安装的ubuntu server 22.04,开机登录,账户名:ubuntu,密码:ubuntu。
2.登录后提升权限:
sudo su3.设定root账户密码:
sudo passwd root输入您的密码,两次。
4.启用已被停止的账户root,无论他停不停用,都执行一下:
sudo passwd -u root5.修改ssh登录配置文件sshd_config,不然无法开启ssh用root登录:
vi /etc/ssh/sshd_config先按下 i 进入编辑插入模式,在#PermitRootLogin prohibit-password下插入:PermitRootLogin yes

然后,按 Esc 退出编辑,再输入 :wq 保存并退出文件(或者按shift+z+z保存退出)。
6.重启ubuntu
cd
reboot
7.开机输入root和密码即可。
二、设置静态网络
1.输入ip a,查看系统网卡
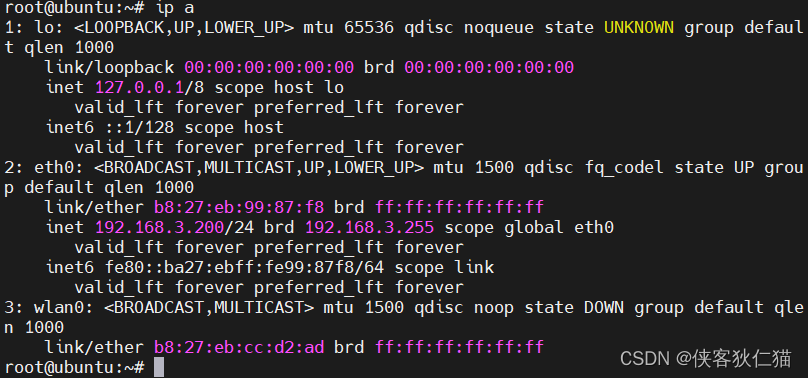
其中eth0为我的有线网卡标识,wlan0为我的无线网卡标识,请记住。
2.打开netplan文件夹,备份文件,方便有问题处理;
sudo cp /etc/netplan/50-cloud-init.yaml /etc/netplan/50-cloud-init.yaml.bak3.打开网络配置文件,etc/netplan/xxx.yaml结尾的文件:
cd /etc/netplan
vi 50-cloud-init.yaml
修改如下:
# This file is generated from information provided by the datasource.  Changes
# to it will not persist across an instance reboot.  To disable cloud-init's
# network configuration capabilities, write a file
# /etc/cloud/cloud.cfg.d/99-disable-network-config.cfg with the following:
# network: {config: disabled}
network:
  ethernets:
    eth0:
      dhcp4: false
      addresses: [192.168.3.200/24]
      routes:
       - to: default
         via: 192.168.3.1
      nameservers:
       addresses: [192.168.3.1, 114.114.114.114]
  version: 2
其中,192.168.3.200为我的系统静态ip, 24表示子网掩码255.255.255.0,其他请自行百度,192.168.3.1为我的网关。DNS默认这个可以用。然后保存。注意,gateway4在ubuntu18.04使用正常,在这个系统会报错,所以,我现在用routes。报错如下:
`gateway4` has been deprecated, use default routes instead...
ubuntu18.04 配置文件如下:
network:
    wifis:
        wlan0:
            dhcp4: false
            access-points:
              "无线网名称":
                password: "无线网密码"
            addresses: [192.168.1.190/24]
            gateway4: 192.168.1.1
            nameservers:
             addresses: [192.168.1.1, 114.114.114.114]
    ethernets:
        eth0:
            dhcp4: false
            addresses: [192.168.10.40/24]
    version: 2
请注意,以上文本配置,有着严格的层级要求,只能以英文空格对齐,否则会报错:
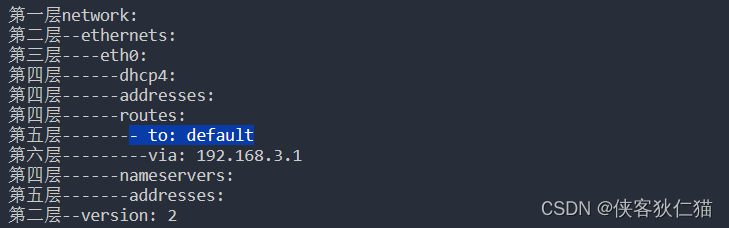
4.接下来,最重要的一步,非常重要!!执行以下命令:
sudo netplan apply如果不报错,重启系统,等待一会即可使用静态IP。
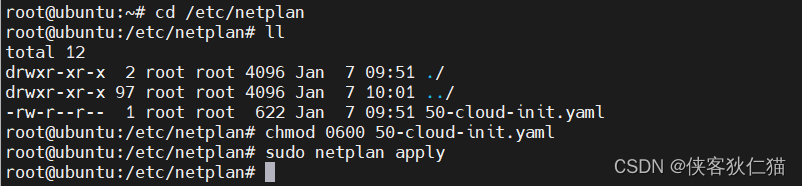
5.如果运行4的指令时,出现以下错误:
Permissions for /etc/netplan/05-cloud-init.yaml are too open. Netplan configuration should NOT be accessible by others.
如果你只能ssh登录,这个时候千万不要重新启动。此时需要修改文件权限,解决方式如下:
升级权限到root,
cd /etc/netplan
sudo su
先查看文件权限:
ll
然后,修改此文件的权限,
chmod 0600 50-cloud-init.yaml 之后再运行sudo netplan apply即可。
三、无线网配置静态ip
1.和有线网卡配置一样,打开网络配置文件,etc/netplan/xxx.yaml结尾的文件,增加wlan配置部分。
# This file is generated from information provided by the datasource.  Changes
# to it will not persist across an instance reboot.  To disable cloud-init's
# network configuration capabilities, write a file
# /etc/cloud/cloud.cfg.d/99-disable-network-config.cfg with the following:
# network: {config: disabled}
network:
  ethernets:
    eth0:
      dhcp4: false
      addresses: [192.168.3.200/24]
      routes:
       - to: default
         via: 192.168.3.1
         metric: 100
      nameservers:
       addresses: [192.168.3.1, 114.114.114.114]
    wifis:
      wlan0:
      dhcp4: false
      access-points:
        "无线网账户":
          password: "无线网密码"
      addresses: [192.168.3.160/24]
      routes:
       - to: default
         via: 192.168.3.1
         metric: 110
      nameservers:
       addresses: [192.168.3.1, 114.114.114.114]
  version: 2
其中,192.168.3.160为我的系统无线网卡静态ip,192.168.3.1为我的网关。nameservers是DNS,前面是我个人的,后面114是通用。然后保存。
2.再啰嗦一遍。接下来,最重要的一步,非常重要!!执行以下命令:
sudo netplan apply如果不报错,重启系统,等待一会即可使用静态IP。
最后再说明一下,我的设备是树莓派3B,所以会有两个网卡。所安装的系统为ubuntu22.04 server 版本。

魔乐社区(Modelers.cn) 是一个中立、公益的人工智能社区,提供人工智能工具、模型、数据的托管、展示与应用协同服务,为人工智能开发及爱好者搭建开放的学习交流平台。社区通过理事会方式运作,由全产业链共同建设、共同运营、共同享有,推动国产AI生态繁荣发展。
更多推荐


 55
55 0
0- 0


 已为社区贡献1条内容

所有评论(0)