CIFAR-10数据集查看与下载原图
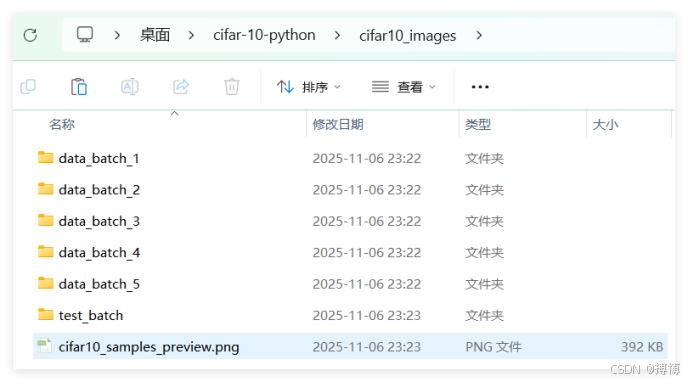
将代码保存为Python文件(如extract_cifar10.py),确保CIFAR-10数据集路径正确,CMD运行脚本,所有图像将自动保存到执行文件所在目录的cifar10_images文件夹中。注意:CIFAR-10的图像数据是3072维的向量,前1024维是红色通道,中间1024是绿色,最后1024是蓝色。同时,当前仅可以看到一张图像,假如我们需要所有的图像,则需要其他操作。新建一个pyt
CIFAR-10数据集查看与下载原图
一、CIFAR-10数据集介绍
CIFAR-10数据集下载解压出来里面是5个训练批次文件、1个测试批次文件、1个类别名称文件batches.meta,每个批次文件都是用pickle序列化的二进制文件。解压后的目录如下:

有关CIFAR-10数据集的详细说明以及官方下载,可以看我写的CSDN博客:https://blog.csdn.net/lzm12278828/article/details/148817721
数据集的效果如下:
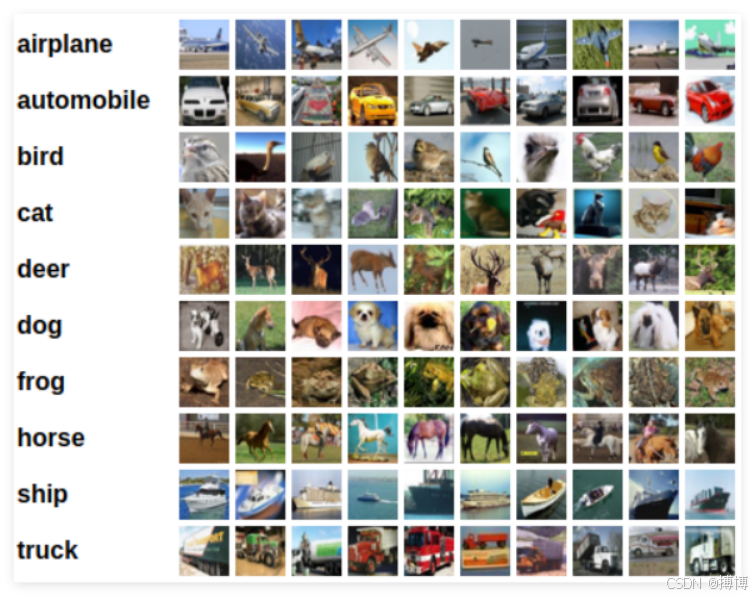
二、CIFAR-10数据集图像查看
其实,我们是不能直接看到如上图的图片效果的,即不可以直接展示出来。数据集中里面的图像到底是怎样的?这时就需用Python解析才能获取图像数据和标签,下面给出查看图像的代码:
import pickle
import matplotlib.pyplot as plt
import numpy as np

# 1. 定义数据集路径
data_path = ""C:/Users/lzm07/Desktop/cifar-10-python/data_batch_1"

# 2. 解析pickle文件
with open(data_path, 'rb') as f:
    # 注意:为python3与python2解析pickle的兼容性需指定encoding='bytes'
    data_dict = pickle.load(f, encoding='bytes')

# 3. 提取关键数据
images = data_dict[b'data']  # 图像数据
labels = data_dict[b'labels']  # 标签数据
label_names = pickle.load(open(""C:/Users/lzm07/Desktop/cifar-10-python/batches.meta", 'rb'), encoding='bytes')[b'label_names']  # 类别名称

# 4. 处理单张图像
image_index = 99  # 范围:0-9999(每个批次10000张图)
single_image = images[image_index]

# 5. 重塑像素格式:从(3072,)转为(3, 32, 32),再转成(32, 32, 3)(matplotlib要求的HWC格式)
single_image = single_image.reshape(3, 32, 32).transpose(1, 2, 0)

# 6. 显示图像
plt.figure(figsize=(2, 2))  # 设置图像大小
plt.imshow(single_image)  # 显示图像
plt.title(label_names[labels[image_index]].decode('utf-8'))  # 显示类别名称
plt.axis('off')  # 隐藏坐标轴
plt.show()
新建一个python代码文件,将以上代码放在前面的解压目录里,通过CMD进入目录,再执行python文件,即可看到图像。
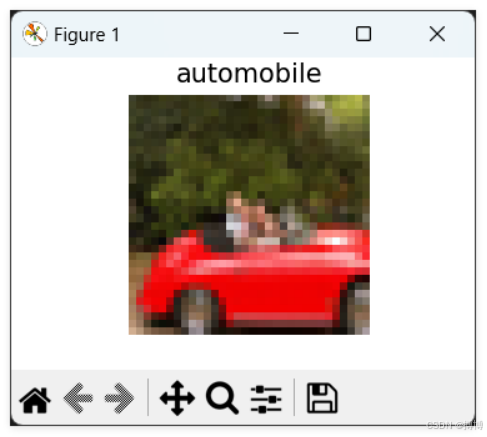
里面的每一张图像都是32*32大小,所以是很模糊的。同时,当前仅可以看到一张图像,假如我们需要所有的图像,则需要其他操作。
三、CIFAR-10数据集解析保存
我们将从CIFAR-10读取所有图像,并将它们保存到当前执行的python代码文件路径所在的同一个文件夹中。当然,如果想直接下载原始图片集,我在CSDN上也放有资源包:https://download.csdn.net/download/lzm12278828/92260040
以下是CIFAR-10数据集解析保存的详细步骤:
1.解析步骤
(1)解析pickle文件,获取图像数据和标签。
(2)创建保存图像的文件夹(如果不存在)。
(3)遍历每一张图像,将其从原始格式转换为图像格式(RGB),并保存为图片文件。
(4)可以使用PIL库来保存图像,也可以使用matplotlib,但这里我们使用PIL因为更轻量。
注意:CIFAR-10的图像数据是3072维的向量,前1024维是红色通道,中间1024是绿色,最后1024是蓝色。形状为(3,32,32),需要转置为(32,32,3)以便用PIL保存。
我们将按照标签名称创建子文件夹,以便按类别保存。
实现以上功能的Python代码如下:
import pickle
import matplotlib.pyplot as plt
import numpy as np
import os
from PIL import Image

def save_cifar10_images(data_path, output_dir, batch_file):
    """
    读取CIFAR-10批次文件并保存所有图像

    参数:
        data_path: CIFAR-10数据文件路径
        output_dir: 输出目录
        batch_file: 批次文件名(用于创建子文件夹)
    """
    # 创建输出目录
    batch_output_dir = os.path.join(output_dir, batch_file.replace('.', '_'))
    os.makedirs(batch_output_dir, exist_ok=True)

    # 解析pickle文件
    with open(data_path, 'rb') as f:
        data_dict = pickle.load(f, encoding='bytes')

    # 提取关键数据
    images = data_dict[b'data']  # 图像数据
    labels = data_dict[b'labels']  # 标签数据
    label_names = pickle.load(
        open("C:/Users/lzm07/Desktop/cifar-10-python/batches.meta", 'rb'),
        encoding='bytes'
    )[b'label_names']  # 类别名称

    # 解码标签名称
    decoded_label_names = [name.decode('utf-8') for name in label_names]

    # 为每个类别创建子文件夹
    for label_name in decoded_label_names:
        label_dir = os.path.join(batch_output_dir, label_name)
        os.makedirs(label_dir, exist_ok=True)

    print(f"正在处理批次: {batch_file}")
    print(f"总图像数量: {len(images)}")

    # 处理并保存所有图像
    saved_count = 0
    for i in range(len(images)):
        # 获取单张图像
        single_image = images[i]
        label = labels[i]
        label_name = decoded_label_names[label]

        try:
            # 重塑像素格式:从(3072,)转为(3, 32, 32),再转成(32, 32, 3)
            image_array = single_image.reshape(3, 32, 32).transpose(1, 2, 0)

            # 转换为PIL图像
            pil_image = Image.fromarray(image_array)

            # 生成文件名
            filename = f"{label_name}_{i:05d}.png"
            filepath = os.path.join(batch_output_dir, label_name, filename)

            # 保存图像
            pil_image.save(filepath)
            saved_count += 1

            # 每1000张显示进度
            if (i + 1) % 1000 == 0:
                print(f"已处理 {i + 1}/{len(images)} 张图像")

        except Exception as e:
            print(f"处理第 {i} 张图像时出错: {e}")

    print(f"批次 {batch_file} 处理完成,成功保存 {saved_count}/{len(images)} 张图像")
    return saved_count

def process_all_cifar10_batches(base_path, output_dir):
    """
    处理所有CIFAR-10批次文件

    参数:
        base_path: CIFAR-10数据集基础路径
        output_dir: 输出目录
    """
    # 批次文件列表
    batch_files = [
        "data_batch_1",
        "data_batch_2",
        "data_batch_3",
        "data_batch_4",
        "data_batch_5",
        "test_batch"
    ]

    total_saved = 0

    # 处理每个批次
    for batch_file in batch_files:
        batch_path = os.path.join(base_path, batch_file)

        if os.path.exists(batch_path):
            saved_count = save_cifar10_images(batch_path, output_dir, batch_file)
            total_saved += saved_count
        else:
            print(f"警告: 文件 {batch_path} 不存在,跳过")

    print(f"\n所有批次处理完成!")
    print(f"总共保存了 {total_saved} 张图像到目录: {output_dir}")

    return total_saved

def create_sample_preview(output_dir, num_samples=10):
    """
    创建样本预览图

    参数:
        output_dir: 输出目录
        num_samples: 每个类别显示的样本数量
    """
    # 获取所有类别
    batch_dirs = [d for d in os.listdir(output_dir) if os.path.isdir(os.path.join(output_dir, d))]

    if not batch_dirs:
        print("未找到任何批次目录")
        return

    # 使用第一个批次目录来获取类别
    first_batch_dir = os.path.join(output_dir, batch_dirs[0])
    label_dirs = [d for d in os.listdir(first_batch_dir) if os.path.isdir(os.path.join(first_batch_dir, d))]

    # 创建预览图
    fig, axes = plt.subplots(len(label_dirs), num_samples, figsize=(15, 12))

    for i, label in enumerate(label_dirs):
        # 在每个批次中查找图像
        label_images = []
        for batch_dir in batch_dirs:
            label_path = os.path.join(output_dir, batch_dir, label)
            if os.path.exists(label_path):
                images = [f for f in os.listdir(label_path) if f.endswith('.png')]
                for img_file in images[:num_samples]:
                    if len(label_images) < num_samples:
                        img_path = os.path.join(label_path, img_file)
                        label_images.append(img_path)

        # 显示图像
        for j, img_path in enumerate(label_images[:num_samples]):
            if j < num_samples:
                img = Image.open(img_path)
                if len(label_dirs) > 1:
                    axes[i, j].imshow(img)
                    axes[i, j].axis('off')
                    if j == 0:
                        axes[i, j].set_ylabel(label, rotation=0, ha='right')
                else:
                    axes[j].imshow(img)
                    axes[j].axis('off')
                    if j == 0:
                        axes[j].set_ylabel(label, rotation=0, ha='right')

    plt.tight_layout()
    plt.savefig(os.path.join(output_dir, 'cifar10_samples_preview.png'), dpi=150, bbox_inches='tight')
    plt.show()

def main():
    """
    主函数
    """
    # 1. 定义数据集路径和输出目录
    base_data_path = "C:/Users/lzm07/Desktop/cifar-10-python"

    # 获取当前执行文件所在目录
    current_dir = os.path.dirname(os.path.abspath(__file__))
    output_directory = os.path.join(current_dir, "cifar10_images")

    print(f"数据集路径: {base_data_path}")
    print(f"输出目录: {output_directory}")

    # 2. 检查数据文件是否存在
    if not os.path.exists(base_data_path):
        print(f"错误: 数据路径 {base_data_path} 不存在!")
        return

    # 3. 处理所有批次
    total_saved = process_all_cifar10_batches(base_data_path, output_directory)

    # 4. 创建样本预览
    if total_saved > 0:
        print("\n正在创建样本预览图...")
        create_sample_preview(output_directory)

    # 5. 显示统计信息
    print("\n" + "="*50)
    print("处理完成统计:")
    print("="*50)

    if os.path.exists(output_directory):
        total_files = 0
        for root, dirs, files in os.walk(output_directory):
            png_files = [f for f in files if f.endswith('.png')]
            total_files += len(png_files)
            if png_files:
                rel_path = os.path.relpath(root, output_directory)
                print(f"{rel_path}: {len(png_files)} 张图像")

        print(f"\n总计: {total_files} 张图像")
        print(f"保存位置: {output_directory}")

if __name__ == "__main__":
main()2.代码主要功能
(1)批量处理所有CIFAR-10批次文件:data_batch_1 到 data_batch_5、test_batch。
(2)自动创建目录结构:
cifar10_images/
├── data_batch_1/
│ ├── airplane/
│ ├── automobile/
│ ├── bird/
│ └── ...
├── data_batch_2/
│ ├── airplane/
│ ├── automobile/
│ └── ...
└── ...
(3)按类别保存图像:10个类别分别建立子文件夹,文件名格式:类别名_序号.png
(4)进度显示和错误处理:每处理1000张图像显示进度,捕获并报告处理错误。
(5)生成预览图:自动创建所有类别的样本预览,保存为cifar10_samples_preview.png
(6)使用方法:将代码保存为Python文件(如extract_cifar10.py),确保CIFAR-10数据集路径正确,CMD运行脚本,所有图像将自动保存到执行文件所在目录的cifar10_images文件夹中。
(7)输出特点:
格式:PNG格式保存,保持原始32×32像素
组织:按批次和类别两级目录组织
命名:清晰的命名规则便于识别
统计:完整的处理统计信息
预览:自动生成样本预览图
这样就能够完整地提取CIFAR-10数据集的所有60,000张图像(50,000训练 + 10,000测试),并按原始结构进行组织保存。

魔乐社区(Modelers.cn) 是一个中立、公益的人工智能社区,提供人工智能工具、模型、数据的托管、展示与应用协同服务,为人工智能开发及爱好者搭建开放的学习交流平台。社区通过理事会方式运作,由全产业链共同建设、共同运营、共同享有,推动国产AI生态繁荣发展。
更多推荐


 9
9 0
0- 0


 已为社区贡献22条内容

所有评论(0)