银河麒麟系统v10安装zabbix(mysql篇)及踩坑排雷总结
安装前准备:本次使用的软件包有:nginx-1.10.2.tar.gzmysql-5.6.26.tar.gzphp-5.6.13.tar.bz2zabbix-3.2.3.tar.gzzabbix-4.0.32.tar.gz(由于测试时想先测试麒麟系统是否可以安装zabbix,故先安装的低版本zabbix3.2.3,若需要直接安装zabbix4,可参照《zabbix3.2升级4.0》进行升级)一、部
安装前准备:
本次使用的软件包有:
nginx-1.10.2.tar.gz
mysql-5.6.26.tar.gz
php-5.6.13.tar.bz2
zabbix-3.2.3.tar.gz
zabbix-4.0.32.tar.gz
(由于测试时想先测试麒麟系统是否可以安装zabbix,故先安装的低版本zabbix3.2.3,若需要直接安装zabbix4,可参照《zabbix3.2升级4.0》进行升级)
一、部署LNMP环境
1.安装nginx
[root@localhost src]# yum install -y gcc gcc-c++ autoconf automake zlib zlib-devel openssl openssl-devel pcre-devel
//zlib:给Nginx提供gzip模块;OPenssl提供SSL功能;PCRE,地址重写
[root@localhost ~]# cd /usr/src/
[root@localhost src]# tar xvf nginx-1.10.2.tar.gz
[root@localhost src]# cd /usr/src/nginx-1.10.2
[root@localhost nginx-1.10.2]# ./configure --prefix=/usr/local/nginx --with-http_dav_module --with-http_stub_status_module --with-http_addition_module --with-http_sub_module --with-http_flv_module --with-http_mp4_module
[root@localhost nginx-1.10.2]# make
注1:可能会有报错make[1]: *** [objs/Makefile:470:objs/src/core/ngx_murmurhash.o] 错误 1
如下图: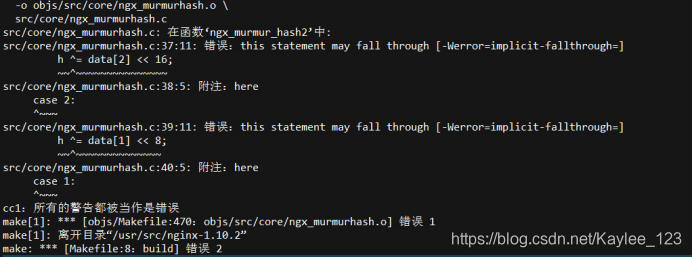
报错原因:
编译过程中将警告作为错误处理,导致编译不通过报错。
解决方法:
[root@localhost nginx-1.10.2] # cd objs/
[root@localhost nginx-1.10.2] # vi Makefile
去掉如图所示参数 “-Werror”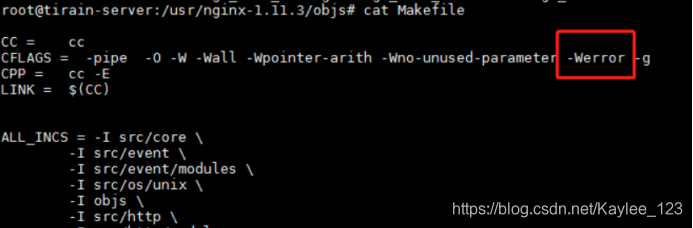
注2:可能会出现报错:make[1]: *** [objs/Makefile:771:objs/src/os/unix/ngx_user.o] 错误 1
如下图所示报错: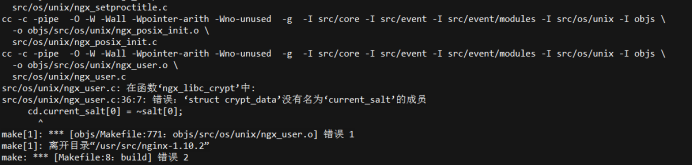
解决方法:
[root@localhost nginx-1.10.2]# cd src/os/unix/
[root@localhost unix]# vi ngx_user.c
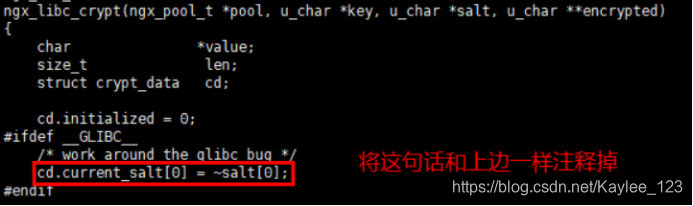
将 “cd.current_salt[0] = -salt[0];” 注释掉
注释方法为 “/* cd.current_salt[0] = -salt[0]; */ ”
[root@localhost nginx-1.10.2]# make install
[root@localhost nginx-1.10.2]# cd
[root@localhost ~]# useradd -u 8001 -M -s /sbin/nologin nginx
[root@localhost ~]#vim /usr/local/nginx/conf/nginx.conf
#user nobody;
user root; #此行添加
…… #下面这段内容,需要去掉注释,然后修改script_filename
location ~ \.php$ {
root html;
fastcgi_pass 127.0.0.1:9000;
fastcgi_index index.php;
fastcgi_param SCRIPT_FILENAME /usr/local/nginx/html$fastcgi_script_name;
include fastcgi_params;
}
[root@localhost ~]# /usr/local/nginx/sbin/nginx
[root@localhost ~]# ps -ef | grep nginx
[root@localhost ~]# echo "/usr/local/nginx/sbin/nginx" >> /etc/rc.local
[root@localhost ~]# setenforce 0
[root@localhost ~]# service iptables stop
[root@localhost ~]# chkconfig iptables off
到此安装完毕,可以登录页面看是否成功
如果没有访问到页面可以查看一下防火墙是否正常关闭
[root@localhost ~]# systemctl status firewalld.service
如未关闭,关闭即可.
[root@localhost ~]# systemctl stop firewalld.service
2. 安装mysql
[root@localhost ~]# yum remove -y mysql mysql-devel mysql-server
[root@localhost ~]# cd /usr/src/
[root@localhost src]# tar zxf mysql-5.6.26.tar.gz
[root@localhost src]# cd mysql-5.6.26
[root@localhost mysql-5.6.26]# useradd -u 8003 -M -s /sbin/nologin mysql
[root@localhost mysql-5.6.26]# yum -y install ncurses-devel cmake
[root@localhost mysql-5.6.26]#cmake -DCMAKE_INSTALL_PREFIX=/usr/local/mysql -DMYSQL_UNIX_ADDR=/tmp/mysql.sock -DDEFAULT_CHARSET=utf8 -DDEFAULT_COLLATION=utf8_general_ci -DWITH_EXTRA_CHARSETS=all -DWITH_MYISAM_STORAGE_ENGINE=1 -DWITH_INNOBASE_STORAGE_ENGINE=1 -DWITH_MEMORY_STORAGE_ENGINE=1 -DWITH_READLINE=1 -DENABLED_LOCAL_INFILE=1 -DMYSQL_DATADIR=/usr/local/mysql/data -DMYSQL_USER=mysql
[root@localhost mysql-5.6.26]# make
注3:可能有报错:make[2]: *** [sql/CMakeFiles/sql.dir/build.make:910:sql/CMakeFiles/sql.dir/sql_acl.cc.o] 错误 1
make[1]: *** [CMakeFiles/Makefile2:5668:sql/CMakeFiles/sql.dir/all] 错误 2
如下图报错: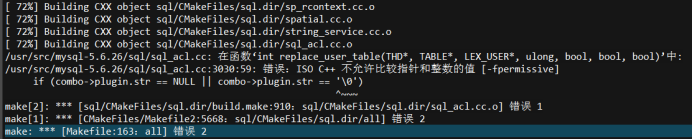
解决方法:
[root@localhost mysql-5.6.26]# cd sql
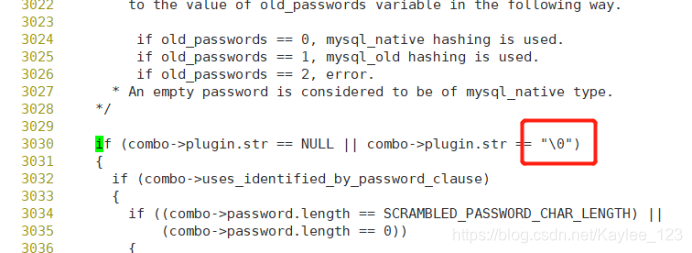
[root@localhost mysql-5.6.26]# vi sql_acl.cc
找到3030行,修改 ’\0’ 为 “\0”
[root@localhost mysql-5.6.26] # make install
[root@localhost mysql-5.6.26]# chown -R mysql:mysql /usr/local/mysql/
[root@localhost mysql-5.6.26]# cp /usr/local/mysql/support-files/my-default.cnf /etc/my.cnf
[root@localhost mysql-5.6.26]# cp /usr/local/mysql/support-files/mysql.server /etc/init.d/mysqld
[root@localhost mysql-5.6.26]# cd
[root@localhost ~]# vim /etc/init.d/mysqld
basedir=/usr/local/mysql
datadir=/usr/local/mysql/data
[root@localhost ~]# chkconfig mysqld on
[root@localhost ~]# /usr/local/mysql/scripts/mysql_install_db --defaults-file=/etc/my.cnf --basedir=/usr/local/mysql --datadir=/usr/local/mysql/data --user=mysql
[root@localhost ~]# service mysqld start
[root@localhost ~]# echo "export PATH=$PATH:/usr/local/mysql/bin" >>/etc/profile
[root@localhost ~]#source /etc/profile
3. 安装php
[root@localhost ~]# cd /usr/src/
[root@localhost src]# tar xvf libmcrypt-2.5.8.tar.gz
[root@localhost src]# cd /usr/src/libmcrypt-2.5.8/
[root@localhost libmcrypt-2.5.8]# ./configure --prefix=/usr/local/libmcrypt && make && make install
[root@localhost libmcrypt-2.5.8]# cd /usr/src/
[root@localhost src]# tar jxf php-5.6.13.tar.bz2
[root@localhost src]# cd php-5.6.13
[root@localhost php-5.6.13]# yum install -y php-pear libjpeg-devel libxml2 libxml2-devel curl curl-devel libpng-devel freetype-devel
(yum 没有php-pear,但是安装过程没有明显影响)
[root@localhost php-5.6.13]# echo "/usr/local/mysql/lib/" >> /etc/ld.so.conf
[root@localhost php-5.6.13]# echo "/usr/local/libmcrypt/lib" >> /etc/ld.so.conf
[root@localhost php-5.6.13]# ldconfig
[root@localhost php-5.6.13]# echo "ldconfig" >> /etc/rc.local
[root@localhost php-5.6.13]# ./configure --prefix=/usr/local/php -with-config-file-path=/usr/local/php --with-mysql=/usr/local/mysql --with-mysqli=/usr/local/mysql/bin/mysql_config --with-iconv-dir --with-freetype-dir --with-jpeg-dir --with-png-dir --with-zlib --with-libxml-dir=/usr --enable-xml --disable-rpath --enable-bcmath --enable-shmop --enable-sysvsem --enable-inline-optimization --with-curl --enable-mbregex --enable-fpm --enable-mbstring --with-gd --enable-gd-native-ttf --with-openssl --with-mhash --enable-pcntl --enable-sockets --with-xmlrpc --enable-zip --enable-soap --with-mcrypt=/usr/local/libmcrypt --with-gettext
注4:可能报错:configure: error: Please reinstall the libcurl distribution -
easy.h should be in <curl-dir>/include/curl/
如下图报错: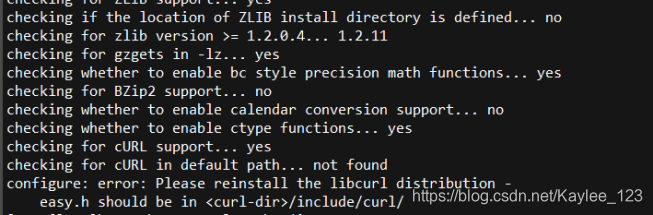
方法:[root@localhost php-5.6.13]# yum -y install curl-devel
注5:可能报错:configure: error: jpeglib.h not found.
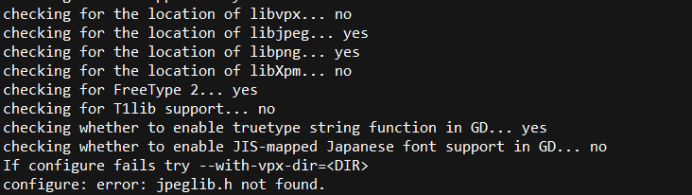
解决方法:
[root@localhost php-5.6.13]# yum install libjpeg libpng freetype libjpeg-devel libpng-devel freetype-devel -y
注6:可能报错:checking for libmcrypt version... configure: error: libmcrypt version 2.5.6 or greater required.
报错原因:libmcrypt版本不对,需要安装2.5.6及以上版本。但我上面已经安装了libmcrypt2.5.8版本了,大概没有安装成功,没有成功识别,重新安装后可以了
解决方法:安装libmcrypt-2.5.8 (安装方法上面已经有了)
注7:可能报错configure: error: Don't know how to define struct flock on this system, set --enable-opcache=no
解决方法:
[root@localhost php-5.6.13]# vi /etc/ld.so.conf
添加一行 “/usr/local/lib64”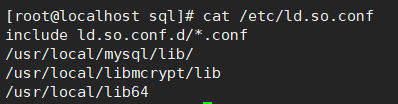
[root@localhost php-5.6.13]# ldconfig
注8:可能报错:make: *** [Makefile:630:ext/openssl/openssl.lo] 错误 1 报错原因:由于当前系统openssl版本过高,与安装的5.6.13不兼容,需要重新安装一个。
解决方法:在这安装的openssl-1.0.2版本(https://www.openssl.org/source/openssl-1.0.2k.tar.gz)
[root@localhost src]# tar -xvf openssl-1.0.2k.tar.gz
[root@localhost src]# cd openssl-1.0.2k
[root@localhost src]# ./config
[root@localhost src]# make && make install
[root@localhost php-5.6.13]# make
[root@localhost php-5.6.13]# make install
[root@localhost php-5.6.13]# cp /usr/src/php-5.6.13/php.ini-production /usr/local/php/php.ini
[root@localhost php-5.6.13]# cp /usr/local/php/etc/php-fpm.conf.default /usr/local/php/etc/php-fpm.conf
[root@localhost php-5.6.13]# cp /usr/src/php-5.6.13/sapi/fpm/init.d.php-fpm /etc/init.d/php-fpm
[root@localhost php-5.6.13]# chmod +x /etc/init.d/php-fpm
[root@localhost php-5.6.13]# cd
[root@localhost ~]# chkconfig --add php-fpm
[root@localhost ~]# chkconfig php-fpm on
[root@localhost ~]# echo "<?php phpinfo(); ?>" > /usr/local/nginx/html/index.php
[root@localhost ~]# service php-fpm start
Starting php-fpm done
就可以访问页面查看: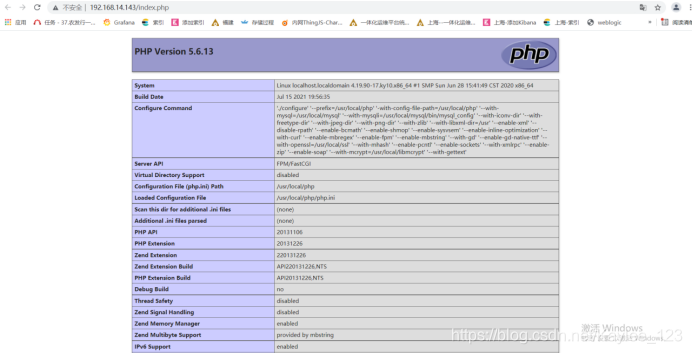
注9:可能访问页面报错 File not found. 查看nginx的error.log能看到访问日志报错为:
2021/07/16 14:35:22 [error] 226434#0: *1 FastCGI sent in stderr: "Primary script unknown" while reading response header from upstream, client: 192.168.14.88, server: localhost, request: "GET /index.php HTTP/1.1", upstream: "fastcgi://127.0.0.1:9000", host: "192.168.14.143"
如下图所示报错:
解决方法:报错显示权限不足,需要给nginx的html目录授权码。(但是我试着不可以,尝试给上一层目录也授权后可以了)
即:我的html目录为 /usr/local/nginx/html
[root@localhost ~]# chmod -R 775 /usr/local/nginx
二、安装zabbix_server
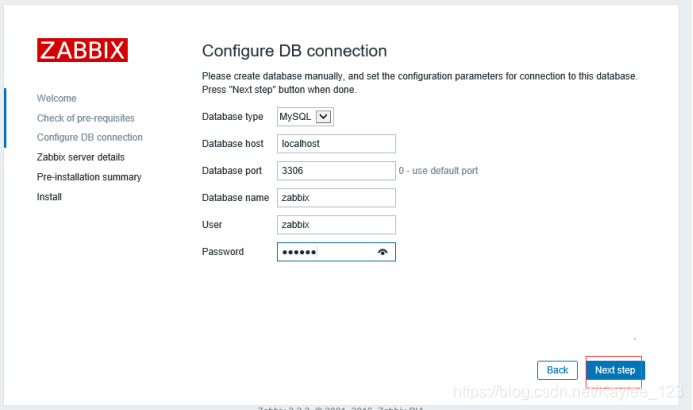
1. 创建Zabbix使用数据库
[root@localhost ~]# mysql
mysql> create database zabbix character set utf8 collate utf8_bin;
mysql> grant all on zabbix.* to zabbix@localhost identified by 'zabbix';
mysql> flush privileges;
mysql> exit
注10.如果登录mysql报错:
ERROR 2002 (HY000): Can't connect to local MySQL server through socket '/var/lib/mysql/mysql.sock'(2)
如下图所示:

报错原因:(1)mysql是否正常启动;(2)socket文件路径是否正常
解决方法: mysql未启动,启动即可。下面主要讲第二种
[root@localhost ~]# vi /etc/my.cnf
添加socket路径,如下图所示: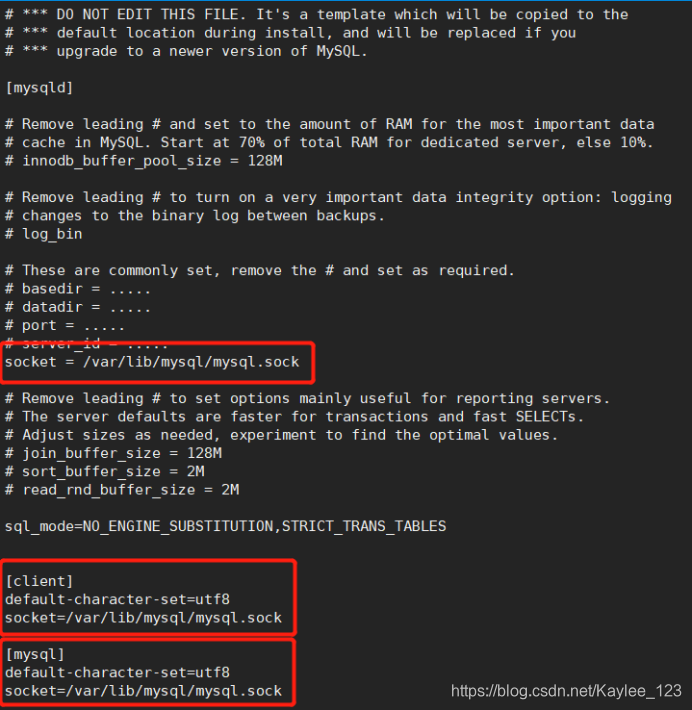
添加完毕重启即可。
[root@localhost ~]# cd /usr/src/
[root@localhost src]# tar xvf zabbix-3.2.3.tar.gz
[root@localhost src]# cd zabbix-3.2.3
[root@localhost zabbix-3.2.3]# mysql -uzabbix -pzabbix zabbix < database/mysql/schema.sql [root@localhost zabbix-3.2.3]# mysql -uzabbix -pzabbix zabbix < database/mysql/images.sql
[root@localhost zabbix-3.2.3]# mysql -uzabbix -pzabbix zabbix < database/mysql/data.sql
2. 编译安装zabbix
[root@localhost zabbix-3.2.3]# yum install -y net-snmp-devel
//net-snmp-config依赖
[root@localhost zabbix-3.2.3]# ntpdate cn.pool.ntp.org //同步系统时间
[root@localhost zabbix-3.2.3] crontab -e
*/5 * * * * /usr/sbin/ntpdate cn.pool.ntp.org
[root@localhost zabbix-3.2.3]# ./configure --prefix=/usr/local/zabbix --enable-server --enable-agent --with-mysql=/usr/local/mysql/bin/mysql_config --with-net-snmp --with-libcurl
[root@localhost zabbix-3.2.3]# make
[root@localhost zabbix-3.2.3]# make install
[root@localhost ~]# ls /usr/local/zabbix/
bin etc lib sbin share
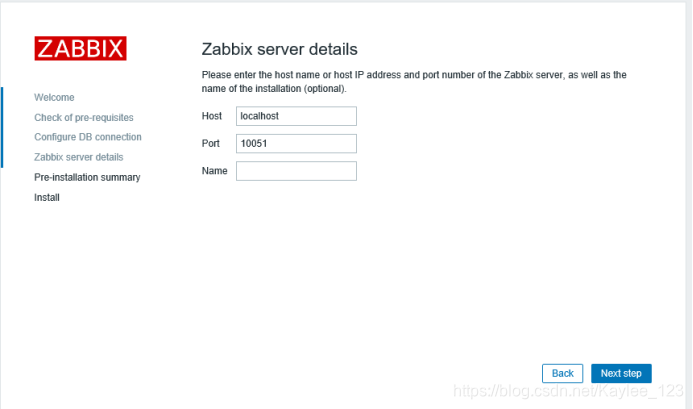
[root@localhost ~]# vim /usr/local/zabbix/etc/zabbix_server.conf
DBHost=localhost #默认注释掉了,直接取消注释即可
DBName=zabbix #数据库名字
DBUser=zabbix #默认是root,我们授权的用户是zabbix
DBPassword=zabbix #密码我们授权的也是zabbix
3. 监控Zabbix Server本身
[root@localhost ~]# vim /usr/local/zabbix/etc/zabbix_agentd.conf
Server=127.0.0.1 #默认监控服务器自己,这三行不用改
ServerActive=127.0.0.1
Hostname=Zabbix server
UnsafeUserParameters=1 #允许所用的字符是用户定义的参数,参数传递,也就是支持自定义脚本
4. 启动服务
[root@localhost ~]# useradd -u 8005 -M -s /sbin/nologin zabbix
//如果zabbix用户不存在,将以root运行,新建之后,如果zabbix存在,那么就直接可以用zabbix运行
[root@localhost ~]# /usr/local/zabbix/sbin/zabbix_server //直接运行
[root@localhost ~]# echo /usr/local/zabbix/sbin/zabbix_server >> /etc/rc.local //开机启动
[root@localhost ~]# netstat -antup | grep zabbix
tcp 0 0 0.0.0.0:10051 0.0.0.0:* LISTEN 94837/zabbix_serverbix_server
注11.这里可能zabbix_server未启动,并查看日志可以看到报错
zabbix_server [12925]: cannot create IPC key for path '/usr/local/zabbix/etc/zabbix_server.conf', try to create for path '.': [13] Permission denied
解决方法:问题显示是权限不够,直接给权限:
[root@localhost ~]# cd /usr/local
[root@localhost local]# chmod -R 755 zabbix/
注12.如果报错为:
13474:20210716:151130.547 [Z3001] connection to database 'zabbix' failed: [2002] Can't connect to local MySQL server through socket '/tmp/mysql.sock' (2)
解决方法:
[root@localhost tmp]# ln -s /var/lib/mysql/mysql.sock /tmp/mysql.sock
注13:如果报错为:
zabbix_server [13578]: Is this process already running? Could not lock PID file [/tmp/zabbix_server.pid]: [11] Resource temporarily unavailable
![]()
解决方法:此报错是zabbix_server.pid文件已经生产了,删除原来的pid文件即可。
[root@localhost tmp]# rm -rf zabbix_server.pid
[root@localhost ~]# vim /etc/services
zabbix-agent 10050/tcp # Zabbix Agent
zabbix-agent 10050/udp # Zabbix Agent
zabbix-trapper 10051/tcp # Zabbix Trapper
zabbix-trapper 10051/udp # Zabbix Trapper
通过启动脚本启动zabbix
Zabbix默认有部分启动脚本,如果你自己也可以通过脚本的方式来实现,可以使用他的模板来实现。脚本在源码目录的misc/init.d/下面(使用fedora下面的core即可,也可以使用fedroa core5的脚本均可)
[root@localhost ~]# cd /usr/src/zabbix-3.2.3/misc/init.d/
[root@localhost init.d]# cp fedora/core/zabbix_server /etc/init.d/
[root@localhost init.d]# cp fedora/core/zabbix_agentd /etc/init.d/
[root@localhost init.d]# vim /etc/init.d/zabbix_server
BASEDIR=/usr/local/zabbix #找到此行,并修改
[root@localhost init.d]# vim /etc/init.d/zabbix_agentd
BASEDIR=/usr/local/zabbix #找到此行,并修改
[root@localhost init.d]# chkconfig --add zabbix_agentd
[root@localhost init.d]# chkconfig zabbix_agentd on
[root@localhost init.d]# chkconfig --add zabbix_server
[root@localhost init.d]# chkconfig zabbix_server on
[root@localhost init.d]# service zabbix_agentd start
[root@localhost init.d]# service zabbix_server restart
(最好用systemctl status zabbix_server.service查看一下状态,如果没有running状态,则systemctl restart zabbix_server.service)
5. 编辑php页面控制文件
默认配置文件没有写入到我们的Nginx的配置文件中,也就是不能加载到我们的zabbix页面目录
[root@localhost init.d]# mkdir -p /tmp/nginxhtml
[root@localhost init.d]# mv /usr/local/nginx/html/* /tmp/nginxhtml/
[root@localhost init.d]# cp -r /usr/src/zabbix-3.2.3/frontends/php/* /usr/local/nginx/html/
将文件复制后,需要给html授权重新授权
[root@localhost local]# cd /usr/local
[root@localhost local]# chmod -R 755 nginx/
[root@localhost init.d]# vim /usr/local/nginx/conf/nginx.conf
location / {
root html;
index index.php index.html index.htm; #找到此行内容,添加index.php
}
重新加载nginx,重启php-fpm
[root@localhost init.d]# /usr/local/nginx/sbin/nginx -s reload ; /etc/init.d/php-fpm restart
Gracefully shutting down php-fpm . done
Starting php-fpm done
[root@zabbix-3-2-3 ~]# ln -s /usr/local/zabbix/etc/ /etc/zabbix
[root@zabbix-3-2-3 ~]# ln -s /usr/local/zabbix/bin/* /usr/bin/
[root@zabbix-3-2-3 ~]# ln -s /usr/local/zabbix/sbin/* /usr/sbin/
打开网页安装zabbix
浏览器输入:http:// 192.168.14.143 如图,下一步Next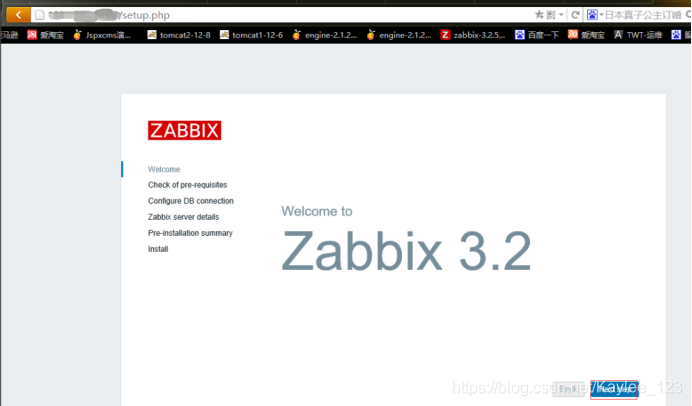
 [root@localhost init.d]# vim /usr/local/php/php.ini
post_max_size = 16M
max_execution_time = 300
max_input_time = 300
date.timezone = Asia/Shanghai
always_populate_raw_post_data = -1
[root@localhost init.d]# /usr/local/nginx/sbin/nginx -s reload ; /etc/init.d/php-fpm restart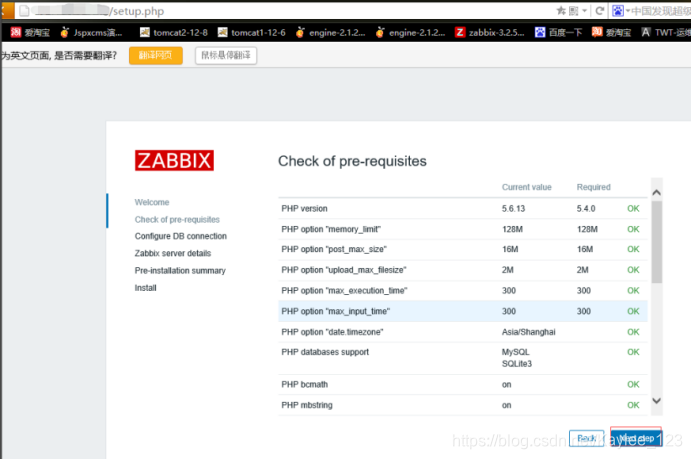
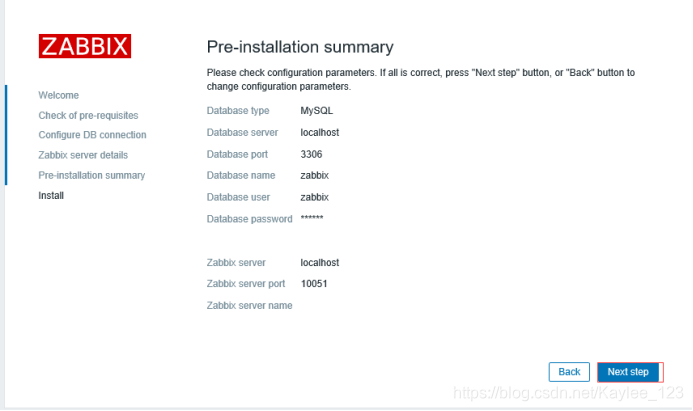
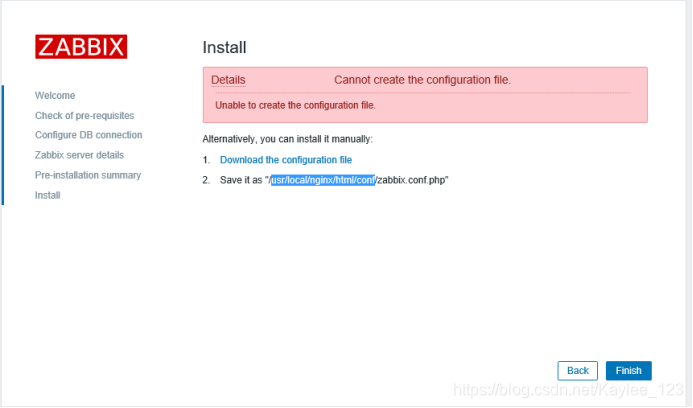
将下载的文件拷贝到/usr/local/nginx/html/conf/目录下
拷贝到目录下后,需要给该文件授权:
[root@localhost conf]# chmod 775 zabbix.conf.php
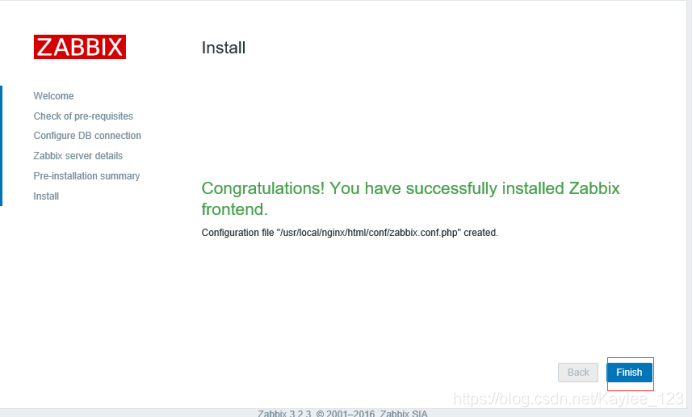
点击Finish,完成安装!
6. 登陆并设置中文语言
默认用户名和密码分别为Admin,zabbix
点击右上角,Profile,然后选择语言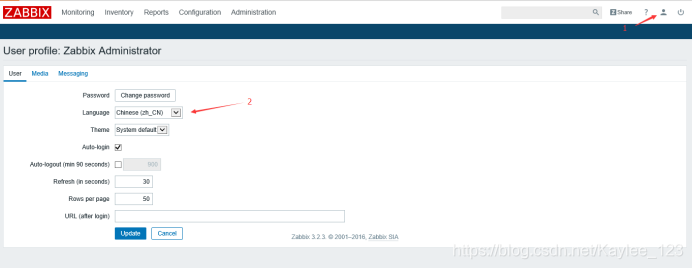
已变成中文,如果所示,可到我们当前监控的本机(默认没有启动,点击后面红色的停用,则启用)
至此,zabbix3.2安装完毕。
ps:第一次在麒麟系统安装zabbix,遇到的小坑不断,找了很多资料,也感谢大佬们也踩过这些坑,才能让我顺利完成写完给自己做个总结。

魔乐社区(Modelers.cn) 是一个中立、公益的人工智能社区,提供人工智能工具、模型、数据的托管、展示与应用协同服务,为人工智能开发及爱好者搭建开放的学习交流平台。社区通过理事会方式运作,由全产业链共同建设、共同运营、共同享有,推动国产AI生态繁荣发展。
更多推荐


 1
1 0
0- 0


 已为社区贡献1条内容

所有评论(0)