开始 ComfyUI 的 AI 绘图之旅-Cosmos Predict2世界模型文生图(全网首发,官网都没有更新)(十三)
本文介绍了如何在 ComfyUI 中完成 Cosmos-Predict2 文生图的工作流
系列文章
- 基础篇
- Flux.1
- 进阶篇
- 开始 ComfyUI 的 AI 绘图之旅-Qwen-Image(十一)
- 开始 ComfyUI 的 AI 绘图之旅-Qwen-Image-Edit(十二)
- 开始 ComfyUI 的 AI 绘图之旅-Cosmos Predict2世界模型文生图(全网首发,官网都没有更新)(十三)
- 开始 ComfyUI 的 AI 绘图之旅-SDXL文生图和图生图(全网首发,官网都没有更新)(十四)
- 开始 ComfyUI 的 AI 绘图之旅-SD3.5文生图和图生图(全网首发,官网都没有更新)(十五)
- 开始 ComfyUI 的 AI 绘图之旅-ComfyUI更新到0.3.60,Qwen-Image-Edit-2509强势来袭(十六)
本文介绍了如何在 ComfyUI 中完成 Cosmos-Predict2 文生图的工作流
一、Cosmos-Predict2
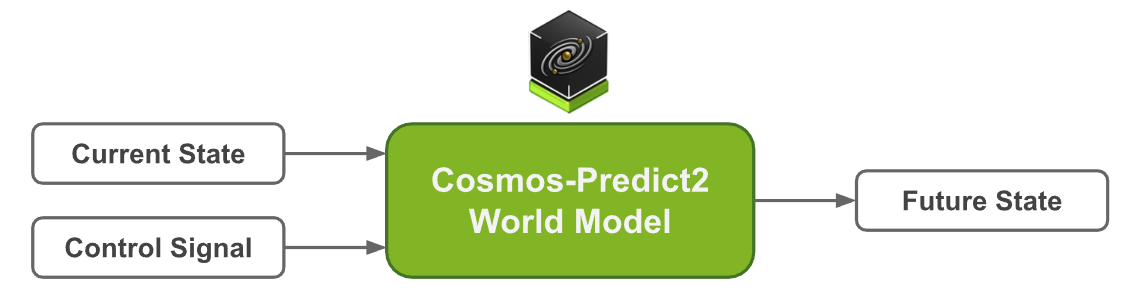
Cosmos-Predict2 是由 NVIDIA 推出的新一代物理世界基础模型,专为物理 AI 场景下的高质量视觉生成与预测任务设计。
该模型具备极高的物理准确性、环境交互性和细节还原能力,能够真实模拟复杂的物理现象与动态场景。
Cosmos-Predict2 支持文本到图像(Text2Image)和视频到世界(Video2World)等多种生成方式,广泛应用于工业仿真、自动驾驶、城市规划、科学研究等领域,是推动智能视觉与物理世界深度融合的重要基础工具。
Cosmos-Predict2 包含四个模型:Cosmos-Predict2-2B-Text2Image和 Cosmos-Predict2-14B-Text2Image,用于将文本描述转换为高质量图像;Cosmos-Predict2-2B-Video2World和Cosmos-Predict2-14B-Video2World,用于将图像或视频输入转换为视觉模拟。为了加速物理 AI 世界模型的开发,我们根据 NVIDIA 开放模型许可证开放了 代码、模型权重和基准测试 ( PBench )。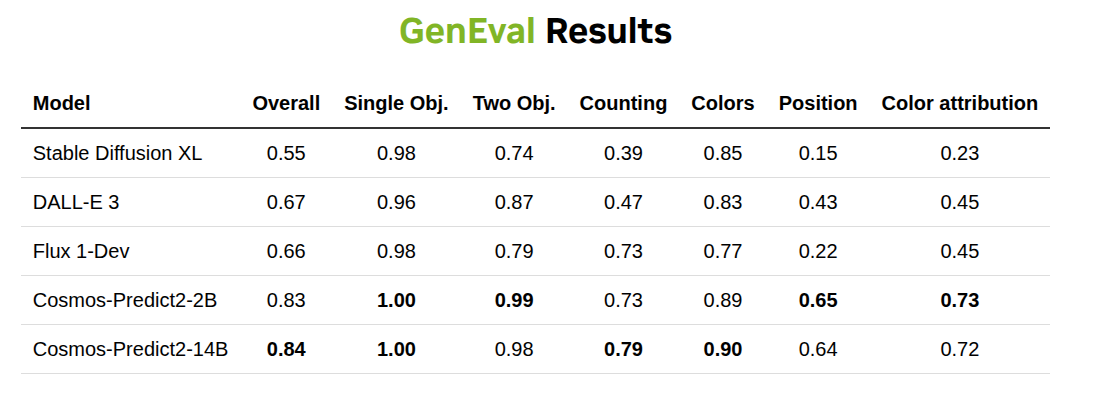
GitHub:Cosmos-predict2
huggingface: Cosmos-Predict2
来源:https://research.nvidia.com/labs/dir/cosmos-predict2/
1.Cosmos Predict2 Text2Image 工作流
本篇指南将引导你完成在 ComfyUI 中 文生图 工作流程。
对于 2B 版本,在实际运行时,需要 10GB 的显存
1.1 下载工作流文件

1.2 手动模型安装
Diffusion model
其它权重请访问 Cosmos_Predict2_repackaged 进行下载
Text encoder
oldt5_xxl_fp8_e4m3fn_scaled.safetensors
VAE
安装aria2快速下载模型,几乎能将我家1000M的宽带跑满,每秒80~90M,接下来的介绍模型都会给出安装命令。
apt install aria2
aria2c https://huggingface.co/Comfy-Org/Cosmos_Predict2_repackaged/resolve/main/cosmos_predict2_2B_t2i.safetensors -o SourceCode/ComfyUI/models/diffusion_models/cosmos_predict2_2B_t2i.safetensors --auto-file-renaming=false --allow-overwrite=false

aria2c https://huggingface.co/comfyanonymous/cosmos_1.0_text_encoder_and_VAE_ComfyUI/resolve/main/text_encoders/oldt5_xxl_fp8_e4m3fn_scaled.safetensors -o SourceCode/ComfyUI/models/text_encoders/oldt5_xxl_fp8_e4m3fn_scaled.safetensors --auto-file-renaming=false --allow-overwrite=false

aria2c https://huggingface.co/Comfy-Org/Wan_2.1_ComfyUI_repackaged/resolve/main/split_files/vae/wan_2.1_vae.safetensors -o SourceCode/ComfyUI/models/vae/wan_2.1_vae.safetensors --auto-file-renaming=false --allow-overwrite=false
小技巧:你要是打不开https://huggingface.co,可以将其换成为https://hf-mirror.com/试一试
文件保存位置
📂 ComfyUI/
├──📂 models/
│   ├── 📂 diffusion_models/
│   │   └─── cosmos_predict2_2B_t2i.safetensors
│   ├── 📂 text_encoders/
│   │   └─── oldt5_xxl_fp8_e4m3fn_scaled.safetensors
│   └── 📂 vae/
│       └──  wan_2.1_vae.safetensors
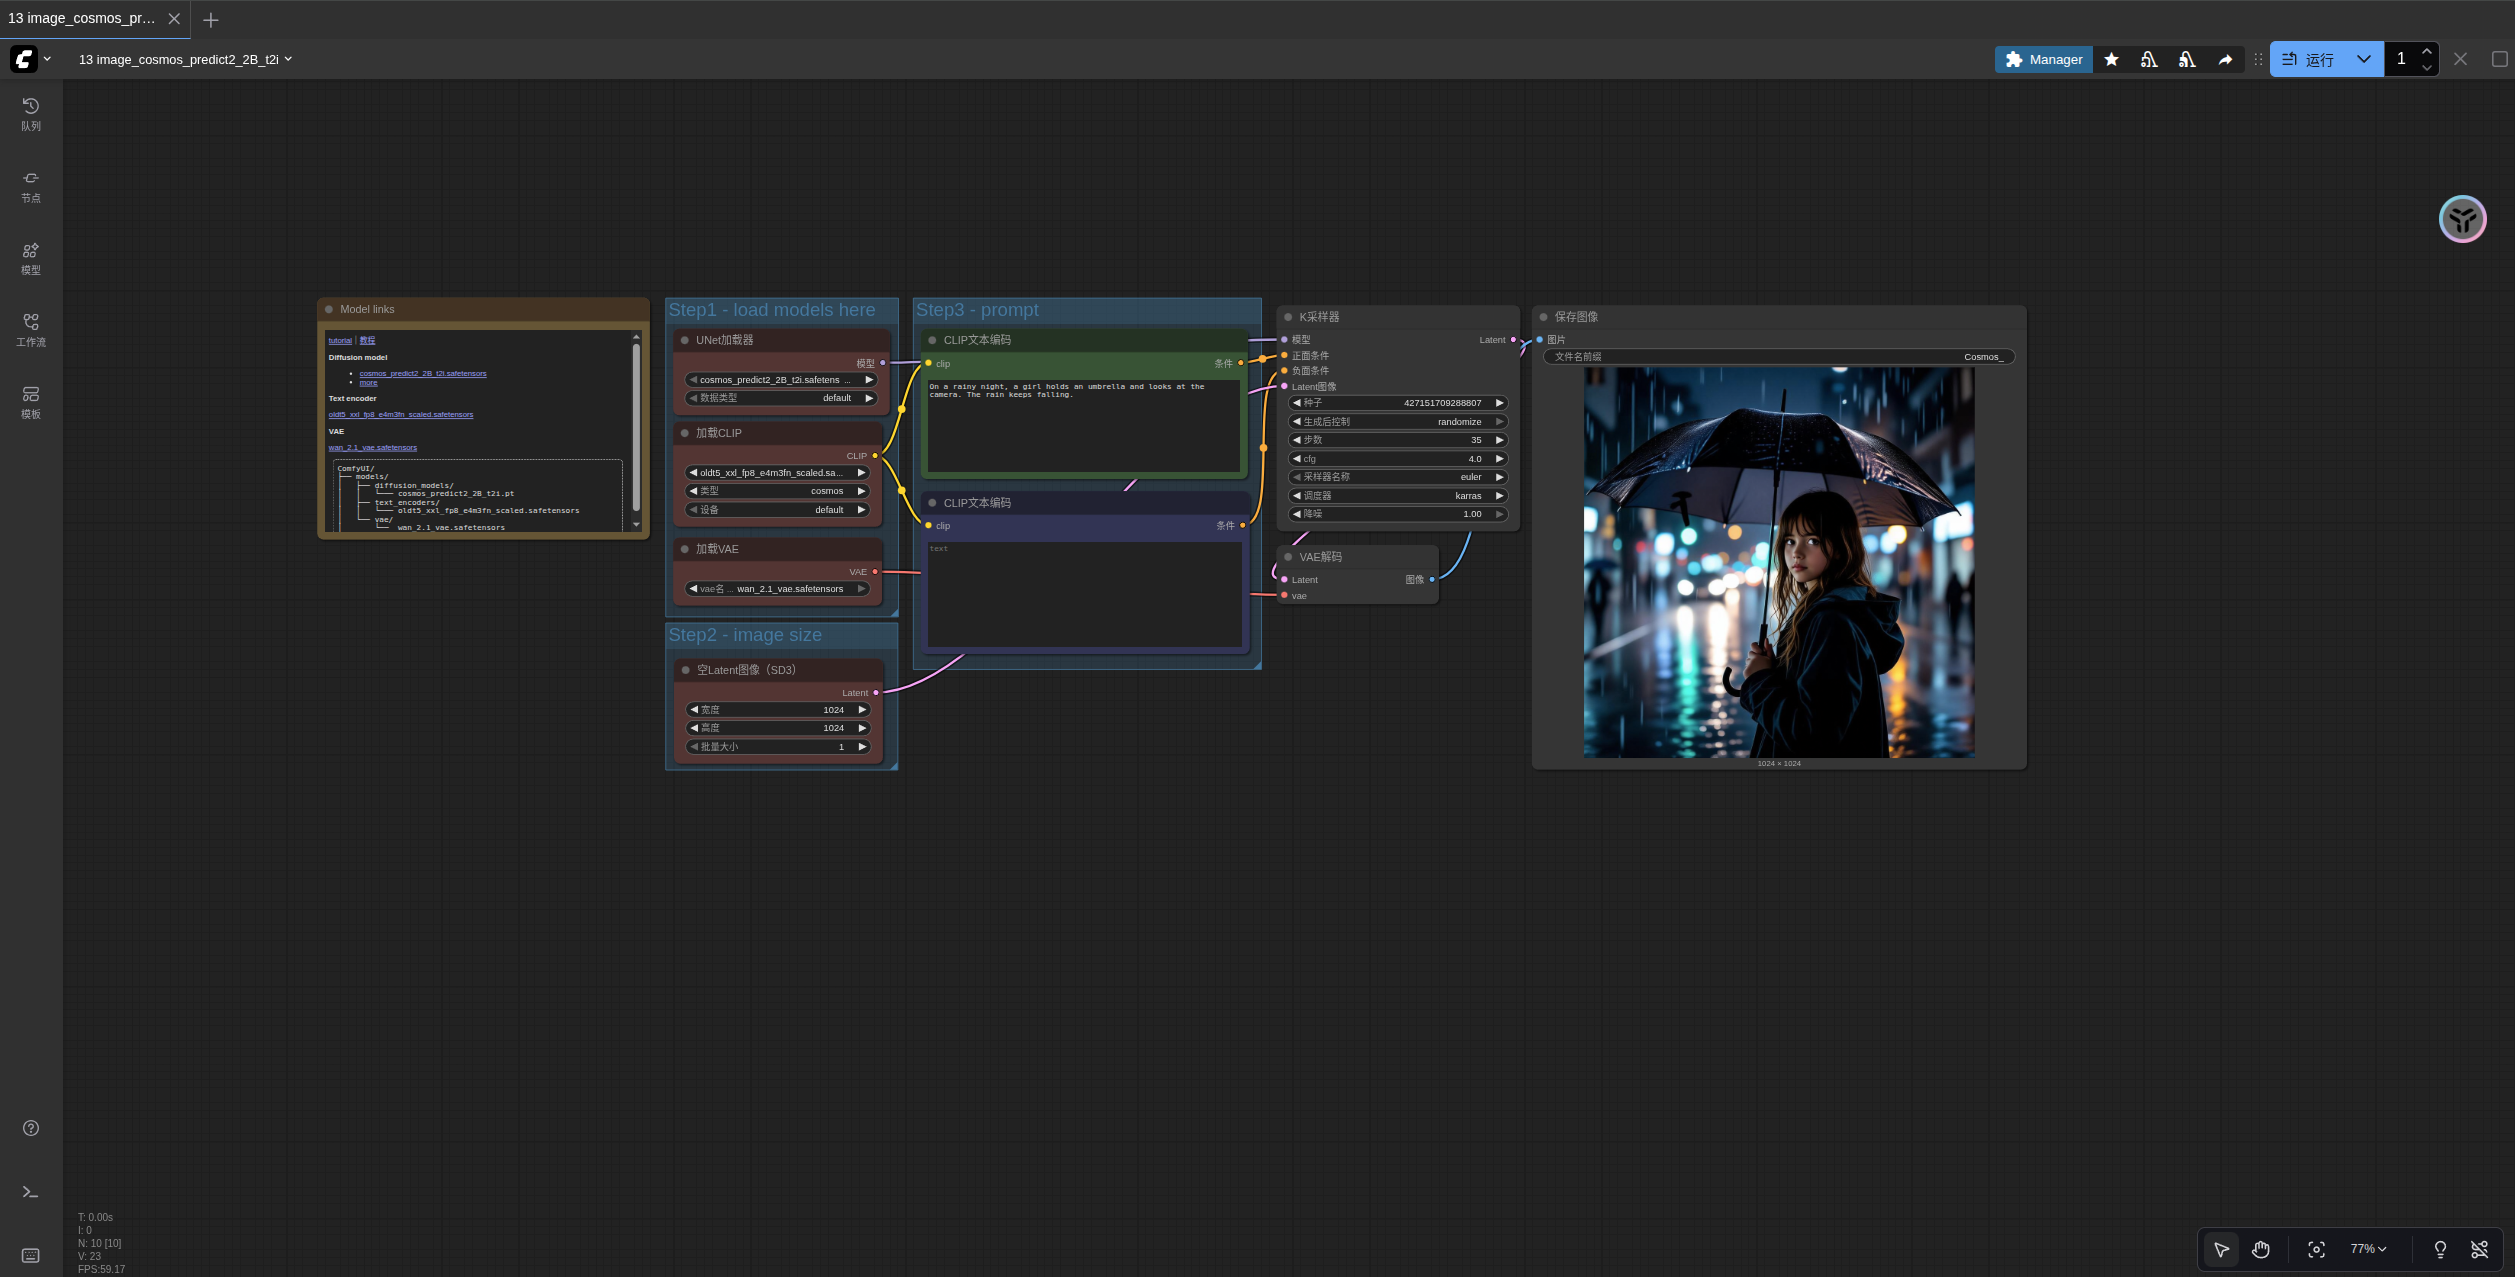
1.3 按步骤完成工作流运行
请参照图片序号进行逐步确认,来保证对应工作流的顺利运行
- 确保
Load Diffusion Model节点加载了cosmos_predict2_2B_t2i.safetensors - 确保
Load CLIP节点加载了oldt5_xxl_fp8_e4m3fn_scaled.safetensors - 确保
Load VAE节点加载了wan_2.1_vae.safetensors - 在
EmptySD3LatentImage设置图片的尺寸 - 在
ClipTextEncode节点中修改提示词 - 点击
Run按钮,或者使用快捷键Ctrl(cmd) + Enter(回车)来执行文生图 - 生成完成后对应的图片会自动保存到
ComfyUI/output/目录下,你也可以在save image节点中预览或者调整保存位置

魔乐社区(Modelers.cn) 是一个中立、公益的人工智能社区,提供人工智能工具、模型、数据的托管、展示与应用协同服务,为人工智能开发及爱好者搭建开放的学习交流平台。社区通过理事会方式运作,由全产业链共同建设、共同运营、共同享有,推动国产AI生态繁荣发展。
更多推荐

 12
12 0
0- 0


 已为社区贡献7条内容

所有评论(0)