基于SpringBoot实现数据的增删改查(包含搭建SpringBoot、配置mysql和mybatis及编写CRUD类)
crud
天行健,君子以自强不息;地势坤,君子以厚德载物。
每个人都有惰性,但不断学习新东西是好好生活的根本,共勉!
文章均为学习整理笔记,分享记录为主,如有错误请指正,共同学习进步。
文章目录
一、内容提要
配置mysql和mybatis
数据库提前建表
自动生成代码
增删改查代码
二、开发环境
JDK版本:1.8
maven版本:3.9.0
开发工具:IDEA社区版ideaIC-2018.3
项目框架:spring boot 版本为 2.6.3 springboot搭建传送门
三、实现
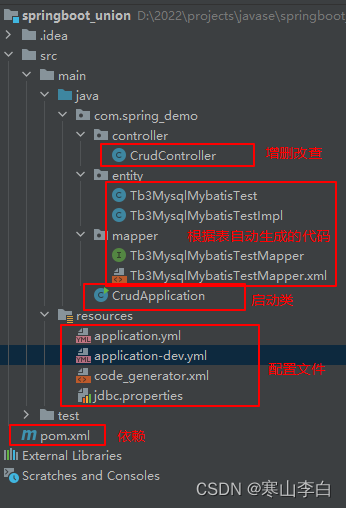
1. 项目包结构截图
2. 所需依赖
在pom.xml文件中添加如下依赖
包含spring boot、mysql、mybatis的依赖及插件
    <dependencies>

        <!--SpringBoot启动依赖-->
        <dependency>
            <groupId>org.springframework.boot</groupId>
            <artifactId>spring-boot-starter-web</artifactId>
            <version>2.6.3</version>
        </dependency>
        <dependency>
            <groupId>org.springframework.boot</groupId>
            <artifactId>spring-boot-starter-test</artifactId>
            <version>2.6.3</version>
            <scope>test</scope>
        </dependency>

        <!--集成mysql数据库-->
        <dependency>
            <groupId>mysql</groupId>
            <artifactId>mysql-connector-java</artifactId>
            <version>8.0.26</version>
        </dependency>
        <dependency>
            <groupId>org.springframework.boot</groupId>
            <artifactId>spring-boot-starter-jdbc</artifactId>
            <version>2.6.1</version>
        </dependency>

        <!--spring boot集成mybatis的依赖-->
        <dependency>
            <groupId>org.mybatis.spring.boot</groupId>
            <artifactId>mybatis-spring-boot-starter</artifactId>
            <version>2.1.0</version>
        </dependency>

        <!-- fastjson -->
        <dependency>
            <groupId>com.alibaba</groupId>
            <artifactId>fastjson</artifactId>
            <version>2.0.23</version>
        </dependency>

    </dependencies>


    <!--插件部分-->
    <build>
        <plugins>
            <!--添加mybatis generator maven插件-->
            <plugin>
                <groupId>org.springframework.boot</groupId>
                <artifactId>spring-boot-maven-plugin</artifactId>
                <version>2.3.4.RELEASE</version>
            </plugin>

            <plugin>
                <groupId>org.mybatis.generator</groupId>
                <artifactId>mybatis-generator-maven-plugin</artifactId>
                <version>1.3.7</version>
                <configuration>
                    <!--generatorConfig.xml位置-->
                    <configurationFile>src/main/resources/code_generator.xml</configurationFile>
                    <verbose>true</verbose>
                    <!--                    如果本来就有mapper、dao文件了就覆盖-->
                    <overwrite>true</overwrite>
                </configuration>

                <executions>
                    <execution>
                        <id>Generate MyBatis Artifacts</id>
                        <!--<phase>package</phase>-->
                        <phase>deploy</phase>
                        <goals>
                            <goal>generate</goal>
                        </goals>
                    </execution>
                </executions>
                <!--此处必须添加mysql驱动包-->
                <dependencies>
                    <dependency>
                        <groupId>mysql</groupId>
                        <artifactId>mysql-connector-java</artifactId>
                        <scope>runtime</scope>
                        <version>8.0.26</version>
                    </dependency>
                </dependencies>
            </plugin>
        </plugins>

        <!--扫描指定的配置文件 如果mapper的xml文件没有放在resources目录下,而是放在了和接口类在一起的包,这里就必须配置-->
        <resources>
            <resource>
                <directory>src/main/java</directory>
                <includes>
                    <include>**/*.csv</include>
                    <include>**/*.yml</include>
                    <include>**/*.xml</include>
                    <include>**/*.properties</include>
                </includes>
                <filtering>false</filtering>
            </resource>
            <resource>
                <directory>src/main/resources</directory>
                <includes>
                    <include>**/*.csv</include>
                    <include>**/*.yml</include>
                    <include>**/*.xml</include>
                    <include>**/*.properties</include>
                </includes>
                <filtering>false</filtering>
            </resource>
        </resources>
    </build>
3. 配置文件
3.1 application.yml
激活环境
spring:
  profiles:
    active: dev
3.2 application-dev.yml
数据库连接
spring:
  application:
    name: springboot_union
  datasource:
    #url切换数据库之后如果对应数据库名称和路径有变动,需要修改url
    url: jdbc:mysql://localhost:3306/springboot_union?serverTimezone=GMT%2B8&useUnicode=true&characterEncoding=utf-8&useSSL=false
    username: root
    password: root
    driver-class-name: com.mysql.cj.jdbc.Driver
    # serverTimezone=GMT%2B8 设置时区
    # useUnicode=true 是否使用Unicode编码
    # characterEncoding=utf8 设定字符集
    # autoReconnect=true 是否自动重连
    # allowMultiQueries=true 是否允许批量操作
3.3 jdbc.properties
mybatis相关的数据库连接参数,以及自动生成代码的参数
#mysql连接驱动的版本
spring.datasource.driverLocation=mysql-connector-java-8.0.21.jar
#mysql驱动类名
spring.datasource.driverClassName=com.mysql.cj.jdbc.Driver
#mysql数据库的访问地址(localhost)、端口号(3306)、数据库名称(springboot_union)及其他配置
spring.datasource.url=jdbc:mysql://localhost:3306/springboot_union?useUnicode=true&characterEncoding=utf-8&useSSL=false
#数据库用户名
spring.datasource.username=root
#数据库用户密码
spring.datasource.password=root

#根据此表名生成代码
tableName=tb3_mysql_mybatis_test
#生成的实体类和接口实现类所存放的位置(如果项目中不存在此包名则自动生成此包)
entityPackage=com.spring_demo.entity
#数据访问xml和数据访问接口代码所存放的位置(如果项目中不存在此包名则自动生成此包)
mapperPackage=com.spring_demo.mapper
可在文件中定义表名,会根据此表明生成代码可在文件中定义包名,会将代码存放到对应的包内
4. 建表
在数据库中建表
建表语句
CREATE TABLE IF NOT EXISTS `tb3_mysql_mybatis_test`(
   `id` INT UNSIGNED AUTO_INCREMENT,
   `user_name` VARCHAR(100) ,
     `user_id` VARCHAR(100) ,
     `address` VARCHAR(100) ,
   PRIMARY KEY ( `id` )
)ENGINE=InnoDB DEFAULT CHARSET=utf8;
5. 代码生成工具code_generator.xml
xml配置,自动生成代码的配置文件
<?xml version="1.0" encoding="UTF-8"?>
<!DOCTYPE generatorConfiguration
        PUBLIC "-//mybatis.org//DTD MyBatis Generator Configuration 1.0//EN"
        "http://mybatis.org/dtd/mybatis-generator-config_1_0.dtd">

<generatorConfiguration>

    <properties resource="jdbc.properties"/>

    <context id="sqlserverTables" targetRuntime="MyBatis3">

        <!-- 生成的pojo,将implements Serializable-->
        <plugin type="org.mybatis.generator.plugins.SerializablePlugin"></plugin>
        <!-- 可序列化-->
        <!--替换默认生成的dao-Example-->
        <plugin type="org.mybatis.generator.plugins.RenameExampleClassPlugin">
            <property name="searchString" value="Example$" />
            <property name="replaceString" value="Impl" />
        </plugin>

        <commentGenerator>
            <!-- 是否生成注释代时间戳-->
            <property name="suppressDate" value="true" />
            <!-- 是否去除自动生成的注释 true:是 : false:否 -->
            <property name="suppressAllComments" value="true" />
        </commentGenerator>

        <!-- 数据库链接URL、用户名、密码 -->
        <jdbcConnection driverClass="${spring.datasource.driverClassName}"
                        connectionURL="${spring.datasource.url}"
                        userId="${spring.datasource.username}"
                        password="${spring.datasource.password}">
        </jdbcConnection>

        <!--默认false,把JDBC DECIMAL 和 NUMERIC 类型解析为 Integer-->
        <!--true,把JDBC DECIMAL 和 NUMERIC 类型解析为java.math.BigDecimal-->

        <javaTypeResolver>
            <property name="forceBigDecimals" value="false" />
        </javaTypeResolver>

        <!--生成model模型,对应的包路径,以及文件存放路径(targetProject),targetProject可以指定具体的路径,如./src/main/java,-->
        <!--也可以使用“MAVEN”来自动生成,这样生成的代码会在target/generatord-source目录下-->
        <!--<javaModelGenerator targetPackage="com.joey.mybaties.test.pojo" targetProject="MAVEN">-->
        <javaModelGenerator targetPackage="${entityPackage}" targetProject="./src/main/java">
            <property name="enableSubPackages" value="true"/>
            <!-- 从数据库返回的值被清理前后的空格  -->
            <property name="trimStrings" value="true" />
        </javaModelGenerator>

        <!--对应的mapper.xml文件  -->
        <sqlMapGenerator targetPackage="${mapperPackage}" targetProject="./src/main/java">
            <property name="enableSubPackages" value="true"/>
        </sqlMapGenerator>

        <!-- 对应的Mapper接口类文件 -->
        <javaClientGenerator type="XMLMAPPER" targetPackage="${mapperPackage}" targetProject="./src/main/java">
            <property name="enableSubPackages" value="true"/>
        </javaClientGenerator>

        <!-- 列出要生成代码的所有表,这里配置的是不生成Example文件 -->
        <!--    配置表信息
                        tableName  表名
                        domainObjectName    实体类名称-->
        <table tableName="${tableName}"
               enableCountByExample="false"
               enableUpdateByExample="true"
               enableDeleteByExample="true"
               enableSelectByExample="true"
               selectByExampleQueryId="false">
            <property name="useActualColumnNames" value="false"/>
        </table>

        <!--        <table tableName="${tableName}"-->
        <!--               domainObjectName="MybatisUser"-->
        <!--               enableCountByExample="false"-->
        <!--               enableUpdateByExample="true"-->
        <!--               enableDeleteByExample="true"-->
        <!--               enableSelectByExample="true"-->
        <!--               selectByExampleQueryId="false">-->
        <!--            <property name="useActualColumnNames" value="false"/>-->
        <!--        </table>-->

    </context>
</generatorConfiguration>
6. 生成代码
右侧选择maven插件打开生成器生成代码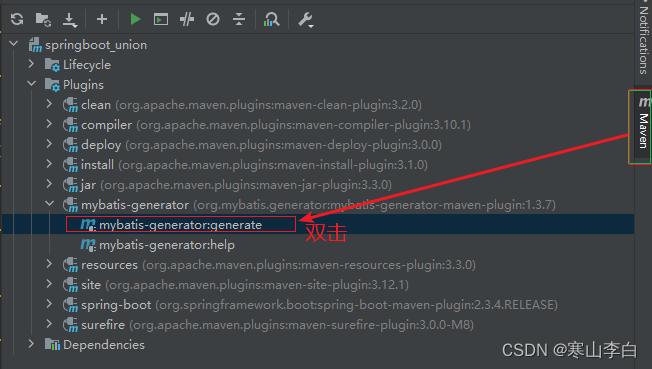
代码生成结束的控制台截图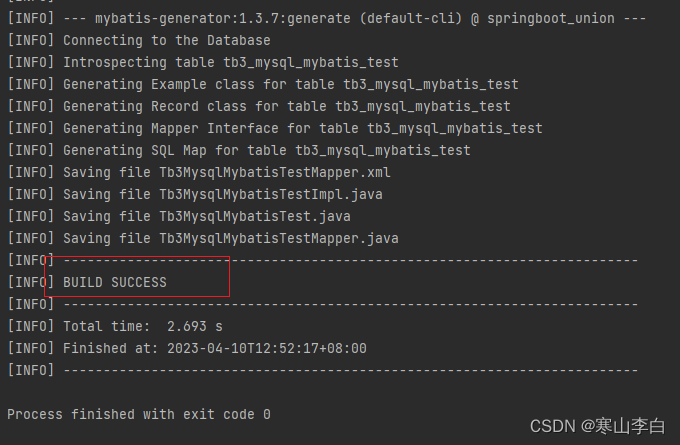
代码文件截图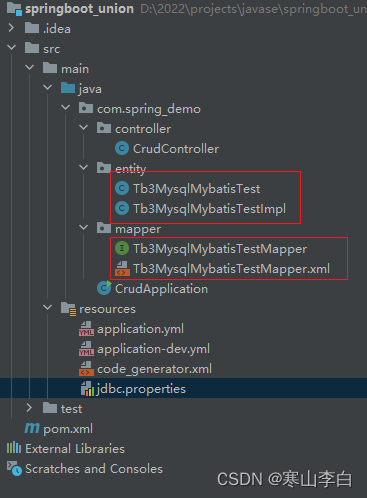
7. 添加注解
生成的代码不能直接使用,需要添加注解,如下
7.1 实体类
添加@Component注解
7.2 实现类
添加@Service注解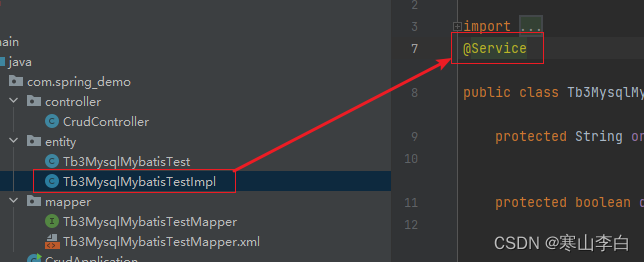
7.3 接口映射类
添加@Mapper注解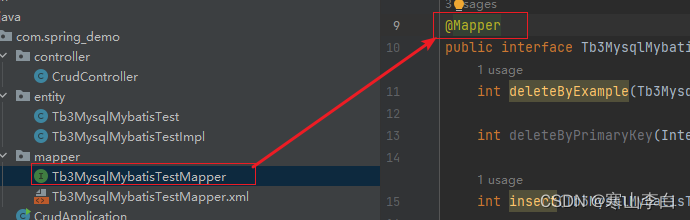
8. 增删改查的代码类
可根据实际生成的代码来修改代码
CurdController.java
package com.spring_demo.controller;

import com.alibaba.fastjson.JSONObject;
import com.spring_demo.entity.Tb3MysqlMybatisTest;
import com.spring_demo.entity.Tb3MysqlMybatisTestImpl;
import com.spring_demo.mapper.Tb3MysqlMybatisTestMapper;
import org.springframework.beans.factory.annotation.Autowired;
import org.springframework.http.MediaType;
import org.springframework.web.bind.annotation.RequestBody;
import org.springframework.web.bind.annotation.RequestMapping;
import org.springframework.web.bind.annotation.RequestMethod;
import org.springframework.web.bind.annotation.RestController;

import java.util.List;

/**
 * @ClassDescription: 操作数据库的类
 * @Author:李白
 * @Date:2023/4/10 12:40
 */
@RestController
@RequestMapping("crud")
public class CrudController {

    @Autowired
    Tb3MysqlMybatisTestMapper crudMapper;

    /**
     * 新增数据
     * @param testInfo
     * @return
     */
    @RequestMapping(value = "create", method = RequestMethod.POST, produces = MediaType.APPLICATION_JSON_VALUE)
    public JSONObject create(@RequestBody Tb3MysqlMybatisTest testInfo){

        crudMapper.insert(testInfo);

        JSONObject insertObj = new JSONObject();
        insertObj.put("insertInfo",testInfo);
        return insertObj;

    }

    /**
     * 查询数据
     * @return
     */
    @RequestMapping(value = "read", method = RequestMethod.POST, produces = MediaType.APPLICATION_JSON_VALUE)
    public JSONObject read(){

        Tb3MysqlMybatisTestImpl testImpl = new Tb3MysqlMybatisTestImpl();
        List<Tb3MysqlMybatisTest> testList = crudMapper.selectByExample(testImpl);

        JSONObject checkObj = new JSONObject();
        checkObj.put("checkObj",testList);
        return checkObj;

    }

    /**
     * 更新数据
     * @param testInfo
     * @return
     */
    @RequestMapping(value = "update", method = RequestMethod.POST, produces = MediaType.APPLICATION_JSON_VALUE)
    public JSONObject update(@RequestBody Tb3MysqlMybatisTest testInfo){

        Tb3MysqlMybatisTestImpl testImpl = new Tb3MysqlMybatisTestImpl();
        Tb3MysqlMybatisTestImpl.Criteria criteria = testImpl.createCriteria();
        criteria.andUserIdEqualTo(testInfo.getUserId());
        crudMapper.updateByExampleSelective(testInfo, testImpl);

        JSONObject updateObj = new JSONObject();
        updateObj.put("updateObj", testInfo);
        return updateObj;

    }

    /**
     * 删除数据
     * @param testInfo
     * @return
     */
    @RequestMapping(value = "delete", method = RequestMethod.POST, produces = MediaType.APPLICATION_JSON_VALUE)
    public JSONObject delete(@RequestBody Tb3MysqlMybatisTest testInfo){

        Tb3MysqlMybatisTestImpl testImpl = new Tb3MysqlMybatisTestImpl();
        Tb3MysqlMybatisTestImpl.Criteria criteria = testImpl.createCriteria();
        criteria.andUserIdEqualTo(testInfo.getUserId());
        crudMapper.deleteByExample(testImpl);

        JSONObject deleteObj = new JSONObject();
        deleteObj.put("deleteObj",testInfo);
        return deleteObj;

    }

}
四、注意事项
在使用更新方法时,需要注意updateByExampleSelective和updateByExample的区别updateByExample方法使用时传入的对象必须包含id参数,不然会报错updateByExampleSelective方法使用时传入的参数无需包含id参数
故推荐使用带有Selectibe的方法
注:想要更为详细的讲解文章可以参考下面这篇,分四步,spring boot搭建-集成mysql-集成mybatis-增删改查编写
详细篇–传送门

魔乐社区(Modelers.cn) 是一个中立、公益的人工智能社区,提供人工智能工具、模型、数据的托管、展示与应用协同服务,为人工智能开发及爱好者搭建开放的学习交流平台。社区通过理事会方式运作,由全产业链共同建设、共同运营、共同享有,推动国产AI生态繁荣发展。
更多推荐

 3
3 0
0- 0


 已为社区贡献10条内容

所有评论(0)