2.mybatis实用小插件
我们在使用 MyBatis时,经常会用到一些单表查询,但是不得不在 *Mapper.xml 中写简单 sql,而如 selectUserBy(Long id) 这种情况,也需要在 Mapper.xml文件中写select * from user where id = #{id} ,我觉得这是不必要的,也
我们在使用 MyBatis时,经常会用到一些单表查询,但是不得不在 *Mapper.xml 中写简单 sql,而如 selectUserBy(Long id) 这种情况,也需要在 Mapper.xml文件中写select * from user where id = #{id} ,我觉得这是不必要的,也是多余的,不外乎现在也有一些mybatis 插件来帮助我们避免 sql 的编写,如 mybatisplus 插件,但是对于 mybatisplus 插件,我也不是很满意,我们来看如下代码:
List<RuleOperateResultEntity> ruleOperateResultList = ruleOperateResultService
                    .selectList(new EntityWrapper<RuleOperateResultEntity>()
                    .eq("order_no", orderNo)
                    .eq("rule_log_id", id)
                    .orderBy("id",false));
在上述代码中,我觉得蓝色字体的代码是猢多余的,黑色字体如order_no,在java代码中写的变量竟然不是驼峰,让我很难受,如果在 service 层写一个查询方法占用这么多行,让我的业务代码看起来那么臃肿,可读性太差了。我们再来看看插入和更新方法。
在idea中,点击 insert 方法,看哪里引用了 insert,发现这么多的地方使用了,假如user表被插入了一条错误数据,现在我想在代码中找到插入位置,这没法找了。更新方法也存在同样的问题,如 user 表的 status 字段被更新了,想找到代码中字段更新位置,这也找起来也异常艰难。

那么正确的开发方式是怎样的呢?

每一张表中都对应一个 Mapper.java,在 Mapper 方法中定义所有插入和更新的方法,如果想看这张表在哪里插入的,只需要在方法中按住Control+右键,直接查看该方法在代码中引用的位置,如下图
通过上述方法就能找到在方法在代码中引用的位置了,从而找到表插入或更新的业务逻辑,但是这样写带来的一个问题就是,即使写简单的SQL查询或更新方法,都要在 Mapper.xml 中去写 sql,开发效率不高,今天我们的博客就是讲如何解决上述问题。
首先来看看在插件的加驰下,我们是怎样开发的:
文章的未尾提到git 地址 ,lz_mybatis_plugin_project是应用项目。lz_mybatis_plugin主要是插件包项目。
1.pom.xml 中打包和实际项目中引入该包
首先在lz_mybatis_plugin项目中运行 mvn clean install
本地打包。
再在lz_mybatis_plugin_project中引用该包。
2.配置ResolverBeanPostProcessor
a.如果你使用的是原生的 mybatis,引入ResolverBeanPostProcessor
@Bean
public ResolverBeanPostProcessor resolverBeanPostProcessor (){
    return new ResolverBeanPostProcessor();
}
b.如果你引用了baomidou 2.1.9的包的话,需要下面这种写法
@Bean
public ResolverBeanPostProcessor resolverBeanPostProcessor() {
    MyBatisBaomidouServiceImpl impl = new MyBatisBaomidouServiceImpl();
    return new ResolverBeanPostProcessor(impl);
}
MyBatisBaomidouServiceImpl.java
import com.baomidou.mybatisplus.MybatisMapperRegistry;
import com.lz.mybatis.plugin.service.MyBatisBaomidouService;
import com.lz.mybatis.plugin.utils.SqlParseUtils;
import com.lz.mybatis.plugin.utils.t.PluginTuple;
import com.lz.mybatis.plugin.utils.t.Tuple2;
import org.apache.ibatis.binding.MapperMethod;
import org.apache.ibatis.binding.MapperProxyFactory;
import org.apache.ibatis.reflection.ParamNameResolver;

import java.lang.reflect.Method;
import java.util.List;
import java.util.Map;

public class MyBatisBaomidouServiceImpl implements MyBatisBaomidouService {

    @Override
    public void init(List<PluginTuple> pluginTuples, org.apache.ibatis.session.Configuration configuration, Class type) {
        try {
            MybatisMapperRegistry mapperRegistry = (MybatisMapperRegistry) configuration.getMapperRegistry();
            Map<Class<?>, MapperProxyFactory<?>> knownMappers = SqlParseUtils.getFieldValue(mapperRegistry, "knownMappers");
            MapperProxyFactory mapperProxyFactory = knownMappers.get(type);
            Map<Method, MapperMethod> methodCache = mapperProxyFactory.getMethodCache();
            for (PluginTuple pluginTuple : pluginTuples) {
                Tuple2<Boolean, Method> data = pluginTuple.getData();
                Method method = data.getSecond();
                MapperMethod mapperMethod = methodCache.get(method);
                if (mapperMethod == null) {
                    if (mapperProxyFactory.getMapperInterface() != null) {
                        mapperMethod = new MapperMethod(mapperProxyFactory.getMapperInterface(), method, configuration);
                    } else {
                        mapperMethod = new MapperMethod(type, method, configuration);
                    }
                    MapperMethod.MethodSignature methodSignature = SqlParseUtils.getFieldValue(mapperMethod, "method");
                    ParamNameResolver paramNameResolver = SqlParseUtils.getFieldValue(methodSignature, "paramNameResolver");
                    SqlParseUtils.setFieldValue(paramNameResolver, "hasParamAnnotation", data.getFirst());
                    methodCache.put(method, mapperMethod);
                }
            }
        } catch (Exception e) {
            e.printStackTrace();
        }
    }
}
c.如果你引用了baomidou 3.3.1插件的包的话,需要下面这种写法
@Bean
public ResolverBeanPostProcessor resolverBeanPostProcessor() {
    MyBatisBaomidouServiceImpl myBatisBaomidouService = new MyBatisBaomidouServiceImpl();
    return new ResolverBeanPostProcessor(myBatisBaomidouService);
}
import com.baomidou.mybatisplus.core.MybatisMapperRegistry;
import com.baomidou.mybatisplus.core.override.MybatisMapperMethod;
import com.baomidou.mybatisplus.core.override.MybatisMapperProxyFactory;
import com.lz.mybatis.plugin.service.MyBatisBaomidouService;
import com.lz.mybatis.plugin.utils.SqlParseUtils;
import com.lz.mybatis.plugin.utils.t.PluginTuple;
import com.lz.mybatis.plugin.utils.t.Tuple2;
import org.apache.ibatis.binding.MapperMethod;
import org.apache.ibatis.reflection.ParamNameResolver;
import org.apache.ibatis.session.Configuration;

import java.lang.reflect.Method;
import java.util.List;
import java.util.Map;

public class MyBatisBaomidouServiceImpl implements MyBatisBaomidouService {

    @Override
    public void init(List<PluginTuple> pluginTuples, Configuration configuration, Class type) {
        try {
            MybatisMapperRegistry mapperRegistry = (MybatisMapperRegistry) configuration.getMapperRegistry();
            Map<Class<?>, MybatisMapperProxyFactory<?>> knownMappers = SqlParseUtils.getFieldValue(mapperRegistry, "knownMappers");
            MybatisMapperProxyFactory mapperProxyFactory = knownMappers.get(type);
            Map<Method, MybatisMapperMethod> methodCache = mapperProxyFactory.getMethodCache();
            for (PluginTuple pluginTuple : pluginTuples) {
                Tuple2<Boolean, Method> data = pluginTuple.getData();
                Method method = data.getSecond();
                MybatisMapperMethod mapperMethod = methodCache.get(method);
                if (mapperMethod == null) {
                    if (mapperProxyFactory.getMapperInterface() != null) {
                        mapperMethod = new MybatisMapperMethod(mapperProxyFactory.getMapperInterface(), method, configuration);
                    } else {
                        mapperMethod = new MybatisMapperMethod(type, method, configuration);
                    }
                    MapperMethod.MethodSignature methodSignature = SqlParseUtils.getFieldValue(mapperMethod, "method");
                    ParamNameResolver paramNameResolver = SqlParseUtils.getFieldValue(methodSignature, "paramNameResolver");
                    SqlParseUtils.setFieldValue(paramNameResolver, "hasParamAnnotation", data.getFirst());
                    methodCache.put(method, mapperMethod);
                }
            }
        } catch (Exception e) {
            e.printStackTrace();
        }
    }
}
为什么不同的 baomidou 版本需要使用不同的 service 呢?原因在于MybatisMapperRegistry,MybatisMapperMethod,MybatisMapperProxyFactory类所在的包不同。因此需要对不同的插件版本做兼容。
可能大家对 baomidou是什么有些疑惑,如下图:
就是引用com.baomidou.mybatis-plus插件而已,我们公司都称其为包米豆。那我也叫他包米豆吧,公司目前只用了这个 mybatis 插件,因此我只对这个插件的两个版本做了兼容,如果你移植到你们公司代码,可能会有其他问题,到时候需要你根据实际情况再做兼容,后面我会对插件做详细解析。希望会对聪明的读者有用。
3. pom.xml加入-parameters参数
pom.xml 中加入插件,主要是为了减少 Mapper.java 中的@Param 注解的编写
<plugin>
 <groupId>org.apache.maven.plugins</groupId>
 <artifactId>maven-compiler-plugin</artifactId>
 <version>3.5.1</version>
 <configuration>
 <source>1.8</source>
 <target>1.8</target>
 <debug>true</debug>
 <debuglevel>lines,vars,source</debuglevel>
 <compilerArgs>
 <arg>-parameters</arg>
 </compilerArgs>
 </configuration>
</plugin>
4.使用
上述己经将如何配置插件演示过了,下面来看看,在实际开发中如何使用。
1.表准备
CREATE TABLE `lz_test_user` (
  `id` bigint(20) NOT NULL AUTO_INCREMENT COMMENT '主键id',
  `is_delete` tinyint(4) NOT NULL DEFAULT '0' COMMENT '是否删除',
  `gmt_create` datetime NOT NULL DEFAULT CURRENT_TIMESTAMP COMMENT '生成时间',
  `gmt_modified` datetime NOT NULL DEFAULT CURRENT_TIMESTAMP COMMENT '修改时间',
  `type` int(11) DEFAULT '0' COMMENT '0',
  `branch_id` int(11) DEFAULT NULL COMMENT '版本号',
  `real_name` varchar(256) DEFAULT NULL COMMENT '真实名称',
  `mobile` varchar(256) DEFAULT NULL COMMENT '手机号码',
  `username` varchar(256) DEFAULT NULL COMMENT '用户名',
  `task_id` int(11) DEFAULT NULL COMMENT '任务 id',
  `staff_id` int(11) DEFAULT '0' COMMENT '员工 id',
  PRIMARY KEY (`id`)
) ENGINE=InnoDB AUTO_INCREMENT=57 DEFAULT CHARSET=utf8mb4 COMMENT='项目用户';
为了保持可读性,简单性,目前只支持单表操作,如果想支持多表操作,聪明的读者,在你看完这篇博客以后,你自己去开发吧。
2.数据准备
INSERT INTO `lz_test_user` (`id`, `is_delete`, `gmt_create`, `gmt_modified`, `type`, `branch_id`, `real_name`, `mobile`, `username`, `task_id`, `staff_id`)
VALUES
    (13, 1, '2021-01-19 11:39:49', '2021-01-19 11:39:49', 0, 1, '金x', '1575xxx', '1xxxx', 1, 311),
    (14, 1, '2021-01-19 11:39:49', '2021-01-19 11:39:49', 0, 1, '李x', '1826xxx', 'zhangsan', 1, 323),
    (45, 1, '2021-01-19 15:41:11', '2021-01-19 15:41:11', 4, 1, 'x甜', '1575xxx', '1xxx76952', 1, 310),
    (46, 1, '2021-01-19 15:41:11', '2021-01-19 15:41:11', 4, 1, 'x海', '1526xxx', '1xxx89338', 1, 325),
    (47, 1, '2021-01-19 15:41:11', '2021-01-19 15:41:11', 5, 1, 'x金', '1760xxx', '1xxx50797', 1, 317),
    (48, 1, '2021-02-02 14:58:57', '2021-02-02 14:58:57', 0, 10, '张三', '18458195149', 'zhangsan', NULL, 10),
    (49, 1, '2021-02-02 15:07:08', '2021-02-02 15:07:08', 4, 1, '张三', '18458195149', '18458195149', NULL, 10),
    (50, 1, '2021-02-02 15:24:22', '2021-02-02 15:24:22', 0, 1, '张三aaa', '18458195149', 'zhangsan', NULL, 10),
    (51, 1, '2021-02-02 15:25:07', '2021-03-12 15:15:27', 0, 10, '张三xxxxxxx', '123', '张', 10, 10),
    (52, 1, '2021-03-12 15:14:42', '2021-03-12 15:14:42', 0, 10, '张三', '18458195149', 'zhangsan', NULL, 10),
    (53, 1, '2021-03-12 15:15:01', '2021-03-12 15:15:01', NULL, 10, '张三', '18458195149', 'zhangsan', NULL, 10),
    (54, 1, '2021-03-12 15:15:01', '2021-03-12 15:15:01', NULL, 10, '张三', '18258136007', 'zhangsan', NULL, 10),
    (55, 1, '2021-03-12 15:15:14', '2021-03-12 15:15:14', NULL, 10, '张三', '18458195149', 'zhangsan', NULL, 10),
    (56, 1, '2021-03-12 15:15:14', '2021-03-12 15:15:14', NULL, 10, '张三', '18258136007', 'zhangsan', NULL, 10);
3. 创建 Mapper.java
public interface TestUserMapper extends MyBaseMapper<TestUser> {

    //所有的查询条件,默认是 AND 和 = 关系,如果想在其他的关系,可以写相关的注解@OR ,或@Like
    TestUser selectTestUserById(Long id);

    @OrderBy({
            @By(value = {"id"}, type = OrderType.DESC),
    })
    TestUser selectUserByCondition(Long branchId, @GT int type, @LIKE String realName, UserInfo userInfo);

    @LIMIT(10)
    List<TestUser> selectUserByRealName(@LIKE String realName, @LLIKE String mobile);

    //对于这种情况 taskId 和 staffId 传入的值可以是 null
    List<TestUser> selectByTaskId(@IsNull Long taskId, @IsNotNull Long staffId);

    List<TestUser> selectByTaskRealNameMobile(@IsNotEmpty String mobile, @IsEmpty String realName);

    int countUser(@LIKE String realName);

    Long insertTestUser(TestUser testUser);

    Long insertBatchTestUser(List<TestUser> testUsers);

    Long insertTestUserBatch(TestUser[] testUsers);

    //目前不支持批量更新
    int updateTestUserById(TestUser testUser);

    //默认使用最后一个作为更新条件
    int updateRealNameById(String realName, Long id);

    //如果想写多个更新条件,在字段前面加 @by注解,值得注意的是,所有的方法参数名称都应该和数据库中的字段对应,在自动生成 sql时,会将驼峰参数名转化为数据库字段
    void updateTestUserUserNamePassword(String username, String mobile, @By  Long id, @By Long taskId);

    @Realy
    int deleteTestUserById(Long id);

    // @In注解中的值,对应数据库列字段
    int deleteTestUserByIds(@IN("id") List<Long> ids);

    //【注意】千万不能这样写,这样写的话,是删除所有的数据
    void deleteBatch();
}
4. 创建 Mapper.xml
<?xml version="1.0" encoding="UTF-8"?>
<!DOCTYPE mapper PUBLIC "-//mybatis.org//DTD Mapper 3.0//EN" "http://mybatis.org/dtd/mybatis-3-mapper.dtd">
<mapper namespace="com.admin.crawler.mapper.TestUserMapper">


</mapper>
5. 创建Controller
@RestController
public class TestUserController {

    @Autowired
    private TestUserMapper testUserMapper;

    @RequestMapping("/selectTestUserById")
    public String test() {
        TestUser processUser = testUserMapper.selectTestUserById(14l);
        System.out.println(processUser);
        return "测试成功";
    }


    @RequestMapping("/selectUserByCondition")
    public String selectUserByCondition() {
        UserInfo userInfo = new UserInfo();
        userInfo.setStaffId(10l);
        userInfo.setUsername("18458195149");
        TestUser testUser = testUserMapper.selectUserByCondition(1l,1,"张三",userInfo);
        System.out.println(testUser);
        return "测试成功";
    }


    @RequestMapping("/selectUserByRealName")
    public String selectUserByRealName() {
        List<TestUser> testUser = testUserMapper.selectUserByRealName("张三","184");
        System.out.println(testUser);
        return "测试成功";
    }


    @RequestMapping("/selectByTaskId")
    public String selectByTaskId() {
        List<TestUser> testUser = testUserMapper.selectByTaskId(null,null);
        System.out.println(testUser);
        return "测试成功";
    }

    @RequestMapping("/selectByTaskRealNameMobile")
    public String selectByTaskRealNameMobile() {
        List<TestUser> testUser = testUserMapper.selectByTaskRealNameMobile(null,null);
        System.out.println(testUser);
        return "测试成功";
    }


    @RequestMapping("/countUser")
    public String countUser() {
        int a =  testUserMapper.countUser("张");
        System.out.println(a);
        return "测试成功";
    }


    @RequestMapping("/testInsert")
    public String testInsert() {
        TestUser testUser = new TestUser();
        testUser.setBranchId(10l);
        testUser.setMobile("18458195149");
        testUser.setRealName("张三");
        testUser.setStaffId(10l);
        testUser.setUsername("zhangsan");
        testUserMapper.insertTestUser(testUser);
        System.out.println(testUser);
        return "测试成功";
    }


    @RequestMapping("/insertTestUserBatch")
    public String insertBatchTestUser() {
        TestUser testUser = new TestUser();

        testUser.setBranchId(10l);
        testUser.setMobile("18458195149");
        testUser.setRealName("张三");
        testUser.setStaffId(10l);
        testUser.setUsername("zhangsan");

        TestUser testUser2 = new TestUser();
        testUser2.setBranchId(10l);
        testUser2.setMobile("18258136007");
        testUser2.setRealName("张三");
        testUser2.setStaffId(10l);
        testUser2.setUsername("zhangsan");
        List<TestUser> testUsers = new ArrayList<>();
        testUsers.add(testUser);
        testUsers.add(testUser2);

        testUserMapper.insertBatchTestUser(testUsers);
        for (TestUser testUser1 : testUsers) {
            System.out.println(testUser1);
        }
        return "测试成功";
    }


    @RequestMapping("/insertTestUserBatchByArray")
    public String insertTestUserBatchByArray() {
        TestUser testUser = new TestUser();

        testUser.setBranchId(10l);
        testUser.setMobile("18458195149");
        testUser.setRealName("张三");
        testUser.setStaffId(10l);
        testUser.setUsername("zhangsan");

        TestUser testUser2 = new TestUser();
        testUser2.setBranchId(10l);
        testUser2.setMobile("18258136007");
        testUser2.setRealName("张三");
        testUser2.setStaffId(10l);
        testUser2.setUsername("zhangsan");
        TestUser[] testUsers = new TestUser[2];
        testUsers[0] = testUser;
        testUsers[1] = testUser2;

        testUserMapper.insertTestUserBatch(testUsers);
        for (TestUser testUser1 : testUsers) {
            System.out.println(testUser1);
        }
        return "测试成功";
    }

    @RequestMapping("/testUpdate1")
    public String testUpdate1() {
        TestUser testUser = new TestUser();
        testUser.setBranchId(10l);
        testUser.setMobile("18458195149");
        testUser.setRealName("张三xxxxxxx");
        testUser.setStaffId(10l);
        testUser.setUsername("zhangsan");
        testUser.setId(51l);
        testUserMapper.updateTestUserById(testUser);
        System.out.println(testUser);
        return "测试成功";
    }

    @RequestMapping("/updateTestUserUserNamePassword")
    public String updateTestUserUserNamePassword() {
        testUserMapper.updateTestUserUserNamePassword("张","123",51l,10l);
        return "测试成功";
    }

    @RequestMapping("/updateRealNameById")
    public String updateRealNameById() {
        testUserMapper.updateRealNameById("张三aaa", 50l);
        return "测试成功";
    }

    @RequestMapping("/deleteTestUserById")
    public String deleteTestUserById() {
        testUserMapper.deleteTestUserById(50l);
        return "测试成功";
    }


    @RequestMapping("/deleteTestUserByIds")
    public String deleteTestUserByIds() {
        List<Long> ids = new ArrayList<>();
        ids.add(43l);
        ids.add(44l);
        testUserMapper.deleteTestUserByIds(ids);
        return "测试成功";
    }


    @RequestMapping("/deleteBatch")
    public String deleteBatch() {
        List<Long> ids = new ArrayList<>();
        ids.add(43l);
        ids.add(44l);
        testUserMapper.deleteBatch();
        return "测试成功";
    }
}
接下来,我们对每一个方法分析
1. selectTestUserById
TestUser selectTestUserById(Long id);
默认情况下所有的查询条件之间以 AND 拼接,如 selectByUserNamePassword(String userName,String password) ; 插件动态生成的 SQL 是
select * from lz_test_user where user_name = #{userName} and password = #{password}
插件会自动将方法参数的驼峰名转化为数据库中以下划线分割的列名,如上述的userName 被转化为 user_name。如果查询条件之间的关系不是and 关系,是OR 关系,方法该如何编写呢?
2. selectByUserNameMobile
List<TestUser> selectByUserNameMobile(String username,@OR String mobile);
默认情况下生成的 sql条件参数和方法参数的顺序一致,因此,我们只需要在第二个方法参数前加上@OR 注解即可。上述生成的 sql 是
SELECT * FROM lz_test_user WHERE username = ‘zhangsan’ OR mobile = ‘184581149’ AND IS_DELETE = 0 ,运行结果如下图
如果现在的需要是,username = #{username} and (mobile = #{mobile} or real_name = #{real_name}) 这种情况怎么办呢?我们继续看例子。
3.selectUserByCondition
@OrderBy({
        @By(value = {"id"}, type = OrderType.DESC),
})
TestUser selectUserByCondition(Long branchId, @GT int type, @LIKE String realName, UserInfo userInfo);

@OR
public class UserInfo {
    @LIKE
    @AND
    private String username;
    @EQ
    @OR
    private Long staffId;
    ... get set 方法省略
}
根据 branchId 查找,并且 type > #{type} and realName like #{realName} and (userInfo) ,我相信大家从字面意思中就能理解上述方法所代码的 sql,我们来测试一下。
SELECT * FROM lz_test_user WHERE branch_id = 1 AND type > 1 AND real_name LIKE CONCAT(‘%’,‘张三’,‘%’) AND ( username LIKE CONCAT(‘%’,‘18458195149’,‘%’) OR staff_id = 10 ) AND IS_DELETE = 0 ORDER BY id DESC
大家可能比较困惑,为什么UserInfo对象标明了@OR注解,但是sql () 外还是以 AND 拼接呢?这里声明一下,对象上的注解,只对对象内部的条件控制,如staffId不加@OR 注解,只要UserInfo对象上加了OR 注解,内部的条件都以OR 来连接,这样做的好处就是,当遇到对象内部有很多属性需要以 OR 来连接的话,只需要在对象上加上注解 OR 即可。如果对象内部的条件和外面条件也想以 OR 来连接怎么办呢?只需要在Mapper 方法的对象参数前加上@OR 注解即可,如下

聪明的读者可能现在己经发现了,其实对象的第一个属性加AND或OR注解毫无意义,因为在 sql语句中的()内的第一个条件前是不允许加AND或OR的。又有说伙伴会提问了,你这些都懂,如果查询条件要左like怎么办呢?你不用担心,这也提供了。
4.selectUserByRealName
List<TestUser> selectUserByRealName(@LIKE String realName, @LLIKE String mobile);
我们来看看 SQL是怎样的,
SELECT * FROM lz_test_user WHERE real_name LIKE CONCAT(‘%’,‘张三’,‘%’) AND mobile LIKE CONCAT(‘’,‘184’,‘%’)AND IS_DELETE = 0
肯定又有机灵的读者会提问,你这些我都知道了,如果需要判断一些字段为空,另外一些字段不是空,那怎么办呢?
5.selectByTaskId
List<TestUser> selectByTaskId(Long @IsNull taskId, @IsNotNull Long staffId);这个需要注意一点的就是,传的参数taskId和staffId无效,也就是说,你传入任何参数都可以,一般传 null。我们来看看生成的 SQL,SELECT * FROM lz_test_user WHERE task_id IS NULL AND staff_id IS NOT NULL AND IS_DELETE = 0,可能这个时候,细心的读者又会提问了,如果我们插入数据库中,不小心,插入了一个空字符串(‘’),但是这个时间也需要在查询条件中,这怎么办呢?
6.selectByTaskRealNameMobile
List selectByTaskRealNameMobile(@IsNotEmpty String mobile, @IsEmpty String realName),那我们来看看sql的区别。
SELECT * FROM lz_test_user WHERE (mobile IS NOT NULL OR mobile != ‘’ ) AND (real_name IS NULL OR real_name = ‘’ ) AND IS_DELETE = 0,细心的读者会发现IsNull和IsEmpty的区别了,主要是在空串的区别,isNull 不对空串处理,IsEmpty对空串处理,IsNotNull和IsNotEmpty的区别类似,接下来肯定又有读者会想了,你这些我知道了,但是对于排序,你又是怎样处理的呢?你不可能写到方法参数中吧,因为排序不一定作为查询条件,你不用担心,我们来继续看下图
看完上图以后,肯定又有人会想,如果先按 id降序,再按 mobile降序呢?
这个时间又有读者在想,如果我还想按username升序怎么办呢?
接下来我们来看生成的 sql
这个时候,读者又会想,如果通过字段来排序,我也不知道,这需要根据前端传过来的来确定是升序还是降序。这个你也不用担心,请看:
在方法的参数中新增了一个 OrderBy 注解,注解的默认值是需要排序的字段,上图中是以 id来排序,String asc 是一个字符串,如果前端传过来是 "ASC"字符串那么,就以 id升序排序,如果前端传过来是"DESC"字符串,以 id 降序排序。
肯定有读者会想,排序好了,我只要要前面的10条,怎么办呢?

假如我想实现手动分页,那该怎么办呢?

可能又有人会想,如果想实现分页,这个时候,limit里的 index 和 offset 不是写死在方法注解之上,而是通过方法参数控制,这个你也不用担心,在我们的方法中,提供了分页方法。
这个方法的使用需要注意,Page后面的泛型可写可不写,同时方法参数中一定要有两个参数分别被@CurrPage ,@PageSize 注解修饰,因为分页一定需要传当前页和 pageSize 两个参数。
接下来我们来谈谈分页这样写的好处。
这是我们之前的代码中使用分页,从这个代码中我们能够看到,除了能看到实现了分页,没有看到任何业务逻辑信息,同时还占用3行代码。还有一种写法如下,使用 PageHelper插件,但是有一个问题,就是在我们查询方法的前面需要写PageHelper.startPage(pn, 5);一行代码,如果有人不小心,在我们的分页方法查询方法前面又写了一个查询方法,这个时候分页地逻辑就不是我们想要的了。
基于上述问题,我之前想过另外一种情况来封装,达到不会被同事不小心,在分页查询代码之前加一行其他的业务方法,如下:
上图写法终究还是没有那么简捷,因此我们这个插件提供了终级方案,接下来,来看如何调用
测试结果:
当你看到了这个方法的使用时,你肯定会想,原来分页是如此简单的事情 。
可能又有读者在想了,如果我想要查询某个条件有多少条数据,那怎么办呢?
7.countUser
int countUser(@LIKE String realName);
那生成的 sql 是怎样的呢?
此时此刻,我相信大部分单表查询都能满足了。至少我用这个插件对于单表查询还没有写过 sql,哈哈。接下来我们来看SQL 的插入操作。
8.插入数据insertTestUser

插入数据,主键数据回显,是插件帮我们实现了,后面我们再来分析插件是如何实现。有人可能会问,如果是批量插入数据,那该怎么办?
9.批量插入数据

批量插入数据主键也回显了。可能又有读者会问了,你传入的是集合,如果传入的是数组怎么办呢?
我相信大部分插入操作都是上述两种情况,其他的情况,感兴趣的小伙伴可以去改插件源码 。
10.根据主键更新用户数据

上述情况,我们大部分更新操作既是如此,根据id 查询出对象,设置对象数据,再更新到数据库,但这样可能会导致数据问题,如果用户1查询出 User 对象数据返回给前端页面,此时user的 username = “zhangsan”,用户2查询user的数据返回前端username=“zhangsan”,此时用户2将user数据 username改成"lisi" 提交,数据库中的username变成了 lisi,但是用户1修改user 的 mobile 数据为185xxx,此时前端页面的username依然是zhangsan 提交给后台,后台根据 id 查询出用户数据,将 username继续设置成"zhangsan",此时用户2来看,发现之前 user 数据不是设置成 lisi 了吗,怎么又变成了 zhangsan 了呢?莫名其妙,但是在开发的过程中,这种情况时有发生,你说程序错也吗?也没有,只是偶然出现这种情况而已。为了减少这种问题的发生,我们只能,如果用户只更新 username那么就只更新 username 字段,而不是将user的username 和mobile字段都更新一次。那么我们来看在插件的加驰下,如何实现。
此时生成的 sql是UPDATE lz_test_user SET real_name = ‘张三aaa’ where id = 50,机灵的小伙伴肯定晕了,这是怎么回事,我又没有设置其他的选项,他怎么知道 where 后面的条件是 id,而不是 real_name 呢?这是这个插件的规定,如果用户没有设置@By 注解,默认以方法的最后一个参数作为更新条件,那么使用@By注解是如何使用的呢?
我相信开发丰富的小伙伴肯定觉得这个操作很有意思,如果我们每更新一个字段,就需要到 Mapper.xml中写一条 SQL 也太麻烦了,不得已用千篇一律的updateXXXById 方法,但是这个方法也带来不好的一面,就是并发问题。此时,我相信这样操作对你很有帮助,可能有些小伙伴想到批量更新的问题,而我们现实中很少在 mybatis的 xml 文件中写批量更新代码,要么使用插件批量更新,要么一条一条的更新,还有一些像如下写法。
我不是很喜欢这种写法,因为要实现批量更新,首先得设置mysql支持批量操作,在jdbc链接中需要附加&allowMultiQueries=true属性才行 ,同时Mysql 需要执行多条语句,性能上我觉得应该比不上一条语句就实现的所有数据的更新。而我们这个插件原理采用的是第二种方式,利用mysql的自身语法 case…when…then语法来实现。
接下来,我们来看看如何使用
是不是很简单,只需要传一个一 list 集合即可,但是需要注意的一点是,目前批量更新只支持基于主键的批量更新,如果根据对象的多个条件来更新的话,还需要用户自己去写 sql 来实现。
更新的使用说完了,下面我们来看删除如何使用
删除分上述三种情况,根据 ids批量删除,或根据id删除以及删除所有数据,第三种情况,千万不能这样写,因为太危险了,一不小心将表中的数据全部删除了,但是细心的读者可能会发现,为什么deleteTestUserById方法有一个@Realy注解,因为我们公司的所有的数据库表中都有三个字段是固定的is_delete,gmt_create,gmt_modified,因此删除时,如果表中有字段 is_delete,那么默认情况下是逻辑删除,将 is_delete 字段置为1,但是有时候,我们明确知道这条数据不要了,存在表中,占用空间,因此,我们可以在方法上加@Realy注解,表示直接物理删除数据 。根据 id删除多条数据,可以使用 in 注解,但是 in 注解的值需要填写,值为对应的数据库字段。
关于插件的使用,看完上面的说明,大家肯定都了解了,但是这么好用的插件,他的原理是什么呢?接下来,我们将对插件原码进行解析。
源码解析
首先,插件帮我们动态增加 sql 的入口ResolverBeanPostProcessor。
public class ResolverBeanPostProcessor implements BeanPostProcessor, ApplicationContextAware {

    private List<String> mappers = new ArrayList<>();
    public ApplicationContext ac;

    private MyBatisBaomidouService myBatisBaomidouService;

    public ResolverBeanPostProcessor() {
    }

    public ResolverBeanPostProcessor(MyBatisBaomidouService myBatisBaomidouService) {
        this.myBatisBaomidouService = myBatisBaomidouService;
    }

    @Override
    public void setApplicationContext(ApplicationContext applicationContext) throws BeansException {
        ac = applicationContext;
    }

    @Override
    public Object postProcessBeforeInitialization(Object bean, String beanName) throws BeansException {
        return bean;
    }

    @Override
    public Object postProcessAfterInitialization(Object bean, String beanName) throws BeansException {
    	// 只对 MapperFactoryBean 作处理,非MapperFactoryBean 略过
        if (!(bean instanceof MapperFactoryBean)) {
            return bean;
        }

        // 解决多次调用问题,如在项目启动过程中,一个MapperFactoryBean可能会多次调用postProcessAfterInitialization方法
        // Mapper 动态生成 sql只需要调用一次就可以了,如果容器多次调用,后面的调用直接略过
        if (!check(mappers, beanName)) {
            return bean;
        }
        try {
            mappers.add(beanName);
            // 从 Spring 源码中得知,获取bean 的工厂方法,只需要用 & + beanName ,就能从容器中获取创建 bean 的工厂bean
            Object factoryBean = ac.getBean("&" + beanName);            //获取 Mapper的工厂方法
            if (factoryBean != null && factoryBean instanceof MapperFactoryBean) {
                MapperFactoryBean mapperFactoryBean = (MapperFactoryBean) factoryBean;
                SqlSession sqlSession = mapperFactoryBean.getSqlSession();
                Configuration configuration = sqlSession.getConfiguration();
                // myBatisBaomidouService 主要是解析版本兼容问题,交给引入包的项目来解决不同版本兼容性问题
                CustomerMapperBuilder customerMapperBuilder = new CustomerMapperBuilder(configuration,
                        mapperFactoryBean.getObjectType(), myBatisBaomidouService);
                // 调用 parse 方法,解析 *Mapper.java中的方法,动态生成sql并保存到org.apache.ibatis.session.Configuration中
                customerMapperBuilder.parse();
            }
        } catch (BeansException e) {
            e.printStackTrace();
        } finally {
            mappers.add(beanName);
        }
        return bean;
    }

    public synchronized boolean check(List<String> mappers, String beanName) {
        if (mappers.contains(beanName)) {
            return false;
        }
        return true;
    }

}
ResolverBeanPostProcessor实现了ApplicationContextAware接口和BeanPostProcessor接口。
首先我们来看看ApplicationContextAware。
public interface ApplicationContextAware extends Aware {
    void setApplicationContext(ApplicationContext var1) throws BeansException;
}
那么setApplicationContext何时调用呢?


上图一系列的调用中得知,在resolverBeanPostProcessor实例化时,当属性设置完成,将调用其initializeBean,接着调用applyBeanPostProcessorsBeforeInitialization方法,获取容器中所有的BeanPostProcessor,再调用BeanPostProcessor的postProcessBeforeInitialization方法,ResolverBeanPostProcessor类的setApplicationContext方法是在调用 ApplicationContextAwareProcessor的postProcessBeforeInitialization方法时调用。在ApplicationContextAwareProcessor中继续调用invokeAwareInterfaces方法,接下来我们来看看invokeAwareInterfaces方法的内部实现。
ApplicationContextAwareProcessor.java
private void invokeAwareInterfaces(Object bean) {
    if (bean instanceof Aware) {
        if (bean instanceof EnvironmentAware) {
            ((EnvironmentAware)bean).setEnvironment(this.applicationContext.getEnvironment());
        }

        if (bean instanceof EmbeddedValueResolverAware) {
            ((EmbeddedValueResolverAware)bean).setEmbeddedValueResolver(this.embeddedValueResolver);
        }

        if (bean instanceof ResourceLoaderAware) {
            ((ResourceLoaderAware)bean).setResourceLoader(this.applicationContext);
        }

        if (bean instanceof ApplicationEventPublisherAware) {
            ((ApplicationEventPublisherAware)bean).setApplicationEventPublisher(this.applicationContext);
        }

        if (bean instanceof MessageSourceAware) {
            ((MessageSourceAware)bean).setMessageSource(this.applicationContext);
        }

        if (bean instanceof ApplicationContextAware) {
            ((ApplicationContextAware)bean).setApplicationContext(this.applicationContext);
        }
    }

}
在invokeAwareInterfaces方法中有一个非常重要的条件,如果 bean 实现了ApplicationContextAware,则将当前容器【ApplicationContext】通过setApplicationContext方法注入bean中,在 bean中就得到了当前容器的引用,拿到当前容器引用,我们就可以对当前容器中所有的 bean 进行"为所欲为"的查询及修改了。
接下来我们继续看BeanPostProcessor接口。
public interface BeanPostProcessor {

    Object postProcessBeforeInitialization(Object bean, String beanName) throws BeansException;

    Object postProcessAfterInitialization(Object bean, String beanName) throws BeansException;

}
这个接口分别提供了两个接口方法 postProcessBeforeInitialization和postProcessAfterInitialization,这两个方法有什么用呢?在 bean的生命周期中起到什么样的作用呢?我们来看一张 bean的生命周期图,这个图非常重要,几乎 Spring 所有Bean的生命周期都遵循这张图。
从上图中得知,在容器中的任何 Bean 在创建过程中,都会被实现了BeanPostProcessor接口的 bean拦截到,ResolverBeanPostProcessor实现BeanPostProcessor接口,主要是为了拦截到Spring 容器中所有被创建的 Bean,当发现是我们要找的Mapper.java时,我们就可以对其"动手动脚"了。
可能有读者会问了,你为什么不在InitializingBean 的 AfterPropertiesSet()方法中去增强Mapper而是在BeanPostProcessor的 postProcessAfterInitialization中去拦截呢?请听我尾尾道来。
首先我们来看看testUserMapper的BeanDefinition注册,
在代码中寻寻觅觅,我们发现,最终是调用ClassPathMapperScanner的 doScan 方法,才将我们的 Mapper.java 的BeanDefinition注册到容器中。
而又有人会问,basePackages,又是在我们的业务代码中哪里设置的呢?
相信 MapperScan注解大家不陌生吧,我们再来看看SpringBooot启动类。
在启动类中配置了MapperScan注解,我们来看看 MapperScan注解的内容。
@Retention(RetentionPolicy.RUNTIME)
@Target(ElementType.TYPE)
@Documented
@Import(MapperScannerRegistrar.class)
public @interface MapperScan {

  String[] value() default {};

  String[] basePackages() default {};

  Class<?>[] basePackageClasses() default {};

  Class<? extends BeanNameGenerator> nameGenerator() default BeanNameGenerator.class;

  Class<? extends Annotation> annotationClass() default Annotation.class;

  Class<?> markerInterface() default Class.class;

  String sqlSessionTemplateRef() default "";

  String sqlSessionFactoryRef() default "";

  Class<? extends MapperFactoryBean> factoryBean() default MapperFactoryBean.class;

}
从 MapperScan 的内容看,最常用的就是指定Mapper.java的包路径,但是有一个factoryBean属性引起了我的注意,我觉得可以在 MapperScan指定一个自定义CustomerMapperFactoryBean,并继承MapperFactoryBean从而来对 Mapper.java类增强
发现MapperFactoryBean继承了 DaoSupport,并且实现了InitializingBean接口,在 bean 的生命周期中肯定会调用afterPropertiesSet方法,那我们在CustomerMapperFactoryBean中重写afterPropertiesSet方法
但很遗憾的是,DaoSupport中的afterPropertiesSet方法是 final修饰的,不能被覆盖。
但是细心的读者肯定会发现在DaoSupport中有一个方法initDao是提供给子类覆盖的,那在这里来实现我们的Mapper增强,结果会怎样。
DaoSupport.java
public abstract class DaoSupport implements InitializingBean {

	protected final Log logger = LogFactory.getLog(getClass());
	@Override
	public final void afterPropertiesSet() throws IllegalArgumentException, BeanInitializationException {
		checkDaoConfig();
		try {
			initDao();
		}
		catch (Exception ex) {
			throw new BeanInitializationException("Initialization of DAO failed", ex);
		}
	}

	protected abstract void checkDaoConfig() throws IllegalArgumentException;

	protected void initDao() throws Exception {
	}
}
CustomerMapperFactoryBean.java
public class CustomerMapperFactoryBean extends MapperFactoryBean {
    protected void initDao() throws Exception {
        SqlSession sqlSession = getSqlSession();
        Configuration configuration = sqlSession.getConfiguration();
        // myBatisBaomidouService 主要是解析版本兼容问题,交给引入包的项目来解决不同版本兼容性问题
        MyBatisBaomidouService myBatisBaomidouService = new MyBatisBaomidouServiceImpl();
        CustomerMapperBuilder customerMapperBuilder = new CustomerMapperBuilder(configuration,
                this.getObjectType(), myBatisBaomidouService);
        // 调用 parse 方法,解析 *Mapper.java中的方法,动态生成sql并保存到org.apache.ibatis.session.Configuration中
        customerMapperBuilder.parse();
    }

}
指定 MapperScan 的 factoryBean。
此时,我觉得代码非常的优雅,我们来看看测试结果。

但遗憾的是程序出错了,解决了一会问题,没有解决掉,感兴趣的小伙伴可以根据我的思路来尝试一下,说不定你就解决了呢?如果有解决方案,请留言告诉我,我们一起学习,一起进步。那问题先放到这里吧,以后有时间再来研究。
恢复一下代码。我们继续来调试,我们从下图中看到了ClassPathMapperScanner类的继承关系,ClassPathMapperScanner继承ClassPathBeanDefinitionScanner,而在ClassPathMapperScanner中并没有自己实现 doScan 方法,而是调用父类的 doScan 方法。
接下来,我们来看看 doScan的内部实现,从下面代码中得知原理其实很简单,就是遍历所有包,并且获取每一个包下所有Bean的 BeanDefinition,但是不要小看下面的代码,findCandidateComponents方法内部实现极其复杂,在我之前的博客中专门写了一篇博客就是为了讲解这个方法,因为在 Spring内部需要通过 ASM 技术,解析java类字节码才能得到 Bean 的定义,包括注解解析,常量池解析,方法解析,等等,因此,在这里就不做深入研究了。
ClassPathBeanDefinitionScanner.java
protected Set<BeanDefinitionHolder> doScan(String... basePackages) {
	Assert.notEmpty(basePackages, "At least one base package must be specified");
	////创建bean定义的holder对象用于保存扫描后生成的bean定义对象
	// 创建一个集合,存入扫描到的Bean 定义的封装类
	Set<BeanDefinitionHolder> beanDefinitions = new LinkedHashSet<BeanDefinitionHolder>();
	//循环我们的包路径集合
	// 遍历扫描所给定的包
	for (String basePackage : basePackages) {
		// 找到候选的 @Component
		// 调用父类的 ClassPathScanningCandidateComponentProvider 的 findCandidateComponents 方法
		// 扫描给定类路径的,获取符合条件的Bean的定义
		// 类路径的Bean定义扫描 ClassPathBeanDefinitionScanner 主要通过 findCandidateComponents() 方法调用其父类 ClassPathScanningCandidateComponentProvider
		// 来扫描获取给定包及其子包的类
		Set<BeanDefinition> candidates = findCandidateComponents(basePackage);
		// 遍历扫描得到的Bean
		for (BeanDefinition candidate : candidates) {
			// 获取Bean定义类中的@Scope注解的值,即获取Bean的作用域
			ScopeMetadata scopeMetadata = this.scopeMetadataResolver.resolveScopeMetadata(candidate);
			// 为Bean设置注解配置的作用域
			candidate.setScope(scopeMetadata.getScopeName());
			//设置我们的beanName,为Bean生成名称
			String beanName = this.beanNameGenerator.generateBeanName(candidate, this.registry);
			// 处理@AutoWired相关的
			// 如果扫描到Bean不是Spring的注解Bean,则为Bean设置默认值
			// 设置Bean的自动依赖注入装配属性等
			if (candidate instanceof AbstractBeanDefinition) {
				postProcessBeanDefinition((AbstractBeanDefinition) candidate, beanName);
			}
			//处理jsr250相关的组件,如果扫描到的Bean是Spring的注解的Bean,则处理其通用的注解
			if (candidate instanceof AnnotatedBeanDefinition) {
				// 处理注解Bean中通过的注解,在分析注解Bean定义类读取器时已经分析过了
				AnnotationConfigUtils.processCommonDefinitionAnnotations((AnnotatedBeanDefinition) candidate);
			}
			//把我们解析出来的组件bean定义注册到Spring IoC容器中,根据Bean名称检查指定的Bean是否需要在容器注册,或者是否是容器中
			// 有冲突。
			if (checkCandidate(beanName, candidate)) {
				LogUtils.info(" scan bean Name :" + beanName);
				BeanDefinitionHolder definitionHolder = new BeanDefinitionHolder(candidate, beanName);
				// 根据注解中的配置的作用域,为Bean的应用的代理模式
				definitionHolder = AnnotationConfigUtils.applyScopedProxyMode(scopeMetadata, definitionHolder, this.registry);
				beanDefinitions.add(definitionHolder);
				//注册到Spring IoC容器中,向容器注册扫描到的Bean
				registerBeanDefinition(definitionHolder, this.registry);
			}
		}
	}
	return beanDefinitions;
}
在ClassPathBeanDefinitionScanner解析中,我们只得到了普通的 BeanDefinition定义,如下图所示:
那么在ClassPathMapperScanner中,又对BeanDefinition 做了哪些"添油加醋"的操作呢?我们接下来看processBeanDefinitions方法
ClassPathMapperScanner.java
private void processBeanDefinitions(Set<BeanDefinitionHolder> beanDefinitions) {
    GenericBeanDefinition definition;
    for (BeanDefinitionHolder holder : beanDefinitions) {
        definition = (GenericBeanDefinition) holder.getBeanDefinition();

        if (logger.isDebugEnabled()) {
            logger.debug("Creating MapperFactoryBean with name '" + holder.getBeanName()
                    + "' and '" + definition.getBeanClassName() + "' mapperInterface");
        }


        // mapper接口是bean的原始类,但是,bean的实际类是MapperFactoryBean
        definition.getConstructorArgumentValues().addGenericArgumentValue(definition.getBeanClassName()); // issue #59
        //设置 bean的实际类型为mapperFactoryBean
        definition.setBeanClass(this.mapperFactoryBean.getClass());

        definition.getPropertyValues().add("addToConfig", this.addToConfig);

        boolean explicitFactoryUsed = false;
        //如果 MapperScan 中设置了sqlSessionFactoryRef,添加sqlSessionFactory属性引用
        if (StringUtils.hasText(this.sqlSessionFactoryBeanName)) {
            definition.getPropertyValues().add("sqlSessionFactory", new RuntimeBeanReference(this.sqlSessionFactoryBeanName));
            explicitFactoryUsed = true;
        } else if (this.sqlSessionFactory != null) {
            definition.getPropertyValues().add("sqlSessionFactory", this.sqlSessionFactory);
            explicitFactoryUsed = true;
        }
		//如果 MapperScan的sqlSessionTemplateRef属性不为空,设置sqlSessionTemplate的引用
        if (StringUtils.hasText(this.sqlSessionTemplateBeanName)) {
            if (explicitFactoryUsed) {
                logger.warn("Cannot use both: sqlSessionTemplate and sqlSessionFactory together. sqlSessionFactory is ignored.");
            }
            definition.getPropertyValues().add("sqlSessionTemplate", new RuntimeBeanReference(this.sqlSessionTemplateBeanName));
            explicitFactoryUsed = true;
        } else if (this.sqlSessionTemplate != null) {
            if (explicitFactoryUsed) {
                logger.warn("Cannot use both: sqlSessionTemplate and sqlSessionFactory together. sqlSessionFactory is ignored.");
            }
            definition.getPropertyValues().add("sqlSessionTemplate", this.sqlSessionTemplate);
            explicitFactoryUsed = true;
        }
        if (!explicitFactoryUsed) {
            if (logger.isDebugEnabled()) {
                logger.debug("Enabling autowire by type for MapperFactoryBean with name '" + holder.getBeanName() + "'.");
            }
            definition.setAutowireMode(AbstractBeanDefinition.AUTOWIRE_BY_TYPE);
        }
    }
}
可能有读者不知道mapperFactoryBean属性是中哪里赋值的,看下面代码
ClassPathMapperScanner.java
private MapperFactoryBean<?> mapperFactoryBean = new MapperFactoryBean<Object>();

public void setMapperFactoryBean(MapperFactoryBean<?> mapperFactoryBean) {
  this.mapperFactoryBean = mapperFactoryBean != null ? mapperFactoryBean : new MapperFactoryBean<Object>();
}
如果MapperScan注解中没有配置factoryBean,默认情况下使用MapperFactoryBean作为 bean 类型,如果指定了,则使用指定类型。上述代码中还有一个非常重要方法调用,getConstructorArgumentValues.addGenericArgumentValue(),将当前Mapper的名称赋值给构造函数参数,这样做的用意是什么呢?我们来看看MapperFactoryBean的构造函数。
在MapperFactoryBean中有两个构造函数,一个无参数的构造函数,一个有参数的构造函数,有参数的构造函数接收一个接口参数,因此,我们将当前 Mapper的类名称添加到BeanDefinition 的genericArgumentValues属性中,在创建MapperFactoryBean 时,会调用有参数的构造方法,同时将 Mapper 接口作为参数传入。
理解了processBeanDefinitions方法,我们又来看看 MapperFactoryBean 的继承关系。如下图
我们发现MapperFactoryBean竟然继承 FactoryBean,那么说明此时的 Mapper是一个工厂Bean,在创建 Mapper 实例时,会调用工厂方法的getObject()方法来创建实例存储于容器中。我们再来看MapperFactoryBean中的方法。
上图中的每个方法都很重要。我们先来看看setSqlSessionFactory和setSqlSessionTemplate的实现,这两个方法是 MapperFactoryBean 从SqlSessionDaoSupport中继承而来。方法的实现很简单,就是给 MapperFactoryBean 的sqlSession属性赋值。那么可能又会有小伙伴会问sqlSessionFactory又是从哪里来,又是何时创建的呢?
小伙伴别急,请听我娓娓道来,在 Spring中任何一个 Bean的创建都依赖于Bean的 BeanDefinition,那么我们要找到sqlSessionFactory的创建过程,先要找到在哪里创建sqlSessionFactory的 BeanDefinition。
经过我在代码中寻寻觅觅,终于找到了sqlSessionFactory的 BeanDefinition 的创建。
首先,我们来看ConfigurationClassParser的doProcessConfigurationClass方法。
在ConfigurationClassParser的retrieveBeanMethodMetadata方法中。
ConfigurationClassParser.java
private Set<MethodMetadata> retrieveBeanMethodMetadata(SourceClass sourceClass) {
  AnnotationMetadata original = sourceClass.getMetadata();
  Set<MethodMetadata> beanMethods = original.getAnnotatedMethods(Bean.class.getName());
  if (beanMethods.size() > 1 && original instanceof StandardAnnotationMetadata) {
    //尝试通过ASM读取类文件以获得确定性声明顺序... ,不幸的是,
    //JVM的标准反射以任意顺序返回方法,即使在同一JVM上同一应用程序的不同运行之间也是如此。
    try {
      AnnotationMetadata asm =
          this.metadataReaderFactory.getMetadataReader(original.getClassName()).getAnnotationMetadata();
      //使用ASM读取类字节码获取注解了@Bean 注解的方法注解元数据
      Set<MethodMetadata> asmMethods = asm.getAnnotatedMethods(Bean.class.getName());
      if (asmMethods.size() >= beanMethods.size()) {
        Set<MethodMetadata> selectedMethods = new LinkedHashSet<MethodMetadata>(asmMethods.size());
        for (MethodMetadata asmMethod : asmMethods) {
          for (MethodMetadata beanMethod : beanMethods) {
            if (beanMethod.getMethodName().equals(asmMethod.getMethodName())) {
              selectedMethods.add(beanMethod);
              break;
            }
          }
        }
        if (selectedMethods.size() == beanMethods.size()) {
          //在ASM方法集中找到的所有反射检测方法->继续
          beanMethods = selectedMethods;
        }
      }
    }
    catch (IOException ex) {
      logger.debug("Failed to read class file via ASM for determining @Bean method order", ex);
      // No worries, let's continue with the reflection metadata we started with...
    }
  }
  return beanMethods;
}

将配置了@Bean 注解的方法元数据构建成BeanMethod对象添加到configClass的beanMethods属性中,我们再来看看MybatisAutoConfiguration的两个方法sqlSessionFactory(),sqlSessionTemplate()方法,这两个方法分别返回了SqlSessionFactory和SqlSessionTemplate对象,而这两个方法的注解元数据被加入到configClass的beanMethods属性中,接下来我们继续看是如何构建sqlSessionFactory的 BeanDefinition。
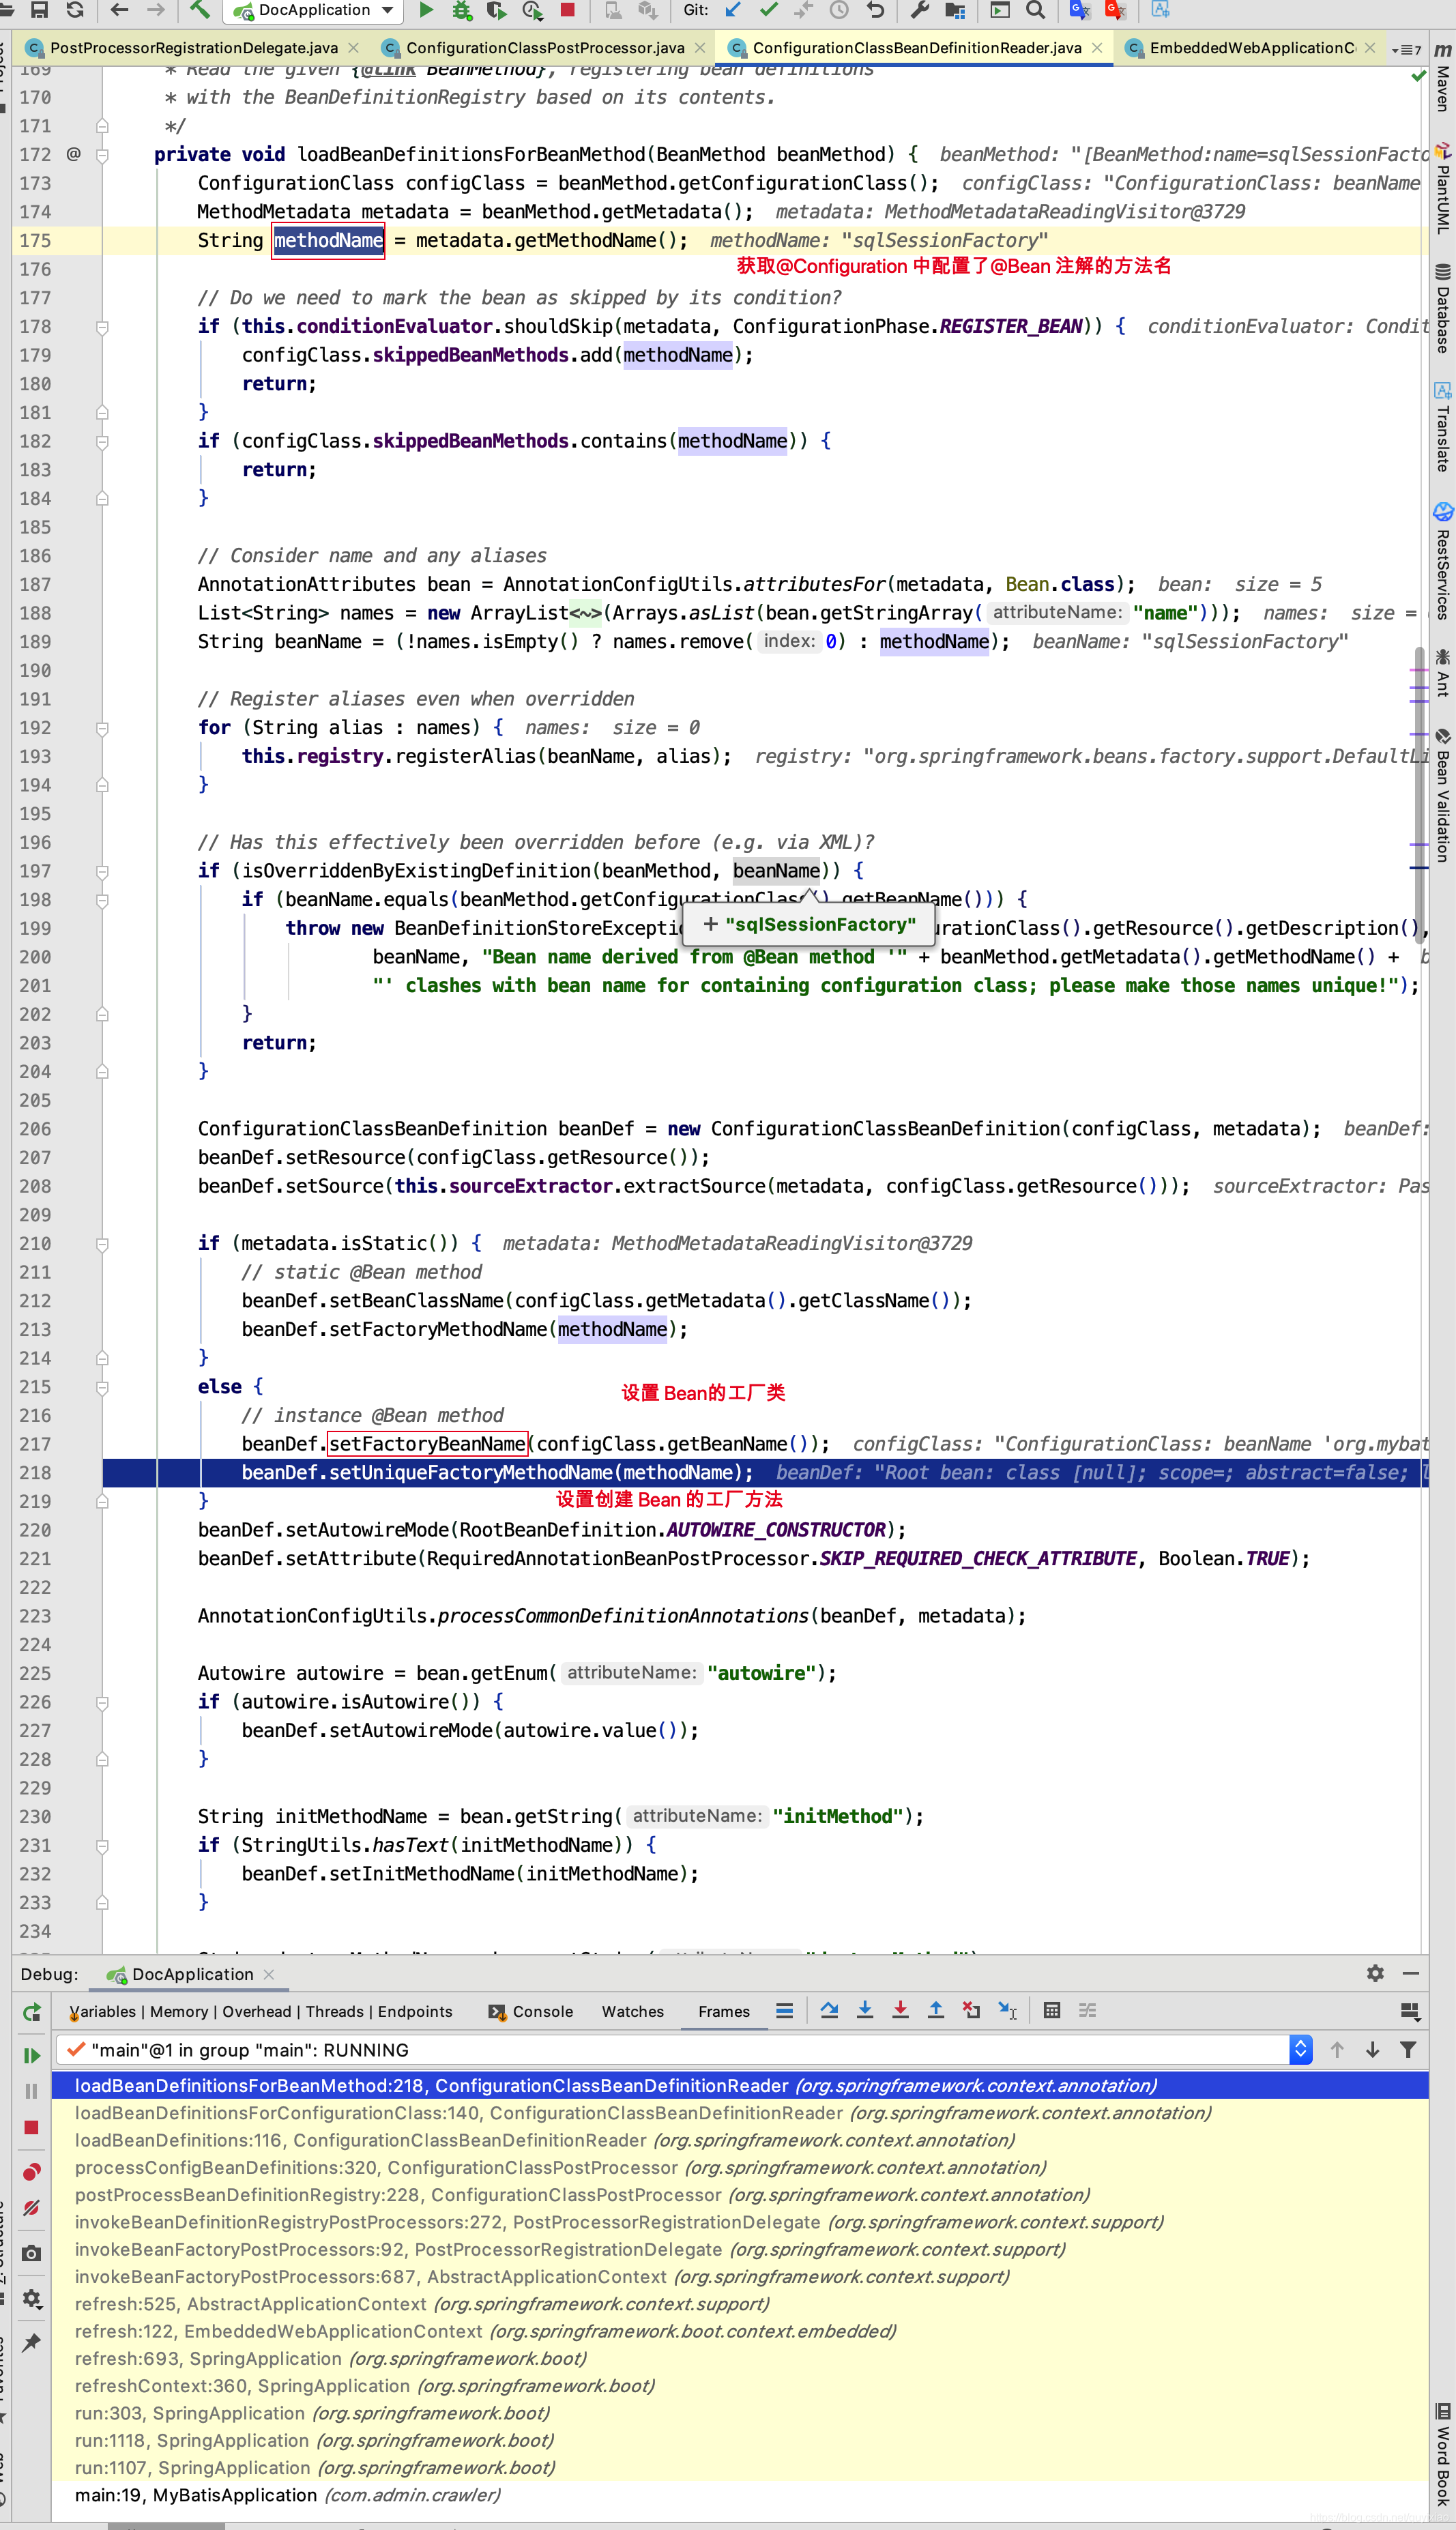
在invokeBeanFactoryPostProcessors方法中,所有配置了@Configuration 注解的 Bean ,并遍历其beanMethods,为 Bean构建 BeanDefinition。


调用所有配置了@Configuration注解的类,并调用loadBeanDefinitionsForConfigurationClass方法来对配置了@Bean 注解的方法构建BeanDefinition。
ConfigurationClassBeanDefinitionReader.java
private void loadBeanDefinitionsForConfigurationClass(ConfigurationClass configClass,
    TrackedConditionEvaluator trackedConditionEvaluator) {

  if (trackedConditionEvaluator.shouldSkip(configClass)) {
    String beanName = configClass.getBeanName();
    if (StringUtils.hasLength(beanName) && this.registry.containsBeanDefinition(beanName)) {
      this.registry.removeBeanDefinition(beanName);
    }
    this.importRegistry.removeImportingClass(configClass.getMetadata().getClassName());
    return;
  }

  if (configClass.isImported()) {
    registerBeanDefinitionForImportedConfigurationClass(configClass);
  }
  //遍历configClass的所有 BeanMethod对象,为其方法返回的类型添加 BeanDefinition
  for (BeanMethod beanMethod : configClass.getBeanMethods()) {
    loadBeanDefinitionsForBeanMethod(beanMethod);
  }
  loadBeanDefinitionsFromImportedResources(configClass.getImportedResources());
  loadBeanDefinitionsFromRegistrars(configClass.getImportBeanDefinitionRegistrars());
}

相信此此刻,大家非常清楚 MapperFactoryBean中的sqlSessionFactory和sqlSessionTemplate的来源了,来自于MybatisAutoConfiguration的sqlSessionFactory()和sqlSessionTemplate()方法的调用,而关于sqlSessionFactory需要传入dataSource,这里就不再深究了,感兴趣的小伙伴可以去研究一下,sqlSessionFactory中的 DataSource又是何时注入的呢?
MybatisAutoConfiguration.java
@Bean
@ConditionalOnMissingBean
public SqlSessionFactory sqlSessionFactory(DataSource dataSource) throws Exception {
  SqlSessionFactoryBean factory = new SqlSessionFactoryBean();
  factory.setDataSource(dataSource);
  factory.setVfs(SpringBootVFS.class);
  if (StringUtils.hasText(this.properties.getConfigLocation())) {
    factory.setConfigLocation(this.resourceLoader.getResource(this.properties.getConfigLocation()));
  }
  Configuration configuration = this.properties.getConfiguration();
  if (configuration == null && !StringUtils.hasText(this.properties.getConfigLocation())) {
    configuration = new Configuration();
  }
  if (configuration != null && !CollectionUtils.isEmpty(this.configurationCustomizers)) {
    for (ConfigurationCustomizer customizer : this.configurationCustomizers) {
      customizer.customize(configuration);
    }
  }
  //设置数据源 databaseId,如 MySql,Oracle 等
  factory.setConfiguration(configuration);
  if (this.properties.getConfigurationProperties() != null) {
    factory.setConfigurationProperties(this.properties.getConfigurationProperties());
  }
  //设置 MyBatis中拦截器插件,如本项目中使用到的DataScopeInterceptor拦截器
  if (!ObjectUtils.isEmpty(this.interceptors)) {
    factory.setPlugins(this.interceptors);
  }
  if (this.databaseIdProvider != null) {
    factory.setDatabaseIdProvider(this.databaseIdProvider);
  }
  //设置type-aliases-package
  if (StringUtils.hasLength(this.properties.getTypeAliasesPackage())) {
    factory.setTypeAliasesPackage(this.properties.getTypeAliasesPackage());
  }
  //设置 type-handlers-package
  if (StringUtils.hasLength(this.properties.getTypeHandlersPackage())) {
    factory.setTypeHandlersPackage(this.properties// 设置mapper-locations
  if (!ObjectUtils.isEmpty(this.properties.resolveMapperLocations())) {
    factory.setMapperLocations(this.properties.resolveMapperLocations());
  }
  return factory.getObject();
}

@Bean
@ConditionalOnMissingBean
public SqlSessionTemplate sqlSessionTemplate(SqlSessionFactory sqlSessionFactory) {
  ExecutorType executorType = this.properties.getExecutorType();
  if (executorType != null) {
    return new SqlSessionTemplate(sqlSessionFactory, executorType);
  } else {
    return new SqlSessionTemplate(sqlSessionFactory);
  }
}
在上述方法中主要是一些MyBatis 的 Configuration 的属性设置,可能又会有小伙伴会想了,properties对象MybatisProperties参数值是从哪里来的呢?我们先来看看
@ConfigurationProperties(prefix = MybatisProperties.MYBATIS_PREFIX)
public class MybatisProperties {

  public static final String MYBATIS_PREFIX = "mybatis";

  //MyBatis xml配置文件的位置
  private String configLocation;

  //MyBatis Mapper 文件位置
  private String[] mapperLocations;

  //MyBatis 类型别名所在包,可以以,; \t\n 隔开
  private String typeAliasesPackage;

  //MyBatis 类型处理器所有包 ,可以以 ,; \t\n 隔开
  private String typeHandlersPackage;

  //指示是否执行MyBatis xml配置文件的存在性检查。
  private boolean checkConfigLocation = false;


  private ExecutorType executorType;

  //MyBatis配置的外部化属性。
  private Properties configurationProperties;

  //用于自定义默认设置的Configuration对象。如果指定了{@link #configLocation} *,则不使用此属性
  @NestedConfigurationProperty
  private Configuration configuration;

	... get set 方法省略

  public Resource[] resolveMapperLocations() {
    ResourcePatternResolver resourceResolver = new PathMatchingResourcePatternResolver();
    List<Resource> resources = new ArrayList<Resource>();
    if (this.mapperLocations != null) {
      for (String mapperLocation : this.mapperLocations) {
        try {
          Resource[] mappers = resourceResolver.getResources(mapperLocation);
          resources.addAll(Arrays.asList(mappers));
        } catch (IOException e) {
          // ignore
        }
      }
    }
    return resources.toArray(new Resource[resources.size()]);
  }
}
再来看Spring 中是如何设置值的。如下图
SqlSessionFactoryBean.java
public SqlSessionFactory getObject() throws Exception {
  if (this.sqlSessionFactory == null) {
    afterPropertiesSet();
  }
  return this.sqlSessionFactory;
}
public void afterPropertiesSet() throws Exception {
  notNull(dataSource, "Property 'dataSource' is required");
  notNull(sqlSessionFactoryBuilder, "Property 'sqlSessionFactoryBuilder' is required");
  state((configuration == null && configLocation == null) || !(configuration != null && configLocation != null),
            "Property 'configuration' and 'configLocation' can not specified with together");

  this.sqlSessionFactory = buildSqlSessionFactory();
}
SqlSessionFactoryBean.java
protected SqlSessionFactory buildSqlSessionFactory() throws IOException {

  Configuration configuration;

  XMLConfigBuilder xmlConfigBuilder = null;
  if (this.configuration != null) {
    configuration = this.configuration;
    if (configuration.getVariables() == null) {
      configuration.setVariables(this.configurationProperties);
    } else if (this.configurationProperties != null) {
      configuration.getVariables().putAll(this.configurationProperties);
    }
  } else if (this.configLocation != null) {
    xmlConfigBuilder = new XMLConfigBuilder(this.configLocation.getInputStream(), null, this.configurationProperties);
    configuration = xmlConfigBuilder.getConfiguration();
  } else {
    if (LOGGER.isDebugEnabled()) {
      LOGGER.debug("Property 'configuration' or 'configLocation' not specified, using default MyBatis Configuration");
    }
    configuration = new Configuration();
    if (this.configurationProperties != null) {
      configuration.setVariables(this.configurationProperties);
    }
  }

  if (this.objectFactory != null) {
    configuration.setObjectFactory(this.objectFactory);
  }

  if (this.objectWrapperFactory != null) {
    configuration.setObjectWrapperFactory(this.objectWrapperFactory);
  }

  if (this.vfs != null) {
    configuration.setVfsImpl(this.vfs);
  }

  if (hasLength(this.typeAliasesPackage)) {
    String[] typeAliasPackageArray = tokenizeToStringArray(this.typeAliasesPackage,
        ConfigurableApplicationContext.CONFIG_LOCATION_DELIMITERS);
    for (String packageToScan : typeAliasPackageArray) {
      configuration.getTypeAliasRegistry().registerAliases(packageToScan,
              typeAliasesSuperType == null ? Object.class : typeAliasesSuperType);
      if (LOGGER.isDebugEnabled()) {
        LOGGER.debug("Scanned package: '" + packageToScan + "' for aliases");
      }
    }
  }

  if (!isEmpty(this.typeAliases)) {
    for (Class<?> typeAlias : this.typeAliases) {
      configuration.getTypeAliasRegistry().registerAlias(typeAlias);
      if (LOGGER.isDebugEnabled()) {
        LOGGER.debug("Registered type alias: '" + typeAlias + "'");
      }
    }
  }

  if (!isEmpty(this.plugins)) {
    for (Interceptor plugin : this.plugins) {
      configuration.addInterceptor(plugin);
      if (LOGGER.isDebugEnabled()) {
        LOGGER.debug("Registered plugin: '" + plugin + "'");
      }
    }
  }

  if (hasLength(this.typeHandlersPackage)) {
    String[] typeHandlersPackageArray = tokenizeToStringArray(this.typeHandlersPackage,
        ConfigurableApplicationContext.CONFIG_LOCATION_DELIMITERS);
    for (String packageToScan : typeHandlersPackageArray) {
      configuration.getTypeHandlerRegistry().register(packageToScan);
      if (LOGGER.isDebugEnabled()) {
        LOGGER.debug("Scanned package: '" + packageToScan + "' for type handlers");
      }
    }
  }

  if (!isEmpty(this.typeHandlers)) {
    for (TypeHandler<?> typeHandler : this.typeHandlers) {
      configuration.getTypeHandlerRegistry().register(typeHandler);
      if (LOGGER.isDebugEnabled()) {
        LOGGER.debug("Registered type handler: '" + typeHandler + "'");
      }
    }
  }

  if (this.databaseIdProvider != null) {//fix #64 set databaseId before parse mapper xmls
    try {
      configuration.setDatabaseId(this.databaseIdProvider.getDatabaseId(this.dataSource));
    } catch (SQLException e) {
      throw new NestedIOException("Failed getting a databaseId", e);
    }
  }

  if (this.cache != null) {
    configuration.addCache(this.cache);
  }

  if (xmlConfigBuilder != null) {
    try {
      xmlConfigBuilder.parse();

      if (LOGGER.isDebugEnabled()) {
        LOGGER.debug("Parsed configuration file: '" + this.configLocation + "'");
      }
    } catch (Exception ex) {
      throw new NestedIOException("Failed to parse config resource: " + this.configLocation, ex);
    } finally {
      ErrorContext.instance().reset();
    }
  }

  if (this.transactionFactory == null) {
    this.transactionFactory = new SpringManagedTransactionFactory();
  }

  configuration.setEnvironment(new Environment(this.environment, this.transactionFactory, this.dataSource));

  if (!isEmpty(this.mapperLocations)) {
    for (Resource mapperLocation : this.mapperLocations) {
      if (mapperLocation == null) {
        continue;
      }
      try {
        XMLMapperBuilder xmlMapperBuilder = new XMLMapperBuilder(.getInputStream(),
            configuration, mapperLocation.toString(), configuration.getSqlFragments());
        xmlMapperBuilder.parse();
      } catch (Exception e) {
        throw new NestedIOException("Failed to parse mapping resource: '" + mapperLocation + "'", e);
      } finally {
        ErrorContext.instance().reset();
      }

      if (LOGGER.isDebugEnabled()) {
        LOGGER.debug("Parsed mapper file: '" + mapperLocation + "'");
      }
    }
  } else {
    if (LOGGER.isDebugEnabled()) {
      LOGGER.debug("Property 'mapperLocations' was not specified or no matching resources found");
    }
  }
  return this.sqlSessionFactoryBuilder.build(configuration);
}
上述代码我相信大家并不陌生,只是将 mybatis 配置在 xml 文件中的配置搬到了 mybatis-spring包中实现。在mybatis.xml配置如下
<databaseIdProvider type="DB_VENDOR">
    <property name="MySQL" value="mysql" />
    <property name="Oracle" value="oracle" />
</databaseIdProvider>

<typeAliases>
  <package name="com.spring_101_200.test_121_130.test_128_mybatis_objectfactory"/>
</typeAliases>

<objectFactory type="com.spring_101_200.test_121_130.test_128_mybatis_objectfactory.UserObjectFactory">
    <property name="email" value="哈哈"/>
</objectFactory>

<objectWrapperFactory type="com.spring_101_200.test_121_130.test_129_mybatis_objectwrapper.MyMapWrapperFactory"></objectWrapperFactory>

<typeHandlers>
    <package name="com.spring_101_200.test_131_140.test_132_mybatis_typehandlers"/>
</typeHandlers>

<mappers>
    <package name="com.spring_101_200.test_131_140.test_132_mybatis_typehandlers"/>
    <!--<mapper resource="spring_101_200/config_131_140/spring132_mybatis_typehandlers/UserMapper.xml"></mapper>-->
    <!-- <mapper class="com.spring_101_200.test_131_140.test_132_mybatis_typehandlers.UserMapper"></mapper>-->
    <!--<mapper url="file:///Users/quyixiao/git/spring_tiny/src/main/resources/spring_101_200/config_131_140/spring132_mybatis_typehandlers/UserMapper.xml"></mapper>-->
</mappers>

<plugins>
    <plugin interceptor="com.spring_101_200.test_121_130.test_127_mybatis_plugins.DataScopeInterceptor">
        <property name="someProperty" value="100"/>
    </plugin>

    <plugin interceptor="com.spring_101_200.test_121_130.test_127_mybatis_plugins.QueryScopeInterceptor">
        <property name="someProperty" value="100"/>
    </plugin>
</plugins>
如果我们配置了configLocation,也就是Spring中配置了mybatis-config.xml 的路径,Spring会调用xmlConfigBuilder.parse();方法解析 mybatis配置文件。
XMLConfigBuilder.java
public Configuration parse() {
  if (parsed) {
    throw new BuilderException("Each XMLConfigBuilder can only be used once.");
  }
  parsed = true;
  parseConfiguration(parser.evalNode("/configuration"));
  return configuration;
}

private void parseConfiguration(XNode root) {
  try {
    propertiesElement(root.evalNode("properties"));
    Properties settings = settingsAsProperties(root.evalNode("settings"));
    loadCustomVfs(settings);
    typeAliasesElement(root.evalNode("typeAliases"));
    pluginElement(root.evalNode("plugins"));
    objectFactoryElement(root.evalNode("objectFactory"));
    objectWrapperFactoryElement(root.evalNode("objectWrapperFactory"));
    reflectorFactoryElement(root.evalNode("reflectorFactory"));
    settingsElement(settings);
    environmentsElement(root.evalNode("environments"));
    databaseIdProviderElement(root.evalNode("databaseIdProvider"));
    typeHandlerElement(root.evalNode("typeHandlers"));
    mapperElement(root.evalNode("mappers"));
  } catch (Exception e) {
    throw new BuilderException("Error parsing SQL Mapper Configuration. Cause: " + e, e);
  }
}
相信上面的代码大家很熟悉了,Spring调用了MyBatis的源码来解析用户自己配置的mybatis-config.xml文件。关于内部源码的解析,之前写过一篇博客专门解析 MyBatis 是如何解析配置文件及Mapper.xml文件的,这里就不再赘述。
如果用户配置了mapperLocations,如下图
那么Spring又会怎样做呢?请看
XMLMapperBuilder.java
public void parse() {
  if (!configuration.isResourceLoaded(resource)) {
    configurationElement(parser.evalNode("/mapper"));
    configuration.addLoadedResource(resource);
    //解析 XML 对应的 Mapper.java 文件中的mybatis标签注解
    bindMapperForNamespace();
  }

  parsePendingResultMaps();
  parsePendingCacheRefs();
  parsePendingStatements();
}

private void configurationElement(XNode context) {
  try {
    String namespace = context.getStringAttribute("namespace");
    if (namespace == null || namespace.equals("")) {
      throw new BuilderException("Mapper's namespace cannot be empty");
    }
    builderAssistant.setCurrentNamespace(namespace);
    cacheRefElement(context.evalNode("cache-ref"));
    cacheElement(context.evalNode("cache"));
    parameterMapElement(context.evalNodes("/mapper/parameterMap"));
    resultMapElements(context.evalNodes("/mapper/resultMap"));
    sqlElement(context.evalNodes("/mapper/sql"));
    buildStatementFromContext(context.evalNodes("select|insert|update|delete"));
  } catch (Exception e) {
    throw new BuilderException("Error parsing Mapper XML. The XML location is '" + resource + "'. Cause: " + e, e);
  }
}
相信细心的小伙伴肯定会发现,上面的标签好熟悉,你想对了,这不正是我们的Mapper.xml 文件中的标签吗?
接下来我们继续看SqlSessionFactory的构建。最终我们发现是创建了DefaultSqlSessionFactory作为SqlSessionFactory对象。sqlSessionTemplate对象的创建,和SqlSession 一样,这里就不再赘述。
public SqlSessionFactory build(Configuration config) {
  return new DefaultSqlSessionFactory(config);
}
关于setSqlSessionFactory()和setSqlSessionTemplate()方法我们终于分析完毕,下面我们来看看其他方法。我们先来看看MapperFactoryBean的afterPropertiesSet方法。
DaoSupport.java
public final void afterPropertiesSet() throws IllegalArgumentException, BeanInitializationException {
  checkDaoConfig();
  try {
    initDao();
  }
  catch (Exception ex) {
    throw new BeanInitializationException("Initialization of DAO failed", ex);
  }
}
protected abstract void checkDaoConfig() throws IllegalArgumentException;
protected void initDao() throws Exception {
}
MapperFactoryBean.java
protected void checkDaoConfig() {
  super.checkDaoConfig();

  notNull(this.mapperInterface, "Property 'mapperInterface' is required");

  Configuration configuration = getSqlSession().getConfiguration();
  //addToConfig默认为 true,如果Configuration的mapperRegistry对象的
  //knownMappers集合中并没有 Mapper,则加入到集合中
  if (this.addToConfig && !configuration.hasMapper(this.mapperInterface)) {
    try {
      configuration.addMapper(this.mapperInterface);
    } catch (Exception e) {
      logger.error("Error while adding the mapper '" + this.mapperInterface + "' to configuration.", e);
      throw new IllegalArgumentException(e);
    } finally {
      ErrorContext.instance().reset();
    }
  }
}
在MapperFactoryBean的afterPropertiesSet方法实际上只调用了checkDaoConfig方法,因为initDao默认是空实现,并没有什么业务逻辑,而在checkDaoConfig方法中,将接口 Mapper 加入到configuration的mapperRegistry对象的knownMappers属性中,我们来看看内部实现。
Configuration.java
public <T> void addMapper(Class<T> type) {
  mapperRegistry.addMapper(type);
}
MapperRegistry.java
public <T> void addMapper(Class<T> type) {
  if (type.isInterface()) {
    if (hasMapper(type)) {
      throw new BindingException("Type " + type + " is already known to the MapperRegistry.");
    }
    boolean loadCompleted = false;
    try {
      knownMappers.put(type, new MapperProxyFactory<T>(type));
      MapperAnnotationBuilder parser = new MapperAnnotationBuilder(config, type);
      parser.parse();
      loadCompleted = true;
    } finally {
      if (!loadCompleted) {
        knownMappers.remove(type);
      }
    }
  }
}
因为之前所有的*.Mapper.xml 己经被MyBatis解析,此时只能基于 Mapper. java配置了注解方法进行解析。我们继续来看parse方法。
MapperAnnotationBuilder.java
public MapperAnnotationBuilder(Configuration configuration, Class<?> type) {
  String resource = type.getName().replace('.', '/') + ".java (best guess)";
  this.assistant = new MapperBuilderAssistant(configuration, resource);
  this.configuration = configuration;
  this.type = type;

  ...
}
public void parse() {
  String resource = type.toString();
  if (!configuration.isResourceLoaded(resource)) {
  	//如果有 Mapper对应的 Xml 没有被加载,加载 Mapper.java 包下的 Mapper.xml文件
    loadXmlResource();
    configuration.addLoadedResource(resource);
    assistant.setCurrentNamespace(type.getName());
    parseCache();
    parseCacheRef();
    Method[] methods = type.getMethods();
    for (Method method : methods) {
      try {
        if (!method.isBridge()) {
          parseStatement(method);
        }
      } catch (IncompleteElementException e) {
        configuration.addIncompleteMethod(new MethodResolver(this, method));
      }
    }
  }
  parsePendingMethods();
}
isResourceLoaded和addLoadedResource方法,我相信很好理解,如 TestUserMapper.java 文件在解析的过程中,如果外部继续调用parse方法,则不再进行解析。loadXmlResource方法的用意就是在解析 Mapper.java中的注解时,如果 Mapper.xml没有被解析,则先解析 Mapper.xml。但是Mapper.xml文件的路径有要求,必需是和 Mapper.java 是在同一个路径下。
private void loadXmlResource() {
  if (!configuration.isResourceLoaded("namespace:" + type.getName())) {
    String xmlResource = type.getName().replace('.', '/') + ".xml";
    InputStream inputStream = null;
    try {
      inputStream = Resources.getResourceAsStream(type.getClassLoader(), xmlResource);
    } catch (IOException e) {
      // ignore, resource is not required
    }
    if (inputStream != null) {
      XMLMapperBuilder xmlParser = new XMLMapperBuilder(inputStream, assistant.getConfiguration(), xmlResource, configuration.getSqlFragments(), type.getName());
      xmlParser.parse();
    }
  }
}
我们又看到了isResourceLoaded方法,意思就是如果 Mapper.xml 己经被解析了,就不再解析 Mapper.java 对应的 Mapper.xml 文件,但是"namespace:" + type.getName()是在何时被加入到Configuration对象的loadedResources中的呢?带着疑问,我们在代码中寻寻觅觅。发现在解析 Mapper.xml 文件后,调用了如下方法,在如下方法中添加了"namespace:" + type.getName()到loadedResources中
XMLMapperBuilder.java
private void bindMapperForNamespace() {
  String namespace = builderAssistant.getCurrentNamespace();
  if (namespace != null) {
    Class<?> boundType = null;
    try {
      boundType = Resources.classForName(namespace);
    } catch (ClassNotFoundException e) {
      //ignore, bound type is not required
    }
    if (boundType != null) {
      if (!configuration.hasMapper(boundType)) {
        configuration.addLoadedResource("namespace:" + namespace);
        configuration.addMapper(boundType);
      }
    }
  }
}
其实从上述源码解析中,我们得出一个结论,在解析完 xml 后,MyBatis 会找到命名空间对应的 Mapper.java 接口,并解析接口方法中配置的 MyBatis 注解标签。其实只要我们配置了 mapper-locations
并且 Mapper.xml 文件中命名空间配置正确,其实@MapperScan注解配置或者不配置都不重要,因为 Mapper.xml解析完成以后,肯定会找到命名空间对应的 Mapper.java 并解析其配置的 Mybatis 注解标签。

上述中己经将 Mapper.xml 文件及 Mapper.java 文件都己经被解析完了,因此我们来看看MapperFactoryBean的getObject方法。
MapperFactoryBean.java
public T getObject() throws Exception {
  return getSqlSession().getMapper(this.mapperInterface);
}
DefaultSqlSession.java
@Override
public <T> T getMapper(Class<T> type) {
  return configuration.<T>getMapper(type, this);
}
Configuration.java
public <T> T getMapper(Class<T> type, SqlSession sqlSession) {
  return mapperRegistry.getMapper(type, sqlSession);
}
MapperRegistry.java
public <T> T getMapper(Class<T> type, SqlSession sqlSession) {
  final MapperProxyFactory<T> mapperProxyFactory = (MapperProxyFactory<T>) knownMappers.get(type);
  if (mapperProxyFactory == null) {
    throw new BindingException("Type " + type + " is not known to the MapperRegistry.");
  }
  try {
    return mapperProxyFactory.newInstance(sqlSession);
  } catch (Exception e) {
    throw new BindingException("Error getting mapper instance. Cause: " + e, e);
  }
}
MapperProxyFactory.java
public T newInstance(SqlSession sqlSession) {
  final MapperProxy<T> mapperProxy = new MapperProxy<T>(sqlSession, mapperInterface, methodCache);
  return newInstance(mapperProxy);
}

protected T newInstance(MapperProxy<T> mapperProxy) {
  return (T) Proxy.newProxyInstance(mapperInterface.getClassLoader(), new Class[] { mapperInterface }, mapperProxy);
}
代码跟进到这里,我相信大家己经明白了,最终Spring 容器中存储的TestUserMapper,竟然是一个JDK代理对象,而代理工厂是MapperProxy,那么我们继续来看MapperProxy的 invoke 方法。
MapperProxy.java
public class MapperProxy<T> implements InvocationHandler, Serializable {

  private static final long serialVersionUID = -6424540398559729838L;
  private final SqlSession sqlSession;
  private final Class<T> mapperInterface;
  private final Map<Method, MapperMethod> methodCache;

  public MapperProxy(SqlSession sqlSession, Class<T> mapperInterface, Map<Method, MapperMethod> methodCache) {
    this.sqlSession = sqlSession;
    this.mapperInterface = mapperInterface;
    this.methodCache = methodCache;
  }

  @Override
  public Object invoke(Object proxy, Method method, Object[] args) throws Throwable {
    try {
      if (Object.class.equals(method.getDeclaringClass())) {
      	//如果是 Object 中的方法,直接反射调用,如 getClass,hashCode,equals,clone方法等
        return method.invoke(this, args);
      } else if (isDefaultMethod(method)) {
        return invokeDefaultMethod(proxy, method, args);
      }
    } catch (Throwable t) {
      throw ExceptionUtil.unwrapThrowable(t);
    }
    final MapperMethod mapperMethod = cachedMapperMethod(method);
    return mapperMethod.execute(sqlSession, args);
  }
  ....
}
上述中真正重要的是execute方法,接下来看看execute方法的内部实现。
public class MapperMethod {

  private final SqlCommand command;
  private final MethodSignature method;

  public MapperMethod(Class<?> mapperInterface, Method method, Configuration config) {
    this.command = new SqlCommand(config, mapperInterface, method);
    this.method = new MethodSignature(config, mapperInterface, method);
  }

  public Object execute(SqlSession sqlSession, Object[] args) {
    Object result;
    switch (command.getType()) {
      case INSERT: {
      Object param = method.convertArgsToSqlCommandParam(args);
        result = rowCountResult(sqlSession.insert(command.getName(), param));
        break;
      }
      case UPDATE: {
        Object param = method.convertArgsToSqlCommandParam(args);
        result = rowCountResult(sqlSession.update(command.getName(), param));
        break;
      }
      case DELETE: {
        Object param = method.convertArgsToSqlCommandParam(args);
        result = rowCountResult(sqlSession.delete(command.getName(), param));
        break;
      }
      case SELECT:
        if (method.returnsVoid() && method.hasResultHandler()) {
          executeWithResultHandler(sqlSession, args);
          result = null;
        } else if (method.returnsMany()) {
          result = executeForMany(sqlSession, args);
        } else if (method.returnsMap()) {
          result = executeForMap(sqlSession, args);
        } else if (method.returnsCursor()) {
          result = executeForCursor(sqlSession, args);
        } else {
          Object param = method.convertArgsToSqlCommandParam(args);
          result = sqlSession.selectOne(command.getName(), param);
        }
        break;
      case FLUSH:
        result = sqlSession.flushStatements();
        break;
      default:
        throw new BindingException("Unknown execution method for: " + command.getName());
    }
    if (result == null && method.getReturnType().isPrimitive() && !method.returnsVoid()) {
      throw new BindingException("Mapper method '" + command.getName()
          + " attempted to return null from a method with a primitive return type (" + method.getReturnType() + ").");
    }
    return result;
  }

}
因此我们在用TestUser testUser = testUserMapper.selectUserByCondition(1l, 1, “张三”, userInfo);调用selectUserByCondition方法,实际上调用的是JDK代理对象的 invoke 方法。在代理对象中实现了复杂的逻辑,并将结果值返回到业务代码中来,关于 execute 方法内部是如何实现的,在之前的博客中也己经详细的解析过了,这里也不再赘述,其实这篇博客对 mybatis原理的解析,之前的博客中己经或多或者的提及过了,现在只不过是为了更加好的理解插件的开发原理,才详细的说明,我相信此时此刻,我们对 mybatis 的原理及 SpringBoot中 mybatis整合有了一定的了解了,接下来我们再来看我们插件的实现。在了解插件之前,我们再次来看看Spring中Bean 的生命周期。

为了避免对己有的 Mapper.xml及 Mapper.java 代码的影响,我们只能将代码加到 MapperFactoryBean的 checkDaoConfig()方法之后,本来我们可以加到initDao方法中的,但是为了避免对MapperFactoryBean的修改,还是加到postProcessAfterInitialization中吧,之前也测试过,报错,我这边也不去究其原因了,感兴趣的小伙伴可以去研究一下,我觉得加到 initDao方法中,代码会更加优雅。
接下来我们继续看ResolverBeanPostProcessor的postProcessAfterInitialization方法的内部实现。
ResolverBeanPostProcessor.java
public Object postProcessAfterInitialization(Object bean, String beanName) throws BeansException {
    // 只对 MapperFactoryBean 作处理,非MapperFactoryBean 略过
    if (!(bean instanceof MapperFactoryBean)) {
        return bean;
    }
    // 解决多次调用问题,如在项目启动过程中,一个MapperFactoryBean可能会多次调用postProcessAfterInitialization方法
    // Mapper 动态生成 sql只需要调用一次就可以了,如果容器多次调用,后面的调用直接略过
    if (!check(mappers, beanName)) {
        return bean;
    }
    try {
        mappers.add(beanName);
        // 从 Spring 源码中得知,获取bean 的工厂方法,只需要用 & + beanName ,就能从容器中获取创建 bean 的工厂bean
        Object factoryBean = ac.getBean("&" + beanName);            //获取 Mapper的工厂方法
        if (factoryBean != null && factoryBean instanceof MapperFactoryBean) {
            MapperFactoryBean mapperFactoryBean = (MapperFactoryBean) factoryBean;
            SqlSession sqlSession = mapperFactoryBean.getSqlSession();
            Configuration configuration = sqlSession.getConfiguration();
            // myBatisBaomidouService 主要是解析版本兼容问题,交给引入包的项目来解决不同版本兼容性问题
            CustomerMapperBuilder customerMapperBuilder = new CustomerMapperBuilder(configuration,
                    mapperFactoryBean.getObjectType(), myBatisBaomidouService);
            // 调用 parse 方法,解析 *Mapper.java中的方法,动态生成sql并保存到org.apache.ibatis.session.Configuration中
            customerMapperBuilder.parse();
        }
    } catch (BeansException e) {
        e.printStackTrace();
    } finally {
        mappers.add(beanName);
    }
    return bean;
}
上述代码其实很简单,我们想获取 bean的工厂bean,只需要在 bean的名称前加上&,就能从容器中获取工厂 bean 了,Spring 内部就是这样写死的,MapperFactoryBean中通过setSqlSessionFactory()方法,己经将DefaultSqlSessionFactory对象设置到sqlSession中,因此我们就可以通过sqlSession得到configuration,及 DataSource。
上述 parse()方法是不是和下面的方法很相似,你猜得没错,就是一样的,接下来,我们来看看parse方法的内部实现。
CustomerMapperBuilder.java
public class CustomerMapperBuilder extends MapperAnnotationBuilder {
    private final Set<Class<? extends Annotation>> customerAnnotationTypes = new HashSet<Class<? extends Annotation>>();

    private Configuration configuration = null;
    private MapperBuilderAssistant assistant = null;
    private Class<?> type = null;
    private static JdbcTemplate jdbcTemplate = null;
    private String tableName;
    private List<String> tableColumns;
    private List<String> primaryColumns;
    public final static String TABLENAME = "TableName";
    public MyBatisBaomidouService myBatisBaomidouService;
    protected final TypeAliasRegistry typeAliasRegistry;
    private Class entityType;

    public CustomerMapperBuilder(Configuration configuration, Class<?> type, MyBatisBaomidouService myBatisBaomidouService) {
        super(configuration, type);
        String resource = type.getName().replace('.', '/') + ".java (best guess)";
        this.assistant = new MapperBuilderAssistant(configuration, resource);
        this.configuration = configuration;
        this.type = type;
        this.myBatisBaomidouService = myBatisBaomidouService;
        this.typeAliasRegistry = this.configuration.getTypeAliasRegistry();
        try {
            // 有些 mybatis Configuration 的 useGeneratedKeys 字段没有默认设置为true,为了保险起见,还是调用一下setUseGeneratedKeys
            // 设置其默认值为 true
            Method method = Configuration.class.getMethod("setUseGeneratedKeys", boolean.class);
            if (method != null) {
                // invoke  setUseGeneratedKeys set value true
                method.invoke(configuration, true);          //默认不需要写@Param注解,就能在 sql 中引用方法参数名称
            }
        } catch (Exception e) {
            e.printStackTrace();
        }
        // 获取 Datasource 构建jdbcTemplate ,主要用途是用来在项目启动时获取数据库表中的所有字段
        if (jdbcTemplate == null) {
            final Environment environment = configuration.getEnvironment();
            DataSource dataSource = environment.getDataSource();
            jdbcTemplate = new JdbcTemplate(dataSource);
        }

        // 获取表名,看Mapper的继承类中有没有配置泛型,如果配置泛型,看泛型对象是否有@TableName注解,如果有@TableName注解
        // 获取@TableName注解的 value 作为表名称
        tableName = SqlParseUtils.findTableName(type);
        entityType = SqlParseUtils.findEntityType(type);    //找到实体名称
        if (StringUtils.isEmpty(tableName)) { //
            tableName = SqlParseUtils.getAnnotationValueByTypeName(type, TABLENAME);
        }
        //如果表名为空,则直接退出
        if (StringUtils.isEmpty(tableName)) {
            return;
        }
        //通过 jdbc 获取表信息,主要是表的主键列 和 表的所有列
        Tuple2<List<String>, List<String>> tableInfos = getTableInfo(jdbcTemplate, tableName).getData();
        primaryColumns = tableInfos.getFirst();
        tableColumns = tableInfos.getSecond();
        // 初始化 Select ,Insert ,Update,Delete 注解,如:
        // 我们在 Mapper 中定义了一个方法 selectUser(String username) ; 但是方法上确配置了@Delete注解
        // 那么最后动态生成的 sql  是 delete from user where username = #{username}
        // 如果selectUser没有配置 @Delete 注解,那么生成的 sql 是 select * from user where username = #{username}
        // Select ,Insert ,Update,Delete 注解的作用主要是指定方法的是查询 ,更新,插入,还是删除
        // 默认情况下,方法名以:
        // select 开头的方法是 查询操作
        // update 开头的方法是 更新操作
        // insert 开头的方法是 插入操作
        // delete 开头的方法是 删除操作
        customerAnnotationTypes.add(Select.class);
        customerAnnotationTypes.add(Insert.class);
        customerAnnotationTypes.add(Update.class);
        customerAnnotationTypes.add(Delete.class);
    }
相信读者看了上述代码以后,觉得也不难,无非就是根据表名获取表中的主键列和表中所有的列而已,而需要注意的是,默认情况下,select 开头的方法,表示 select 操作,delete 开头的方法,表示 delete操作,在customerAnnotationTypes集合中添加了插件自定义的注解Select,Insert,Update,Delete,主要是为了解决,如果 delete 开头的方法,我想要 select 操作,怎么办,直接在 delete 方法上加上@Select 注解即可,PluginTuple对象只是一个元组而已,java 中不支持元组,但是我想用元组,只能自定义了。
    public void parse() {
        // 获取 *Mapper.java 中的所有方法
        Method[] methods = type.getMethods();
        // 设置名称空间
        assistant.setCurrentNamespace(type.getName());
        // PluginTuple 是一个java元组,类似于 python 中的元组
        List<PluginTuple> pluginTuples = new ArrayList<>();
        for (Method method : methods) {
            try {
                String methodName = method.getName();
                // 以currentNamespace + . + methodName 构建 id ,在 mybatis 源码中也是这样构建 id的
                // 这个 id 在 configuration 中唯一,以 id为key,保存 mappedStatement
                String id = assistant.applyCurrentNamespace(methodName, false);
                MappedStatement mappedStatement = null;
                try {
                    mappedStatement = configuration.getMappedStatement(id);
                } catch (Exception e) {
                }
                // 如果 Mapper 中的方法没有对应的mappedStatement, 并且方法不是桥接方法,则为此方法生成 mappedStatement
                if (!method.isBridge() && mappedStatement == null) {
                    Tuple1<Boolean> one = parseStatement(method).getData();
                    pluginTuples.add(new PluginTuple(one.getFirst(), method));
                }
            } catch (IncompleteElementException e) {
                configuration.addIncompleteMethod(new MethodResolver(this, method));
            }catch (Exception e ){
                e.printStackTrace();
            }
        }
        // 这个方法的目的主要是解决:
        // 如: 在 A.xml 的 selectXXX 方法引用了一个 B.xml 的 <resultMap .../> 的 id,但是在解析 A.xml 时,B.xml还没有被解析
        // 这个时候,解析器会将selectXXX方法的信息存储于 configuration 的 incompleteMethods属性中。
        // 当 C.xml 己经解析完了,会查看configuration 的 incompleteMethods属性中是否有未初始化完成的 method
        // 如果有,则继续去完成 selectXXX 的 mappedStatement 的创建,如果还是失败,将抛出 IncompleteElementException异常,
        // selectXXX信息会继续留incompleteMethods中等待下一个 *.xml 的解析,
        // 直到selectXXX引用的 resultMap所在的 B.xml 被解析完成 ,此时创建selectXXX的mappedStatement将不会抛出异常,
        // 并且将selectXXX方法的信息从从configuration 的 incompleteMethods属性移除
        // selectXXX的mappedStatement就己经创建完成,并将创建好的mappedStatement保存到configuration的mappedStatements属性中
        parsePendingMethods();

        Object mapperRegistry = configuration.getMapperRegistry();
        if ("MybatisMapperRegistry".equals(mapperRegistry.getClass().getSimpleName())) {
        	//对于不同版本的 baonidou 插件支持
            myBatisBaomidouService.init(pluginTuples, configuration, type);
        } else if (mapperRegistry instanceof MapperRegistry) {
        	//没有使用 baomidou插件情况下,原生 mybatis 处理方式
            originMyBatis(pluginTuples);
        }
    }
}
在上述中,所有己经被解析的 Mapper中的方法会被生成一个个mappedStatement,存储于Configuration 的mappedStatements属性中,而mappedStatements是一个 Map类型,因此,我们根据存储的 id从mappedStatements获取相应的mappedStatement,如果mappedStatement为空,说明该方法没有配置@Select(“select * from tableName … “) 注解或在 Mapper.xml 中没有生成如<select id=”…” />相应的标签,这个方法就是我们需要为其动态添加sql的方法。
在解析Statement 之前,我们先来看看Options注解。
@Documented
@Retention(RetentionPolicy.RUNTIME)
@Target(ElementType.METHOD)
public @interface Options {

  public enum FlushCachePolicy {
    DEFAULT,

    TRUE,

    FALSE
  }
  // useCache = true表示本次查询结果被缓存以提高下次查询速度,
  boolean useCache() default true;
  // flushCache = false表示下次查询时不刷新缓存,
  FlushCachePolicy flushCache() default FlushCachePolicy.DEFAULT;

  ResultSetType resultSetType() default ResultSetType.FORWARD_ONLY;

  StatementType statementType() default StatementType.PREPARED;

  int fetchSize() default -1;
  //timeout = 10000表示查询结果缓存10000秒。
  int timeout() default -1;
  // 主键是否自增
  boolean useGeneratedKeys() default false;
  // 设置的主键对应的字段名
  String keyProperty() default "id";
  // 设置的主键对应的数据库列
  String keyColumn() default "";
  //可以自定义resultSet结果集处理方法
  String resultSets() default "";
}
了解了Options注解的参数之后,我们再来看看parseStatement()方法的解析。
CustomerMapperBuilder.java
PluginTuple parseStatement(Method method) throws Exception {
    Class<?> parameterTypeClass = getParameterType(method);
    LanguageDriver languageDriver = getLanguageDriver(method);
    SqlCommandType sqlCommandType = getSqlCommandType(method);
    PluginTuple data = getSqlSourceFromAnnotations(method, parameterTypeClass, languageDriver, sqlCommandType);
    Tuple5<Boolean, SqlSource, String, String, String> tupleInfo = data.getData();
    //如果返回了ResultMap标签,则需解析resultMap ,并添加到configuration的resultMaps属性中
    if (StringUtils.isNotEmpty(tupleInfo.getFourth())) {
        XPathParser xPathParser = new XPathParser(tupleInfo.getFifth());
        List<XNode> xNodeList = xPathParser.evalNodes("/resultMap");
        resultMapElement(xNodeList.get(0));
    }
    SqlSource sqlSource = tupleInfo.getSecond();
    String keyPropertyPre = "";
    if (StringUtils.isNotEmpty(tupleInfo.getThird())) {
        keyPropertyPre = tupleInfo.getThird();
    }

    if (sqlSource != null) {
        Options options = method.getAnnotation(Options.class);
        final String mappedStatementId = type.getName() + "." + method.getName();
        Integer fetchSize = null;
        Integer timeout = null;
        StatementType statementType = StatementType.PREPARED;
        ResultSetType resultSetType = ResultSetType.FORWARD_ONLY;

        boolean isSelect = sqlCommandType == SqlCommandType.SELECT;
        boolean flushCache = !isSelect;
        boolean useCache = isSelect;

        KeyGenerator keyGenerator;
        String keyProperty = keyPropertyPre + "id";
        String keyColumn = null;
        //如果是 insert 或 update,需要回显主键
        if (SqlCommandType.INSERT.equals(sqlCommandType) || SqlCommandType.UPDATE.equals(sqlCommandType)) {
            SelectKey selectKey = method.getAnnotation(SelectKey.class);
            KeyGenerator jdbc3KeyGenerator = SqlCommandType.INSERT.equals(sqlCommandType) ?
                    Jdbc3KeyGenerator.INSTANCE : CustomerJdbc3KeyGenerator.INSTANCE;
            if (selectKey != null) {
                keyGenerator = handleSelectKeyAnnotation(selectKey, mappedStatementId, getParameterType(method), languageDriver);
                keyProperty = selectKey.keyProperty();
            } else if (options == null) {
                keyGenerator = configuration.isUseGeneratedKeys() ? jdbc3KeyGenerator : NoKeyGenerator.INSTANCE;
            } else {
                keyGenerator = options.useGeneratedKeys() ? jdbc3KeyGenerator : NoKeyGenerator.INSTANCE;
                keyProperty = options.keyProperty();
                keyColumn = options.keyColumn();
            }
        } else {
            keyGenerator = NoKeyGenerator.INSTANCE;
        }
        if (options != null) {
            if (Options.FlushCachePolicy.TRUE.equals(options.flushCache())) {
                flushCache = true;
            } else if (Options.FlushCachePolicy.FALSE.equals(options.flushCache())) {
                flushCache = false;
            }
            useCache = options.useCache();
            fetchSize = options.fetchSize() > -1 || options.fetchSize() == Integer.MIN_VALUE ? options.fetchSize() : null; //issue #348
            timeout = options.timeout() > -1 ? options.timeout() : null;
            statementType = options.statementType();
            resultSetType = options.resultSetType();
        }
        String resultMapId = null;
        if(StringUtils.isEmpty(tupleInfo.getFourth())){
            ResultMap resultMapAnnotation = method.getAnnotation(ResultMap.class);
            if (resultMapAnnotation != null) {
                String[] resultMaps = resultMapAnnotation.value();
                StringBuilder sb = new StringBuilder();
                for (String resultMap : resultMaps) {
                    if (sb.length() > 0) {
                        sb.append(",");
                    }
                    sb.append(resultMap);
                }
                resultMapId = sb.toString();
            } else if (isSelect) {
                resultMapId = parseResultMap(method);
            }
        }else{
            resultMapId = tupleInfo.getFourth();
        }

        assistant.addMappedStatement(
                mappedStatementId,
                sqlSource,
                statementType,
                sqlCommandType,
                fetchSize,
                timeout,
                // ParameterMapID
                null,
                parameterTypeClass,
                resultMapId,
                getReturnType(method),
                resultSetType,
                flushCache,
                useCache,
                // TODO gcode issue #577
                false,
                keyGenerator,
                keyProperty,
                keyColumn,
                // DatabaseID
                null,
                languageDriver,
                // ResultSets
                options != null ? nullOrEmpty(options.resultSets()) : null);
    }
    return data;
}
上述代码主要是对Options,SelectKey,ResultMap注解属性的获取入封装到 MappedStatement 中去,在上述代码中需要注意的是,当元组返回第5个参数不为空时,说明在 sql 解析时需要添加 resultMap映射,这个时候调用resultMapElement方法解析resultMap 映射的标签,解析好以后,保存到 configuration 的 resultMaps 中。并且设置当前方法的resultMap 的 id 为元组返回的第4个参数,这么做的用处是什么呢?在插件中主要是为了分页Mapper方法的使用。下面我们来看看如果是分页,元组将返回什么信息给我们。
来看看执行结果
而我们生成 sql关键代码getSqlSourceFromAnnotations方法,在这个方法中,为我们的方法动态生成 sql。我们来看看其内部实现。
CustomerMapperBuilder.java
private PluginTuple getSqlSourceFromAnnotations(Method method, Class<?> parameterType, LanguageDriver languageDriver, SqlCommandType sqlCommandType) {
    try {
        return buildSqlSourceFromStrings(method, parameterType, languageDriver, sqlCommandType);
    } catch (Exception e) {
        e.printStackTrace();
        throw new BuilderException("Could not find value method on SQL annotation.  Cause: " + e, e);
    }
}
private PluginTuple buildSqlSourceFromStrings(Method method, Class<?> parameterTypeClass, LanguageDriver languageDriver, SqlCommandType sqlCommandType) {
	//解析 Mapper.java的方法,获取sql
    Tuple5<Boolean, String, String,String ,String> data = SqlParseUtils.parse(tableName, primaryColumns, tableColumns, sqlCommandType, method, entityType).getData();
    SqlSource sqlSource = languageDriver.createSqlSource(configuration, data.getSecond().trim(), parameterTypeClass);
    return new PluginTuple(data.getFirst(), sqlSource, data.getThird(),data.getFourth(),data.getFifth());
}
SqlParseUtils.java
public class SqlParseUtils {
    public final static String IS_DELETE = "is_delete";
    public final static String GMT_MODIFIED = "gmtModified";
    public final static String TABLE_ID = "TableId";
    public final static String BY = "By";
    public static String TAB = "    ";
    private static final List<Class<?>> primitiveTypes = new ArrayList<>(8);

    ...
    private static List<String> tableColumns = Arrays.asList(new String[]{"id", "is_delete", "gmt_create", "gmt_modified", "type", "branch_id", "real_name", "mobile", "username", "task_id", "staff_id"});
    private static List<String> primaryC = Arrays.asList(new String[]{"id"});

    public static PluginTuple testSelect(Class clazz, String methodName) {
        SqlCommandType sqlCommandType = SqlCommandType.SELECT;
        return parse("lz_test_user", primaryC, tableColumns, sqlCommandType, getMethod(clazz, methodName), null);

    }

    public static PluginTuple testInsert(Class clazz, String methodName) {
        SqlCommandType sqlCommandType = SqlCommandType.INSERT;
        return parse("lz_test_user", primaryC, tableColumns, sqlCommandType, getMethod(clazz, methodName), null);
    }

    public static PluginTuple testUpdate(Class clazz, String methodName) {
        SqlCommandType sqlCommandType = SqlCommandType.UPDATE;
        return parse("lz_test_user", primaryC, tableColumns, sqlCommandType, getMethod(clazz, methodName), null);
    }


    public static PluginTuple testDelete(Class clazz, String methodName) {
        SqlCommandType sqlCommandType = SqlCommandType.DELETE;
        return parse("lz_test_user", primaryC, tableColumns, sqlCommandType, getMethod(clazz, methodName), null);
    }

    public static PluginTuple testCount(Class clazz, String methodName) {
        SqlCommandType sqlCommandType = SqlCommandType.UNKNOWN;
        return parse("lz_test_user", primaryC, tableColumns, sqlCommandType, getMethod(clazz, methodName), null);
    }


    public static PluginTuple parse(String tableName, List<String> primaryColumns, List<String> tableColumns,
                                    SqlCommandType sqlCommandType, Method method, Class entityType) {
        DefaultParameterNameDiscoverer parameterNameDiscoverer = new DefaultParameterNameDiscoverer();
        String[] parameterNames = parameterNameDiscoverer.getParameterNames(method);
        StringBuilder sb = new StringBuilder();
        //select方法解析生成 sql 逻辑
        if (SqlCommandType.SELECT.equals(sqlCommandType)) {
        	//如果方法名以 count 开头,表示查询 count
            if (method.getName().startsWith("count")) {
                return parseCount(tableName, tableColumns, parameterNames, method);
            } else if (method.getReturnType().equals(Page.class)) { //如果返回值是 Page 类型,表示分页,使用时需要注意,Page 是我们插件中的 Page 类
                return parseSelectPage(tableName, tableColumns, parameterNames, method, entityType);
            } else {
            	//其他的情况的select查询
                return parseSelect(tableName, tableColumns, parameterNames, method);
            }
        //insert方法解析生成 sql 逻辑
        } else if (SqlCommandType.INSERT.equals(sqlCommandType)) {
        	//如果方法名以insertOrUpdate开头,则表示如果对象有 id,则是更新操作,如果没有 id,则表示插入操作
            if (method.getName().startsWith("insertOrUpdate")) {
                Tuple2<Boolean, String> tupleInsert = parseInsert(tableName, parameterNames, method).getData();
                String insertSql = removeScript(tupleInsert.getSecond());
                Tuple2<Boolean, String> tupleUpdate = parseUpdate(tableName, parameterNames, method).getData();
                String updateSql = removeScript(tupleUpdate.getSecond());
                StringBuilder sBuild = new StringBuilder();
                sBuild.append("<script> ").append("\n");
                sBuild.append("<choose>").append("\n");
                sBuild.append("<when ");
                if (primaryColumns == null || primaryColumns.size() == 0) {
                    primaryColumns = primaryC;
                }
                sBuild.append("test=\"");
                for (int i = 0; i < primaryColumns.size(); i++) {
                    if (i != 0) {
                        sBuild.append(" AND ");
                    }
                    sBuild.append(primaryColumns.get(i) + " != null ");
                }
                sBuild.append("\"");
                sBuild.append(" >").append("\n");
                sBuild.append(updateSql);
                sBuild.append(" </when>").append("\n");
                sBuild.append(" <otherwise>").append("\n");
                sBuild.append(insertSql);
                sBuild.append(" </otherwise>").append("\n");
                sBuild.append(" </choose>").append("\n");
                sBuild.append(" </script>").append("\n");
                return new PluginTuple(false, sBuild.toString());
            }
            //插入操作
            return parseInsert(tableName, parameterNames, method);
        //update方法解析生成sql逻辑
        } else if (SqlCommandType.UPDATE.equals(sqlCommandType)) {
        	//更新操作,分为批量更新和单个对象更新
            return parseUpdate(tableName, parameterNames, method);
        //delete方法解析生成sql逻辑
        } else if (SqlCommandType.DELETE.equals(sqlCommandType)) {
        	//批量删除,和根据查询条件删除
            return parseDelete(tableName, tableColumns, parameterNames, method);
        }
        return new PluginTuple(true, sb.toString());
    }
    ...
}
关于SqlParseUtils类是如何帮我们生成 sql ,这里也不再赘述,其实你来看SqlParseUtils类中的parseCount,parseSelectPage,parseSelect,parseInsert,parseUpdate,parseDelete方法,内部实现非常简单,就是解析方法参数及方法上和注解,将解析注解得到的值拼成sql,也没有什么多的技术含量。但是为了方便测试你写的方法最终生成的sql是怎样的,在SqlParseUtils类中提供了testSelect,testInsert,testUpdate,testDelete,testCount方法方便测试,如何测试,如下图所示。
但小伙伴需要注意,SqlParseUtils生成 sql解析器是基于我们的表中一定有三个字段is_delete,gmt_create,gmt_modified
因此,如果你的业务表没有这三个字段,或者是其他的字段代表是否删除,创建时间,更新时间,你需要根据你们的业务表来修改SqlParseUtils内的部分方法内容,才能投入生产使用,我们公司都是用 jdk1.8来开发了,因此没有做1.7的兼容,如果你们的代码是运行在1.7之上的,不好意思,插件也没有提供支持,但是感兴趣的小伙伴也可以自己去开发 ,无非将我们生成的 sql的#{username} 这种改成#{param1},#{param2}而已。
插件源码解析完了吗?细心的小伙伴肯定觉得还没有解析完,在插件中还有一个非常重要的部分没有解析,就是手动指定方法是否使用@Param参数,为什么要控制方法的参数是否使用@Param注解呢?我们先来看一个例子。对于insert 方法,如果我们没有加@Param 注解

我们的 sql 是如下写法。
<insert id="insertTestUser" parameterType="TestUser" useGeneratedKeys="true" keyProperty="id" >
insert into lz_test_user(
        <trim suffixOverrides=",">
            <if test="id != null">id, </if>
            <if test="isDelete != null">is_delete, </if>
            <if test="gmtCreate != null">gmt_create, </if>
            <if test="gmtModified != null">gmt_modified, </if>
            <if test="type != null">type, </if>
            <if test="branchId != null">branch_id, </if>
            <if test="realName != null and realName != '' ">real_name, </if>
            <if test="mobile != null and mobile != '' ">mobile, </if>
            <if test="username != null and username != '' ">username, </if>
            <if test="taskId != null">task_id, </if>
            <if test="staffId != null">staff_id, </if>
        </trim>
        )values(
        <trim suffixOverrides=",">
            <if test="id != null">#{id}, </if>
            <if test="isDelete != null">#{isDelete}, </if>
            <if test="gmtCreate != null">#{gmtCreate}, </if>
            <if test="gmtModified != null">#{gmtModified}, </if>
            <if test="type != null">#{type}, </if>
            <if test="branchId != null">#{branchId}, </if>
            <if test="realName != null and realName != '' ">#{realName}, </if>
            <if test="mobile != null and mobile != '' ">#{mobile}, </if>
            <if test="username != null and username != '' ">#{username}, </if>
            <if test="taskId != null">#{taskId}, </if>
            <if test="staffId != null">#{staffId}, </if>
        </trim>
        )
</insert>
但是如果我们方法参数中添加了@Param 注解。
我们的sql 就必需这样写了。
<insert id="insertTestUser" parameterType="TestUser" useGeneratedKeys="true" keyProperty="user.id" >
insert into lz_test_user(
        <trim suffixOverrides=",">
            <if test="user.id != null">id, </if>
            <if test="user.isDelete != null">is_delete, </if>
            <if test="user.gmtCreate != null">gmt_create, </if>
            <if test="user.gmtModified != null">gmt_modified, </if>
            <if test="user.type != null">type, </if>
            <if test="user.branchId != null">branch_id, </if>
            <if test="user.realName != null and realName != '' ">real_name, </if>
            <if test="user.mobile != null and mobile != '' ">mobile, </if>
            <if test="user.username != null and username != '' ">username, </if>
            <if test="user.taskId != null">task_id, </if>
            <if test="user.staffId != null">staff_id, </if>
        </trim>
        )values(
        <trim suffixOverrides=",">
            <if test="user.id != null">#{user.id}, </if>
            <if test="user.isDelete != null">#{user.isDelete}, </if>
            <if test="user.gmtCreate != null">#{user.gmtCreate}, </if>
            <if test="user.gmtModified != null">#{user.gmtModified}, </if>
            <if test="user.type != null">#{user.type}, </if>
            <if test="user.branchId != null">#{user.branchId}, </if>
            <if test="user.realName != null and user.realName != '' ">#{user.realName}, </if>
            <if test="user.mobile != null and user.mobile != '' ">#{user.mobile}, </if>
            <if test="user.username != null and user.username != '' ">#{user.username}, </if>
            <if test="user.taskId != null">#{user.taskId}, </if>
            <if test="user.staffId != null">#{user.staffId}, </if>
        </trim>
        )
</insert>
因此,加不加@Param 注解,我们的 sql 方法写法是不一样的,所以我们需要生成的 sql手动来控制方法是否加@Param 注解。
CustomerMapperBuilder.java
public void originMyBatis(List<PluginTuple> pluginTuples) {
    try {
        MapperRegistry mapperRegistry = configuration.getMapperRegistry();
        // 获取MapperRegistry的knownMappers属性值
        Map<Class<?>, MapperProxyFactory<?>> knownMappers = SqlParseUtils.getFieldValue(mapperRegistry, "knownMappers");
        //根据 Mapper 类型获取MapperProxyFactory
        MapperProxyFactory mapperProxyFactory = knownMappers.get(type);
        // 从mapperProxyFactory的缓存中获取Map<Method, MapperMethod>
        Map<Method, MapperMethod> methodCache = mapperProxyFactory.getMethodCache();
        for (PluginTuple pluginTuple : pluginTuples) {
            Tuple2<Boolean, Method> data = pluginTuple.getData();
            Method method = data.getSecond();
            MapperMethod mapperMethod = methodCache.get(method);
            // 如果方法对应的 mapperMethod 为空,则创建MapperMethod
            if (mapperMethod == null) {
                if (mapperProxyFactory.getMapperInterface() != null) {
                    mapperMethod = new MapperMethod(mapperProxyFactory.getMapperInterface(), method, configuration);
                } else {
                    mapperMethod = new MapperMethod(type, method, configuration);
                }
                // 获取mapperMethod的method方法属性
                MapperMethod.MethodSignature methodSignature = SqlParseUtils.getFieldValue(mapperMethod, "method");
                // 反射调用,获取methodSignature的paramNameResolver属性
                ParamNameResolver paramNameResolver = SqlParseUtils.getFieldValue(methodSignature, "paramNameResolver");
                // 调用 paramNameResolver的hasParamAnnotation方法, data.getFirst()为 boolean 类型
                // hasParamAnnotation 的作用,设置当前方法有没有使用@Param 注解
                // 1. 对于普通的查询方法如 selectUserById(Long id) 这种情况,默认data.getFirst(),表示使用@Param注解
                // 最后生成的 sql 为 select * from user where username = #{username},可以设置hasParamAnnotation值为true
                // 的好处就是省去了在 selectUserById(Long id) 方法中@Param注解的书写。
                // 本来要写成 selectUserById(@Param Long id)的,现在只需要写成selectUserById(Long id)
                // 2. 而对于insert(User user )方法,MyBatis本身是支持这样写的,因此,我们这里设置hasParamAnnotation为 false
                // 设置 true 和 false 由生成sql时控制
                // 如果在insert(User user )中也设置hasParamAnnotation为 true
                // insert(id ,username ,password ) values (user.id,user.username,user.password)
                // hasParamAnnotation为设置为 false,则生成的 sql 是
                // insert (id ,username,password ) values (id,username,password),签于方便,我选择了后者
                SqlParseUtils.setFieldValue(paramNameResolver, "hasParamAnnotation", data.getFirst());
                methodCache.put(method, mapperMethod);
            }
        }
    } catch (Exception e) {
        e.printStackTrace();
    }
}
上述方法,大家看到的只是一个结论性的东西,肯定有小伙伴心里会想,为什么要这样做,请听我细细讲来。在MapperFactoryBean 的checkDaoConfig方法中,己经将当前Mapper 接口添加到了MapperRegistry的knownMappers Map 中,
因此在originMyBatis方法中,我们能从knownMappers中获取MapperProxyFactory对象,获取到MapperProxyFactory有什么用处呢?我们先来看看MapperProxyFactory。
MapperProxyFactory.java
public class MapperProxyFactory<T> {

  private final Class<T> mapperInterface;
  private final Map<Method, MapperMethod> methodCache = new ConcurrentHashMap<Method, MapperMethod>();

  public MapperProxyFactory(Class<T> mapperInterface) {
    this.mapperInterface = mapperInterface;
  }

  public Class<T> getMapperInterface() {
    return mapperInterface;
  }

  public Map<Method, MapperMethod> getMethodCache() {
    return methodCache;
  }

  @SuppressWarnings("unchecked")
  protected T newInstance(MapperProxy<T> mapperProxy) {
    return (T) Proxy.newProxyInstance(mapperInterface.getClassLoader(), new Class[] { mapperInterface }, mapperProxy);
  }

  public T newInstance(SqlSession sqlSession) {
    final MapperProxy<T> mapperProxy = new MapperProxy<T>(sqlSession, mapperInterface, methodCache);
    return newInstance(mapperProxy);
  }
}
单从类内容中看不出什么所以然,只知道在创建MapperProxy 时,将methodCache传入其中,同时我们知道,当 Spring 容器启动完成时,存储于容器的是由Proxy.newProxyInstance()创建的一个 JDK 代理对象,当业务调用 Mapper接口的方法时,这个时候会调用MapperProxy的 invoke 方法,从而从数据库中查找数据封装并返回,那么我们来看看MapperProxy的内部实现。
MapperProxy.java
public class MapperProxy<T> implements InvocationHandler, Serializable {

  private static final long serialVersionUID = -6424540398559729838L;
  private final SqlSession sqlSession;
  private final Class<T> mapperInterface;
  private final Map<Method, MapperMethod> methodCache;

  public MapperProxy(SqlSession sqlSession, Class<T> mapperInterface, Map<Method, MapperMethod> methodCache) {
    this.sqlSession = sqlSession;
    this.mapperInterface = mapperInterface;
    this.methodCache = methodCache;
  }

  @Override
  public Object invoke(Object proxy, Method method, Object[] args) throws Throwable {
    try {
      if (Object.class.equals(method.getDeclaringClass())) {
        return method.invoke(this, args);
      } else if (isDefaultMethod(method)) {
        return invokeDefaultMethod(proxy, method, args);
      }
    } catch (Throwable t) {
      throw ExceptionUtil.unwrapThrowable(t);
    }
    final MapperMethod mapperMethod = cachedMapperMethod(method);
    //调用MapperMethod的execute方法执行 sql 并返回值
    return mapperMethod.execute(sqlSession, args);
  }

  private MapperMethod cachedMapperMethod(Method method) {
  	//如果缓存中存在,则从缓存中获取,如果缓存中不存在,则创建MapperMethod
    MapperMethod mapperMethod = methodCache.get(method);
    if (mapperMethod == null) {
      //创建MapperMethod
      mapperMethod = new MapperMethod(mapperInterface, method, sqlSession.getConfiguration());
      //创建好的MapperMethod存储于methodCache中
      methodCache.put(method, mapperMethod);
    }
    return mapperMethod;
  }

  @UsesJava7
  private Object invokeDefaultMethod(Object proxy, Method method, Object[] args)
      throws Throwable {
    final Constructor<MethodHandles.Lookup> constructor = MethodHandles.Lookup.class
        .getDeclaredConstructor(Class.class, int.class);
    if (!constructor.isAccessible()) {
      constructor.setAccessible(true);
    }
    final Class<?> declaringClass = method.getDeclaringClass();
    return constructor
        .newInstance(declaringClass,
            MethodHandles.Lookup.PRIVATE | MethodHandles.Lookup.PROTECTED
                | MethodHandles.Lookup.PACKAGE | MethodHandles.Lookup.PUBLIC)
        .unreflectSpecial(method, declaringClass).bindTo(proxy).invokeWithArguments(args);
  }

  private boolean isDefaultMethod(Method method) {
    return (method.getModifiers()
        & (Modifier.ABSTRACT | Modifier.PUBLIC | Modifier.STATIC)) == Modifier.PUBLIC
        && method.getDeclaringClass().isInterface();
  }
}
真正的执行是调用mapperMethod的 execute方法,因此mapperMethod这个类肯定封装了
mybatis 属性,我们继续进入MapperMethod的构造方法。
public class MapperMethod {

  private final SqlCommand command;
  private final MethodSignature method;

  public MapperMethod(Class<?> mapperInterface, Method method, Configuration config) {
    this.command = new SqlCommand(config, mapperInterface, method);
    this.method = new MethodSignature(config, mapperInterface, method);
  }
  ...
}
在上述方法中,好像没有什么东西嘛,无非创建了一个MethodSignature对象,SqlCommand对象,无非标识当前方法是 select,update 还是其他操作,感觉到了山穷水尽的地步,我们进入MethodSignature构造方法看看。
public static class MethodSignature {

    private final boolean returnsMany;
    private final boolean returnsMap;
    private final boolean returnsVoid;
    private final boolean returnsCursor;
    private final Class<?> returnType;
    private final String mapKey;
    private final Integer resultHandlerIndex;
    private final Integer rowBoundsIndex;
    private final ParamNameResolver paramNameResolver;

    public MethodSignature(Configuration configuration, Class<?> mapperInterface, Method method) {
      Type resolvedReturnType = TypeParameterResolver.resolveReturnType(method, mapperInterface);
      //设置方法返回值类型
      if (resolvedReturnType instanceof Class<?>) {
        this.returnType = (Class<?>) resolvedReturnType;
      } else if (resolvedReturnType instanceof ParameterizedType) {
        this.returnType = (Class<?>) ((ParameterizedType) resolvedReturnType).getRawType();
      } else {
        this.returnType = method.getReturnType();
      }
      //如果方法返回值是 void,则returnsVoid为 true
      this.returnsVoid = void.class.equals(this.returnType);
      //如果返回值是数组类型或 Collection 集合类型,则returnsMany为 true
      this.returnsMany = configuration.getObjectFactory().isCollection(this.returnType) || this.returnType.isArray();
      this.returnsCursor = Cursor.class.equals(this.returnType);
      this.mapKey = getMapKey(method);
      this.returnsMap = this.mapKey != null;
      //如果方法参数中有RowBounds对象,则获取其在方法参数的索引位置
      this.rowBoundsIndex = getUniqueParamIndex(method, RowBounds.class);
      //如果方法参数中有ResultHandler对象,则获取其在方法参数的索引位置,如果位于方法参数的第一个位置,则resultHandlerIndex为0
      this.resultHandlerIndex = getUniqueParamIndex(method, ResultHandler.class);
      //参数名称解析器
      this.paramNameResolver = new ParamNameResolver(configuration, method);
    }
    ...
}
终于柳暗花明了,看到了参数名称解析器,终于看到了希望的曙光,我们进入ParamNameResolver类。
ParamNameResolver.java
public class ParamNameResolver {

  private static final String GENERIC_NAME_PREFIX = "param";

  private final SortedMap<Integer, String> names;

  //如果配置了@Param注解,则hasParamAnnotation为 true
  private boolean hasParamAnnotation;

  public ParamNameResolver(Configuration config, Method method) {
    final Class<?>[] paramTypes = method.getParameterTypes();
    final Annotation[][] paramAnnotations = method.getParameterAnnotations();
    final SortedMap<Integer, String> map = new TreeMap<Integer, String>();
    int paramCount = paramAnnotations.length;

    for (int paramIndex = 0; paramIndex < paramCount; paramIndex++) {
      //如果方法参数是RowBounds或ResultHandler类,则跳过
      if (isSpecialParameter(paramTypes[paramIndex])) {
        continue;
      }
      String name = null;
      for (Annotation annotation : paramAnnotations[paramIndex]) {
        if (annotation instanceof Param) {
          //如果配置了Param注解,则hasParamAnnotation为 true
          hasParamAnnotation = true;
          name = ((Param) annotation).value();
          break;
        }
      }
      if (name == null) {
        //如果config中的useGeneratedKeys属性为 true
        if (config.isUseActualParamName()) {
          //从 ASM 中获取方法参数名称
          name = getActualParamName(method, paramIndex);
        }
        if (name == null) {
          // 如果参数名依然为空,只能使用 "0", "1", ...来代替了
          name = String.valueOf(map.size());
        }
      }
      map.put(paramIndex, name);
    }
    names = Collections.unmodifiableSortedMap(map);
  }

  private String getActualParamName(Method method, int paramIndex) {
    if (Jdk.parameterExists) {
      return ParamNameUtil.getParamNames(method).get(paramIndex);
    }
    return null;
  }

  private static boolean isSpecialParameter(Class<?> clazz) {
    return RowBounds.class.isAssignableFrom(clazz) || ResultHandler.class.isAssignableFrom(clazz);
  }


  public String[] getNames() {
    return names.values().toArray(new String[0]);
  }

  public Object getNamedParams(Object[] args) {
    final int paramCount = names.size();
    if (args == null || paramCount == 0) {
      return null;
    } else if (!hasParamAnnotation && paramCount == 1) {
      return args[names.firstKey()];
    } else {
      final Map<String, Object> param = new ParamMap<Object>();
      int i = 0;
      for (Map.Entry<Integer, String> entry : names.entrySet()) {
      	// 添加方法参数名 username,password 等到 map 中
        param.put(entry.getValue(), args[entry.getKey()]);
        // 添加普通的参数名 param1, param2, ...到 Map 中
        final String genericParamName = GENERIC_NAME_PREFIX + String.valueOf(i + 1);
        if (!names.containsValue(genericParamName)) {
          param.put(genericParamName, args[entry.getKey()]);
        }
        i++;
      }
      return param;
    }
  }
}
在上述getNamedParams方法中,我们发现,当方法只有一个参数时,hasParamAnnotation就起作用了,如果配置了@Param 参数,Map 对象,而不配置@Param 参数,方法返回的是一个 Object对象。那么两者有什么区别呢?我们来测试一下。
经过我的一波测试,发现hasParamAnnotation一直为 false 也不会报错,不过在之前的测试中确实因为返回值是普通对象还是Map对象时,Ognl解析报错,不一样的处理方式导致报错,我才想到去控制hasParamAnnotation的值,从而解析错误问题,不过现在都没有这个问题了,解析方案还是留在这里吧,说不定小伙伴也遇到一样的问题,到时候就有解决方案了。
而originMyBatis方法的目的就是,控制hasParamAnnotation为 true或 false,当只有一个参数时,控制getNamedParams方法返回的是一个普通的参数对象还是一个被Map包裹的方法参数对象。不过刚刚也测试过了,其实只要useActualParamName=true,hasParamAnnotation为 false 也没有关系,而默认情况下Configuration的useActualParamName为 true。
到这里,我们的MyBatis 小插件的使用及源码解析己经完成了,感兴趣的小伙伴可以尝试着将包加入到你们的业务开发中去,己经支持了大部分单表操作,省去了写 SQL 的操作,提高了我们代码的可阅读性,减少 bug 出错的机率,相信你们会喜欢,当然,发现有问题,及时进出,我们一起学习,一起进步。
注意:
目前只支持 jdk1.8 ,jdk1.7 目前不支持,感兴趣的小伙伴可以自己去开发一下。
对于idea版本比低的小伙伴,在配置 maven 插件的-parameters参数时,需要手动加一下,万一不行,自己升级一下 idea 的版本。
当然也有同事建义集成 JPA的方法提示功能,如下
不过我觉得意义不大,因为我们写 Mapper方法时,一般在开发的时候,直接在业务代码中写好需要添加的 Mapper 方法,按快捷键直接创建方法。而不是先到 Mapper 中创建方法,再到业务方法来引用,因此我觉得意义不大。所以就不开发了。提供jpa 代码的git 地址在这,感兴趣的小伙伴可以去研究一下,如何在 Mapper中提供方法名创建时提示功能。https://github.com/quyixiao/jpa_webwork
希望小插件对你的工作,开发有帮助。
2023-01-23
之前这个小框架,我本不想引入多表查询,但是有小伙伴想用这个框架来实现多表查询,因此还是提供了支持,但是随着不断的开发,确实多表查询写sql 也太麻烦了,最终我不太看好的多表查询,我自己也用得频繁起来,不外乎写出了如下SQL。

当然生成的SQL如下 :
<script>
    SELECT   ifnull(count(distinct(uad.user_id)), 0)    FROM zns_user_run_data_details uad
 LEFT JOIN zns_user u ON  uad.user_id = u.id
 LEFT JOIN zns_run_activity_user au ON  au.user_id = uad.user_id and au.activity_id =  uad.activity_id    WHERE  uad.is_delete = 0
 AND   u.is_robot=0 and u.is_test=0 and   u.is_delete = 0
 AND au.is_delete = 0
 AND  uad.create_time  <![CDATA[ >=]]> #{startTime}
 AND  uad.create_time  <![CDATA[ <= ]]>  #{endTime}
 <if test="isComplete != null">
      AND au.is_complete = #{isComplete}
 </if>
 AND au.activity_type IN
<foreach collection="activityType" item="item" index="index" separator="," open="(" close=")">
  #{item}
</foreach>
</script>
这是我们项目中的业务SQL,显然可读性并没有那么好,开发起来和去xml中写SQL使用的时间也好不到哪里去,不过肯定还是省一些时间的,因为查询条件还是比较方便 。
之前我非常讨厌在业务代码中写在么一大串查询相关的内容,如下所示。
因为我觉得业务代码就是业务代码,不要因为这些增删改查占用大量的代码篇幅,不过一看,不过细看,觉得其中的lambda表达式还是很可爱的嘛,如果能应用于我们的小框架中,那该多好啊,如:
也就是将所有需要手动声明数据库字段的地方全部替换成lambda表达式那该多好啊。 这样代码逻辑是不是更加清晰,同时开发效率也更快。 因为每一张表肯定有一个唯一的别名,因此就不需要我们手动去为每张表命名别名了,只需要关注需要关联的字段,是不是更加省心,但遗憾的是,注解属性并不支持lambda表达式,吾偿终日而思之,但是始终没有找到解决办法,编译器本身也支持,我也没有办法 ,在这种技术的细节中困了几日,在几日的纠节当前,网上查找了很多的资料,一无所获,终于在2023年大年初一的晚上,想到了解决办法,之前陷入了技术的细节实现中,而忽略了问题的本来目的,我的目的是让代码写起来更加方便,而lambda表达式只是一种实现方式而已,并一定要用lambda表达式,如果有更好的方式呢?上面这种用lambda表达式的方式是无法实现了,编译器本身不支持,我也无力回天,那用我的方式来实现。
和数据库对应的实体本身可以用工具生成,可以在实体中加入对应的java字段对应的数据库字段即可。如
当然,生成实体,Service, Dao的工具包已经准备好了,自己到码云上去下载即可。 连接地址 ,感兴趣可以去下载
https://toscode.gitee.com/quyixiao/mysql_main
当然使用自己的方式,最终写法是 。
第1种方式,是之前的写法,第二种方式,是自定义写法,第三种方式,是lambda表达式写法,个人觉得比lambda表达式的写法更加简单。
来看一下最终生成的SQL。
大家可能感觉比较困惑,t,t1,t2 别名是怎样定义的呢?我的定义默认当前Mapper对应的实体的别名为t, 关联其中表,第一张表的别名是t1,第二张表的别名是t2 ,以此类推,有人可能会想,为什么不以表名的下划线之后的第一个字段拼接起来作为别名呢? 如 zns_user_run_data_details,那么可以定义他的别名为zurdd, 这样定义的别名基本上也是唯一的哈。 我偿试过,但SQL的可读性不强,还是以刚刚的例子来看。
第一种
<script>
    SELECT IFNULL(COUNT(DISTINCT(zurdd.user_id)),0)  FROM zns_user_run_data_details zurdd
 LEFT JOIN zns_user zu ON zurdd.user_id = zu.id
 LEFT JOIN zns_run_activity_user zrau ON zrau.user_id = zurdd.user_id AND zrau.activity_id = zurdd.activity_id WHERE  zurdd.is_delete = 0
 AND zu.is_robot = 0
 AND zu.is_test = 0
 AND zu.is_delete = 0
 AND zrau.is_delete = 0
 AND  zurdd.create_time  <![CDATA[ >=]]> #{startTime}
 AND  zurdd.create_time  <![CDATA[ <= ]]>  #{endTime}
 <if test="isComplete != null">
      AND zrau.is_complete = #{isComplete}
 </if>
 AND zrau.activity_type IN
<foreach collection="activityType" item="item" index="index" separator="," open="(" close=")">
  #{item}
</foreach>
</script>


=============================================================

第二种
<script>
    SELECT IFNULL(COUNT(DISTINCT(t.user_id)),0)  FROM zns_user_run_data_details t
 LEFT JOIN zns_user t1 ON t.user_id = t1.id
 LEFT JOIN zns_run_activity_user t2 ON t2.user_id = t.user_id AND t2.activity_id = t.activity_id WHERE  t.is_delete = 0
 AND t1.is_robot = 0
 AND t1.is_test = 0
 AND t1.is_delete = 0
 AND t2.is_delete = 0
 AND  t.create_time  <![CDATA[ >=]]> #{startTime}
 AND  t.create_time  <![CDATA[ <= ]]>  #{endTime}
 <if test="isComplete != null">
      AND t2.is_complete = #{isComplete}
 </if>
 AND t2.activity_type IN
<foreach collection="activityType" item="item" index="index" separator="," open="(" close=")">
  #{item}
</foreach>
</script>
第一种zns_user_run_data_details , zns_user, zns_run_activity_user的别名分别为zurdd,zu,zrau, 在阅读后面的sql条件时, 还要去理解一下zurdd到底是谁的别名, zu又是哪张表的别名,没有按照顺序t 就是当前Mapper对应实体的别名,t1 表示声明第一张表的别名,t2 表示声明第二张表的别名,以此类推,当然啦, 如果你想用第一种方式,源码中还是给你预留了方法的。
当然啦,有人肯定会想,我不想用你的,我想自己定义别名,如第一张表用a,第二张表用b,第三张表用c,当然也是可以的。

显然这种点点点的操作比自己在注解中拼SQL效率高得多。 对怎样实现感兴趣的小伙伴,到时候将源码分享出来,自己去阅读的哈。这里对新加的和扩展的一些注解使用进行分享。
CountDistinct
新增CountDistinct注解,如
之前想查询uad表的user_id去重个数是多少, 需要这样写 ifnull(count(distinct(uad.user_id)), 0) ,显然太繁锁,直接用@CountDistinct(ZnsUserRunDataDetailsEntity.user_id)注解即可。
Mapping注解
Mapping注解扩展

第一种情况是最原始的写法。
第二种情况,还是查询之前的列,但as属性后可以用一个字符串数组来命名别名,当某列不想取别名是,可以用下划线来代替(从python中学到的,当返回一个元组时,如果某个返回值不想要时,可以用下划线替代)。
第三种写法,当返回的列很多时,只有一到两列需要被替换成其他别名,其他的都是默认转驼峰方式,因此就可以派上用场了。
像上面一样,需要查询
uc.id as id , c.title as couponName, c.coupon_type as couponType, u.first_name as nickName , u.email_address as emailAddress ,uc.gmt_create as gmtCreate , uc.gmt_end as gmtEnd ,uc.gmt_use as gmtUse, uc.status as status ,uc.remarks as remarks, u.is_test as isTest 那么多列,其实只需要两列 c.title 和 u.first_name需要重新命名,可以使用@MK注解来实现, key为需要被重命名的列, 而value就是别名。
LeftJoinOns
接下来看LeftJoinOns注解扩展。

如上述,在Left join on 的条件中 au表的user_id和uad表的user_id关联,au 表的activity_id和uad表的activity_id关联,因此可以写成
left = {ZnsRunActivityUserEntity.user_id, ZnsRunActivityUserEntity.activity_id},
right = {ZnsUserRunDataDetailsEntity.user_id, ZnsUserRunDataDetailsEntity.activity_id}
当然,有人会想,如果left join on 的条件中只有一个字段关联,那怎么办呢?那就更加简单了。
Where注解扩展
之前的where注解中,直接写一个字符串,显然对开发者不太友好,还是要手动去写,不能点点点,因此,这里对Where注解进行了扩展。 在Where注解中增加了Item[]数组属性。
而在Item注解中使用了它的三个属性。
分别是left , right , opt ,而Opt支持以下操作
GE, // >=
GT, // >
EQ, // =
LE, // <=
LT, // <
LIKE,//
LLIKE,          // 左like
RLIKE,      //右like
NE,         // 不等于;

请看like 的where条件SQL解析效果。
LBracket,RBracket注解
之前对SQL语句中加括号一直没有想明白,不知道是创建一个对象呢?这个对象里所有的属性都用括号括起来,还是其他注解来实现,始终没有想明白,终于在昨天晚上,我想清楚了,不直接加一个左右括号注解就实现了不? 请看。

三个查询条件,realName,mobile , password,想mobile和password 用括号括起来,并且他们之间以OR连接 。
    SELECT *  FROM lz_test_user t WHERE  t.is_delete = 0
 AND t.real_name LIKE CONCAT('%',#{realName},'%')
 AND ( t.mobile LIKE CONCAT('',#{mobile},'%')
 OR t.password = #{password} ) LIMIT 10
显然生成的SQL满足条件 。
第二种情况,假如我想括号范围更加大,想在对象中的一些属性也包含在括号之内,那怎样写呢?


当然,还有人会想,如果我只需要对象中的两个属性在括号之内,那怎么写呢? 只需要将Mapper方法中的@LBracket去掉,并将@LBracket注解移到到UserInfo属性上即可。


当然,还值得一提的是,之前写测试用例都是通过类名,加字符串方法名的方式来测试自己写的SQL到底是怎样,
这样写总是需要Ctrl+c , Ctrl + v ,麻烦,显然不太Java,因为Java就是点点点的操作,不方便,最近重新更新了测试用例写法,让我们写起来更加方便 。
之前写在另一篇博客中的内容移植到这篇博客中来。
MapF2FInterceptor
我相信细心的读者还发现一个问题,就是我还写了一个MapF2FInterceptor,这个插件有什么用呢?同样这个插件的源码很简单,不分析 ,只看应用场景,这个应用场景也是对之前的一篇博客的补充吧。 之前哪篇博客呢?2.mybatis实用小插件 ,主要对mybatis 的一些写法的优化,讲一种应用场景。
// http://localhost:8502/api/test12
@RequestMapping("/test12")
public String test12() throws Exception {
    List<StageBorrow> borrows = stageBorrowDao.selectStageBorrowByAll();
    // 此时此刻 需要拿到所有用户 的用户名
    List<String> uniqueCodes = borrows.stream().map(StageBorrow::getUniqueCode).collect(Collectors.toList());
    List<UserPhone> userPhones = userPhoneDao.selectUserPhoneByUniqueCodes(uniqueCodes);
    Map<String,UserPhone> mapUserPhone =  userPhones.stream().collect(Collectors.toMap(UserPhone::getUniqueCode , Function.identity()));
    for(StageBorrow stageBorrow :borrows){
        UserPhone userPhone = mapUserPhone.get(stageBorrow.getUniqueCode());
        System.out.println("=========" + userPhone.getRealNameEn());
    }

    System.out.println("==================还有一种写法=========================");
    for(StageBorrow stageBorrow :borrows){
        // 这种法写,性能太差了
        UserPhone userPhone = userPhoneDao.selectUserPhoneByUniqueCode(stageBorrow.getUniqueCode());
        System.out.println("=========" + userPhone.getRealNameEn());
    }
    return "success";
}
上面这个例子,想通过借款表查找所有借款用户的真实姓名,通过uniqueCode关联,上面提供了两种写法,
第一种
- 先通过lamb表达式获取uniqueCode列表
- 通过uniqueCode查询
- 将查询的结果转化为Map
这种方式我不太喜欢,至少写了3行代码,同时我也不喜欢lambda表达式,因为没有python语法简洁,因此我基本不用。第二种写法,就不用说了,性能太差,java 就没有一种好的写法吗?很遗憾的告诉你,到少我没有发现,既然没有,那就自己想办法实现吧。
 // http://localhost:8502/api/test13
@RequestMapping("/test13")
public String test13() throws Exception {
    List<StageBorrow> borrows = stageBorrowDao.selectStageBorrowByAll();
    // 此时此刻 需要拿到所有用户 的用户名
    Map<String,UserPhone> mapUserPhone =  userPhoneDao.selectUserPhoneMapByUniqueCode(borrows);
    for(StageBorrow stageBorrow :borrows){
        UserPhone userPhone = mapUserPhone.get(stageBorrow.getUniqueCode());
        System.out.println("=========" + userPhone.getRealNameEn());
    }
    return "success";
}
先来看看效果
Mapper.xml的实现如下
@Bean2Map(key = "uniqueCode",value = "this")
Map<String, UserPhone> selectUserPhoneMapByUniqueCode(@IN  @Row("uniqueCode") List<StageBorrow> uniqueCode);
Bean2Map注解有两个参数,key返回对象中的哪个字段封装为key , value 如果为"this" ,表示对象自身,如果为其他的字符串,则对对象中的某个属性, 方法参数中有两个注解,@IN注解可以传一个参数,参数对应的是下面加粗的条件 ,如果不传,则取方法名转化为下划线 unique_code ,
select * from lt_user_phone where unique_code in ( ? ,? ,?)
uniqueCode转化为下划线后为unique_code, @Row()注解也需要传一个参数,如这个参数表示是取StageBorrow对象的哪个属性作为in 的条件 ,本例中取StageBorrow的 uniqueCode属性作为in 的条件 。所以真正的sql为
SELECT * FROM lt_user_phone WHERE is_delete = 0 AND unique_code IN ( ‘1111’ , ‘2222’ , ‘3333’ , ‘1111’ )
接下来,我们继续看,如果返回的Map 的value是一个具体的值,而不是一个对象,那怎么办呢?

看Mapper中的写法
@Bean2Map(key = "uniqueCode",value = "realNameEn")
MapString, String> selectUserPhoneMapByUniqueCodeRealName(@IN("uniqueCode")  @Row("uniqueCode")ListStageBorrow> borrows);
以UserPhone对象的uniqueCode为key , realNameEn属性为value的Map ,同时@IN()注解的参数为加粗代码
select * from lt_user_phone where unique_code in ( ? ,? ,?),而 @Row(“uniqueCode”) 注解里的参数为in (?,?,?)里的条件 。
我们再回到test13方法。
应该加上空判断,如果userPhone为空,是不是导致userPhone.getRealNameEn()报空指针异常,其实你也不用担心 ,底层框架已经实现。我们修改lt_stage_borrow的unique_code的值 。

访问http://localhost:8502/api/test13 ,发现没有报空指针异常
@Bean2Map(key = "uniqueCode",value = "this",fillNull = false)
MapString, UserPhone> selectUserPhoneMapByUniqueCode(@IN  @Row("uniqueCode") ListStageBorrow> uniqueCode);
在@Bean2Map中设置fillNull参数为false。
当然你不用担心,fillNull的默认值为true,如果你不想让插件帮你填充空值时,可以设置fillNull = false。
hibernate虽然我不喜欢用,但是他有些功能我觉得还是很好的。比如级联拉取。

这个是什么意思呢?先来看看Mapper
Mapper
ListStageBorrowDto> selectStageBorrowByAllDto();
StageBorrowDto
@Data
public class StageBorrowDto extends StageBorrow{
    @Pull(self = "uniqueCode", target = "uniqueCode", sort = "desc",limit =  1 )
    private List<UserPhone> userPhoneList;
}
Pull注解的self表示StageBorrow的字段, target 表示UserPhone对应的字段,相当于写一条SQL
select * from lt_user_phone where unique_code = #{uniqueCode} order by id desc limit 1
其实selectStageBorrowByAllDto()的意图就是,在查询StageBorrow 时将与之关联的UserPhone对象拉取出来 。当然,拉取的UserPhone也可以是一个对象,并不一定是一个list。
Controller
// http://localhost:8502/api/test16
@RequestMapping("/test16")
public String test16() throws Exception {
    ListStageBorrowDto2> borrows = stageBorrowDao.selectStageBorrowByAllDto2();
    for(StageBorrowDto2 stageBorrowDto : borrows){
        UserPhone userPhone = stageBorrowDto.getUserPhone();
        System.out.println(JSON.toJSONString(userPhone));
    }
    return "success";
}
StageBorrowDto2
@Data
public class StageBorrowDto2 extends StageBorrow{

    @Pull(self = "uniqueCode", target = "uniqueCode", sort = "desc",limit =  1 )
    private UserPhone userPhone;


}
Mapper
List<StageBorrowDto2> selectStageBorrowByAllDto2();
当然此时此刻还有人会想,如果我想在lt_user_phone表拉取时,加一个条件怎么办呢?那我们也可以来终级大招。 修改StageBorrowDto3实体
StageBorrowDto3
@Data

public class StageBorrowDto3 extends StageBorrow{

    @Pull(self = "uniqueCode", target = "uniqueCode", where = " type = 1 and cnl_code = 'chenn' ", sort = "desc",limit =  1 )
    private UserPhone userPhone;

}

当然,有人想,我也分不清self ,target 也容易弄混,能不能都写到where条件里,那当然可以。
@Data
public class StageBorrowDto4 extends StageBorrow{
    @Pull(where = " unique_code = #{uniqueCode} and  type = 1 and cnl_code = 'chenn' ", sort = "desc",limit =  1 )
    private UserPhone userPhone;
}

当然,有人还 会想,如果UserPhone对象内部还想拉取其他对象,能不能实现呢?当然可以啦。
依然还是先创建两个实体,StageBorrowDto5包含了UserPhoneDto 。 主要意思是什么呢?我想通过借款表查找到用户表,再将用户所有的登陆日志拉取出来 。
@Data
public class StageBorrowDto5 extends StageBorrow{

    @Pull(where = " unique_code = #{uniqueCode} and  type = 1 and cnl_code = 'chenn' ", sort = "desc",limit =  1 )
    private UserPhoneDto userPhone;
}

@Data
public class UserPhoneDto extends UserPhone {

    @Pull(where = " user_id = #{id}  ", sort = "desc")
    private List<UserLogin> userLoginList;
}
 上面的pull功能依然有点小问题,如果是需要被加密解密字段就不能用pull进行拉取了,需要自己重新写Mapper,这一点需要注意 。
文章到这里也告一段落了,整个项目的开发过程中,非常感谢涛哥,华坤,小谷,中正,铮俊,志轩 提供了问题及保贵的建议,才得以框架在生产上正常运行。
同时感谢技术大佬爱姐毫无条件的支持与信任, 感谢测试团队黎甜,进惠,海燕,潘含,闪哥辛勤不辍的不断发现问题,如数据被加密两遍,分页问题,批量更新问题,通过条件查询过后,查询条件被加密问题等 ,最终这些问题都得以解决,这个框架是一个技术团队花了几个月的时间共同努力的结果。希望其中的解决方案对同行有所帮助 。
我觉得,如果是一个构架师,应该根据开发的需要开发更加易用,出bug率少的工具给开发人员使用,让开发人员投身到具体的业务中去,而少写无用的东西,我也不是什么架构师,只是一个技术爱好者而已 。
如果网友有什么好的建议及更好的方案提供,请给我留言吧,下一篇博客见。
应用项目 github 地址
https://github.com/quyixiao/spring-data-en-decoder
https://github.com/quyixiao/github-lz-mybatis-en-plugins.git
https://github.com/quyixiao/lz_mybatis_plugin_project
插件 github 地址
https://github.com/quyixiao/lz_mybatis_plugin

魔乐社区(Modelers.cn) 是一个中立、公益的人工智能社区,提供人工智能工具、模型、数据的托管、展示与应用协同服务,为人工智能开发及爱好者搭建开放的学习交流平台。社区通过理事会方式运作,由全产业链共同建设、共同运营、共同享有,推动国产AI生态繁荣发展。
更多推荐

 30
30 0
0- 0


 已为社区贡献3条内容

所有评论(0)