Django PostgreSQL安装和设置
We’ll know that SQLite is very powerful, embedded relational database management system and it offers a really amazing set of tools to manage approximately all sorts of data. But when it comes Multi-u
We’ll know that SQLite is very powerful, embedded relational database management system and it offers a really amazing set of tools to manage approximately all sorts of data. But when it comes Multi-user applications (where multiple users want to use the same databases), It fails. So It is recommended to choose a fully featured relational database management system rather than SQLite.
我们将知道SQLite是非常强大的嵌入式关系数据库管理系统,它提供了一套非常了不起的工具来管理几乎所有类型的数据。 但是,当涉及到多用户应用程序(多个用户希望使用相同的数据库)时,它就会失败。 因此,建议选择功能全面的关系数据库管理系统,而不要选择SQLite。
Some examples of Fully featured RDBMS are MySQL, PostgreSQL, Oracle databases.
功能齐全的RDBMS的一些示例是MySQL,PostgreSQL,Oracle数据库。
Django is very flexible in terms of changing databases.
Django在更改数据库方面非常灵活。
So in this article, we’ll see how we can change the database from SQLite to PostgreSQL.
因此,在本文中,我们将看到如何将数据库从SQLite更改为PostgreSQL。
先决条件 (Prerequisites)
Instead of creating everything from scratch, we’re taking the example of our previous article, in which we’re using SQLite database.
而不是从头开始创建所有内容,我们以上一篇文章为例,其中我们使用SQLite数据库。
If you haven’t read our previous article yet, then here it is https://www.thecrazyprogrammer.com/2019/01/django-models.html
如果您尚未阅读我们的上一篇文章,那么这里是https://www.thecrazyprogrammer.com/2019/01/django-models.html
Let’s start.
开始吧。
步骤1:安装PostgreSQL (Step 1: Install PostgreSQL)
To Install PostgreSQL for Django in Ubuntu:
要在Ubuntu中为Django安装PostgreSQL:
Open terminal and type these two commands.
打开终端并键入这两个命令。
sudo apt-get update
sudo apt-get更新
sudo apt-get install python-pip python-dev libpq-dev postgresql postgresql- contrib
须藤apt-get install python-pip python-dev libpq-dev postgresql postgresql- contrib
To Install PostgreSQL for Django in Windows:
要在Windows中为Django安装PostgreSQL:
Download the installer from its official site: https://www.postgresql.org/download/windows/
从官方网站下载安装程序: https : //www.postgresql.org/download/windows/
And follow the instructions mentioned in the link. While installing you have to enter a password and a port number. Note it down.
并按照链接中提到的说明进行操作。 在安装时,您必须输入密码和端口号。 记下来。
To Install PostgreSQL for Django in Mac OS:
在Mac OS中为Django安装PostgreSQL:
Like windows, you need to download the installer from its official site: https://www.postgresql.org/download/macosx/
与Windows一样,您需要从其官方网站下载安装程序: https : //www.postgresql.org/download/macosx/
While installing you have to enter a password and a port number. Note it down.
在安装时,您必须输入密码和端口号。 记下来。
步骤2:设置用户和数据库 (Step 2: Setup User and Database)
Login using your password.
使用密码登录。
Here I am using a Ubuntu 18.04 and I am accessing the PostgreSQL from the terminal, So I have to switch to the user postgres that was created while installing PostgreSQL.
在这里,我使用的是Ubuntu 18.04,并且正在从终端访问PostgreSQL,因此,我必须切换到安装PostgreSQL时创建的用户postgres 。
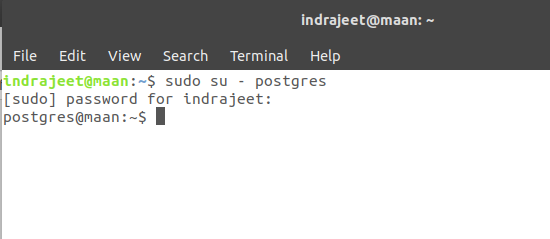
To switch the user to postgres, open terminal and type
要将用户切换到postgres,请打开终端并输入
sudo su – postgres
sudo su – Postgres
Now you’re ready to enter the shell session for the postgres user. Log into a Postgres session by typing:
现在您可以为postgres用户输入shell会话了。 通过键入以下内容登录到Postgres会话:
psql
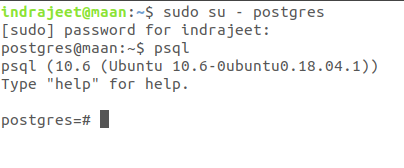
psql
Now create a database by typing:
现在通过键入以下内容创建数据库:
CREATE DATABASE myproject;
创建数据库myproject ;
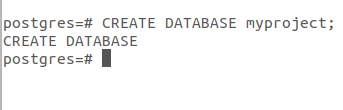
Choose the database name that is more relevant to your project. As it is just an example so I am using here myproject.
选择与您的项目更相关的数据库名称。 因为这只是一个示例,所以我在这里使用myproject。
Now create a user to use the database that we’ve just created. To create a user type:
现在创建一个用户来使用我们刚刚创建的数据库。 要创建用户类型:
CREATE USER myuser WITH PASSWORD ‘mypassword’;
使用密码“ mypassword”创建用户myuser;
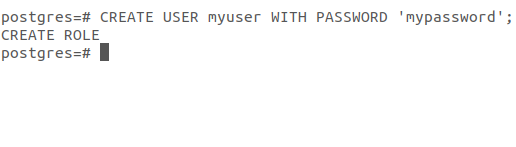
So our user and database are created.
这样就创建了我们的用户和数据库。
Now, at last, give the rights to the user to access the database type:
现在,最后,授予用户访问数据库类型的权限:
GRANT ALL PRIVILEGES ON DATABASE myproject TO myuser;
将数据库myproject上的所有特权授予 myuser;

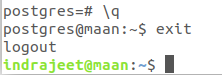
Now just type \q to get back to the postgres user’s shell session then type exit.
现在只需键入\ q返回postgres用户的shell会话,然后键入exit。
That’s all about database setup.
这就是关于数据库设置的一切。
步骤4:安装psycopg2 (Step 4 : Install psycopg2)
psycopg2 is a most popular PostgreSQL database adapter to work with Python. To install pycopg2 type:
psycopg2是最流行的PostgreSQL数据库适配器,可与Python一起使用。 要安装pycopg2,请输入:
pip install django psycopg2
pip安装Django psycopg2
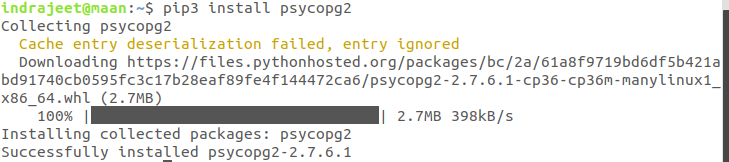
Note: I am using pip3 instead of pip because I have both the versions installed in my Ubuntu Linux.
注意:我使用的是pip3而不是pip,因为我在Ubuntu Linux中都安装了这两个版本。
步骤5:编辑专案的设定档案 ( Step 5: Edit Your Project’s Settings File)
Open your project’s setting file in write mode and go to the DATABASES section.
在写入模式下打开项目的设置文件,然后转到DATABASES部分。
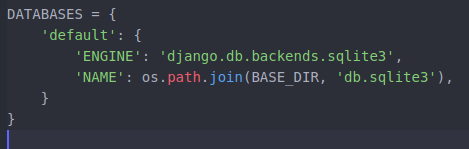
Here you can see that sqlite3 is connected with our project. To change it to PostgreSQL just change these lines as:
在这里,您可以看到sqlite3与我们的项目连接。 要将其更改为PostgreSQL,只需将这些行更改为:
DATABASES = {
数据库= {
‘default’: {
'默认':{
‘ENGINE’: ‘django.db.backends.postgresql’,
'ENGINE':'django.db.backends.postgresql',
‘NAME’: ‘myproject’,
'NAME':'myproject',
‘USER’: ‘myuser,
'USER':' myuser ,
‘PASSWORD’ : ‘mypassword’,
'PASSWORD':'mypassword',
‘HOST’ : ‘localhost’,
'HOST':'localhost',
‘PORT’ : ‘5432’
'PORT':'5432'
}
}
}
}
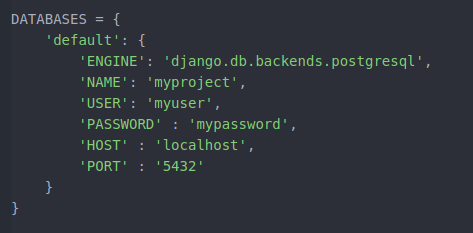
In the above code, NAME, USER, PASSWORD are name of database, name of your user and password that we’ve created while creating the user.
在上面的代码中,NAME,USER,PASSWORD是数据库的名称,用户名和我们在创建用户时创建的密码。
And PORT is same number that I recommended to note down while installing the PostgreSQL.
而且PORT是我建议在安装PostgreSQL时记下的编号。
步骤6:迁移专案 (Step 6: Migrate Your Project)
So we’ve installed PostgreSQL and configured the settings.py file. Now last step is to migrate your project.
因此,我们已经安装了PostgreSQL并配置了settings.py文件。 现在,最后一步是迁移您的项目。
Open your project directory in terminal and type:
在终端中打开您的项目目录,然后键入:
python manage.py runserver
python manage.py运行服务器

All set, test and run your project.
全部设置,测试和运行您的项目。
That’s all about changing database from SQLite to PostgreSQL.
这就是将数据库从SQLite更改为PostgreSQL全部内容。
Note: While migrating, if you’re facing a warning like:
注意:在迁移时,如果您遇到以下警告:
UserWarning: The psycopg2 wheel package will be renamed from release 2.8; in order to keep installing from binary please use “pip install psycopg2-binary” instead. For details see: <http://initd.org/psycopg/docs/install.html#binary-install-from-pypi>.
用户警告:psycopg2 wheel软件包将从2.8版重命名; 为了保持二进制安装,请改用“ pip install psycopg2-binary”。 有关详细信息,请参见:<http://initd.org/psycopg/docs/install.html#binary-install-from-pypi>。
“””)
“””)
You can solve this issue with installing psycopg2-binary by using following command:
您可以使用以下命令通过安装psycopg2-binary解决此问题:
pip install psycopg2-binary
pip安装psycopg2-binary
If you’ve any query related to Django PostgreSQL installation and setup, please let us know in the comment box.
如果您有关于Django PostgreSQL安装和设置的任何疑问,请在评论框中告诉我们。
翻译自: https://www.thecrazyprogrammer.com/2019/01/django-postgresql-installation-and-setup.html

魔乐社区(Modelers.cn) 是一个中立、公益的人工智能社区,提供人工智能工具、模型、数据的托管、展示与应用协同服务,为人工智能开发及爱好者搭建开放的学习交流平台。社区通过理事会方式运作,由全产业链共同建设、共同运营、共同享有,推动国产AI生态繁荣发展。
更多推荐


 0
0 0
0- 0


 已为社区贡献17条内容

所有评论(0)