ML(机器学习)ReLU函数,构建3层神经网络,恒等函数实现
今天,接着跟大家分享一波ReLU函数。这个函数也是激活函数。表达式如下:y = {x,x>00,x<=0}代码实现如下:def ReLU(inx):return np.maximum(0,inx)绘图:Inx = np.arange(-5,5,0.5)y = ReLU(Inx)plt.plot(Inx,y)plt.ylim(-0.5,5)plt.show()可以从图像看出ReLU函数是
·
今天,接着跟大家分享一波ReLU函数。这个函数也是激活函数。表达式如下:
y = {
x,x>0
0,x<=0
}
代码实现如下:
def ReLU(inx):
    return np.maximum(0,inx)
绘图:
    Inx = np.arange(-5,5,0.5)
    y = ReLU(Inx)
    plt.plot(Inx,y)
    plt.ylim(-0.5,5)
    plt.show()
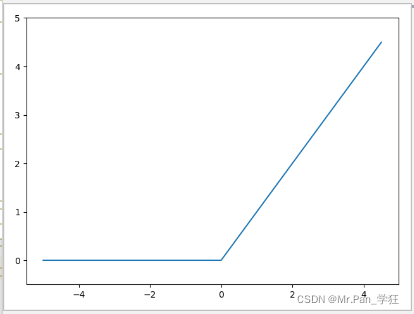
可以从图像看出ReLU函数是非线性函数,相比阶跃函数,它的输出结果有0和自身的输入。阶跃函数的输出结果只有0和1。
多维数组运算:
#encoding="utf-8"
#Author:Mr.Pan_学狂
#finish_time:2022/2/15
def Matrix_calc():
    Matrix1 = np.array([[1,2],[3,4],[5,6]])
    dimension = Matrix1.ndim
    print('{}的维度:'.format(Matrix1),dimension)
    shape = Matrix1.shape
    print('{}的形状:'.format(Matrix1),shape)
    Matrix2 = np.array([[7,8],[9,0]])
    dimension2 = Matrix2.ndim
    print('{}的维度:'.format(Matrix2),dimension2)
    shape2 = Matrix2.shape
    print('{}的形状:'.format(Matrix2),shape2)
    Matrix3 = np.dot(Matrix2,Matrix2)#矩阵的点积
    print(Matrix3)
    print("{}的形状:".format(Matrix3),Matrix3.shape)
    dimension3 = Matrix3.ndim
    print("{}的维度:".format(Matrix3),dimension3)
运行结果: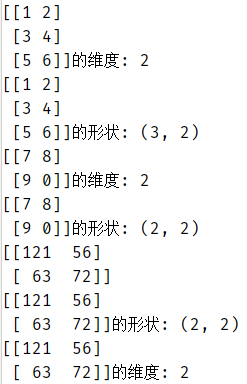
构建三层网络:
def network_build(inx,weights,theta):
    b = -theta#偏置等于阈值的负值
    y = np.dot(inx,weights) + b#输入与权重的点积加上偏置
    #等同于 y = inx * weights + b
    return y
	#第一层网络
    inx = np.array([0.5,1])#传入的数据
    #print(inx.shape)
    weights = np.array([[0.3,0.5,0.7],[0.4,0.6,0.8]])#第一层网络的权重
    # print(weights.shape)
    # result = np.dot(inx,weights)
    # print(result)
    theta = np.array([0.1,0.3,0.5])#第一层网络的阈值
    # for n in range(5):
        # theta = np.array([0.1, 0.3, 0.5])
        # weights = np.array([[0.3, 0.5, 0.7], [0.4, 0.6, 0.8]])  # 权重
    result = network_build(inx,weights,theta)
    output = sigmoid(result)#调用sigmoid函数优化
    print(output)#第一层网络的输出结果
    print()
    print()
    #第二层网络
    inx2 = output#下层网络的输入数据等于上层网络输出的结果
    weights2 = np.array([[0.1,0.3],[0.5,0.7],[0.2,0.4]])#第二层网络的权重
    theta2 = np.array([0.1,0.2])#第二层网络的阈值
    result2 = network_build(inx2,weights2,theta2)
    output2 = sigmoid(result2)
    print(output2)
    #第三层网络
    print()
    print()
    inx3 = output2
    weights3 = np.array([[0.1,0.3,0.5],[0.2,0.4,0.6]])
    theta3 = np.array([0.1,0.2,0.3])
    y = network_build(inx3,weights3,theta3)
    print(y)
    output3 = identity_func(y)#调用恒等函数作为激活函数
    print(output3)
运行结果: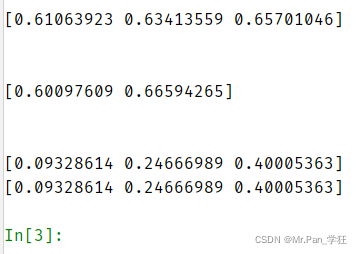
恒等函数构建:
def identity_func(inx):#恒等函数,输入等于输出,激活函数
    return inx
我们结合上面构建三层网络的例子,再做一下调整,也能得到三层网络:
def init_network():#初始化网络
	#这个网络中有我们每一层需要的权重以及theta阈值。
    network = {}
    network['W1'] = np.array([[0.1,0.2,0.3],[0.4,0.5,0.6]])
    network['W2'] = np.array([[0.2,0.4],[0.1,0.3],[0.5,0.7]])
    network['W3'] = np.array([[0.1,0.3],[0.2,0.4]])
    network['theta1'] = np.array([0.1,0.2,0.3])
    network['theta2'] = np.array([0.1,0.3])
    network['theta3'] = np.array([0.2,0.4])
    return network

def forward(network,inx):
    b1 = -network['theta1']#偏置1
    b2 = -network['theta2']#偏置2
    b3 = -network['theta3']#偏置3
    result1 = np.dot(inx,network['W1'])+b1
    output1 = sigmoid(result1)#调用sigmoid激活函数
    print('Sigmoid激活函数输出结果:',output1)
    result2 = np.dot(output1,network['W2'])+b2
    output2 = ReLU(result2)#调用ReLU激活函数
    print('ReLU激活函数输出结果:',output2)
    result3 = np.dot(output2, network['W3']) + b3
    output3 = identity_func(result3)#调用恒等激活函数
    print('identity_func恒等激活函数输出结果:',output3)
运行代码:
    network = init_network()
    x = [0.1,0.6]#输入的数据
    forward(network,x)
运行结果:
最后,感谢大家前来观看鄙人的文章,文中或有诸多不妥之处,还望指出和海涵。

魔乐社区(Modelers.cn) 是一个中立、公益的人工智能社区,提供人工智能工具、模型、数据的托管、展示与应用协同服务,为人工智能开发及爱好者搭建开放的学习交流平台。社区通过理事会方式运作,由全产业链共同建设、共同运营、共同享有,推动国产AI生态繁荣发展。
更多推荐


 0
0 0
0- 0


 已为社区贡献4条内容

所有评论(0)