python+opencv+dlib实现人脸识别
·
一、安装opencv和dlib
1.下载dlib-19.21.99-cp38-cp38-win_amd64.whl
2. pip install dlib-19.21.99-cp38-cp38-win_amd64.whl
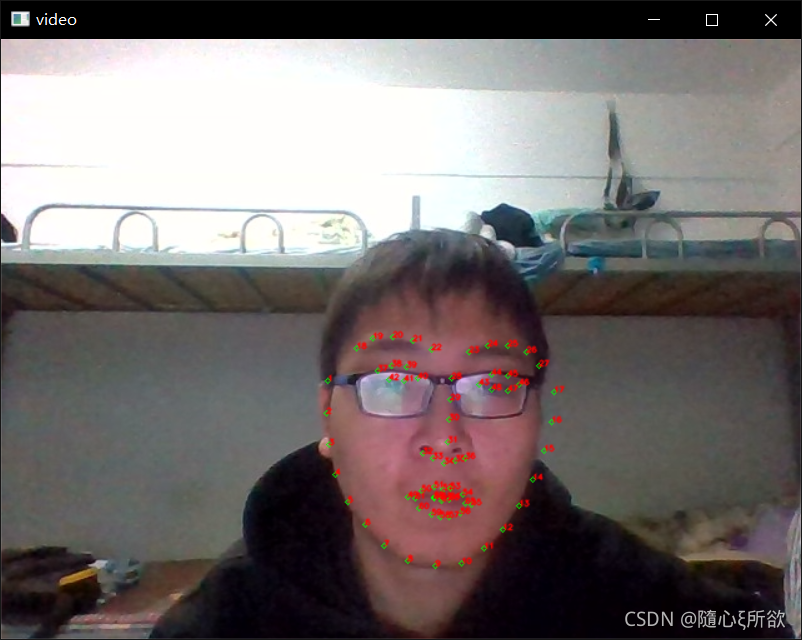
二、打开摄像头,实时采集人脸并保存、绘制68个特征点
# -*- coding: utf-8 -*-
"""
Created on Wed Oct 27 03:15:10 2021

@author: GT72VR
"""
import numpy as np
import cv2
import dlib
import os
import sys
import random
# 存储位置
output_dir = 'C:/Users/86199/tvcamera'
size = 64

if not os.path.exists(output_dir):
    os.makedirs(output_dir)
# 改变图片的亮度与对比度

def relight(img, light=1, bias=0):
    w = img.shape[1]
    h = img.shape[0]
    #image = []
    for i in range(0,w):
        for j in range(0,h):
            for c in range(3):
                tmp = int(img[j,i,c]*light + bias)
                if tmp > 255:
                    tmp = 255
                elif tmp < 0:
                    tmp = 0
                img[j,i,c] = tmp
    return img

#使用dlib自带的frontal_face_detector作为我们的特征提取器
detector = dlib.get_frontal_face_detector()
# 打开摄像头 参数为输入流,可以为摄像头或视频文件
camera = cv2.VideoCapture(0)
#camera = cv2.VideoCapture('C:/Users/CUNGU/Videos/Captures/wang.mp4')
ok = True

detector = dlib.get_frontal_face_detector()
predictor = dlib.shape_predictor('shape_predictor_68_face_landmarks.dat')


while ok:
    # 读取摄像头中的图像,ok为是否读取成功的判断参数
    ok, img = camera.read()

    # 转换成灰度图像
    img_gray = cv2.cvtColor(img, cv2.COLOR_BGR2GRAY)

    rects = detector(img_gray, 0)

    for i in range(len(rects)):
        landmarks = np.matrix([[p.x, p.y] for p in predictor(img,rects[i]).parts()])
        for idx, point in enumerate(landmarks):
            # 68点的坐标
            pos = (point[0, 0], point[0, 1])
            print(idx,pos)

            # 利用cv2.circle给每个特征点画一个圈,共68个
            cv2.circle(img, pos, 2, color=(0, 255, 0))
            # 利用cv2.putText输出1-68
            font = cv2.FONT_HERSHEY_SIMPLEX
            cv2.putText(img, str(idx+1), pos, font, 0.2, (0, 0, 255), 1,cv2.LINE_AA)
    cv2.imshow('video', img)
    k = cv2.waitKey(1)
    if k == 27:    # press 'ESC' to quit
        break

camera.release()
cv2.destroyAllWindows()
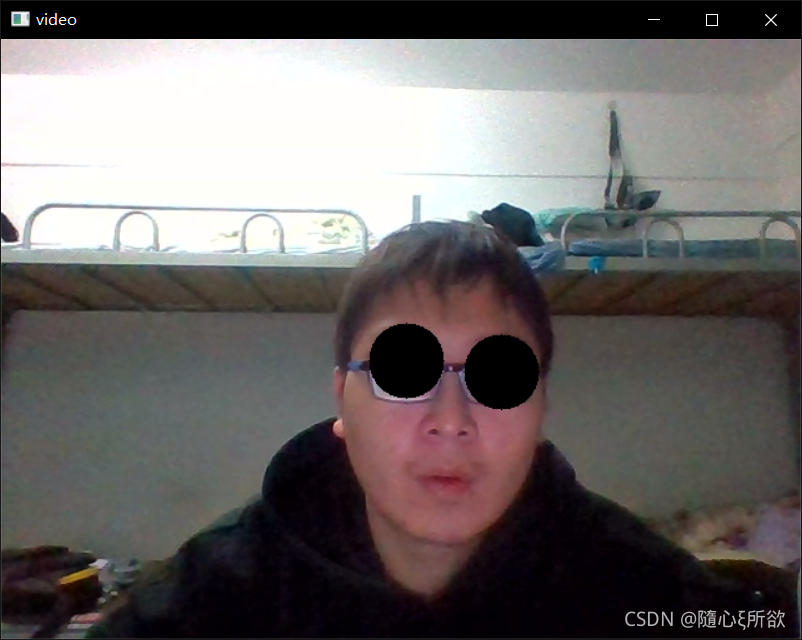
三、人脸虚拟P上一付墨镜
代码
# 导入包
import numpy as np
import cv2
import dlib
import os
import sys
import random
def get_detector_and_predicyor():
    #使用dlib自带的frontal_face_detector作为我们的特征提取器
    detector = dlib.get_frontal_face_detector()
    """
    功能:人脸检测画框
    参数:PythonFunction和in Classes
    in classes表示采样次数,次数越多获取的人脸的次数越多,但更容易框错
    返回值是矩形的坐标,每个矩形为一个人脸(默认的人脸检测器)
    """
    #返回训练好的人脸68特征点检测器
    predictor = dlib.shape_predictor('..\\source\\shape_predictor_68_face_landmarks.dat')
    return detector,predictor
#获取检测器
detector,predictor=get_detector_and_predicyor()
def painting_sunglasses(img,detector,predictor):
    #给人脸带上墨镜
    rects = detector(img_gray, 0)
    for i in range(len(rects)):
        landmarks = np.matrix([[p.x, p.y] for p in predictor(img,rects[i]).parts()])
        right_eye_x=0
        right_eye_y=0
        left_eye_x=0
        left_eye_y=0
        for i in range(36,42):#右眼范围
            #将坐标相加
            right_eye_x+=landmarks[i][0,0]
            right_eye_y+=landmarks[i][0,1]
        #取眼睛的中点坐标
        pos_right=(int(right_eye_x/6),int(right_eye_y/6))
        """
        利用circle函数画圆
        函数原型
        cv2.circle(img, center, radius, color[, thickness[, lineType[, shift]]])
        img:输入的图片data
        center:圆心位置
        radius:圆的半径
        color:圆的颜色
        thickness:圆形轮廓的粗细(如果为正)。负厚度表示要绘制实心圆。
        lineType: 圆边界的类型。
        shift:中心坐标和半径值中的小数位数。
        """
        cv2.circle(img=img, center=pos_right, radius=30, color=(0,0,0),thickness=-1)
        for i in range(42,48):#左眼范围
           #将坐标相加
            left_eye_x+=landmarks[i][0,0]
            left_eye_y+=landmarks[i][0,1]
        #取眼睛的中点坐标
        pos_left=(int(left_eye_x/6),int(left_eye_y/6))
        cv2.circle(img=img, center=pos_left, radius=30, color=(0,0,0),thickness=-1)
camera = cv2.VideoCapture(0)#打开摄像头
ok=True
# 打开摄像头 参数为输入流,可以为摄像头或视频文件
while ok:
    ok,img = camera.read()
     # 转换成灰度图像
    img_gray = cv2.cvtColor(img,cv2.COLOR_BGR2GRAY)
    #display_feature_point(img,detector,predictor)
    painting_sunglasses(img,detector,predictor)#调用画墨镜函数
    cv2.imshow('video', img)
    k = cv2.waitKey(1)
    if k == 27:    # press 'ESC' to quit
        break
camera.release()
cv2.destroyAllWindows()
参考:(34条消息) 人脸特征提取(dlib+opencv3.4+python3.8)_junseven164的博客-CSDN博客

魔乐社区(Modelers.cn) 是一个中立、公益的人工智能社区,提供人工智能工具、模型、数据的托管、展示与应用协同服务,为人工智能开发及爱好者搭建开放的学习交流平台。社区通过理事会方式运作,由全产业链共同建设、共同运营、共同享有,推动国产AI生态繁荣发展。
更多推荐


 0
0 0
0- 0


 已为社区贡献2条内容

所有评论(0)