2024年最全CenterNet2实战:手把手带你实现使用CenterNet2训练自定义数据集
print(self.categories)
self.label.append(label[1])
self.label.append(label)
points = shapes[‘points’]
self.annotations.append(self.annotation(points, label, num))
self.annID += 1
def image(self, data, num):
image = {}
img = utils.img_b64_to_arr(data[‘imageData’])
height, width = img.shape[:2]
img = None
image[‘height’] = height
image[‘width’] = width
image[‘id’] = num + 1
image[‘file_name’] = data[‘imagePath’].split(‘/’)[-1]
self.height = height
self.width = width
return image
def categorie(self, label):
categorie = {}
categorie[‘supercategory’] = label
categorie[‘supercategory’] = label
categorie[‘id’] = labels[label] # 0 默认为背景
categorie[‘name’] = label
return categorie
def annotation(self, points, label, num):
annotation = {}
print(points)
x1 = points[0][0]
y1 = points[0][1]
x2 = points[1][0]
y2 = points[1][1]
contour = np.array([[x1, y1], [x2, y1], [x2, y2], [x1, y2]]) # points = [[x1, y1], [x2, y2]] for rectangle
contour = contour.astype(int)
area = cv2.contourArea(contour)
print("contour is ", contour, " area = ", area)
annotation[‘segmentation’] = [list(np.asarray([[x1, y1], [x2, y1], [x2, y2], [x1, y2]]).flatten())]
[list(np.asarray(contour).flatten())]
annotation[‘iscrowd’] = 0
annotation[‘area’] = area
annotation[‘image_id’] = num + 1
if self.require_mask:
annotation[‘bbox’] = list(map(float, self.getbbox(points)))
else:
x1 = points[0][0]
y1 = points[0][1]
width = points[1][0] - x1
height = points[1][1] - y1
annotation[‘bbox’] = list(np.asarray([x1, y1, width, height]).flatten())
annotation[‘category_id’] = self.getcatid(label)
annotation[‘id’] = self.annID
return annotation
def getcatid(self, label):
for categorie in self.categories:
if label[1]==categorie[‘name’]:
if label == categorie[‘name’]:
return categorie[‘id’]
return -1
def getbbox(self, points):
polygons = points
mask = self.polygons_to_mask([self.height, self.width], polygons)
return self.mask2box(mask)
def mask2box(self, mask):
np.where(mask==1)
index = np.argwhere(mask == 1)
rows = index[:, 0]
clos = index[:, 1]
left_top_r = np.min(rows) # y
left_top_c = np.min(clos) # x
right_bottom_r = np.max(rows)
right_bottom_c = np.max(clos)
return [left_top_c, left_top_r, right_bottom_c - left_top_c, right_bottom_r - left_top_r]
def polygons_to_mask(self, img_shape, polygons):
mask = np.zeros(img_shape, dtype=np.uint8)
mask = PIL.Image.fromarray(mask)
xy = list(map(tuple, polygons))
PIL.ImageDraw.Draw(mask).polygon(xy=xy, outline=1, fill=1)
mask = np.array(mask, dtype=bool)
return mask
def data2coco(self):
data_coco = {}
data_coco[‘images’] = self.images
data_coco[‘categories’] = self.categories
data_coco[‘annotations’] = self.annotations
return data_coco
def save_json(self):
print(“in save_json”)
self.data_transfer()
self.data_coco = self.data2coco()
print(self.save_json_path)
json.dump(self.data_coco, open(self.save_json_path, ‘w’), indent=4)
labelme_json = glob.glob(‘LabelmeData/*.json’)
from sklearn.model_selection import train_test_split
trainval_files, test_files = train_test_split(labelme_json, test_size=0.2, random_state=55)
import os
if not os.path.exists(“projects/CenterNet2/datasets/coco/annotations”):
os.makedirs(“projects/CenterNet2/datasets/coco/annotations/”)
if not os.path.exists(“projects/CenterNet2/datasets/coco/train2017”):
os.makedirs(“projects/CenterNet2/datasets/coco/train2017”)
if not os.path.exists(“projects/CenterNet2/datasets/coco/val2017”):
os.makedirs(“projects/CenterNet2/datasets/coco/val2017”)
labelme2coco(trainval_files, ‘projects/CenterNet2/datasets/coco/annotations/instances_train2017.json’)
labelme2coco(test_files, ‘projects/CenterNet2/datasets/coco/annotations/instances_val2017.json’)
import shutil
for file in trainval_files:
shutil.copy(os.path.splitext(file)[0] + “.jpg”, “projects/CenterNet2/datasets/coco/train2017/”)
for file in test_files:
shutil.copy(os.path.splitext(file)[0] + “.jpg”, “projects/CenterNet2/datasets/coco/val2017/”)
===================================================================
在projects/CenterNet2目录,新建change_model_size.py文件
import torch
import numpy as np
import pickle
num_class = 2
pretrained_weights = torch.load(‘models/CenterNet2_R50_1x.pth’)
pretrained_weights[‘iteration’]=0
pretrained_weights[‘model’][“roi_heads.box_predictor.0.cls_score.weight”].resize_(num_class+1,1024)
pretrained_weights[‘model’][“roi_heads.box_predictor.0.cls_score.bias”].resize_(num_class+1)
pretrained_weights[‘model’][“roi_heads.box_predictor.1.cls_score.weight”].resize_(num_class+1,1024)
pretrained_weights[‘model’][“roi_heads.box_predictor.1.cls_score.bias”].resize_(num_class+1)
pretrained_weights[‘model’][“roi_heads.box_predictor.2.cls_score.weight”].resize_(num_class+1,1024)
pretrained_weights[‘model’][“roi_heads.box_predictor.2.cls_score.bias”].resize_(num_class+1)
torch.save(pretrained_weights, “models/CenterNet2_%d.pth”%num_class)
这个文件的目的是修改模型输出的size,numclass按照本次打算训练的数据集的类别设置。
路径:“detectron2/engine/defaults.py”
–config-file:模型的配置文件,CenterNet2的模型配置文件放在“projects/CenterNet2/configs”下面。名字和预训练模型对应。
parser.add_argument(“–config-file”, default=“./configs/CenterNet2_DLA-BiFPN-P3_4x.yaml”, metavar=“FILE”, help=“path to config file”)
resume 是否再次,训练,如果设置为true,则接着上次训练的结果训练。所以第一次训练不用设置。
parser.add_argument(
“–resume”,
action=“store_true”,
help="Whether to attempt to resume from the checkpoint directory. "
“See documentation of DefaultTrainer.resume_or_load() for what it means.”,
)
–num-gpus,gpu的个数,如果只有一个设置为1,如果有多个,可以自己设置想用的个数。
parser.add_argument(“–num-gpus”, type=int, default=1, help=“number of gpus per machine”)
opts指的是yaml文件的参数。
上面的参数可以设置,也可以不设置,设置之后可以直接运行不用再考虑设置参数,如果不设置每次训练的时候配置一次参数。
修改类别,文件路径“projects/CenterNet2/centernet/config.py”,
_C.MODEL.CENTERNET.NUM_CLASSES = 2

修改yaml文件参数
Base-CenterNet2.yaml中修改预训练模型的路径。
WEIGHTS: “CenterNet2_2.pth”
BASE_LR:设置学习率。
STEPS:设置训练多少步之后调整学习率。
MAX_ITER:最大迭代次数。
CHECKPOINT_PERIOD:设置迭代多少次保存一次模型
BASE_LR: 0.01
STEPS: (10000, 50000)
MAX_ITER: 100000
CHECKPOINT_PERIOD: 5000
在设置上面的参数时要注意,如果选择用CenterNet2_R50_1x.yaml,里面没有参数,则在Base-CenterNet2.yaml中设置,如果选用其他的,例如CenterNet2_DLA-BiFPN-P3_4x.yaml,这些参数需要在CenterNet2_DLA-BiFPN-P3_4x.yaml改。
主要修改该setup函数,增加数据集注册。
NUM_CLASSES=2
def setup(args):
“”"
Create configs and perform basic setups.
“”"
register_coco_instances(“train”, {}, “datasets/coco/annotations/instances_train2017.json”,
“datasets/coco/train2017”)
register_coco_instances(“test”, {}, “datasets/coco/annotations/instances_val2017.json”,
“datasets/coco/val2017”)
cfg = get_cfg()
add_centernet_config(cfg)
cfg.merge_from_file(args.config_file)
cfg.merge_from_list(args.opts)
cfg.DATASETS.TRAIN = (“train”,)
cfg.DATASETS.TEST = (“test”,)
cfg.MODEL.CENTERNET.NUM_CLASSES = NUM_CLASSES
cfg.MODEL.ROI_HEADS.NUM_CLASSES = NUM_CLASSES
if ‘/auto’ in cfg.OUTPUT_DIR:
file_name = os.path.basename(args.config_file)[:-5]
cfg.OUTPUT_DIR = cfg.OUTPUT_DIR.replace(‘/auto’, ‘/{}’.format(file_name))
logger.info(‘OUTPUT_DIR: {}’.format(cfg.OUTPUT_DIR))
cfg.freeze()
default_setup(cfg, args)
return cfg
还要修改detectron2/engine/launch.py,在launch函数下面增加一句
dist.init_process_group(‘gloo’, init_method=‘file://tmp/somefile’, rank=0, world_size=1)
如下图:

这句话的作用是初始化分布式训练,因为我们没有使用分布式,所以没有初始化,但是不初始化就会报错,所以加上这句。
===============================================================
两种启动方式:
第一种,命令行:进入“projects/CenterNet2/”目录下,执行:
python train_net.py
第二种,直接在pycharm 直接运行train_net.py.
训练结果:

从训练结果上看,效果确实不错,不过模型很大。大约有500M

===============================================================
修改projects/CenterNet2/demo.py

在红框的位置增加代码,详细如下面的代码。
NUM_CLASSES=2
def setup_cfg(args):
load config from file and command-line arguments
cfg = get_cfg()
add_centernet_config(cfg)
cfg.MODEL.CENTERNET.NUM_CLASSES = NUM_CLASSES
cfg.MODEL.ROI_HEADS.NUM_CLASSES = NUM_CLASSES
cfg.merge_from_file(args.config_file)
cfg.merge_from_list(args.opts)
Set score_threshold for builtin models
cfg.MODEL.RETINANET.SCORE_THRESH_TEST = args.confidence_threshold
cfg.MODEL.ROI_HEADS.SCORE_THRESH_TEST = args.confidence_threshold
if cfg.MODEL.META_ARCHITECTURE in [‘ProposalNetwork’, ‘CenterNetDetector’]:
cfg.MODEL.CENTERNET.INFERENCE_TH = args.confidence_threshold
cfg.MODEL.CENTERNET.NMS_TH = cfg.MODEL.ROI_HEADS.NMS_THRESH_TEST
cfg.MODEL.PANOPTIC_FPN.COMBINE.INSTANCES_CONFIDENCE_THRESH = args.confidence_threshold
cfg.freeze()
return cfg
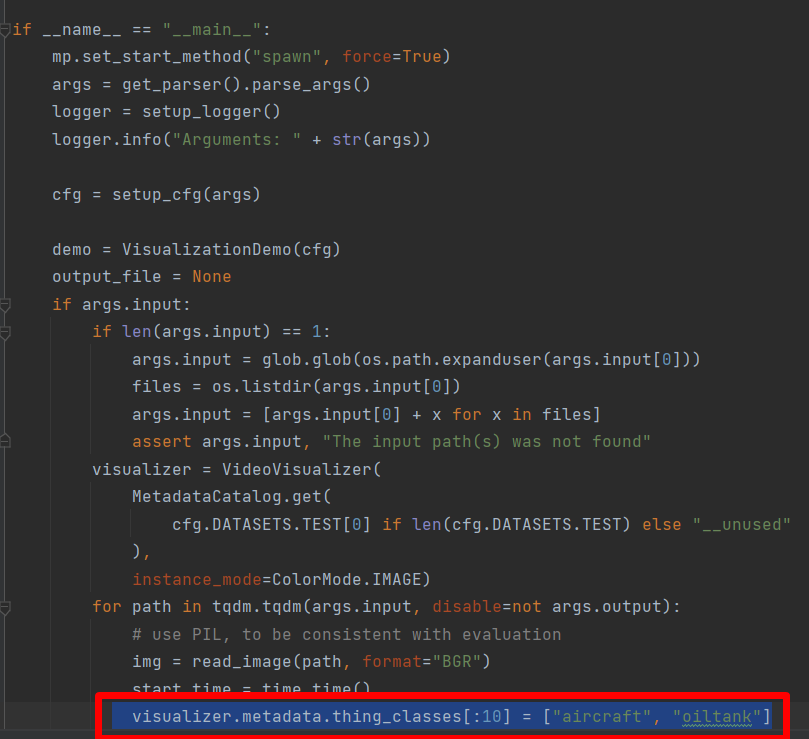
代码:
visualizer.metadata.thing_classes[:10] = [“aircraft”, “oiltank”]
然后进入CenterNet2-master目录,执行如下命令:
python projects/CenterNet2/demo.py --config-file projects/CenterNet2/configs/CenterNet2_R50_1x.yaml --input imgs/ --output imgout --opts MODEL.WEIGHTS projects/CenterNet2/output/CenterNet2/CenterNet2_R50_1x/model_final.pth
做了那么多年开发,自学了很多门编程语言,我很明白学习资源对于学一门新语言的重要性,这些年也收藏了不少的Python干货,对我来说这些东西确实已经用不到了,但对于准备自学Python的人来说,或许它就是一个宝藏,可以给你省去很多的时间和精力。
别在网上瞎学了,我最近也做了一些资源的更新,只要你是我的粉丝,这期福利你都可拿走。
我先来介绍一下这些东西怎么用,文末抱走。
(1)Python所有方向的学习路线(新版)
这是我花了几天的时间去把Python所有方向的技术点做的整理,形成各个领域的知识点汇总,它的用处就在于,你可以按照上面的知识点去找对应的学习资源,保证自己学得较为全面。
最近我才对这些路线做了一下新的更新,知识体系更全面了。

(2)Python学习视频
包含了Python入门、爬虫、数据分析和web开发的学习视频,总共100多个,虽然没有那么全面,但是对于入门来说是没问题的,学完这些之后,你可以按照我上面的学习路线去网上找其他的知识资源进行进阶。

(3)100多个练手项目
我们在看视频学习的时候,不能光动眼动脑不动手,比较科学的学习方法是在理解之后运用它们,这时候练手项目就很适合了,只是里面的项目比较多,水平也是参差不齐,大家可以挑自己能做的项目去练练。

(4)200多本电子书
这些年我也收藏了很多电子书,大概200多本,有时候带实体书不方便的话,我就会去打开电子书看看,书籍可不一定比视频教程差,尤其是权威的技术书籍。
基本上主流的和经典的都有,这里我就不放图了,版权问题,个人看看是没有问题的。
(5)Python知识点汇总
知识点汇总有点像学习路线,但与学习路线不同的点就在于,知识点汇总更为细致,里面包含了对具体知识点的简单说明,而我们的学习路线则更为抽象和简单,只是为了方便大家只是某个领域你应该学习哪些技术栈。

(6)其他资料
还有其他的一些东西,比如说我自己出的Python入门图文类教程,没有电脑的时候用手机也可以学习知识,学会了理论之后再去敲代码实践验证,还有Python中文版的库资料、MySQL和HTML标签大全等等,这些都是可以送给粉丝们的东西。

这些都不是什么非常值钱的东西,但对于没有资源或者资源不是很好的学习者来说确实很不错,你要是用得到的话都可以直接抱走,关注过我的人都知道,这些都是可以拿到的。
网上学习资料一大堆,但如果学到的知识不成体系,遇到问题时只是浅尝辄止,不再深入研究,那么很难做到真正的技术提升。
一个人可以走的很快,但一群人才能走的更远!不论你是正从事IT行业的老鸟或是对IT行业感兴趣的新人,都欢迎加入我们的的圈子(技术交流、学习资源、职场吐槽、大厂内推、面试辅导),让我们一起学习成长!

魔乐社区(Modelers.cn) 是一个中立、公益的人工智能社区,提供人工智能工具、模型、数据的托管、展示与应用协同服务,为人工智能开发及爱好者搭建开放的学习交流平台。社区通过理事会方式运作,由全产业链共同建设、共同运营、共同享有,推动国产AI生态繁荣发展。
更多推荐


 18
18 0
0- 0


 已为社区贡献1条内容

所有评论(0)