微服务体系自媒体实战 学习笔记
实体@valid 验证
实体对象
BO:视图层传输过来的对象
属性上面添加 注解验证
@NotBlank(message = "id不能为空") private String id; @Length(Max = 12, message = "名称不能超过12位") private String name; @Email //邮箱校验 private String email; @Min(value = 0 ,message = "") @Max(value = 1 ,message= "") private integer sex; @JsonForamt(timezone = "GTM+8" , pattern = "yyyy-MM-dd") //日期格式化 传入的字符串类型转换成 date private Date birthday;
方法上面 返回BindingResult 存有验证结果
  public Map<String, String> getErrors(BindingResult result){
        Map<String, String> map = new HashMap<>();
        List<FieldError> errorList = result.getFieldErrors();
        for (FieldError error :errorList){
            //发生验证错误时对应的某个属性
            String field = error.getField();
            //验证消息
            String msg = error.getDefaultMessage();
            map.put(field,msg);
        }
        return map;
    }
定义拦截器
1 创建一个类,实现 HandlerInterceptor 接口
import org.springframework.web.servlet.HandlerInterceptor;
public class verifyInterceptors implements HandlerInterceptor {}
2.重写方法
-
preHandle() 在请求访问到Controller 之前 执行
-
返回值 true 代表请求通过, false 请求被拦截
-
-
postHandle() 在请求访问到Controller 之 渲染视图之前 执行
-
afterCompletion() 在请求访问到Controller 之前,渲染视图之后 执行
3. 实现 WebMvcConfigurer 接口 写配置类
实现 addInterceptors() 完成注册
构建,拦截器的bean
配置拦截bean和路径
import org.springframework.web.servlet.config.annotation.InterceptorRegistry;
import org.springframework.web.servlet.config.annotation.WebMvcConfigurer;
@Configuration
public class InterceptorConfig implements WebMvcConfigurer {
@Bean//构建拦截器Bean
public verifyInterceptors verifyInterceptors() {return new verifyInterceptors();}
@Override
public void addInterceptors(InterceptorRegistry registry) {
registry.addInterceptor(verifyInterceptors())//添加拦截器
.addPathPatterns("/user/verify");//添加拦截路径
}
}
..
@Bean  //注入多个
@Bean
....
    registry.addInterceptor(a())//添加拦截器
...
    registry.addInterceptor(b())//添加拦截器
自定义异常 异常拦截
1. 继承RunTimeException 接口
@Data
public class LfException extends RuntimeException{
private REnum rEnum; //实现自己的枚举
public LfException(REnum rEnum){
super("异常状态码为:" + rEnum.status() +
";具体异常信息为:" + rEnum.msg() );
this.rEnum = rEnum;
}
}
2.统一的封装
public class MyException {
//REnum 是自己实现的枚举 包装了异常信息
public static void display(REnum rEnum){
throw new LfException(rEnum);
}
}
3.统一异常拦截处理
统一异常拦截处理 针对异常的类型进行捕获,然后返回 json 信息到前端
import com.lf.result.R;
import org.springframework.web.bind.annotation.ControllerAdvice;
import org.springframework.web.bind.annotation.ExceptionHandler;
import org.springframework.web.bind.annotation.ResponseBody;
/**
* 统一异常拦截处理 针对异常的类型进行捕获,然后返回json信息到前端
*/
@ControllerAdvice //交给spring管理
public class MyExceptionHandler {
@ExceptionHandler(LfException.class) // 只要是自定的异常都会进入这个方法
@ResponseBody //返回类型
public R returnMyException(LfException e){ //拦截到后 会获取异常信息
e.printStackTrace(); //打印异常信息
return R.exception(e.getREnum());
}
}
设置cookie 与会话信息
使用UUID来添加 token
String userToken = UUID.randomUUID().toString().trim();
向前端保存 cookie
使用URLEncoder.encode(); //设置字符集
Cookie.setDomain() 设置域名信息
public void setCookie(HttpServletRequest request,
HttpServletResponse response,
String keyName,
String value,
Integer maxAge){
try {
value = URLEncoder.encode(value, "utf-8");
Cookie cookie = new Cookie(keyName, value);
cookie.setMaxAge(maxAge);//过期时间
cookie.setDomain("*");
cookie.setPath("/");
response.addCookie(cookie);
} catch (UnsupportedEncodingException e) {
e.printStackTrace();
}
}
API
Mapper
updateByPrimarykeySelective() 和updateByPrimaryKey()区别
| id | name | day |
|---|---|---|
| 1 | lf | |
//更新操作时 数据 只有 day 属性 则不会修改 id 和name terminalMapper.updateByPrimaryKeySelective(); //更新时候 数据 只有 day 会把 id 和name 也更新为空 terminalMapper.updateByPrimaryKey();
restTemplate 发起远程调用
String URL = "httpl..." +jsonUtils.objectToJson(AA);// aa对象转换json
ResponseEntity<bb> BB=
   restTemplate.getForEntity(URL,bb.class);//bb 是返回对象
bb .. = BB.getBody();//获取结果集
VO类 BO类
返回给前端的对象,单不需要全部的数据, 只把需要的数据封装成VO类型
BeanUtils.copyProperties(user,userVO);//只会从 user 复制 userVO 拥有的属性
视图层传输过来的对象对应BO类
流
base64 转换成 Stream
//获取传入的 base64 字符串
String file64 =...;
//base64字符串 转换为byte 数组
byte[] bytes = new BASE64Decoder().decodeBuffer(file64.trim());//trim() 是string 截取 前后空格
//转换为输入流
ByteArrayInputStream inpuStream = new ByteArrayInputStream(bytes);
文件流使用
File file = new File("/xxx/xx");
if( !file.exists() ){//当文件路径不存在时调用创建路径方法
    file.mkdirs();
}
文件传输
import org.springframework.web.multipart.MultipartFile;
例如
@Override
public R uploadFace(String userId, MultipartFile file) throws Exception{
if( file != null){
//获取上传的文件名
String filename = file.getOriginalFilename();
//判断文件名非空
if(StringUtils.isNotBlank(filename)){
String[] split = filename.split("\\.");//字符串 串 从\\、进行截取
//获得后缀 如 png.jpg.jpeg
String suffix = split[split.length-1];
}else {
return R.ok("文件名为空");
}
}else {
return R.ok("文件不能为空");
}
..上传操作
return R.ok();
}
OSS
创建Bucket 列表
使用 Access Key
java SDK —— 简单上传 —— 网络流... 用的比较多
        // yourEndpoint填写Bucket所在地域对应的Endpoint。以华东1(杭州)为例,Endpoint填写为https://oss-cn-hangzhou.aliyuncs.com。
        String endpoint = "yourEndpoint";
// 阿里云账号AccessKey拥有所有API的访问权限,风险很高。强烈建议您创建并使用RAM用户进行API访问或日常运维,请登录RAM控制台创建RAM用户。
        String accessKeyId = "yourAccessKeyId";
        String accessKeySecret = "yourAccessKeySecret";

// 创建OSSClient实例。
        OSS ossClient = new OSSClientBuilder().build(endpoint, accessKeyId, accessKeySecret);

// 填写网络流地址。
        InputStream inputStream = new URL("https://www.aliyun.com/").openStream();
// 依次填写Bucket名称(例如examplebucket)和Object完整路径(例如exampledir/exampleobject.txt)。Object完整路径中不能包含Bucket名称。
        ossClient.putObject("examplebucket", "exampledir/exampleobject.txt", inputStream);

// 关闭OSSClient。
        ossClient.shutdown();
// return 返回exampledir  吧完整的 路径地址 返回个 controller
-
endpoint : Bucket —— 概览 ——访问域名—— 外网访问
-
accessKeyId : 阿里key
-
accessKeySecret: 阿里secret
-
inputStream : 可以 MultipartFile.getInputStream() ;
-
// 填写网络流地址。
        InputStream inputStream = file.getInputStream() ;
-
-
examplebucket: Bucke名字
-
exampledir : 资源路径
# 阿里云相关配置
file.endpoint=***
file.examplebucket=***
file.exampledir=image/face
//属性对应的实体类
@Component
@PropertySource("classpath:file-dev.properties")
@ConfigurationProperties(prefix = "file")
@Data
public class FileResource {
    private String endpoint;
    private String accessKeyId;
    private String accessKeySecret;
    private String examplebucket;
    private String exampledir;
}
Maven
排除标签 排除依赖传递中的 不需要的依赖
<dependency>
    <exclusions>
        <exclusion>
            <groupId>
                ....
            </groupId>
        </exclusion>
    </exclusions>
</dependency>
RabbitMQ
异步任务,
SpringCloud
注册中心 Eureka
-
导入依赖
        <dependency>
            <groupId>org.springframework.cloud</groupId>
            <artifactId>spring-cloud-starter-netflix-eureka-server</artifactId>
        </dependency>
-
配置 application.yml
server: port: 7000 eureka: instance: # eureka 实例的hostname,可以是hostname,也可以自定义配置hostname hostname: eureka client: # 是否要把当前的eureka server注册到自己 register-with-eureka: false # 从注册中心获得检索服务实例,server没有必要,直接false即可 fetch-registry: false # 单实例配置自己的服务地址,高可用集群则配置多个地址 service-url: defaultZone: http://${eureka.instance.hostname}:${server.port}/eureka/ server: enable-self-preservation: false # 关闭eureka的自我保护功能 eviction-interval-timer-in-ms: 5000 # 清理无效节点的时间,可以缩短为5s,默认60s -
启动类开启 EuurekaServer
@SpringBootApplication(exclude = {DataSourceAutoConfiguration.class,
                                    MongoAutoConfiguration.class})
@EnableEurekaServer // 开启注册中心
public class Application {
    .....
}
生产者
-
<dependency> <groupId>org.springframework.cloud</groupId> <artifactId>spring-cloud-starter-netflix-eureka-client</artifactId> </dependency> -
配置yml文件
eureka: # 自定义eureka server的信息 server: hostname: eureka port: 7000 client: # 所有的微服务都必须注册到eureka中 register-with-eureka: true # 从注册中心获得检索服务实例 fetch-registry: true # 注册中心的服务地址 service-url: # defaultZone: http://${eureka.server.hostname}:${eureka.server.port}/eureka/ defaultZone: http://eureka-cluster-7001:7001/eureka/,http://eureka-cluster-7002:7002/eureka/,http://eureka-cluster-7003:7003/eureka/ instance: lease-renewal-interval-in-seconds: 3 # 调整微服务(eureka client)和注册中心(eureka server)的心跳时间 lease-expiration-duration-in-seconds: 5 # eureka 举例最近的一次心跳等待提出的时间,默认90s -
启动类开启 Eureka
.....
@EnableEurekaClient     // 开启eureka client,注册到server中
public class Application {...}
服务端调用 老方法
@Autowired
private DiscoveryClient discoveryClient; //注入服务,获得已经注册的相关服务信息
//发起调用
List<User> ...(Set id){

    String serviceId = "Service-User";// 注册的服务名字Service-User
    Lsit<ServiceInstance> list = discoveryClient.getInstances(serviceId);

    ServiceInstance userService = list.get(0); //获取 服务的相关信息

    //动态地址pinjie
    String Url = "http;//" + userService.getHost() + ":" + userService.getPort() + "/.../...";
}
调用方式二
@LoadBalanced
-
默认轮询 算法
@Bean
@LoadBalanced
public RestTemplate restTemplate(){
    return new RestTemplate(new OkHttp3ClientHttpRequestFactory());
}
Eureka 自我保护
eureka:
	server:
		eureka-self-preservation: fasle/true  #是否开启自我保护
补充
eureka:
	server:
		eviction-interval-timer-in-ms: 5000 #清理无效节点的时间  默认是60s
	instance:
		  instance:
    lease-renewal-interval-in-seconds: 3      # 调整微服务(eureka client)和注册中心(eureka server)的心跳时间
    lease-expiration-duration-in-seconds: 5   # eureka 举例最近的一次心跳等待提出的时间,默认90s
Ribbon
服务间通信负载均衡工具,提供完善的超时重试机制
重试机制
导入依赖
<dependency>
     <groupId>org.springframework.retry</groupId>
     <artifactId>spring-retry</artifactId>
</dependency>
配置文件
ribbon:
    ConnectTimeout: 5000 #5秒  创建连接的超时时间
    ReadTimeout: 5000 #  请求超时时间  连接创建好之后,发起请求
    MaxAutoRetries: 2 # 重试次数
    MaxAutoRetriesNextServer: 2 #集群中有多个实例时, 设置重试的实例台数
A节点重试2 次失败后, 重试B节点的服务,失败后 结束重试
feign 组件 http 简化代码 不推荐使用
导入依赖
 <dependency>
            <groupId>org.springframework.cloud</groupId>
            <artifactId>spring-cloud-starter-openfeign</artifactId>
        </dependency>
消费者,开启注解
启动类上添加@EnableFeignClients({"com.lf,,"}) //{"扫描的路径,扫描调用的接口ControllerApi"}
接口 类上添加 @FeignClient( value = "别名 微服务的名字")
@Autowried
UserApi userApi; //被調用的接口
....
userApi.queryByIds("传入需要拼接的地址");//自动获取映射地址 http://+微服务+端口 +传入的地址
服务降级 客户端、
@FeignClient(value = "name", fallbackFactory = 自己编写的类)
public class ....
创建降级类 继承FallbackFactory<>
@Component
public class aa implements FallbackFactory<需要降级的Controller>{

    @Override
    public aa create(Throwable throwable){
        return new 需要降级的Controller(){
            ...;//重写方法
            @Override
            queryByIds(String userIds){
                //局部降级
            }
            ...;
        };
    }
}
feign日志
logging:
	level:
		com....userControllerApi: debug  #前期是全限定名  :日志打印级别

#配置日志
feign:
	client:
		config:
		#配置服务提供方的名称
		service-user:
			loggerLevel: FULL   #日志等级
等级
-
NONE
-
BASIC
-
HEADERS
-
FULL 全部
Hystrix 服务链路问题,防止雪崩
api模块中 调用方
<dependency>
            <groupId>org.springframework.cloud</groupId>
            <artifactId>spring-cloud-starter-netflix-hystrix</artifactId>
        </dependency>
使用注解 @HystrixCommand 在方法上
@HystrixCommand(fallbackMethod = "bb")
public void aa(){}
-
fallbackMethod = "" : 这是一个降级方法 触发降级后执行方法 bb
全局降级方法 @DefaultProperties(defaultFallback = "")
所有方法 触发降级 都执行方法 aa
@DefaultProperties(defaultFallback= "aa")
@RestController
public class ....
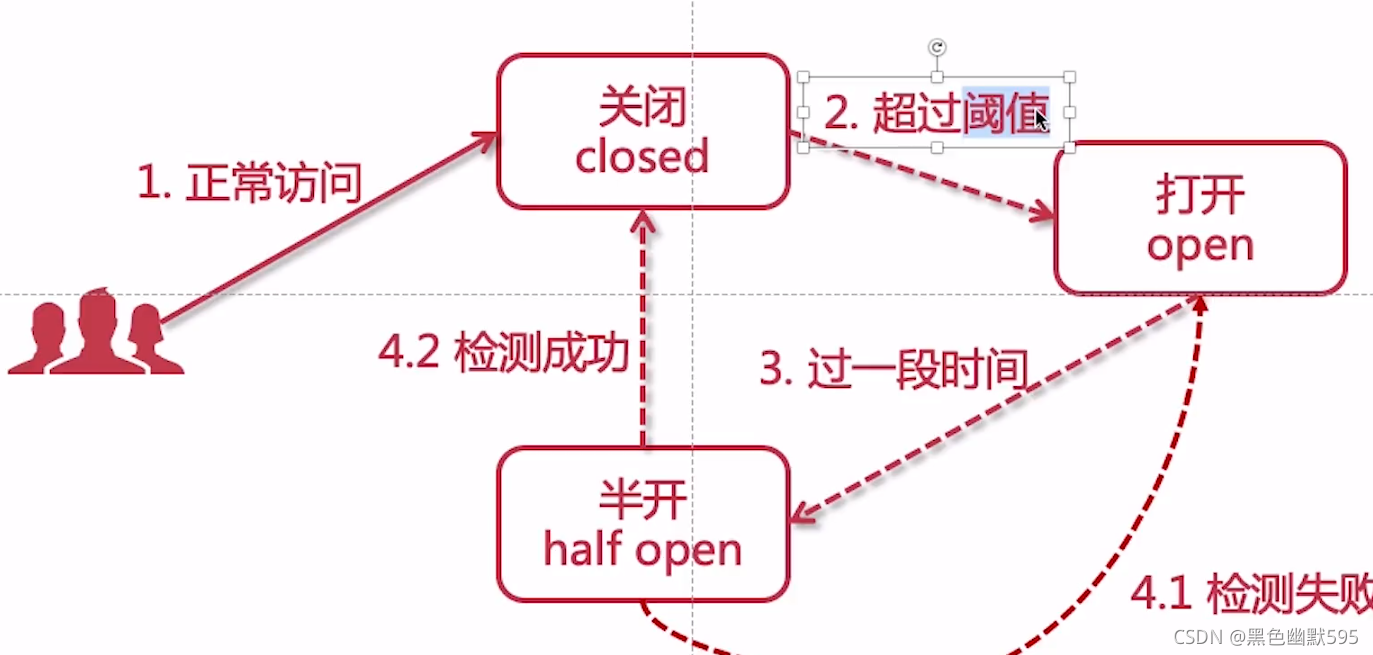
启动类上 添加 @EnableCircuitBreaker 熔断开启注解 hystrix 的
断路器
# 配置hystrix
hystrix:
  command:
    default:
      execution:
        isolation:
          thread:
            timeoutInMilliseconds: 2000   # 设置hystrix超时时间,超过2秒触发降级
      circuitBreaker:   # 配置断路器
        enabled: true
        requestVolumeThreshold: 10    # 触发熔断最小请求次数,默认:20
        sleepWindowInMilliseconds: 15000    # 熔断后过几秒后尝试半开状态(请求重试),默认:5s
        errorThresholdPercentage: 50  # 触发熔断的失败率(异常率/阈值),默认:50
zuul 网关
维护服务地址,用户请求访问微服务网关
        <dependency>
            <groupId>org.springframework.cloud</groupId>
            <artifactId>spring-cloud-starter-netflix-zuul</artifactId>
        </dependency>
启动类添加注解
@EnableZuulServer
@EnableZuulProxy
二选一
@EnableEurekaClient
//@EnableZuulServer  //服务
@EnableZuulProxy       // @EnableZuulProxy是@EnableZuulServer的一个增强升级版,当zuul和eureka、ribbon等组件共同使用,则使用增强版即可
public class Application {}
-
配置路由规则
# 路由规则: http://[网关地址]:[端口号]/[prefix]/[微服务实例id(path)]/[请求地址路径]
zuul:
  routes:
    # 由于路由id和微服务实例id相同,我们可以简化转发的配置
    service-article: /service-article/**
  #    service-article:                  # 配置微服务的路由id,微服务的实例id
#      path: /service-article/**       # 请求路径(前缀)
#      service-id: service-article     # 请求转发的微服务实例id
#      url: http://192.168.1.2:8001    # 请求转发到指定的微服务所在的ip地址
  prefix: /api                        # 请求前缀
-
自定义 zuul 过滤器 / 和拦截器一样
继承 ZuulFilter
import com.netflix.zuul.ZuulFilter;
@Component
public class MyFilter extends ZuulFilter {
/**
* 定义过滤器的类型
* pre: 在请求被路由之前执行
* route: 在路由请求的时候执行
* post: 请求路由以后执行
* error: 处理请求时发生错误的时候执行
* @return
*/
@Override
public String filterType() {
return "pre";
}
/**
* 过滤器执行的顺序,配置多个有顺序的过滤
* 执行顺序从小到大
* @return
*/
@Override
public int filterOrder() {
return 1;
}
/**
* 是否开启过滤器
* true:开启
* false:禁用
* @return
*/
@Override
public boolean shouldFilter() {
return true;
}
/**
* 过滤器的业务实现
* @return
* @throws ZuulException
*/
@Override
public Object run() throws ZuulException {
System.out.println("display pre zuul filter...");
return null; // 没有意义可以不用管。
}
}
扩展 限制ip 访问
自定义属性
# ip请求限制的参数配置
blackIp:
  continueCounts: ${counts:10}    # ip连续请求的次数
  timeInterval: ${interval:10}    # ip判断的事件间隔,单位:秒
  limitTimes: ${times:15}         # 限制的事件,单位:秒
拦截器
@Component
@RefreshScope //动态刷新 actuator 提供
public class BlackIPFilter extends ZuulFilter {
@Value("${blackIp.continueCounts}")
public Integer continueCounts;
@Value("${blackIp.timeInterval}")
public Integer timeInterval;
@Value("${blackIp.limitTimes}")
public Integer limitTimes;
@Autowired
private RedisOperator redis; //自定义的redis
@Override
public String filterType() {return "pre";}
@Override
public int filterOrder() {return 2;}
@Override
public boolean shouldFilter() {return true; }
@Override
public Object run() throws ZuulException {
System.out.println("执行【ip黑名单】过滤器...");
System.out.println("continueCounts: " + continueCounts);
System.out.println("timeInterval: " + timeInterval);
System.out.println("limitTimes: " + limitTimes);
// 获得上下文对象
RequestContext context = RequestContext.getCurrentContext();
HttpServletRequest request = context.getRequest();
// 获得ip
String ip = IPUtil.getRequestIp(request); //IPUtil 自定义工具
/**
* 需求:
* 判断ip在10秒内的请求次数是否超过10次
* 如果超过,则限制这个ip访问15秒,15秒以后再放行
*/
final String ipRedisKey = "zuul-ip:" + ip;
final String ipRedisLimitKey = "zuul-ip-limit:" + ip;
// 获得当前ip这个key的剩余时间
long limitLeftTime = redis.ttl(ipRedisLimitKey);
// 如果当前限制ip的key还存在剩余时间,说明这个ip不能访问,继续等待
if (limitLeftTime > 0) {
stopRequest(context);
return null;
}
// 在redis中累加ip的请求访问次数
long requestCounts = redis.increment(ipRedisKey, 1);
// 从0开始计算请求次数,初期访问为1,则设置过期时间,也就是连续请求的间隔时间
if (requestCounts == 1) {
redis.expire(ipRedisKey, timeInterval);
}
// 如果还能取得请求次数,说明用户连续请求的次数落在10秒内
// 一旦请求次数超过了连续访问的次数,则需要限制这个ip的访问
if (requestCounts > continueCounts) {
// 限制ip的访问时间
redis.set(ipRedisLimitKey, ipRedisLimitKey, limitTimes);
stopRequest(context);
}
return null;
}
private void stopRequest(RequestContext context) {
// 停止zuul继续向下路由,禁止请求通信
context.setSendZuulResponse(false);
context.setResponseStatusCode(200);
String result = JsonUtils.objectToJson(
GraceJSONResult.errorCustom(
ResponseStatusEnum.SYSTEM_ERROR_ZUUL));
context.setResponseBody(result);
context.getResponse().setCharacterEncoding("utf-8");
context.getResponse().setContentType(MediaType.APPLICATION_JSON_VALUE);
}
}
分布式配置中心 SpringCloudConfig
<dependency>
    <groupId>org.springframework.cloud</groupId>
    <artifactId>spring-cloud-config-server</artifactId>
</dependency>
spring:
  cloud:
    config:
      server:
        git:
          uri: https://github.com/leechenxiang/imooc-news-config.git #配置地址
actuator 动态刷新配置,健康检测
<dependency>
    <groupId>org.springframework.boot</groupId>
    <artifactId>spring-boot-starter-actuator</artifactId>
</dependency>
拦截器中添加
@RefreshScope 动态刷新
配置文件
# 配置动态刷新git配置的路径终端请求地址
management:
  endpoints:
    web:
      exposure:
        include: refresh
通过发起一个post的请求来刷新配置文件
http://.../服务端/refresh
消息总线 SpringCloud Bus
配置在服务端的自动刷新 ,方便管理Config
引入依赖 配置服务端
客户端 也需要导入 依赖
<dependency> <groupId>org.springframework.boot</groupId> <artifactId>spring-boot-starter-actuator</artifactId> </dependency> <dependency> <groupId>org.springframework.cloud</groupId> <artifactId>spring-cloud-starter-bus-amqp</artifactId> </dependency>
消息驱动 SpringCloud Stream
统一封装消息的服务框架
service
<dependency>
    <groupId>org.springframework.cloud</groupId>
    <artifactId>spring-cloud-starter-stream-rabbit</artifactId>
</dependency>
配置 MQ
  rabbitmq:
    host: 192.168.1.204
    port: 5672
    username: admin
    password: admin
    virtual-host: imooc-news-dev
  cloud:
    stream:
      bindings:                           # 绑定通道和交换机
        myOutput:                         # 定义生产者的通道
          # 自定义交换机的名字,也就是代码里构建的消息,交给底层mq的交换机
          destination: streamExchange
        myInput:                          # 定义消费者的通道
          # 自定义交换机的名字,也就是消息从底层mq输入到消费端进行消费
          destination: streamExchange
          group: boys # 消息分组,避免重复消费
创建接口
import org.springframework.messaging.MessageChannel;
import org.springframework.messaging.SubscribableChannel;
/**
 * 声明构建通道channel
 */
@Component
public interface MyStreamChannel {

    String OUTPUT = "myOutput";
    String INPUT = "myInput";

    @Output(MyStreamChannel.OUTPUT)
    MessageChannel output();

    @Input(MyStreamChannel.INPUT)
    SubscribableChannel input();
}
-
监听队列
@Component
@EnableBinding(MyStreamChannel.class)
public class MyStreamConsumer {
/**
* 监听并且实现消息的消费和相关业务处理
*/
// @StreamListener(MyStreamChannel.INPUT)
// public void receiveMsg(AppUser user) {
// System.out.println(user.toString());
// }
@StreamListener(MyStreamChannel.INPUT)
public void receiveMsg(String dumpling) {
System.out.println(dumpling);
}
}
-
开启绑定器
**
* 开启绑定器
* 绑定通道channel
*/
@Component
@EnableBinding(MyStreamChannel.class)
public class StreamServiceImpl implements StreamService {
@Autowired
private MyStreamChannel myStreamChannel;
@Override
public void sendMsg() {
AppUser user = new AppUser();
user.setId("10101");
user.setNickname("imooc");
// 消息通过绑定器发送给mq
myStreamChannel.output()
.send(MessageBuilder.withPayload(user).build());
}
@Override
public void eat(String dumpling) {
myStreamChannel.output()
.send(MessageBuilder.withPayload(dumpling).build());
}
}
链路追踪 Sleuth 不推荐 使用
所有的请求都会经过网关 到达微服务
网关模块中 service中 也需要添加2个依赖
<dependency>
    <groupId>org.springframework.cloud</groupId>
    <artifactId>spring-cloud-starter-sleuth</artifactId>
</dependency>
        <dependency>
            <groupId>org.springframework.cloud</groupId>
            <artifactId>spring-cloud-starter-zipkin</artifactId>
        </dependency>
-
服务端配置文件
spring:
      zipkin:
    # 配置zipkin采集的服务地址,数据会发送到这里
    base-url: http://192.168.1.2:9411/
    sender:
      # 数据采集的传输通信方式,web http的形式
      type: web
  sleuth:
    sampler:
      # 数据采样比例(百分数),0~1
      probability: 1
SpringCloud Alibaba
-
注册中间 Eueka 不在更新
-
更换为 Zookeeper Nacos
-
-
服务调用 Ribbon 不推荐 主要使用
-
LoadBalancer 负载均衡器
-
-
服务调用 Feign 不推荐
-
使用 OpenFeign
-
-
断路器 Hystrix 官方不在推荐
-
使用 sentienl 哨兵
-
-
网关 Zuul 不推荐
-
gateway
-
-
服务配置Config 不推荐
-
Nacos
-
-
服务总线 Bus
-
Nacos
-
Zookeeper 注册中心
推荐使用Nacos
-
分布式协调中间件
-
可用于注册/发现服务
-
可以实现分布式锁
-
节点与节点的监听/触发
        <dependency>
            <groupId>org.springframework.cloud</groupId>
            <artifactId>spring-cloud-starter-zookeeper-discovery</artifactId>
        </dependency>
配置yml
spring:
 cloud:
  zookeeper:
    connect-string: 192.168.1.157:2181
启动类类添加注解
@EnableDiscoveryClient //用于注册服务到 zookeeper 或consul
....
GateWay 微服务网关
-
Routes 路由
-
Fiters 过滤器
-
Predicates 断言
<dependency>
    <groupId>org.springframework.cloud</groupId>
    <artifactId>spring-cloud-starter-gateway</artifactId>
</dependency>
spring:
  application:
    name: springcloud-my-gateway
  cloud:
    gateway:
      discovery:
        locator:
          enabled: true       # 开启动态路由,从注册中心根据微服务名称获得目标节点
      routes:
        - id: teacherRoute    # 路由id,可以自定义,保证全局唯一
          uri: lb://service-teacher        # lb 代表负载均衡,会动态寻址
#          uri: http://192.168.1.5:8002    # 后端微服务节点的路由uri地址
          predicates:         # 匹配断言,符合条件的则放行(可以精确到具体的接口名)
            - Path=/teacher/**  # uri+/teacher/**
断言 predicates
官方文档
 predicates:   #是可以有多中断言的
            - Path=/teacher/**
            - RemoteAddr=192.168.1.1/24  #目标地址访问,不是这个ip不能访问
            - After=2017-01-20T17:42:47.789-07:00[America/Denver] #时间节点之后
            - Before=2017-01-20T17:42:47.789-07:00[America/Denver] #时间节点之前
            - Method=GET,POST  #请求方式
            - Query=green #请求参数  ?key=value
自定义过滤器 global Filters
全局过滤器,所有接口路由
-
继承接口
public class MyFilter implements GlobalFilter, Ordered {}重写方法
/ 过滤器的顺序,数字越小优先级越大
@Override
public int getOrder() {
    return 0;
}
@Override public Mono<Void> filter(ServerWebExchange exchange, GatewayFilterChain chain){//执行逻辑 // 判断header中是否有token,对用户请求进行判断过滤 HttpHeaders headers = exchange.getRequest().getHeaders(); ....; if(){ // 禁止通行,禁止向下继续路由 return exchange.getResponse().setComplete(); } // 放行 return chain.filter(exchange);}
Nacos
-
服务注册与发现
-
分布式配置管理
顶级pom
            <dependency>
                <groupId>com.alibaba.cloud</groupId>
                <artifactId>spring-cloud-alibaba-dependencies</artifactId>
                <version>2.2.6.RELEASE</version>
                <type>pom</type>
                <scope>import</scope>
            </dependency>
子工程
        <dependency>
            <groupId>com.alibaba.cloud</groupId>
            <artifactId>spring-cloud-starter-alibaba-nacos-discovery</artifactId>
        </dependency>
配置文件
spring:
 cloud:
    nacos:
      discovery:
        server-addr: 192.168.1.159:8848   # nacos 所在地址
# 打开监控
management:
  endpoints:
    web:
      exposure:
        include: '*'
-
动态配置管理
        <!-- 引入nacos作为配置中心 -->
        <dependency>
            <groupId>com.alibaba.cloud</groupId>
            <artifactId>spring-cloud-starter-alibaba-nacos-config</artifactId>
        </dependency>
-
配置文件 bootstrap.yml
spring:
  cloud:
    nacos:
      config:
        server-addr: 192.168.1.159:8848   # nacos 配置中心所在地址
        file-extension: yaml              # 指定动态配置的文件类型(扩展名)  默认是properties文件
-
controller 中添加@RefreshScope // 动态刷新nacos 配置文件
@RestController
@RequestMapping("teacher")
@RefreshScope       // 动态刷新的注解
public class HelloController {}
Sentinel 流量控制
分布式事务 Seata
seata.io 官中
插件
Swagger2
1.引入依赖
<dependency>
<groupId>io.springfox</groupId>
<artifactId>springfox-swagger2</artifactId>
</dependency>
<dependency>
<groupId>io.springfox</groupId>
<artifactId>springfox-swagger-ui</artifactId>
</dependency>
<dependency>
<groupId>com.github.xiaoymin</groupId>
<artifactId>swagger-bootstrap-ui</artifactId>
</dependency>
2.创建配置类
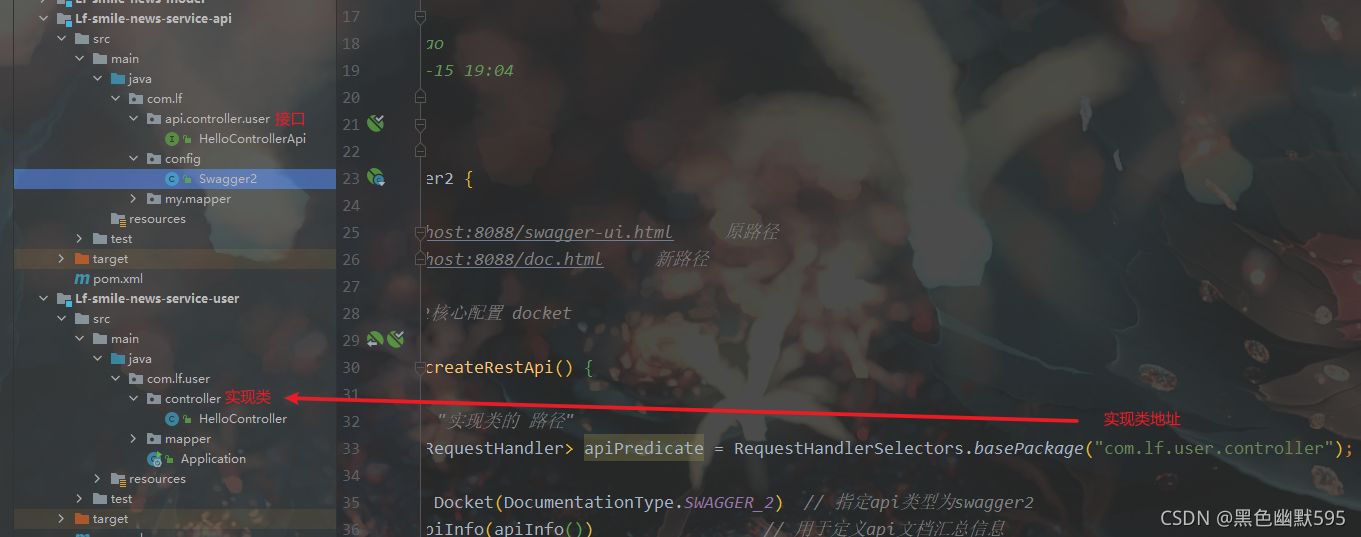
路径是 实现了对应接口的 实现类路径
import com.google.common.base.Predicate;
import com.google.common.base.Predicates;
import org.springframework.context.annotation.Bean;
import org.springframework.context.annotation.Configuration;
import springfox.documentation.RequestHandler;
import springfox.documentation.builders.ApiInfoBuilder;
import springfox.documentation.builders.PathSelectors;
import springfox.documentation.builders.RequestHandlerSelectors;
import springfox.documentation.service.ApiInfo;
import springfox.documentation.service.Contact;
import springfox.documentation.spi.DocumentationType;
import springfox.documentation.spring.web.plugins.Docket;
import springfox.documentation.swagger2.annotations.EnableSwagger2;
@Configuration
@EnableSwagger2
public class Swagger2 {
// http://localhost:8088/swagger-ui.html 原路径
// http://localhost:8088/doc.html 新路径
// 配置swagger2核心配置 docket
@Bean
public Docket createRestApi() {
//开启扫描 "实现类的 路径"
Predicate<RequestHandler> apiPredicate = RequestHandlerSelectors.basePackage("com.lf.user.controller");
return new Docket(DocumentationType.SWAGGER_2) // 指定api类型为swagger2
.apiInfo(apiInfo()) // 用于定义api文档汇总信息
.select()
.apis(Predicates.or(apiPredicate))//扫描包 ,2,3
.paths(PathSelectors.any()) // 所有controller
.build();
}
private ApiInfo apiInfo() {
return new ApiInfoBuilder()
.title("lf自学编写-api接口") // 文档页标题
.contact(new Contact("lf",
"",
"807397634@qq.com")) // 联系人信息
.description("引以为傲的生活") // 详细信息
.version("1.0.0") // 文档版本号
.termsOfServiceUrl("") // 网站地址
.build();
}
}
3.接口添加注解
@Api(value = "controller标题" , tags = {"测试运行"})
public interface HelloControllerApi {
    @ApiOperation(value= "hello方法的接口",notes = "hello方法的接口",httpMethod = "GET")
    public R hello();
}
pagehelper 分页插件
是通过拦截器 拦截select查询语句加入 分页sql
example.orderBy("id").desc(); //可以更具id 进行排序

PageHelper.startPage(page,pageSize);//在执行查询语句之前
..... = userMapper.selectByExample(excample);
PageHelper.startPage(page,pageSize);//在执行查询语句之前
软件
MongoDB
noSql 数据库,内存级别查询,不支持事务,json数据存储,GridFS 小文件存储
导入依赖
<!-- 引入 mongodb 依赖 -->
<dependency>
    <groupId>org.mongodb</groupId>
    <artifactId>mongodb-driver</artifactId>
</dependency>
配置mongdb配置信息
spring:
  data:
    mongodb:
      uri: mongodb://root:root@192.168.1.202:27017
      database: imooc-news
配置GridFSConfig 放入spring容器 //实现文件上传 GridFs
@Component
public class GridFSWebConfig {

    @Value("${spring.data.mongodb.database}")
    private String mongodb;

    @Bean
    public GridFSBucket getGridFSBucket(MongoClient mongoClient){
        MongoDatabase database = mongoClient.getDatabase(mongodb);
        GridFSBucket bucket = GridFSBuckets.create(database);
        return bucket;
    }

}
实体类映射 字段
导入依赖
<dependency>
    <groupId>org.springframework.boot</groupId>
	<artifactId>spring-boot-starter-data-mongodb</artifactId>
</dependency>
实体类 @Field
@Document("别名")//别名 是存入mongoDB中的 名字
public class userMO{

@Field(user_name)
private String userName;
MongoDB持久层操作
FriendLinkMO 实体类 String id值
public interface FriendLinkRepository extends MongoRepository<FriendLinkMO, String> {
}
调用
@Service
....
@Autowired
private    FriendLinkRepository friendLinkRepository ;//注入这个接口
....;
friendLinkRepository.方法调用
主要使用
-
GridFS 存储小文件,例如,图片
-
历史数据的快照: 例如 购物 付款的商品信息(后续不会同步更新改动)
-
用户浏览记录
-
客服聊天记录
ECHARTS 图表 前端
elasticsearch搜索 分布式搜索引擎
Es核心术语
| 索引 index | 表 |
|---|---|
| 类型 type (弃用) | 表逻辑类型 |
| 文档 document | 行 |
| 字段fields | 列 |
| 映射 mapping | 表结构定义 |
| 近实时 NRT | Near real time 接近真实时间 |
| 节点 node | 每一个服务器 |
| shard replica | 数据分片 |
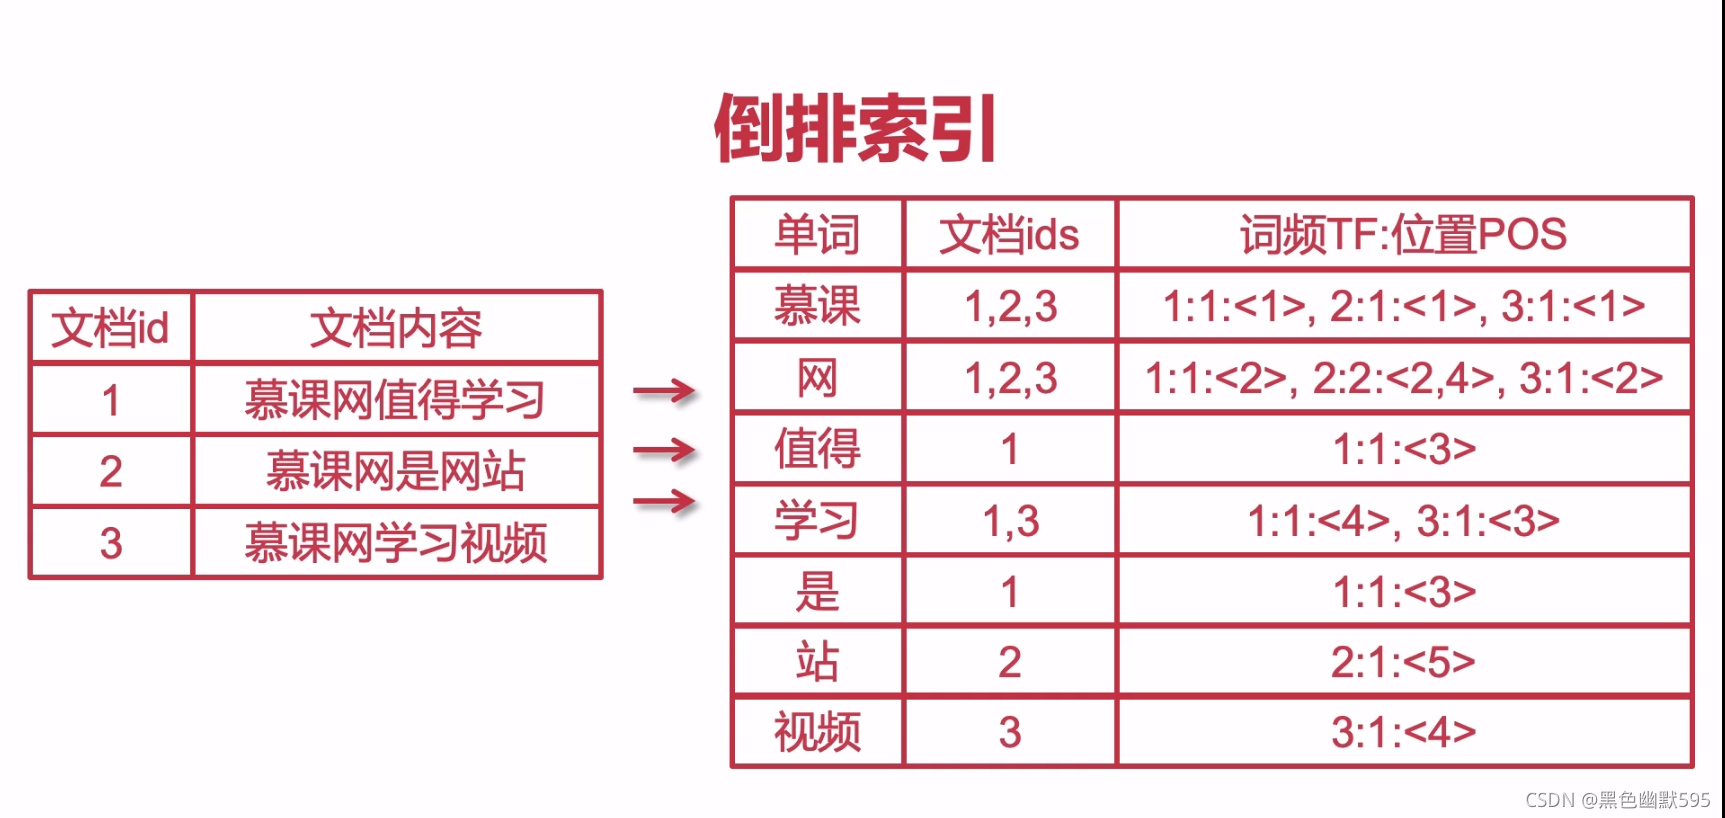
倒排索引
-
导入依赖
<dependency> <groupId>org.springframework.boot</groupId> <artifactId>spring-boot-starter-data-elasticsearch</artifactId> </dependency> -
下载 elastic
业务
双写一致
更新 数据库,和redis
-
删除redis
-
更新数据库
-
删除redis
admin
admin 不提供注册功能,默认存在一个基本账号
通过代码生成用户名,和密码,直接手动生成即可
<dependency>
	<groupId>org.springframework.cloud</groupId>
	<artifactId>spring-cloud-starter-openfeign</artifactId>
</dependency>
String pwd = BCrypt.hashpw(newAdminBO.getPassword(), BCrypt.gensalt());
定时任务
创建配置类
@Configuration
@EnableScheduling  // 开启定时任务
public class ....

    @Scheduled(0/1 0/1 * * * ? )      //执行任务表达式
    public void AA(){}
表达式 在线Cron表达式生成器
支持6位,不支持年
-
定时任务 基本是在全表扫描,对于大量的业务表,会造成负担 会使用MQ做优化
Redis get单个读取 mget 批量读取
在循环体中使用时,每次一次循环都会发起请求,增加redis压力
mget 批量请求
List a = new List();
List<> b = redisTemplate.mget(a);
底部

魔乐社区(Modelers.cn) 是一个中立、公益的人工智能社区,提供人工智能工具、模型、数据的托管、展示与应用协同服务,为人工智能开发及爱好者搭建开放的学习交流平台。社区通过理事会方式运作,由全产业链共同建设、共同运营、共同享有,推动国产AI生态繁荣发展。
更多推荐


 0
0 0
0- 0


 已为社区贡献1条内容

所有评论(0)