深度学习入门(5):unet
小卷积核的设置也对小目标友好。,我们可以利用主干部分获得一个又一个的特征层,Unet的主干特征提取部分与VGG相似,为卷积和最大池化的堆叠。利用主干特征提取部分我们可以获得五个初步有效特征层,在第二步中,我们会利用这五个有效特征层可以进行特征融合。比较常用的医学分割模型,在VOC分割不一定适用,但是可以借着这个模型详细的讲讲一个深度学习框架怎么构建的,并引入一些新的工作,所以这里记录。,我们可以利
引言
比较常用的医学分割模型,在VOC分割不一定适用,但是可以借着这个模型详细的讲讲一个深度学习框架怎么构建的,并引入一些新的工作,所以这里记录。这里借鉴的是憨批的语义分割重制版6——Pytorch 搭建自己的Unet语义分割平台_pytorch进行unet语义分割-CSDN博客
有学习需求的移步这位博主这里就好了,本博客只是复习记录。
正文
Unet框架
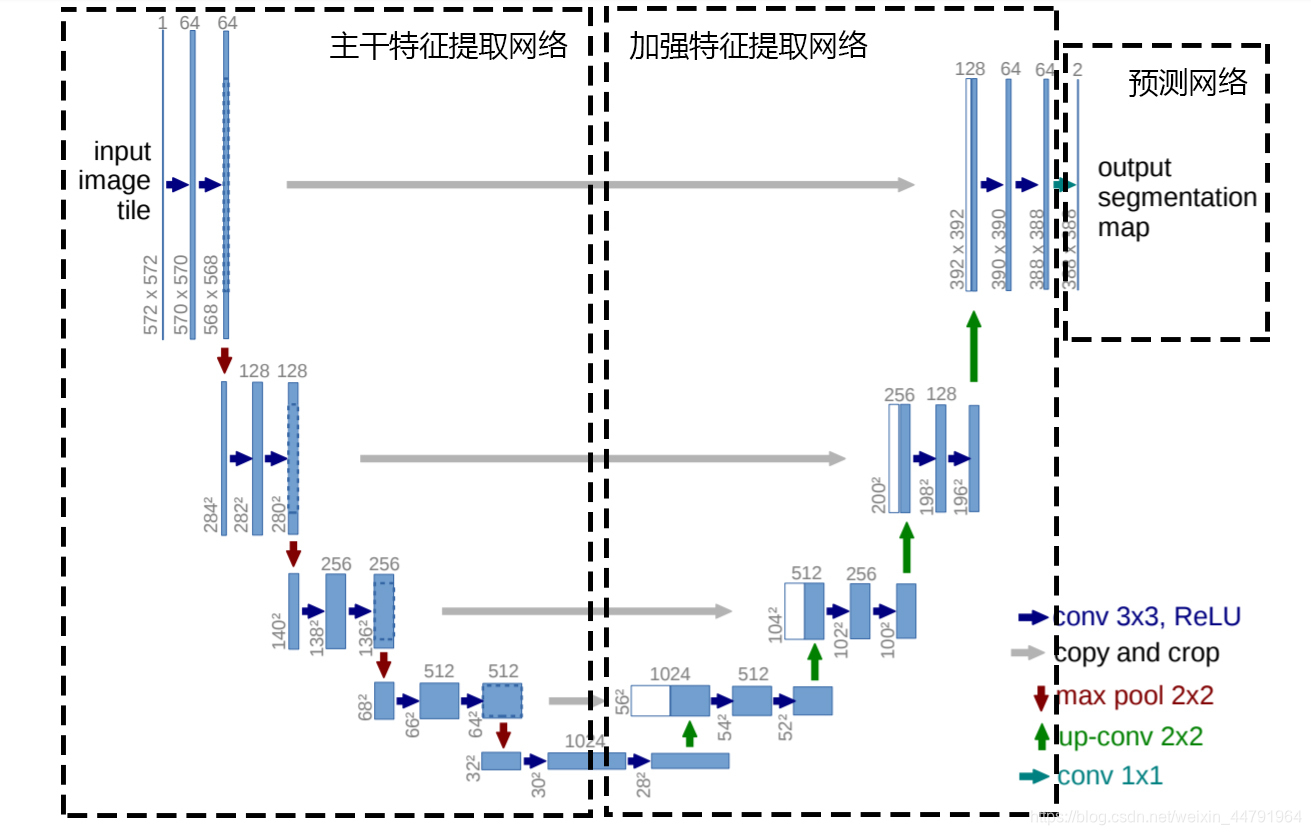
Unet可以分为三个部分,如下图所示:
第一部分是主干特征提取部分,我们可以利用主干部分获得一个又一个的特征层,Unet的主干特征提取部分与VGG相似,为卷积和最大池化的堆叠。利用主干特征提取部分我们可以获得五个初步有效特征层,在第二步中,我们会利用这五个有效特征层可以进行特征融合。
第二部分是加强特征提取部分,我们可以利用主干部分获取到的五个初步有效特征层进行上采样,并且进行特征融合,获得一个最终的,融合了所有特征的有效特征层。
第三部分是预测部分,我们会利用最终获得的最后一个有效特征层对每一个特征点进行分类,相当于对每一个像素点进行分类。
网络架构
1. 编码器(Encoder)部分:提取多尺度特征
由 self.vgg 或 self.resnet 模块组成,用于逐步提取图像的深层次特征:
[feat1, feat2, feat3, feat4, feat5] = self.vgg.forward(inputs)
# 或
[feat1, feat2, feat3, feat4, feat5] = self.resnet.forward(inputs)
-
feat1到feat5是从浅层到深层的特征图,分辨率逐渐降低、语义信息逐渐增强。 -
注意:UNet 本身不定义编码器结构,这里通过引入 VGG16 / ResNet50 提升了特征提取能力。
2. 解码器(Decoder)部分:上采样并逐步恢复分辨率
使用了自定义的模块 unetUp,核心流程是:
-
将上层的解码特征图(inputs2)上采样;
-
与编码阶段对应层(inputs1)特征进行拼接(
torch.cat); -
然后进行两个卷积 + 激活。
class unetUp(nn.Module):
    def forward(self, inputs1, inputs2):
        outputs = torch.cat([inputs1, self.up(inputs2)], 1)  # 跳跃连接(skip connection)
        outputs = self.conv1(outputs)
        outputs = self.relu(outputs)
        outputs = self.conv2(outputs)
        outputs = self.relu(outputs)
        return outputs
解码流程如下:
up4 = self.up_concat4(feat4, feat5)
up3 = self.up_concat3(feat3, up4)
up2 = self.up_concat2(feat2, up3)
up1 = self.up_concat1(feat1, up2)
每一步都把特征图从深到浅逐步恢复空间尺寸,同时保留了早期的空间细节(通过 skip connection)。
3. 尾部卷积 & 上采样(适配不同主干)
-
如果是
resnet50,输出特征图还要再上采样一次以恢复分辨率(ResNet 提取的特征图空间尺寸更小):
if self.up_conv != None:
    up1 = self.up_conv(up1)
4. 输出层(Prediction)
最终使用一个 1x1 卷积将通道数变换为类别数:
self.final = nn.Conv2d(out_filters[0], num_classes, 1)加载数据集
import os

import cv2
import numpy as np
from PIL import Image
from torch.utils.data.dataset import Dataset

from utils.utils import cvtColor, preprocess_input


class UnetDataset(Dataset):
    def __init__(self, annotation_lines, input_shape, num_classes, train, dataset_path):
        super(UnetDataset, self).__init__()
        self.annotation_lines   = annotation_lines
        self.length             = len(annotation_lines)
        self.input_shape        = input_shape
        self.num_classes        = num_classes
        self.train              = train
        self.dataset_path       = dataset_path

    def __len__(self):
        return self.length

    def __getitem__(self, index):
        annotation_line = self.annotation_lines[index]
        name            = annotation_line.split()[0]

        #-------------------------------#
        #   从文件中读取图像
        #-------------------------------#
        jpg         = Image.open(os.path.join(os.path.join(self.dataset_path, "VOC2007/JPEGImages"), name + ".jpg"))
        png         = Image.open(os.path.join(os.path.join(self.dataset_path, "VOC2007/SegmentationClass"), name + ".png"))
        #-------------------------------#
        #   数据增强
        #-------------------------------#
        #jpg, png    = self.get_random_data(jpg, png, self.input_shape, random = self.train)

        jpg         = np.transpose(preprocess_input(np.array(jpg, np.float64)), [2,0,1])
        png         = np.array(png)
        png[png >= self.num_classes] = self.num_classes
        #-------------------------------------------------------#
        #   转化成one_hot的形式
        #   在这里需要+1是因为voc数据集有些标签具有白边部分
        #   我们需要将白边部分进行忽略,+1的目的是方便忽略。
        #-------------------------------------------------------#
        seg_labels  = np.eye(self.num_classes + 1)[png.reshape([-1])]
        seg_labels  = seg_labels.reshape((int(self.input_shape[0]), int(self.input_shape[1]), self.num_classes + 1))

        return jpg, png, seg_labels

    def rand(self, a=0, b=1):
        return np.random.rand() * (b - a) + a

    def get_random_data(self, image, label, input_shape, jitter=.3, hue=.1, sat=1.5, val=1.5, random=True):
        image = cvtColor(image)
        label = Image.fromarray(np.array(label))
        h, w = input_shape

        if not random:
            iw, ih  = image.size
            scale   = min(w/iw, h/ih)
            nw      = int(iw*scale)
            nh      = int(ih*scale)

            image       = image.resize((nw,nh), Image.BICUBIC)
            new_image   = Image.new('RGB', [w, h], (128,128,128))
            new_image.paste(image, ((w-nw)//2, (h-nh)//2))

            label       = label.resize((nw,nh), Image.NEAREST)
            new_label   = Image.new('L', [w, h], (0))
            new_label.paste(label, ((w-nw)//2, (h-nh)//2))
            return new_image, new_label

        # resize image
        rand_jit1 = self.rand(1-jitter,1+jitter)
        rand_jit2 = self.rand(1-jitter,1+jitter)
        new_ar = w/h * rand_jit1/rand_jit2

        scale = self.rand(0.25, 2)
        if new_ar < 1:
            nh = int(scale*h)
            nw = int(nh*new_ar)
        else:
            nw = int(scale*w)
            nh = int(nw/new_ar)

        image = image.resize((nw,nh), Image.BICUBIC)
        label = label.resize((nw,nh), Image.NEAREST)

        flip = self.rand()<.5
        if flip:
            image = image.transpose(Image.FLIP_LEFT_RIGHT)
            label = label.transpose(Image.FLIP_LEFT_RIGHT)

        # place image
        dx = int(self.rand(0, w-nw))
        dy = int(self.rand(0, h-nh))
        new_image = Image.new('RGB', (w,h), (128,128,128))
        new_label = Image.new('L', (w,h), (0))
        new_image.paste(image, (dx, dy))
        new_label.paste(label, (dx, dy))
        image = new_image
        label = new_label

        # distort image
        hue = self.rand(-hue, hue)
        sat = self.rand(1, sat) if self.rand()<.5 else 1/self.rand(1, sat)
        val = self.rand(1, val) if self.rand()<.5 else 1/self.rand(1, val)
        x = cv2.cvtColor(np.array(image,np.float32)/255, cv2.COLOR_RGB2HSV)
        x[..., 0] += hue*360
        x[..., 0][x[..., 0]>1] -= 1
        x[..., 0][x[..., 0]<0] += 1
        x[..., 1] *= sat
        x[..., 2] *= val
        x[x[:,:, 0]>360, 0] = 360
        x[:, :, 1:][x[:, :, 1:]>1] = 1
        x[x<0] = 0
        image_data = cv2.cvtColor(x, cv2.COLOR_HSV2RGB)*255
        return image_data,label


# DataLoader中collate_fn使用
def unet_dataset_collate(batch):
    images      = []
    pngs        = []
    seg_labels  = []
    for img, png, labels in batch:
        images.append(img)
        pngs.append(png)
        seg_labels.append(labels)
    images      = np.array(images)
    pngs        = np.array(pngs)
    seg_labels  = np.array(seg_labels)
    return images, pngs, seg_labels
因为自己定义了损失函数所以需要自己去做one_hot编码
训练模型及测试
import os

import numpy as np
import torch
import torch.backends.cudnn as cudnn
import torch.optim as optim
from torch.utils.data import DataLoader

from nets.unet import Unet
from nets.unet_training import weights_init
from utils.callbacks import LossHistory
from utils.dataloader import UnetDataset, unet_dataset_collate
from utils.utils_fit import fit_one_epoch

'''
训练自己的语义分割模型一定需要注意以下几点:
1、训练前仔细检查自己的格式是否满足要求,该库要求数据集格式为VOC格式,需要准备好的内容有输入图片和标签
   输入图片为.jpg图片,无需固定大小,传入训练前会自动进行resize。
   灰度图会自动转成RGB图片进行训练,无需自己修改。
   输入图片如果后缀非jpg,需要自己批量转成jpg后再开始训练。

   标签为png图片,无需固定大小,传入训练前会自动进行resize。
   由于许多同学的数据集是网络上下载的,标签格式并不符合,需要再度处理。一定要注意!标签的每个像素点的值就是这个像素点所属的种类。
   网上常见的数据集总共对输入图片分两类,背景的像素点值为0,目标的像素点值为255。这样的数据集可以正常运行但是预测是没有效果的!
   需要改成,背景的像素点值为0,目标的像素点值为1。

2、训练好的权值文件保存在logs文件夹中,每个epoch都会保存一次,如果只是训练了几个step是不会保存的,epoch和step的概念要捋清楚一下。
   在训练过程中,该代码并没有设定只保存最低损失的,因此按默认参数训练完会有100个权值,如果空间不够可以自行删除。
   这个并不是保存越少越好也不是保存越多越好,有人想要都保存、有人想只保存一点,为了满足大多数的需求,还是都保存可选择性高。

3、损失值的大小用于判断是否收敛,比较重要的是有收敛的趋势,即验证集损失不断下降,如果验证集损失基本上不改变的话,模型基本上就收敛了。
   损失值的具体大小并没有什么意义,大和小只在于损失的计算方式,并不是接近于0才好。如果想要让损失好看点,可以直接到对应的损失函数里面除上10000。
   训练过程中的损失值会保存在logs文件夹下的loss_%Y_%m_%d_%H_%M_%S文件夹中

4、调参是一门蛮重要的学问,没有什么参数是一定好的,现有的参数是我测试过可以正常训练的参数,因此我会建议用现有的参数。
   但是参数本身并不是绝对的,比如随着batch的增大学习率也可以增大,效果也会好一些;过深的网络不要用太大的学习率等等。
   这些都是经验上,只能靠各位同学多查询资料和自己试试了。
'''
if __name__ == "__main__":
    #-------------------------------#
    #   是否使用Cuda
    #   没有GPU可以设置成False
    #-------------------------------#
    Cuda = True
    #-------------------------------#
    #   训练自己的数据集必须要修改的
    #   自己需要的分类个数+1,如2 + 1
    #-------------------------------#
    num_classes = 21
    #-------------------------------#
    #   主干网络选择
    #   vgg、resnet50
    #-------------------------------#
    backbone    = "vgg"
    #----------------------------------------------------------------------------------------------------------------------------#
    #   是否使用主干网络的预训练权重,此处使用的是主干的权重,因此是在模型构建的时候进行加载的。
    #   如果设置了model_path,则主干的权值无需加载,pretrained的值无意义。
    #   如果不设置model_path,pretrained = True,此时仅加载主干开始训练。
    #   如果不设置model_path,pretrained = False,Freeze_Train = Fasle,此时从0开始训练,且没有冻结主干的过程。
    #--------------------------------------------------------------------------------------------------------------------------
    pretrained  = False
    #----------------------------------------------------------------------------------------------------------------------------#
    #   权值文件的下载请看README,可以通过网盘下载。模型的 预训练权重 对不同数据集是通用的,因为特征是通用的。
    #   模型的 预训练权重 比较重要的部分是 主干特征提取网络的权值部分,用于进行特征提取。
    #   预训练权重对于99%的情况都必须要用,不用的话主干部分的权值太过随机,特征提取效果不明显,网络训练的结果也不会好
    #   训练自己的数据集时提示维度不匹配正常,预测的东西都不一样了自然维度不匹配
    #
    #   如果训练过程中存在中断训练的操作,可以将model_path设置成logs文件夹下的权值文件,将已经训练了一部分的权值再次载入。
    #   同时修改下方的 冻结阶段 或者 解冻阶段 的参数,来保证模型epoch的连续性。
    #
    #   当model_path = ''的时候不加载整个模型的权值。
    #
    #   此处使用的是整个模型的权重,因此是在train.py进行加载的,pretrain不影响此处的权值加载。
    #   如果想要让模型从主干的预训练权值开始训练,则设置model_path = '',pretrain = True,此时仅加载主干。
    #   如果想要让模型从0开始训练,则设置model_path = '',pretrain = Fasle,Freeze_Train = Fasle,此时从0开始训练,且没有冻结主干的过程。
    #   一般来讲,从0开始训练效果会很差,因为权值太过随机,特征提取效果不明显。
    #
    #   网络一般不从0开始训练,至少会使用主干部分的权值,有些论文提到可以不用预训练,主要原因是他们 数据集较大 且 调参能力优秀。
    #   如果一定要训练网络的主干部分,可以了解imagenet数据集,首先训练分类模型,分类模型的 主干部分 和该模型通用,基于此进行训练。
    #----------------------------------------------------------------------------------------------------------------------------#
    model_path  = "model_data/unet_vgg_voc.pth"
    #------------------------------#
    #   输入图片的大小
    #------------------------------#
    input_shape = [512, 512]

    #----------------------------------------------------#
    #   训练分为两个阶段,分别是冻结阶段和解冻阶段。
    #   显存不足与数据集大小无关,提示显存不足请调小batch_size。
    #----------------------------------------------------#
    #----------------------------------------------------#
    #   冻结阶段训练参数
    #   此时模型的主干被冻结了,特征提取网络不发生改变
    #   占用的显存较小,仅对网络进行微调
    #----------------------------------------------------#
    Init_Epoch          = 0
    Freeze_Epoch        = 20
    Freeze_batch_size   = 4
    Freeze_lr           = 1e-4
    #----------------------------------------------------#
    #   解冻阶段训练参数
    #   此时模型的主干不被冻结了,特征提取网络会发生改变
    #   占用的显存较大,网络所有的参数都会发生改变
    #----------------------------------------------------#
    UnFreeze_Epoch      = 40
    Unfreeze_batch_size = 4
    Unfreeze_lr         = 1e-5
    #------------------------------#
    #   数据集路径
    #------------------------------#
    VOCdevkit_path  = 'VOCdevkit'
    #---------------------------------------------------------------------#
    #   建议选项:
    #   种类少(几类)时,设置为True
    #   种类多(十几类)时,如果batch_size比较大(10以上),那么设置为True
    #   种类多(十几类)时,如果batch_size比较小(10以下),那么设置为False
    #---------------------------------------------------------------------#
    dice_loss       = False
    #---------------------------------------------------------------------#
    #   是否使用focal loss来防止正负样本不平衡
    #---------------------------------------------------------------------#
    focal_loss      = False
    #---------------------------------------------------------------------#
    #   是否给不同种类赋予不同的损失权值,默认是平衡的。
    #   设置的话,注意设置成numpy形式的,长度和num_classes一样。
    #   如:
    #   num_classes = 3
    #   cls_weights = np.array([1, 2, 3], np.float32)
    #---------------------------------------------------------------------#
    cls_weights     = np.ones([num_classes], np.float32)
    #------------------------------------------------------#
    #   是否进行冻结训练,默认先冻结主干训练后解冻训练。
    #------------------------------------------------------#
    Freeze_Train    = True
    #------------------------------------------------------#
    #   用于设置是否使用多线程读取数据
    #   开启后会加快数据读取速度,但是会占用更多内存
    #   内存较小的电脑可以设置为2或者0
    #------------------------------------------------------#
    num_workers     = 4

    model = Unet(num_classes=num_classes, pretrained=pretrained, backbone=backbone).train()
    if not pretrained:
        weights_init(model)
    if model_path != '':
        #------------------------------------------------------#
        #   权值文件请看README,百度网盘下载
        #------------------------------------------------------#
        print('Load weights {}.'.format(model_path))
        device          = torch.device('cuda' if torch.cuda.is_available() else 'cpu')
        model_dict      = model.state_dict()
        pretrained_dict = torch.load(model_path, map_location = device)
        pretrained_dict = {k: v for k, v in pretrained_dict.items() if np.shape(model_dict[k]) == np.shape(v)}
        model_dict.update(pretrained_dict)
        model.load_state_dict(model_dict)

    model_train = model.train()
    if Cuda:
        model_train = torch.nn.DataParallel(model)
        cudnn.benchmark = True
        model_train = model_train.cuda()

    loss_history = LossHistory("logs/")

    #---------------------------#
    #   读取数据集对应的txt
    #---------------------------#
    with open(os.path.join(VOCdevkit_path, "VOC2007/ImageSets/Segmentation/train.txt"),"r") as f:
        train_lines = f.readlines()

    with open(os.path.join(VOCdevkit_path, "VOC2007/ImageSets/Segmentation/val.txt"),"r") as f:
        val_lines = f.readlines()

    #------------------------------------------------------#
    #   主干特征提取网络特征通用,冻结训练可以加快训练速度
    #   也可以在训练初期防止权值被破坏。
    #   Init_Epoch为起始世代
    #   Interval_Epoch为冻结训练的世代
    #   Epoch总训练世代
    #   提示OOM或者显存不足请调小Batch_size
    #------------------------------------------------------#
    if True:
        batch_size  = Freeze_batch_size
        lr          = Freeze_lr
        start_epoch = Init_Epoch
        end_epoch   = Freeze_Epoch

        epoch_step      = len(train_lines) // batch_size
        epoch_step_val  = len(val_lines) // batch_size

        if epoch_step == 0 or epoch_step_val == 0:
            raise ValueError("数据集过小,无法进行训练,请扩充数据集。")

        optimizer       = optim.Adam(model_train.parameters(), lr)
        lr_scheduler    = optim.lr_scheduler.StepLR(optimizer, step_size = 1, gamma = 0.96)

        train_dataset   = UnetDataset(train_lines, input_shape, num_classes, True, VOCdevkit_path)
        val_dataset     = UnetDataset(val_lines, input_shape, num_classes, False, VOCdevkit_path)
        gen             = DataLoader(train_dataset, shuffle = True, batch_size = batch_size, num_workers = num_workers, pin_memory=True,
                                    drop_last = True, collate_fn = unet_dataset_collate)
        gen_val         = DataLoader(val_dataset  , shuffle = True, batch_size = batch_size, num_workers = num_workers, pin_memory=True,
                                    drop_last = True, collate_fn = unet_dataset_collate)

        #------------------------------------#
        #   冻结一定部分训练
        #------------------------------------#
        if Freeze_Train:
            model.freeze_backbone()

        for epoch in range(start_epoch, end_epoch):
            fit_one_epoch(model_train, model, loss_history, optimizer, epoch,
                    epoch_step, epoch_step_val, gen, gen_val, end_epoch, Cuda, dice_loss, focal_loss, cls_weights, num_classes)
            lr_scheduler.step()

    if True:
        batch_size  = Unfreeze_batch_size
        lr          = Unfreeze_lr
        start_epoch = Freeze_Epoch
        end_epoch   = UnFreeze_Epoch

        epoch_step      = len(train_lines) // batch_size
        epoch_step_val  = len(val_lines) // batch_size

        if epoch_step == 0 or epoch_step_val == 0:
            raise ValueError("数据集过小,无法进行训练,请扩充数据集。")

        optimizer       = optim.Adam(model_train.parameters(), lr)
        lr_scheduler    = optim.lr_scheduler.StepLR(optimizer, step_size = 1, gamma = 0.96)

        train_dataset   = UnetDataset(train_lines, input_shape, num_classes, True, VOCdevkit_path)
        val_dataset     = UnetDataset(val_lines, input_shape, num_classes, False, VOCdevkit_path)
        gen             = DataLoader(train_dataset, shuffle = True, batch_size = batch_size, num_workers = num_workers, pin_memory=True,
                                    drop_last = True, collate_fn = unet_dataset_collate)
        gen_val         = DataLoader(val_dataset  , shuffle = True, batch_size = batch_size, num_workers = num_workers, pin_memory=True,
                                    drop_last = True, collate_fn = unet_dataset_collate)

        if Freeze_Train:
            model.unfreeze_backbone()

        for epoch in range(start_epoch,end_epoch):
            fit_one_epoch(model_train, model, loss_history, optimizer, epoch,
                    epoch_step, epoch_step_val, gen, gen_val, end_epoch, Cuda, dice_loss, focal_loss, cls_weights, num_classes)
            lr_scheduler.step()
主要配置了focal_loss,dice_loss,冻结层,学习率策略。
focal_loss
主要解决类别不平衡问题,“容易样本”越多1-pt越小实现对多样本训练的控制。
dice_loss
主要解决背景过大的问题,越是背景过大,其交集越大,那么dice值越接近1,因此计算时,其值越小。
冻结层是为了导入别人的模型时,不破坏其权重,现训练生成。可以减少训练时间,避免过拟合
学习率策略主要是为了制定合适的训练策略使其快速收敛的同时精度也高。
预测模型
#----------------------------------------------------#
#   将单张图片预测、摄像头检测和FPS测试功能
#   整合到了一个py文件中,通过指定mode进行模式的修改。
#----------------------------------------------------#
import time

import cv2
import numpy as np
from PIL import Image

from unet import Unet

if __name__ == "__main__":
    #-------------------------------------------------------------------------#
    #   如果想要修改对应种类的颜色,到__init__函数里修改self.colors即可
    #-------------------------------------------------------------------------#
    unet = Unet()
    #----------------------------------------------------------------------------------------------------------#
    #   mode用于指定测试的模式:
    #   'predict'表示单张图片预测,如果想对预测过程进行修改,如保存图片,截取对象等,可以先看下方详细的注释
    #   'video'表示视频检测,可调用摄像头或者视频进行检测,详情查看下方注释。
    #   'fps'表示测试fps,使用的图片是img里面的street.jpg,详情查看下方注释。
    #   'dir_predict'表示遍历文件夹进行检测并保存。默认遍历img文件夹,保存img_out文件夹,详情查看下方注释。
    #----------------------------------------------------------------------------------------------------------#
    mode = "dir_predict"
    #----------------------------------------------------------------------------------------------------------#
    #   video_path用于指定视频的路径,当video_path=0时表示检测摄像头
    #   想要检测视频,则设置如video_path = "xxx.mp4"即可,代表读取出根目录下的xxx.mp4文件。
    #   video_save_path表示视频保存的路径,当video_save_path=""时表示不保存
    #   想要保存视频,则设置如video_save_path = "yyy.mp4"即可,代表保存为根目录下的yyy.mp4文件。
    #   video_fps用于保存的视频的fps
    #   video_path、video_save_path和video_fps仅在mode='video'时有效
    #   保存视频时需要ctrl+c退出或者运行到最后一帧才会完成完整的保存步骤。
    #----------------------------------------------------------------------------------------------------------#
    video_path      = 0
    video_save_path = ""
    video_fps       = 25.0
    #-------------------------------------------------------------------------#
    #   test_interval用于指定测量fps的时候,图片检测的次数
    #   理论上test_interval越大,fps越准确。
    #-------------------------------------------------------------------------#
    test_interval = 100
    #-------------------------------------------------------------------------#
    #   dir_origin_path指定了用于检测的图片的文件夹路径
    #   dir_save_path指定了检测完图片的保存路径
    #   dir_origin_path和dir_save_path仅在mode='dir_predict'时有效
    #-------------------------------------------------------------------------#
    dir_origin_path = "img/"
    dir_save_path   = "img_out/"

    if mode == "predict":
        '''
        predict.py有几个注意点
        1、该代码无法直接进行批量预测,如果想要批量预测,可以利用os.listdir()遍历文件夹,利用Image.open打开图片文件进行预测。
        具体流程可以参考get_miou_prediction.py,在get_miou_prediction.py即实现了遍历。
        2、如果想要保存,利用r_image.save("img.jpg")即可保存。
        3、如果想要原图和分割图不混合,可以把blend参数设置成False。
        4、如果想根据mask获取对应的区域,可以参考detect_image函数中,利用预测结果绘图的部分,判断每一个像素点的种类,然后根据种类获取对应的部分。
        seg_img = np.zeros((np.shape(pr)[0],np.shape(pr)[1],3))
        for c in range(self.num_classes):
            seg_img[:, :, 0] += ((pr == c)*( self.colors[c][0] )).astype('uint8')
            seg_img[:, :, 1] += ((pr == c)*( self.colors[c][1] )).astype('uint8')
            seg_img[:, :, 2] += ((pr == c)*( self.colors[c][2] )).astype('uint8')
        '''
        while True:
            img = input('Input image filename:')
            try:
                image = Image.open(img)
            except:
                print('Open Error! Try again!')
                continue
            else:
                r_image = unet.detect_image(image)
                r_image.show()

    elif mode == "video":
        capture=cv2.VideoCapture(video_path)
        if video_save_path!="":
            fourcc = cv2.VideoWriter_fourcc(*'XVID')
            size = (int(capture.get(cv2.CAP_PROP_FRAME_WIDTH)), int(capture.get(cv2.CAP_PROP_FRAME_HEIGHT)))
            out = cv2.VideoWriter(video_save_path, fourcc, video_fps, size)

        ref, frame = capture.read()
        if not ref:
            raise ValueError("未能正确读取摄像头(视频),请注意是否正确安装摄像头(是否正确填写视频路径)。")

        fps = 0.0
        while(True):
            t1 = time.time()
            # 读取某一帧
            ref, frame = capture.read()
            if not ref:
                break
            # 格式转变,BGRtoRGB
            frame = cv2.cvtColor(frame,cv2.COLOR_BGR2RGB)
            # 转变成Image
            frame = Image.fromarray(np.uint8(frame))
            # 进行检测
            frame = np.array(unet.detect_image(frame))
            # RGBtoBGR满足opencv显示格式
            frame = cv2.cvtColor(frame,cv2.COLOR_RGB2BGR)

            fps  = ( fps + (1./(time.time()-t1)) ) / 2
            print("fps= %.2f"%(fps))
            frame = cv2.putText(frame, "fps= %.2f"%(fps), (0, 40), cv2.FONT_HERSHEY_SIMPLEX, 1, (0, 255, 0), 2)

            cv2.imshow("video",frame)
            c= cv2.waitKey(1) & 0xff
            if video_save_path!="":
                out.write(frame)

            if c==27:
                capture.release()
                break
        print("Video Detection Done!")
        capture.release()
        if video_save_path!="":
            print("Save processed video to the path :" + video_save_path)
            out.release()
        cv2.destroyAllWindows()

    elif mode == "fps":
        img = Image.open('img/street.jpg')
        tact_time = unet.get_FPS(img, test_interval)
        print(str(tact_time) + ' seconds, ' + str(1/tact_time) + 'FPS, @batch_size 1')

    elif mode == "dir_predict":
        import os
        from tqdm import tqdm

        img_names = os.listdir(dir_origin_path)
        for img_name in tqdm(img_names):
            if img_name.lower().endswith(('.bmp', '.dib', '.png', '.jpg', '.jpeg', '.pbm', '.pgm', '.ppm', '.tif', '.tiff')):
                image_path  = os.path.join(dir_origin_path, img_name)
                image       = Image.open(image_path)
                r_image     = unet.detect_image(image)
                if not os.path.exists(dir_save_path):
                    os.makedirs(dir_save_path)
                r_image.save(os.path.join(dir_save_path, img_name))

    else:
        raise AssertionError("Please specify the correct mode: 'predict', 'video', 'fps' or 'dir_predict'.")
结果
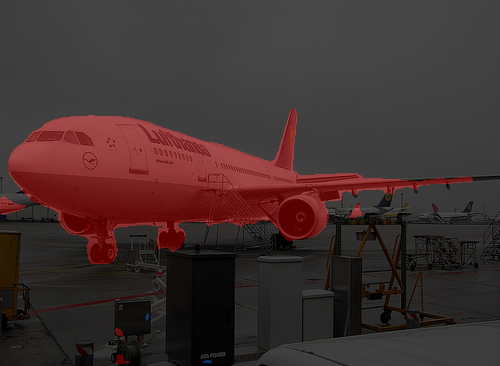
对于单分类分割比较好,但是泛化能力一般,所以VOC训练集效果一般,但是对于医学的小物体分割却效果好。其实从原理上来看也很容易理解原因,编解码结构更有利于恢复边界,同时unet参数量需求较少,契合医学的小样本。小卷积核的设置也对小目标友好。

魔乐社区(Modelers.cn) 是一个中立、公益的人工智能社区,提供人工智能工具、模型、数据的托管、展示与应用协同服务,为人工智能开发及爱好者搭建开放的学习交流平台。社区通过理事会方式运作,由全产业链共同建设、共同运营、共同享有,推动国产AI生态繁荣发展。
更多推荐


 27
27 0
0- 0


 已为社区贡献2条内容

所有评论(0)