Linux下,大恒相机+pyqt\c++ +dlp4500开发
书接上回,硬件完了就是代码了,最开始我导儿让我用c++写,最后又让我用python写,学习了很多东西。
二、代码方面
我还建议,先带着你的目的去看官方的说明文档,真的,很有用。
因为本人代码能力巨垃圾,所有代码大家看个乐就是了,主要分享一下我做的流程和遇到的各种问题的解决办法。
先python吧。
然是Linux,就得弄一个虚拟机,我用的是ubantu,vmware,这些教程很多,自己搜一下,找一个合适的就是。
我建议虚拟机的内存弄大一点,我开始40g,但是下载一些东西后就会卡在开机哪儿,巨不好弄,后面调到100g就好多了,然后下载个conda,因为大恒的那个api很坑壁,有时候会报莫名其妙的错误,实测python3.8很合适(但是不是最合适我就不知道了),这个时候你就得去学习一下怎么创建环境啊,怎么用conda啊巴拉巴拉的。
还有就是pyqt5的使用,实名推荐b站的王铭东up的那个课,超级棒!
接着就是代码,我的代码在这儿,ui文件super and very简单,看着代码都能自己编出来,我就不放出来了。
import gxipy as gx
# from PIL import Image
import os
import cv2
import sys
from PyQt5.QtGui import *
from PyQt5.QtWidgets import QWidget, QApplication, QMainWindow, QMessageBox, QLabel,QComboBox
from PyQt5 import uic
from threading import Thread
from PyQt5.QtCore import pyqtSignal, QTimer,Qt,QEvent
from mainwindow import Ui_MainWindow

device_manager = gx.DeviceManager()
dev_num, dev_info_list = device_manager.update_device_list()
thstop = False
extime = None
exmodel = None

def capture_callback(data):  # 回调函数
    image_data = data.get_numpy_array()
    image_id = data.get_frame_id()
    image_width = image_data.shape[1]
    image_height = image_data.shape[0]

    # 打印图像信息
    print(f"Captured image ID: {image_id}")
    file_path = fr"D:\wulian_labor\captured_image_{image_id}.jpg"
    cv2.imwrite(file_path, image_data)
    print(f"Image saved to {file_path}")

class MyWindow(QMainWindow, Ui_MainWindow):
    def __init__(self, parent=None):
        super(MyWindow,self).__init__(parent)
        #显示图像
        self.label = QLabel(self)
        self.setupUi(self)
        self.label.setGeometry(50, 50, 200, 200)  # 设置标签的大小
        # self.cb = QComboBox(self)
        extime = self.exposure_lineEdit.text()

        #  切记槽函数得写这儿,不能用designer自己生成的那个,不然会报莫名其妙的错误
        self.opendevice.clicked.connect(self.opencamera) # type: ignore
        self.startcap.clicked.connect(self.startgather) # type: ignore
        self.stopcap.clicked.connect(self.stopgather) # type: ignore
        self.closedevice.clicked.connect(self.closecamera) # type: ignore
        self.model_comboBox.currentTextChanged.connect(self.exposuremodel)
        # self.model_comboBox.currentIndexChanged[str].connect(self.exposuremodel)
        self.comboBox_2.currentIndexChanged[str].connect(self.exposuremodel)
        self.exposure_lineEdit.textChanged.connect(self.exposuretime)
        # self.cb.currentIndexChanged[str].connect(self.exposuremodel)
        self.label.installEventFilter(self)

    def eventFilter(self, obj, event):
        if event.type() == QEvent.Resize and obj is self.label:
            self.updateImage(0)
        return super().eventFilter(obj, event)

    def updateImage(self, image_id):
        filename = f"D:\\wulian_labor\\captured_image_{image_id}.jpg"
        if os.path.exists(filename):
            pixmap = QPixmap(filename)
            if not pixmap.isNull():
                print("采集图像尺寸:", pixmap.size())
                # 调整图像大小为标签的大小
                pixmap = pixmap.scaled(self.label.size(), Qt.KeepAspectRatio)
                self.label.setPixmap(pixmap)
                print("调整后图像尺寸:", pixmap.size())
                lb = QLabel(self)
                lb.setPixmap(pixmap)

    def opencamera(self):
        if dev_num == 0:
            # print("没有可用设备")
            QMessageBox.about(self, "提示", "没有可用设备")
        else:
            sn = dev_info_list[0].get("sn")
            self.cam = device_manager.open_device_by_sn(sn)  # 将相机实例化为对象属性 MER-131-210U3M
            QMessageBox.about(self,"提示","相机打开成功")

    # def getSelectedValue(self):
    #     return self.cb.currentIndexChanged
    def exposuremodel(self,model):
        if model == "OFF":
            self.cam.TriggerMode.set(gx.GxSwitchEntry.OFF)
        elif model == "ON":
            self.cam.TriggerMode.set(gx.GxSwitchEntry.ON)

    def triggersource(self,index):
        try:
            if index == "software":
                self.cam.TriggerSource.set(gx.GxTriggerSourceEntry.SOFTWARE)
            elif index == "line0":
                self.cam.TriggerSource.set(gx.GxTriggerSourceEntry.LINE0)
            elif index == "line1":
                self.cam.TriggerSource.set(gx.GxTriggerSourceEntry.LINE1)
            elif index == "line2":
                self.cam.TriggerSource.set(gx.GxTriggerSourceEntry.LINE2)
            elif index == "line3":
                self.cam.TriggerSource.set(gx.GxTriggerSourceEntry.LINE3)
            else:
                QMessageBox.about(self,"提示","未知的触发源")
        except Exception as e:
            print("触发源异常", e)

    # def exposuretime(self):
    #     if extime is None:
    #         self.cam.ExposureAuto.set(gx.GxAutoEntry.CONTINUOUS)
    #     else:
    #         self.cam.ExposureTime.set(extime)
    def exposuretime(self):

        extime = self.exposure_lineEdit.text()
        if extime:
            try:
                extime_float = float(extime)
                self.cam.ExposureTime.set(extime_float)
            except ValueError:
                print("曝光时间必须是一个数字")
            else:
                print("请输入曝光时间")

    def startgather(self, img):
        if dev_num == 0:
            QMessageBox.about(self,"提示","无法开始采集,因为没有检测到设备")
        else:
            self.cam.data_stream[0].register_capture_callback(capture_callback)
            self.cam.stream_on()
            # 参数0代表系统第一个摄像头,第二就用1 以此类推
            cap = cv2.VideoCapture(0)
            # 设置显示分辨率和FPS ,不设置的话会非常卡
            cap.set(cv2.CAP_PROP_FRAME_WIDTH, 800)
            cap.set(cv2.CAP_PROP_FRAME_HEIGHT, 600)
            cap.set(cv2.CAP_PROP_FPS, 20)
            while cap.isOpened():
                if thstop:
                    return
                ret, frame = cap.read()
                if ret == False:
                    continue
                # 水平翻转,很有必要
                frame = cv2.flip(frame, 1)
                # opencv 默认图像格式是rgb qimage要使用BRG,这里进行格式转换,不用这个的话,图像就变色了,困扰了半天,翻了一堆资料
                frame = cv2.cvtColor(frame, cv2.COLOR_RGB2BGR)
                # mat-->qimage
                a = QImage(frame.data, frame.shape[1], frame.shape[0], QImage.Format_RGB888)
                self.SetPic(a)  # 这里调用自定义的SetPic方法
    def stopgather(self):
        self.cam.stream_off()

    def closecamera(self):
        self.cam.close_device()

# 显示图像
    def update_image(self):
        global index
        if index < len(image_files):
            # 从文件名中提取image_id
            image_id = int(image_files[index].split("_")[2].split(".")[0])
            self.updateImage(image_id)
            index += 1
        else:
            # 文件遍历完成后重新开始
            index = 0
        # 每隔一段时间刷新一次
        QTimer.singleShot(1000, self.update_image)

if __name__ == "__main__":
    app = QApplication(sys.argv)
    w = MyWindow()
    w.show()

    image_files = [file for file in os.listdir("D:\\wulian_labor") if file.startswith("captured_image_")]

    global index
    index = 0

    # 初始调用一次update_image
    w.update_image()
    sys.exit(app.exec())
我这个代码里,偶尔label不显示图像,不知道为什么,有大佬可以指出来一下。
但是我着重是为了保存那个图片方便后续的重构,所有显示不是黑重要,我就没去深究了。
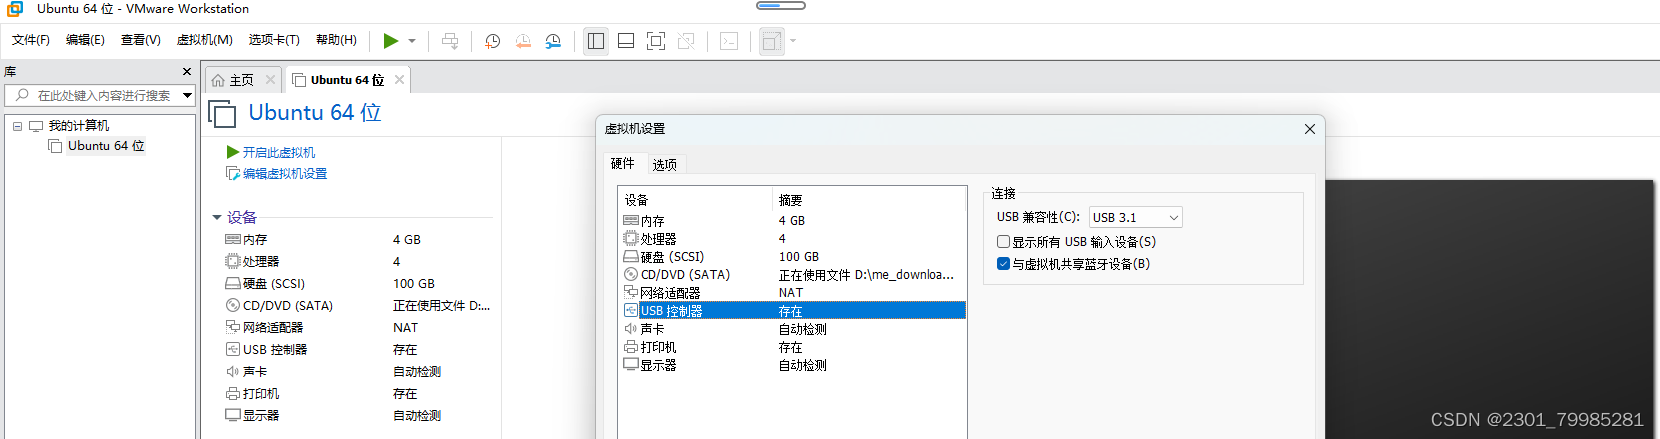
最好就是第二个,Linux下检测不到相机,你先去看一下自己的相机是什么口,usb还是网口,网口的巨坑,我找了很久的资料和方法都没解决;usb的你需要在虚拟机-设置-usb控制器里把兼容性调到3.1,如下图。
小tips:如果和我差不多的新手,建议在windows里下载个qt designer,只编辑界面文件(.ui文件),pyuic转.py文件。槽函数留在setUI下面去编辑,像我的代码里那样,然后下载个xftp把文件发给虚拟机;如果要显示视频的话,建议使用多线程。
注:投影仪的代码是c++的,还在想办法转换

魔乐社区(Modelers.cn) 是一个中立、公益的人工智能社区,提供人工智能工具、模型、数据的托管、展示与应用协同服务,为人工智能开发及爱好者搭建开放的学习交流平台。社区通过理事会方式运作,由全产业链共同建设、共同运营、共同享有,推动国产AI生态繁荣发展。
更多推荐


 4
4 0
0- 0


 已为社区贡献2条内容

所有评论(0)