LLM学习:大模型基础——视觉大模型以及autodl使用
在大模型中,VLM 是视觉语言模型(Vision-Language Model)的缩写,是一种多模态、生成式 AI 模型,能够理解和处理视频、图像和文本。VLM 通过将大语言模型(LLM)与视觉编码器相结合构建而成,使 LLM 具有 “看” 的能力,从而可以处理并提供对提示中的视频、图像和文本输入的高级理解,以生成文本响应。
1、常见的VLM
在大模型中,VLM 是视觉语言模型(Vision-Language Model)的缩写,是一种多模态、生成式 AI 模型,能够理解和处理视频、图像和文本。
VLM 通过将大语言模型(LLM)与视觉编码器相结合构建而成,使 LLM 具有 “看” 的能力,从而可以处理并提供对提示中的视频、图像和文本输入的高级理解,以生成文本响应。与传统的计算机视觉模型不同,VLM 不受固定类别集或特定任务约束,在大量文本和图像 / 视频字幕对的语料上进行重新训练后,它可以用自然语言进行指导,用于处理许多典型的视觉任务以及新的生成式 AI 任务,例如摘要和视觉问答。
常见的VLM有以下几个:
GPT-4V:属于分析型 VLM,是 OpenAI 开发的强大视觉语言模型,能够理解和处理图像与文本的组合输入,并生成文本响应,在视觉问答、图像描述等多种任务上表现出色。
Qwen2.5-VL:是阿里云的旗舰视觉语言模型,有 30 亿、70 亿和 720 亿参数三种规模,使用 ViT 视觉编码器和 Qwen 2.5 LLM,它可以理解长度为一个小时以上的视频,并可以浏览桌面和智能手机界面。
Claude 4:也是分析型 VLM 的代表之一,由 Anthropic 公司开发,具备强大的语言理解和生成能力,同时在处理视觉相关任务时也有很好的表现,能够准确回答关于图像内容的问题等。
2、qwen-VL图像理解实例
通过qwen-VL读取几张图片,提示词和图片从excel中读取,将最终的结果也输出到excel中。

import os
import dashscope
from dashscope.api_entities.dashscope_response import Role
from dashscope import MultiModalConversation
import pandas as pd
dashscope.api_key = os.getenv('DASHSCOPE_API_KEY')

absolute_path = os.path.dirname(os.path.abspath(__file__))
def get_response(user_prompt, image_url):
    # 得到messages
    local_file_path = f'file://{absolute_path}\\{image_url}.jpg'
    messages = [{
    'role': 'system',
    'content': [{
        'text': 'You are a helpful assistant.'
    }]
    }, {
        'role':
        'user',
        'content': [
            {
                'image': f'{local_file_path}'
            },
            {
                'text': f'{user_prompt}.'
            },
        ]
    }]
    print(messages)
    completion = MultiModalConversation.call(model='qwen-vl-plus', messages=messages)

    # 检查API调用是否成功
    if completion is None:
        print("API调用返回None,可能请求失败或网络问题")
        return "错误:API调用失败,返回None"

    if completion.status_code != 200:
        print(f"API调用失败: {completion.status_code}, {completion.message}")
        return f"错误: {completion.message}"

    # 正确处理响应
    try:
        response = completion.output.choices[0]['message']['content'][0]['text']
        print(f'response={response}')
        return response
    except Exception as e:
        print(f"解析响应时出错: {e}")
        return f"错误:无法解析响应,{str(e)}"

df = pd.read_excel(f'{absolute_path}\\prompt_template_cn.xlsx')
df['response'] = ''
for index, row in df.iterrows():
    user_prompt = row['prompt']
    image_url = row['image']
    print(f"user_prompt:{user_prompt}")
    print(f"image_url:{image_url}")
    # 得到VLM推理结果
    result = get_response(user_prompt, image_url)

    # 检查返回结果是否为错误信息
    if isinstance(result, str) and result.startswith("错误"):
        response = result
    else:
        # 如果不是错误信息,则尝试提取响应内容
        try:
            response = result
        except Exception as e:
            response = f"处理响应时出错: {str(e)}"

    print(f"response:{response}")
    df.loc[index, 'response'] = response
    #print(f"{index+1} {user_prompt} {image_url}")
df.to_excel(f'{absolute_path}\\prompt_template_cn_result.xlsx', index=False)
输出的结果:

调试过程中注意,图片的大小不能太大,控制在10M以下。
3、视频模型理解
InternVideo2,新型的视频基础模型(ViFM),在视频识别、视频文本任务和对话任务中取得了SOTA。InternVideo2的核心设计是渐进式训练方法,统一了掩蔽视频建模、跨模态对比学习和下一个token预测, 将视频编码器的规模扩大到60亿参数。在数据层面,通过语义分割视频并生成视频-音频-语音字幕,优先考虑时空一致性,从而提高了视频和文本之间的对齐。

InternVideo2的三个训练阶段:
(1) 通过未掩蔽重建捕获时空结构,
(2) 与其他模态的语义对齐,
(3) 通过下一个token预测增强其开放式对话能力。
不同的训练阶段将引导该模型通过不同的前置任务捕捉不同层次的结构和语义信息。
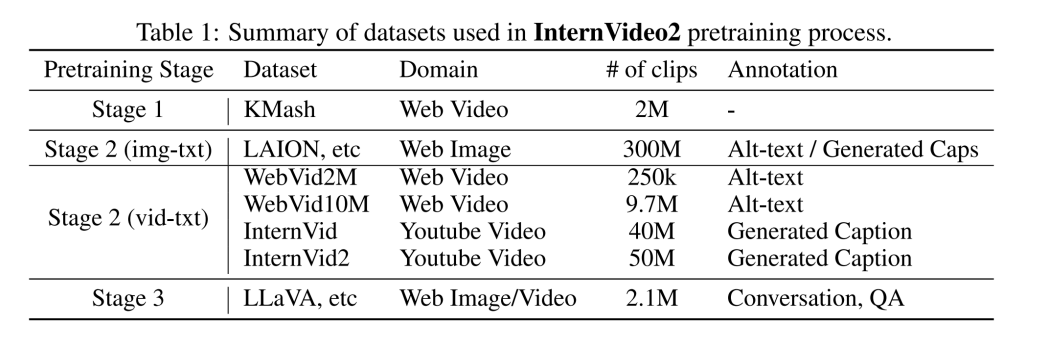
对于InternVideo2的训练,强调数据中的时空一致性和标签质量。
数据集包含4.02亿数据条目,其中包括200万个视频、5000万个视频-文本对(来自WebVid和InternVid)、5000万个视频-音频-语音-文本对(InternVid2)和3亿个图像-文本对。
对于InternVid2,我们将视频语义分割成剪辑,并专注于使用三种模态:音频、视频和语音重新校准剪辑描述。我们首先为这三种模态分别生成字幕。然后,单独的字幕被融合在一起,用于创建一个更全面的描述。
视频模型的理解需要使用到显卡,如果自己没有显卡可以上autodl云计算平台上租用。
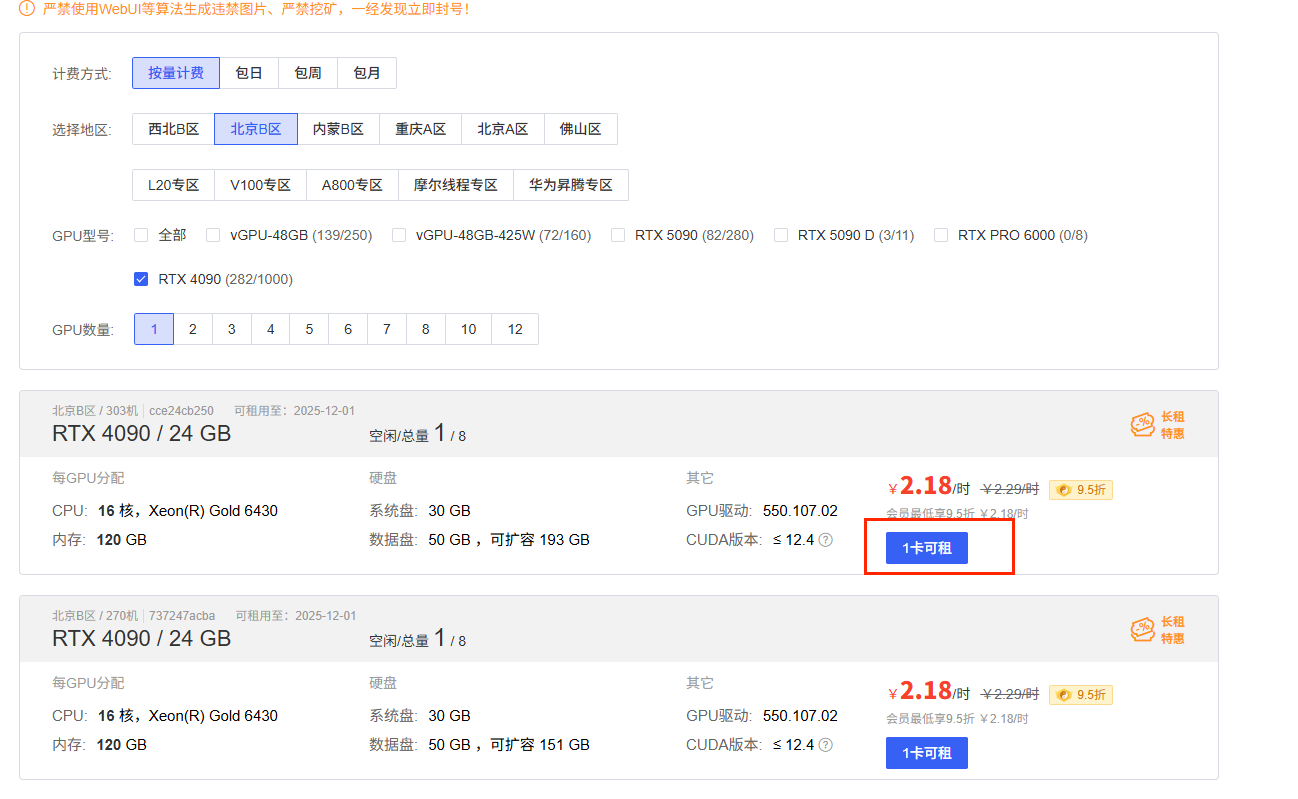
4、autodl 租用显卡的配置
(1)首先选择一个要租用的显卡,我这边选择RTX 4090的显卡,租用一张卡。如果想多显卡同时计算的话,就需要找在一台设备上能够租用多个卡的设备。
(2)选择要用的镜像,我这里使用的是PyTouch,不同的显卡收费也不一样,创建开机开始收费。
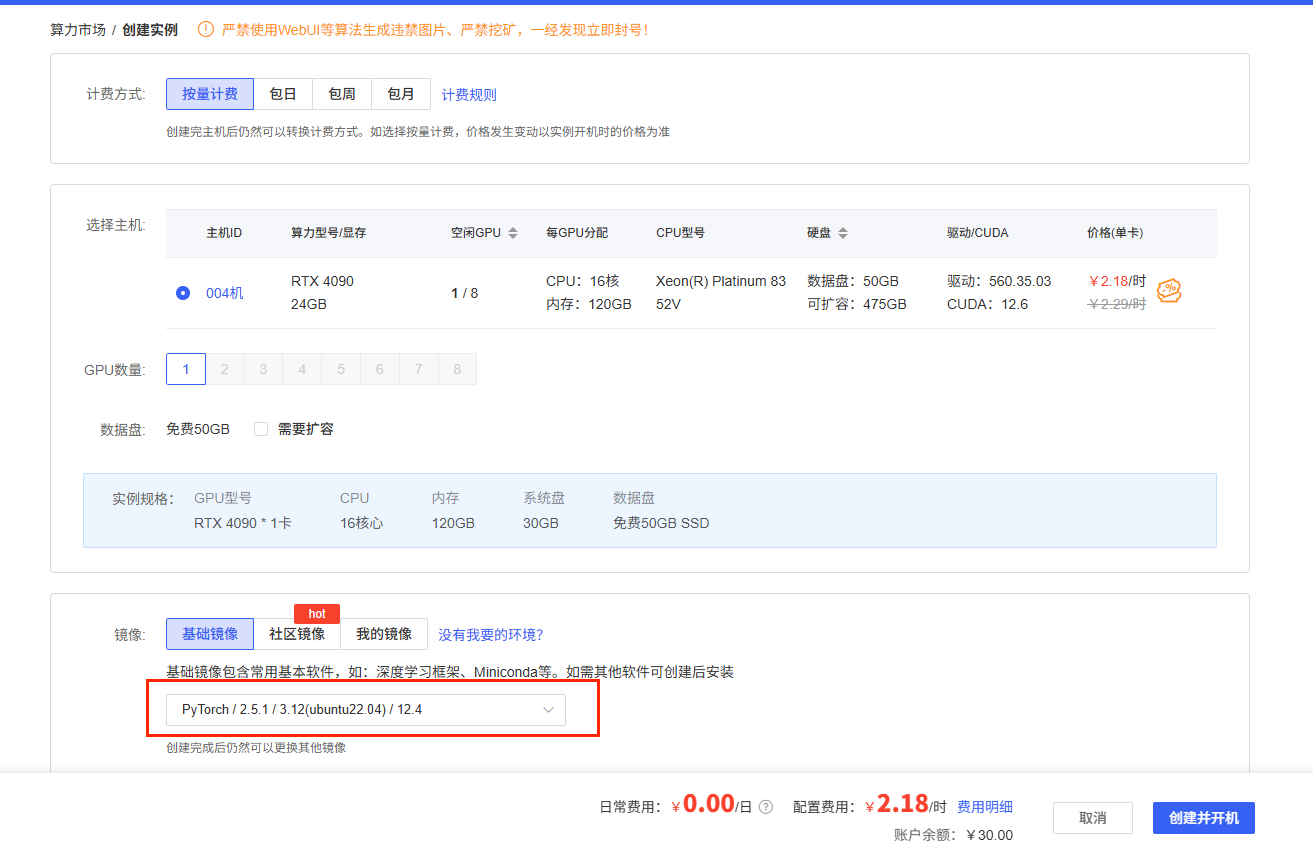
开机之后,打开jupyterLab

5、视频分析的实例
该实例是解析一个汽车剐蹭的视频,具体视频不上传可以换成自己的视频。我的例子实在autodl的设备上运行的,按照上面的步骤打开一个jupyterLab。然后在/root/autodl-tmp/路径下创建models存放llm。代码如下:
"""
属于 InternVL 2.5系列
视频理解与生成:可以用于视频内容的分析、总结和生成相关的文本描述。
视觉问答:能够回答与图像或视频内容相关的问题。
多模态对话:支持与用户进行包含视觉信息的对话。
"""


# In[2]:


# 模型下载,需要下载3个大模型
from modelscope import snapshot_download

model_dir = snapshot_download('OpenGVLab/InternVideo2_5_Chat_8B', cache_dir='/root/autodl-tmp/models')
# model_dir = snapshot_download('internlm/internlm2_5-7b-chat', cache_dir='/root/autodl-tmp/models')
# model_dir = snapshot_download('LLM-Research/Mistral-7B-Instruct-v0.3', cache_dir='/root/autodl-tmp/models')
# model_dir = snapshot_download('AI-ModelScope/bert-base-uncased', cache_dir='/root/autodl-tmp/models')


# In[1]:


# 导入必要的库
import numpy as np
import torch
import torchvision.transforms as T
from decord import VideoReader, cpu
from PIL import Image
from torchvision.transforms.functional import InterpolationMode
from modelscope import AutoModel, AutoTokenizer


# 模型配置
model_path = '/root/autodl-tmp/models/OpenGVLab/InternVideo2_5_Chat_8B'

# 初始化分词器和模型
tokenizer = AutoTokenizer.from_pretrained(model_path, trust_remote_code=True)
model = AutoModel.from_pretrained(model_path, trust_remote_code=True).half().cuda().to(torch.bfloat16)

# ImageNet 数据集的均值和标准差
IMAGENET_MEAN = (0.485, 0.456, 0.406)
IMAGENET_STD = (0.229, 0.224, 0.225)

def build_transform(input_size):
    """
    构建图像转换pipeline

    参数:
        input_size: 输入图像大小

    返回:
        transform: 转换pipeline
    """
    MEAN, STD = IMAGENET_MEAN, IMAGENET_STD
    transform = T.Compose([
        T.Lambda(lambda img: img.convert("RGB") if img.mode != "RGB" else img),
        T.Resize((input_size, input_size), interpolation=InterpolationMode.BICUBIC),
        T.ToTensor(),
        T.Normalize(mean=MEAN, std=STD)
    ])
    return transform


def find_closest_aspect_ratio(aspect_ratio, target_ratios, width, height, image_size):
    """
    寻找最接近原始图像宽高比的目标比例

    参数:
        aspect_ratio: 原始图像的宽高比
        target_ratios: 目标比例列表
        width: 原始图像宽度
        height: 原始图像高度
        image_size: 目标图像大小

    返回:
        best_ratio: 最佳比例
    """
    best_ratio_diff = float("inf")
    best_ratio = (1, 1)
    area = width * height
    for ratio in target_ratios:
        target_aspect_ratio = ratio[0] / ratio[1]
        ratio_diff = abs(aspect_ratio - target_aspect_ratio)
        if ratio_diff < best_ratio_diff:
            best_ratio_diff = ratio_diff
            best_ratio = ratio
        elif ratio_diff == best_ratio_diff:
            if area > 0.5 * image_size * image_size * ratio[0] * ratio[1]:
                best_ratio = ratio
    return best_ratio


def dynamic_preprocess(image, min_num=1, max_num=6, image_size=448, use_thumbnail=False):
    """
    动态预处理图像,根据宽高比将图像分割成多个块

    参数:
        image: 原始图像
        min_num: 最小块数
        max_num: 最大块数
        image_size: 目标图像大小
        use_thumbnail: 是否使用缩略图

    返回:
        processed_images: 处理后的图像列表
    """
    orig_width, orig_height = image.size
    aspect_ratio = orig_width / orig_height

    # 计算现有图像宽高比
    target_ratios = set((i, j) for n in range(min_num, max_num + 1) for i in range(1, n + 1) for j in range(1, n + 1) if i * j <= max_num and i * j >= min_num)
    target_ratios = sorted(target_ratios, key=lambda x: x[0] * x[1])

    # 寻找最接近目标的宽高比
    target_aspect_ratio = find_closest_aspect_ratio(aspect_ratio, target_ratios, orig_width, orig_height, image_size)

    # 计算目标宽度和高度
    target_width = image_size * target_aspect_ratio[0]
    target_height = image_size * target_aspect_ratio[1]
    blocks = target_aspect_ratio[0] * target_aspect_ratio[1]

    # 调整图像大小
    resized_img = image.resize((target_width, target_height))
    processed_images = []
    for i in range(blocks):
        box = ((i % (target_width // image_size)) * image_size, (i // (target_width // image_size)) * image_size,
               ((i % (target_width // image_size)) + 1) * image_size, ((i // (target_width // image_size)) + 1) * image_size)
        # 分割图像
        split_img = resized_img.crop(box)
        processed_images.append(split_img)
    assert len(processed_images) == blocks
    if use_thumbnail and len(processed_images) != 1:
        thumbnail_img = image.resize((image_size, image_size))
        processed_images.append(thumbnail_img)
    return processed_images


def load_image(image, input_size=448, max_num=6):
    """
    加载并处理图像

    参数:
        image: 输入图像
        input_size: 输入大小
        max_num: 最大块数

    返回:
        pixel_values: 处理后的图像张量
    """
    transform = build_transform(input_size=input_size)
    images = dynamic_preprocess(image, image_size=input_size, use_thumbnail=True, max_num=max_num)
    pixel_values = [transform(image) for image in images]
    pixel_values = torch.stack(pixel_values)
    return pixel_values


def get_index(bound, fps, max_frame, first_idx=0, num_segments=32):
    """
    获取视频帧索引

    参数:
        bound: 时间边界 [开始时间, 结束时间]
        fps: 视频帧率
        max_frame: 最大帧数
        first_idx: 第一帧索引
        num_segments: 分段数量

    返回:
        frame_indices: 帧索引数组
    """
    if bound:
        start, end = bound[0], bound[1]
    else:
        start, end = -100000, 100000
    start_idx = max(first_idx, round(start * fps))
    end_idx = min(round(end * fps), max_frame)
    seg_size = float(end_idx - start_idx) / num_segments
    frame_indices = np.array([int(start_idx + (seg_size / 2) + np.round(seg_size * idx)) for idx in range(num_segments)])
    return frame_indices

def get_num_frames_by_duration(duration):
    """
    根据视频时长计算帧数

    参数:
        duration: 视频时长(秒)

    返回:
        num_frames: 计算出的帧数
    """
    local_num_frames = 4
    num_segments = int(duration // local_num_frames)
    if num_segments == 0:
        num_frames = local_num_frames
    else:
        num_frames = local_num_frames * num_segments

    num_frames = min(512, num_frames)
    num_frames = max(128, num_frames)

    return num_frames

def load_video(video_path, bound=None, input_size=448, max_num=1, num_segments=32, get_frame_by_duration = False):
    """
    加载并处理视频

    参数:
        video_path: 视频路径
        bound: 时间边界
        input_size: 输入大小
        max_num: 最大块数
        num_segments: 分段数量
        get_frame_by_duration: 是否根据时长获取帧数

    返回:
        pixel_values: 处理后的视频帧张量
        num_patches_list: 每帧的块数列表
    """
    vr = VideoReader(video_path, ctx=cpu(0), num_threads=1)
    max_frame = len(vr) - 1
    fps = float(vr.get_avg_fps())

    pixel_values_list, num_patches_list = [], []
    transform = build_transform(input_size=input_size)
    if get_frame_by_duration:
        duration = max_frame / fps
        num_segments = get_num_frames_by_duration(duration)
    frame_indices = get_index(bound, fps, max_frame, first_idx=0, num_segments=num_segments)
    for frame_index in frame_indices:
        img = Image.fromarray(vr[frame_index].asnumpy()).convert("RGB")
        img = dynamic_preprocess(img, image_size=input_size, use_thumbnail=True, max_num=max_num)
        pixel_values = [transform(tile) for tile in img]
        pixel_values = torch.stack(pixel_values)
        num_patches_list.append(pixel_values.shape[0])
        pixel_values_list.append(pixel_values)
    pixel_values = torch.cat(pixel_values_list)
    return pixel_values, num_patches_list

# 评估设置
max_num_frames = 512
generation_config = dict(
    do_sample=False,
    temperature=0.0,
    max_new_tokens=1024,
    top_p=0.1,
    num_beams=1
)
video_path = "car.mp4"
num_segments=128


with torch.no_grad():
  # 加载视频并处理
  pixel_values, num_patches_list = load_video(video_path, num_segments=num_segments, max_num=1, get_frame_by_duration=False)
  pixel_values = pixel_values.to(torch.bfloat16).to(model.device)
  video_prefix = "".join([f"Frame{i+1}: <image>\n" for i in range(len(num_patches_list))])

  # 单轮对话:视频详细描述
  question1 = "Describe this video in detail."
  question = video_prefix + question1
  output1, chat_history = model.chat(tokenizer, pixel_values, question, generation_config, num_patches_list=num_patches_list, history=None, return_history=True)
  print(output1)

  # 多轮对话:询问视频中的人数
  question2 = "How many people appear in the video?"
  output2, chat_history = model.chat(tokenizer, pixel_values, question2, generation_config, num_patches_list=num_patches_list, history=chat_history, return_history=True)

  print(output2)


# In[4]:


# video_prefix


# In[3]:


with torch.no_grad():
  # 单轮对话:询问车辆损伤部位(中文)
  question1 = "车的哪个部位损伤了?"
  question = video_prefix + question1
  output1, chat_history = model.chat(tokenizer, pixel_values, question, generation_config, num_patches_list=num_patches_list, history=None, return_history=True)
  print(output1)

  # 多轮对话:询问车辆碰撞位置(中文)
  question2 = "车撞到哪里了?"
  output2, chat_history = model.chat(tokenizer, pixel_values, question2, generation_config, num_patches_list=num_patches_list, history=chat_history, return_history=True)

  print(output2)
直接执行代码会出现缺包的报错,需要安装以下依赖
pip install modelscope==1.25.0 transformers==4.40.1
pip install decord==0.6.0 numpy==2.2.5 Pillow==11.2.1
pip install av imageio opencv-python sentencepiece einops timm
打开自带科学上网 source /etc/network_turbo
pip install flash-attn==2.7.4.post1 --no-build-isolation
flash-attn 装的比较慢,需要多等一会
如果不安装 flash-attn 也能运行, 但 4090 的显存可能不足,可以租用 vGPU-48GB 或 A800-80G 显卡
再执行实例的代码,就可以了
6、MinerU使用
MinerU 专注于高效解析和提取复杂的 PDF 文档、网页和电子书,并将其转换为易于分析的 Markdown 或 JSON 格式。由 上海人工智能实验室OpenDataLab 团队 开发。
主要功能包括:
• PDF 转 Markdown
支持多模态 PDF(含图片、表格、公式等)的结构化转换。
自动去除页眉、页脚、脚注等干扰信息,保留标题、段落、列表等结构。
公式识别并转换为 LaTeX 格式,表格转换为 HTML 或 Markdown。
• 网页内容提取:从网页中剔除广告等干扰信息,精准提取正文、评论、视频文字等内容。
• 电子书转换:支持 epub、mobi、docx、pptx、chm、azw 等格式批量转 Markdown。
• 多语言 OCR:自动检测扫描版 PDF 和乱码,支持 84 种语言 的 OCR 识别
核心技术
• 布局检测:基于 LayoutLMv3 微调,识别文本、表格、图片等区域。
• 公式识别:使用 YOLOv8 检测公式,UniMERNet 模型转换 LaTeX。
• OCR 增强:采用 PaddleOCR 提高文本识别准确率。
应用场景
• 大模型训练:为书生·浦语等模型提供高质量语料。
• 学术研究:提取论文、教材中的关键信息。
• 法律与金融:解析合同、研报等结构化数据。
• 在线使用
https://mineru.net/OpenSourceTools/Extractor
• 客户端
https://mineru.net/client
• API
https://mineru.net/apiManage

魔乐社区(Modelers.cn) 是一个中立、公益的人工智能社区,提供人工智能工具、模型、数据的托管、展示与应用协同服务,为人工智能开发及爱好者搭建开放的学习交流平台。社区通过理事会方式运作,由全产业链共同建设、共同运营、共同享有,推动国产AI生态繁荣发展。
更多推荐


 10
10 0
0- 0


 已为社区贡献1条内容

所有评论(0)