安装cuda+pytorch
第一章 安装cudastep1:查看NVIDIA驱动支持的cuda的版本号方法如下:桌面上右键单击-》点击NVIDIA控制面板-》系统信息-》组件,会看到如下的信息说明当前驱动支持的是CUDA9.0.176step2:安装CUDA9.0.176驱动在nvidia官网下载:https://developer.nvidia.com/cuda-90-down...
第一章 安装cuda
step1:查看NVIDIA驱动支持的cuda的版本号
方法如下:桌面上右键单击-》点击NVIDIA控制面板-》系统信息-》组件,会看到如下的信息
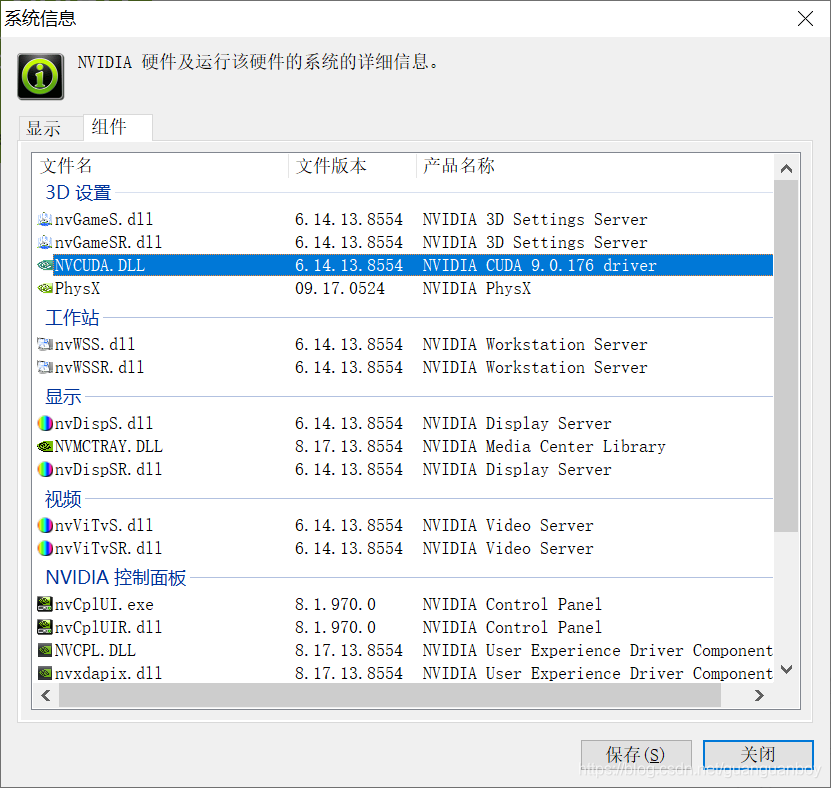
说明当前驱动支持的是CUDA9.0.176
step2:安装CUDA9.0.176驱动
在nvidia官网下载:https://developer.nvidia.com/cuda-90-download-archive
- Home
- High Performance Computing
- CUDA Toolkit
- CUDA Toolkit Archive
- CUDA Toolkit 9.0 Downloads
安装过程参考:https://blog.csdn.net/qq_37296487/article/details/83028394
step3:安装cuDNN
安装过程参考:https://blog.csdn.net/qq_37296487/article/details/83028394
第二章 安装pytorch:
参考官网连接:https://pytorch.org/get-started/locally/
由于我已经安装好了,anacoda,所以使用下面的方法
CUDA 9.0
To install PyTorch via Anaconda, and you are using CUDA 9.0, use the following conda command:
conda install pytorch torchvision cudatoolkit=9.0 -c pytorch但是这个方法安装起来太慢,通过设置清华镜像:
conda config --add channels https://mirrors.tuna.tsinghua.edu.cn/anaconda/cloud/pytorch/
conda install pytorch torchvision cudatoolkit=9.0这个时候要注意,我们已经吧-c pytorch给删除了。
参考
https://blog.csdn.net/yuanzhoulvpi/article/details/86742729
安装之后通过如下命令验证:
From the command line, type:
python
then enter the following code:
from __future__ import print_function
import torch
x = torch.rand(5, 3)
print(x)
The output should be something similar to:
tensor([[0.3380, 0.3845, 0.3217],
        [0.8337, 0.9050, 0.2650],
        [0.2979, 0.7141, 0.9069],
        [0.1449, 0.1132, 0.1375],
        [0.4675, 0.3947, 0.1426]])
Additionally, to check if your GPU driver and CUDA is enabled and accessible by PyTorch, run the following commands to return whether or not the CUDA driver is enabled:
import torch
torch.cuda.is_available()
输出为true,表示安装成功。

魔乐社区(Modelers.cn) 是一个中立、公益的人工智能社区,提供人工智能工具、模型、数据的托管、展示与应用协同服务,为人工智能开发及爱好者搭建开放的学习交流平台。社区通过理事会方式运作,由全产业链共同建设、共同运营、共同享有,推动国产AI生态繁荣发展。
更多推荐

 1
1 0
0- 0


 已为社区贡献5条内容

所有评论(0)