python改变像素点颜色,在Python上使用PIL更改像素颜色
I'm very new to programming, and I am learning more about image processing using PIL.I have a certain task that requires me to change every specific pixel's color with another color. Since there are m
I'm very new to programming, and I am learning more about image processing using PIL.
I have a certain task that requires me to change every specific pixel's color with another color. Since there are more than few pixels I'm required to change, I've created a for loop to access to every pixel. The script "works" at least, however the result is just a black screen with (0, 0, 0) color in each pixel.
from PIL import Image
img = Image.open('/home/usr/convertimage.png')
pixels = img.load()
for i in range(img.size[0]):
for j in range(img.size[1]):
if pixels[i,j] == (225, 225, 225):
pixels[i,j] = (1)
elif pixels[i,j] == (76, 76, 76):
pixels [i,j] = (2)
else: pixels[i,j] = (0)
img.save('example.png')
The image I have is a grayscale image. There are specific colors, and there are gradient colors near the borders. I'm trying to replace each specific color with another color, and then replace the gradient colors with another color.
However for the life of me, I don't understand why my output comes out with a single (0, 0, 0) color at all.
I tried to look for an answer online and friends, but couldn't come up with a solution.
If anyone out there knows what I'm doing wrong, any feedback is highly appreciated. Thanks in advance.
解决方案
The issue is that your image is, as you said, greyscale, so on this line:
if pixels[i,j] == (225, 225, 225):
no pixel will ever equal the RGB triplet (255,255,255) because the white pixels will be simply the greyscale vale 255 not an RGB triplet.
It works fine if you change your loop to:
if pixels[i,j] == 29:
pixels[i,j] = 1
elif pixels[i,j] == 179:
pixels [i,j] = 2
else:
pixels[i,j] = 0
Here is the contrast-stretched result:
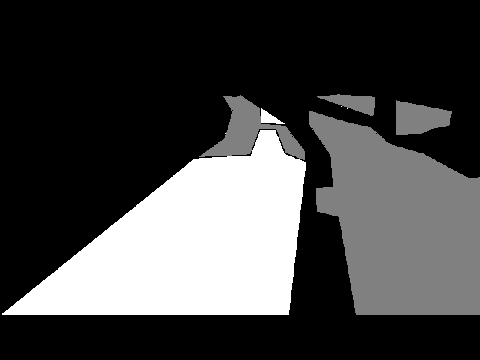
You may like to consider doing the conversion using a "Look Up Table", or LUT, as large numbers of if statements can get unwieldy. Basically, each pixel in the image is replaced with a new one found by looking up its current index in the table. I am doing it with numpy for fun too:
#!/usr/local/bin/python3
import numpy as np
from PIL import Image
# Open the input image
PILimage=Image.open("classified.png")
# Use numpy to convert the PIL image into a numpy array
npImage=np.array(PILimage)
# Make a LUT (Look-Up Table) to translate image values. Default output value is zero.
LUT=np.zeros(256,dtype=np.uint8)
LUT[29]=1 # all pixels with value 29, will become 1
LUT[179]=2 # all pixels with value 179, will become 2
# Transform pixels according to LUT - this line does all the work
pixels=LUT[npImage];
# Save resulting image
result=Image.fromarray(pixels)
result.save('result.png')
Result - after stretching contrast:

I am maybe being a bit verbose above, so if you like more terse code:
import numpy as np
from PIL import Image
# Open the input image as numpy array
npImage=np.array(Image.open("classified.png"))
# Make a LUT (Look-Up Table) to translate image values
LUT=np.zeros(256,dtype=np.uint8)
LUT[29]=1 # all pixels with value 29, will become 1
LUT[179]=2 # all pixels with value 179, will become 2
# Apply LUT and save resulting image
Image.fromarray(LUT[npImage]).save('result.png')

魔乐社区(Modelers.cn) 是一个中立、公益的人工智能社区,提供人工智能工具、模型、数据的托管、展示与应用协同服务,为人工智能开发及爱好者搭建开放的学习交流平台。社区通过理事会方式运作,由全产业链共同建设、共同运营、共同享有,推动国产AI生态繁荣发展。
更多推荐


 0
0 0
0- 0


 已为社区贡献8条内容

所有评论(0)