centos删除多余内核+安装mysql8.0+数据库连接失败+python3+pip
打开终端,查看当前使用的内核;uname -a查看所有内核选项;rpm -qa|grep kernel进入root模式,删除多余内核;yum remove 多余内核重新编译引导;grub2-mkconfig -o /boot/grub2/grub.cfg重启;reboot
打开终端,查看当前使用的内核;
4 uname -r
5 cat /etc/redhat-release
先更新
6 yum -y update
导入ELRepo仓库的公共密钥
7 rpm --import https://www.elrepo.org/RPM-GPG-KEY-elrepo.org
安装ELRepo仓库的yum源
8 rpm -Uvh http://www.elrepo.org/elrepo-release-7.0-3.el7.elrepo.noarch.rpm
查询可用内核版本
9 yum --disablerepo=“*” --enablerepo=“elrepo-kernel” list available
安装最新的稳定版本内核
10 yum --enablerepo=elrepo-kernel install kernel-ml-devel kernel-ml -y
查看系统上的所有可用内核:
11 awk -F’ ‘$1=="menuentry " {print $2}’ /etc/grub2.cfg
12 sudo awk -F’ ‘$1=="menuentry " {print i++ " : " $2}’ /etc/grub2.cfg
通过 grub2-set-default 0 命令设置
13 grub2-set-default 0
编辑(e)将GRUB_DEFAULT设置为0,如下
14 vim /etc/default/grub
生成 grub 配置文件并重启
17 grub2-mkconfig -o /boot/grub2/grub.cfg
18 reboot
19 uname -r
删除旧内核
20 rpm -qa | grep kernel
21 yum remove kernel-3* kernel-tools-3*
22 rpm -qa | grep kernel
23 yum -y remove kernel-tools-libs-3.10.0-1160.76.1.el7.x86_64
24 reboot
25 uname -r
26 grub2-set-default 0
27 grub2-mkconfig -0 /boot/grub2/grub.cfg
28 reboot -h now
29 history
查看所有内核选项;
rpm -qa|grep kernel
grub2-set-default 0
进入root模式,删除多余内核;
yum remove 多余内核
重新编译引导;
grub2-mkconfig -o /boot/grub2/grub.cfg
重启;
reboot
安装mysql8.0
https://zhuanlan.zhihu.com/p/486084781
yum -y remove mariadb*
yum -y install wget
wget http://mirrors.aliyun.com/repo/Centos-7.repo
yum clean all && yum makecache && yum repolist

通过wget下载mysql8.0包
wget https://dev.mysql.com/get/Downloads/mysql-community-server-8.0.27-1.el7.x86_64.rpm
wget https://dev.mysql.com/get/mysql80-community-release-el7-3.noarch.rpm

配置mysql源
sudo rpm -Uvh mysql80-community-release-el7-3.noarch.rpm
执行成功后会在/etc/yum.repos.d/目录下生成两个repo文件mysql-community.repo 及 mysql-community-source.repo

进入yum.repos.d查看
cd /etc/yum.repos.d/
ls -l

执行GPG升级
rpm --import https://repo.mysql.com/RPM-GPG-KEY-mysql-2022
yum install -y  mysql-community-server

开始安装mysl
yum install -y  mysql-community-server

启动mysql并查看端口
systemctl start mysqld && systemctl status mysqld && netstat  -nlpt | grep mysqld && systemctl daemon-reload && systemctl enable mysqld

mysql临时密码
cat /var/log/mysqld.log  | grep password

mysql -u root -p
更改密码(必须是强密码),并刷新(mysql结尾一定要加英文分号;)
mysql> alter user 'root'@'localhost'  identified by 'Root123..';  --修改密码(强密码)
mysql> flush privileges;                                          --刷新,立即生效
mysql> select user,host from mysql.user;                          --查看数据库中账号信息

关掉强密码,修改密码长度最短为6位数,修改密码为弱密码
mysql> set global validate_password.policy=0; --关掉强密码认证
mysql> set global validate_password.length=6; --密码长度最短为6位数
mysql> alter user 'root'@'localhost'  identified by '123456';  --修改密码(弱密码)

重新登录进到数据库,修改user表中的Host:
# mysql -uroot -p123456                            --登录数据库
mysql> show databases;                             --查数据来库
mysql> use mysql;                                  --使用数据库
mysql> select Host, User from user;                --查询表
mysql> update user set Host='%' where User='root'; --修改User表内root用户的Host为%
mysql> flush privileges;                           --刷新

开放3306端口,并且重启防火墙,然后查看端口,开放端口是为了外网能通过Navicat Premium等其他工具访问
firewall-cmd --zone=public --add-port=3306/tcp --permanent --开放3306端口
firewall-cmd --reload                                      --重启防火墙
firewall-cmd --list-ports                                  --查看开放的端口


退出,可是可以使用第三方数据库软件连接数据库了
navicat连接报错:Authentication plugin ‘caching_sha2_password’ cannot be loaded的处理方法 - 知乎 https://zhuanlan.zhihu.com/p/97939548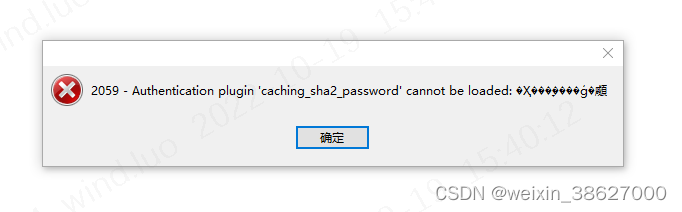
使用Navicat12连接数据库,输入root密码后出现2059 - Authentication plugin ‘caching_sha2_password’ cannot be loaded报错,找了半天原因是MySQL8之前和之后的加密规则不同导致的,现在来处理这个问题。
1.打开MySQL的命令行,输入数据库密码
2.修改加密规则:ALTER USER ‘root’@‘localhost’ IDENTIFIED BY ‘password’ PASSWORD EXPIRE NEVER;
3.更新用户密码:ALTER USER ‘root’@‘localhost’ IDENTIFIED WITH mysql_native_password BY ‘password’;
4.刷新权限: FLUSH PRIVILEGES;
5.重置密码:ALTER USER ‘root’@‘localhost’ IDENTIFIED BY ‘新密码’
这个时候就完成了修改,打开navicat连接数据库,输入新密码,就会显示连接成功
以上不行
使用下面的命令
进入mysql数据库
use mysql;
通过命令 select user,plugin from user where user=‘root’; 我们可以发现加密方式是caching_sha2_password
然后使用命令:alter user ‘root’@‘%’ identified with mysql_native_password by ‘your password’;
alter user ‘root’@‘%’ identified with mysql_native_password by ‘1qaz!@#$’;
再次查看,就发现加密方式已经更改:
select user,plugin from user where user=‘root’;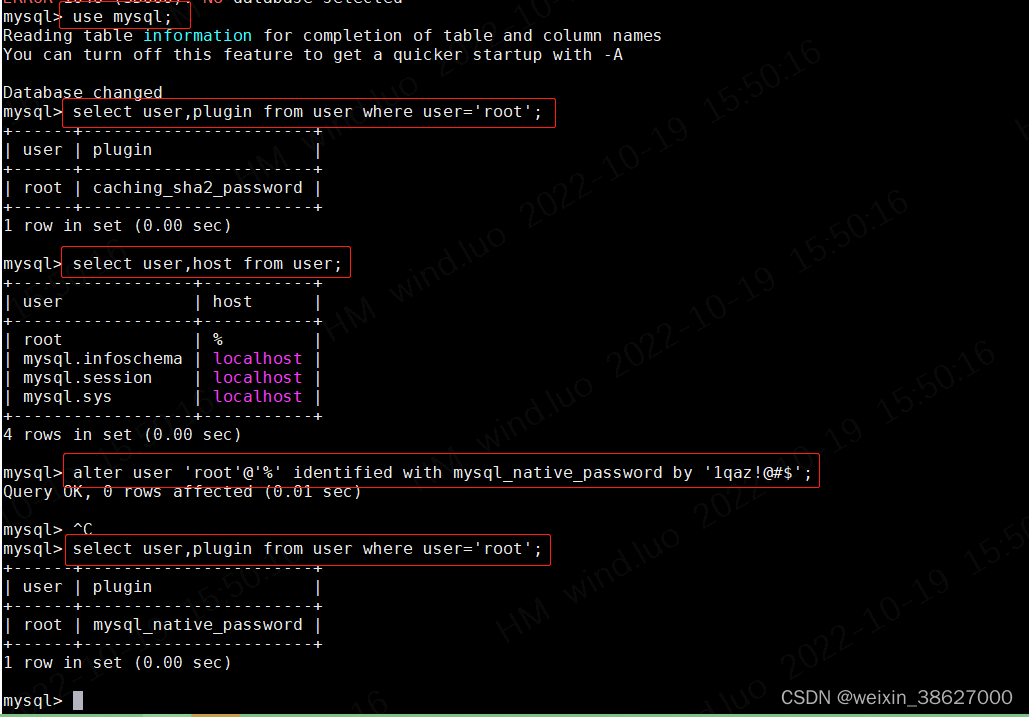
接着找到my.cnf文件(不知道目录的可以通过brew list mysql来确定目录)并加上加密方式:
default_authentication_plugin=mysql_native_password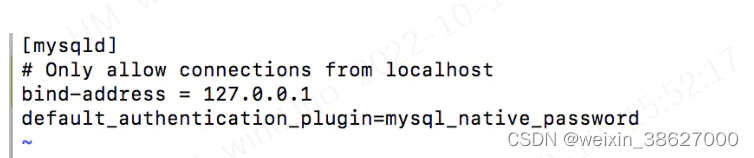
刷新
flush privileges;
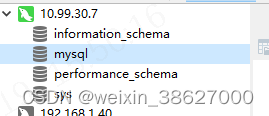
成功
重置mysql8.0密码
1.开启两个窗口
窗口一 root@zabbix-server01:~# mysqld -nt --skip-grant-tables 跳过验证。
窗口二 root@zabbix-server01:~# mysql -u root -p
Enter password: 不要输入任何,直接回车,进入。
2.更新mysql密码
mysql> ALTER user ‘root’@‘%’ IDENTIFIED BY ‘2022@H*******’;
Query OK, 0 rows affected (0.00 sec)
mysql> FLUSH PRIVILEGES;
Query OK, 0 rows affected (0.01 sec)
密码更新完成,重启mysql服务,使用新密码登录进去
安装python3
yum -y install python36
安装pip
升级pip3:
1.sudo wget https://bootstrap.pypa.io/pip/3.5/get-pip.py
2.sudo python3 get-pip.py
3.pip -V
[root@localhost ~]# wget https://bootstrap.pypa.io/pip/3.5/get-pip.py**
–2022-06-02 15:50:48-- https://bootstrap.pypa.io/pip/3.5/get-pip.py
正在解析主机 bootstrap.pypa.io (bootstrap.pypa.io)… 151.101.108.175, 2a04:4e42:36::175
正在连接 bootstrap.pypa.io (bootstrap.pypa.io)|151.101.108.175|:443… 已连接。
已发出 HTTP 请求,正在等待回应… 200 OK
长度:1908223 (1.8M) [text/x-python]
正在保存至: “get-pip.py”
100%[======================================================================================================================>] 1,908,223 4.20MB/s 用时 0.4s
2022-06-02 15:50:49 (4.20 MB/s) - 已保存 “get-pip.py” [1908223/1908223])
[root@localhost ~]# python3 get-pip.py
Collecting pip<21.0
Downloading pip-20.3.4-py2.py3-none-any.whl (1.5 MB)
|████████████████████████████████| 1.5 MB 676 kB/s
Collecting wheel
Downloading wheel-0.37.1-py2.py3-none-any.whl (35 kB)
Installing collected packages: wheel, pip
Attempting uninstall: pip
Found existing installation: pip 9.0.3
Uninstalling pip-9.0.3:
Successfully uninstalled pip-9.0.3
Successfully installed pip-20.3.4 wheel-0.37.1
[root@localhost ~]# pip install pywinrm>=0.3.0
-bash: /usr/bin/pip: 没有那个文件或目录
[root@localhost ~]# pip -V
-bash: /usr/bin/pip: 没有那个文件或目录
解决方案,执行以下命令:
[root@localhost ~]# hash -r
[root@localhost ~]# pip -V
pip 20.3.4 from /usr/local/lib/python3.6/site-packages/pip (python 3.6)
[root@localhost ~]# pip install pywinrm>=0.3.0
WARNING: You are using pip version 20.3.4; however, version 21.3.1 is available.
You should consider upgrading via the ‘/usr/bin/python3 -m pip install --upgrade pip’ command.
[root@localhost ~]# /usr/bin/python3 -m pip install --upgrade pip
Requirement already satisfied: pip in /usr/local/lib/python3.6/site-packages (20.3.4)
Collecting pip
Downloading pip-21.3.1-py3-none-any.whl (1.7 MB)
|████████████████████████████████| 1.7 MB 675 kB/s
Installing collected packages: pip
Attempting uninstall: pip
Found existing installation: pip 20.3.4
Uninstalling pip-20.3.4:
Successfully uninstalled pip-20.3.4
Successfully installed pip-21.3.1
安装python3
安装依赖
yum -y install zlib-devel bzip2-devel openssl-devel ncurses-devel sqlite-devel readline-devel tk-devel gdbm-devel db4-devel libpcap-devel xz-devel libffi-devel gcc gcc-c++
下载python3
wget https://www.python.org/ftp/python/3.8.3/Python-3.8.3.tgz
tar -zxvf Python-3.8.3.tgz
编译安装
mkdir /usr/local/python3
cd Python-3.8.3
./configure --prefix=/usr/local/python3
make && make install
修改python指向,python2指向python3
rm -rf /usr/bin/python
ln -s /usr/local/python3/bin/python3 /usr/bin/python
修改系统默认pip指向
rm -rf /usr/bin/pip
ln -s /usr/local/python3/bin/pip3 /usr/bin/pip
修复yum
系统指向的python3会导致yum不能正常使用,需要修改为默认python2
vi /usr/bin/yum
把 #! /usr/bin/python 修改为 #! /usr/bin/python2
vi /usr/libexec/urlgrabber-ext-down
把 #! /usr/bin/python 修改为 #! /usr/bin/python2
vi /usr/bin/yum-config-manager
#!/usr/bin/python 改为 #!/usr/bin/python2
没有的不用修改

魔乐社区(Modelers.cn) 是一个中立、公益的人工智能社区,提供人工智能工具、模型、数据的托管、展示与应用协同服务,为人工智能开发及爱好者搭建开放的学习交流平台。社区通过理事会方式运作,由全产业链共同建设、共同运营、共同享有,推动国产AI生态繁荣发展。
更多推荐


 0
0 0
0- 0


 已为社区贡献1条内容

所有评论(0)