2025080900-idea创建springboot工程
·
目录
一、创建maven工程
1、创建新工程
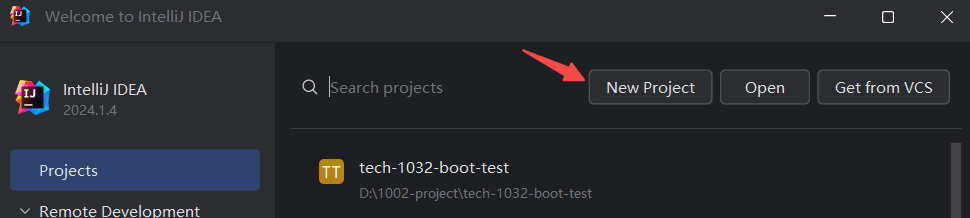
如果已经打开了某个工程,可以通过【File】-> 【New】-> 【Project】创建新工程

2、填写相关信息
注意选择maven
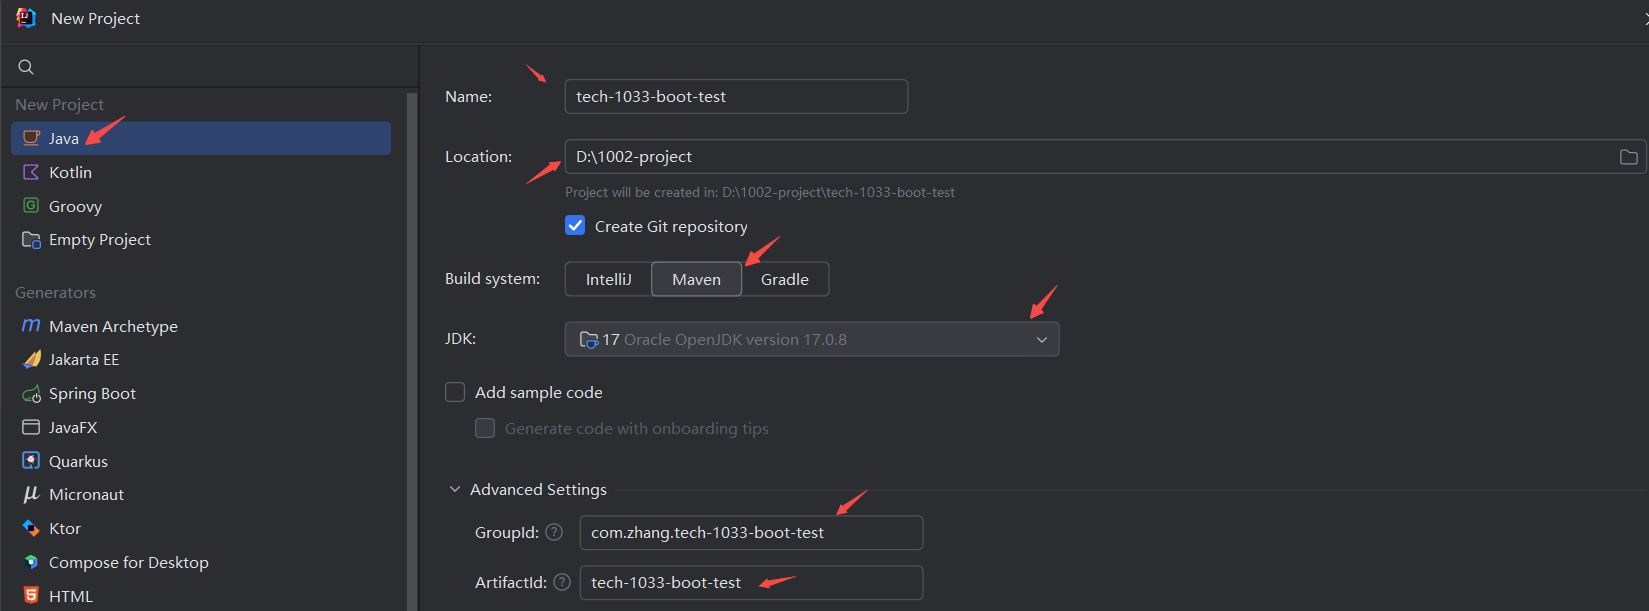
- Name:模块名
- Build system: 选择maven
- JDK:按照自己电脑配置的JDK进行选择
- GroupId: com.{公司/BU }.业务线.[子业务线],最多 4 级
- 可以将工程名作为业务线名称,不重复即可
- ArtifactId: 产品线名-模块名
- 可以将模块名Name作为ArtifactId,一般两者名称保
二、补充pom信息
1、在工程pom文件中补充spring boot版本信息
<parent>
        <groupId>org.springframework.boot</groupId>
        <artifactId>spring-boot-starter-parent</artifactId>
        <version>2.7.9</version>
</parent>
2、在工程pom文件中按需补充依赖信息
<dependencies>
        <!--https://docs.spring.io/spring-boot/docs/2.3.4.RELEASE/reference/html/using-spring-boot.html#using-boot-starter
            官方的starter命名规则是:spring-boot-starter-*, 这些starter都会依赖spring-boot-starter这个最基础的starter
            第三方的starter的命名规则都是:*-spring-boot-starter-->
        <dependency>
            <groupId>org.springframework.boot</groupId>
            <artifactId>spring-boot-starter-web</artifactId>
        </dependency>

        <dependency>
            <groupId>org.springframework.boot</groupId>
            <artifactId>spring-boot-starter-test</artifactId>
            <scope>test</scope>
        </dependency>

        <dependency>
            <groupId>com.mysql</groupId>
            <artifactId>mysql-connector-j</artifactId>
        </dependency>

        <dependency>
            <groupId>org.projectlombok</groupId>
            <artifactId>lombok</artifactId>
        </dependency>

        <!--这个依赖只是在添加yaml配置的时候可以自动提示,没有任何业务作用,建议在在打包的时候排除掉-->
        <dependency>
            <groupId>org.springframework.boot</groupId>
            <artifactId>spring-boot-configuration-processor</artifactId>
        </dependency>

        <dependency>
            <groupId>org.apache.commons</groupId>
            <artifactId>commons-lang3</artifactId>
        </dependency>
</dependencies>
三、在工程中创建module
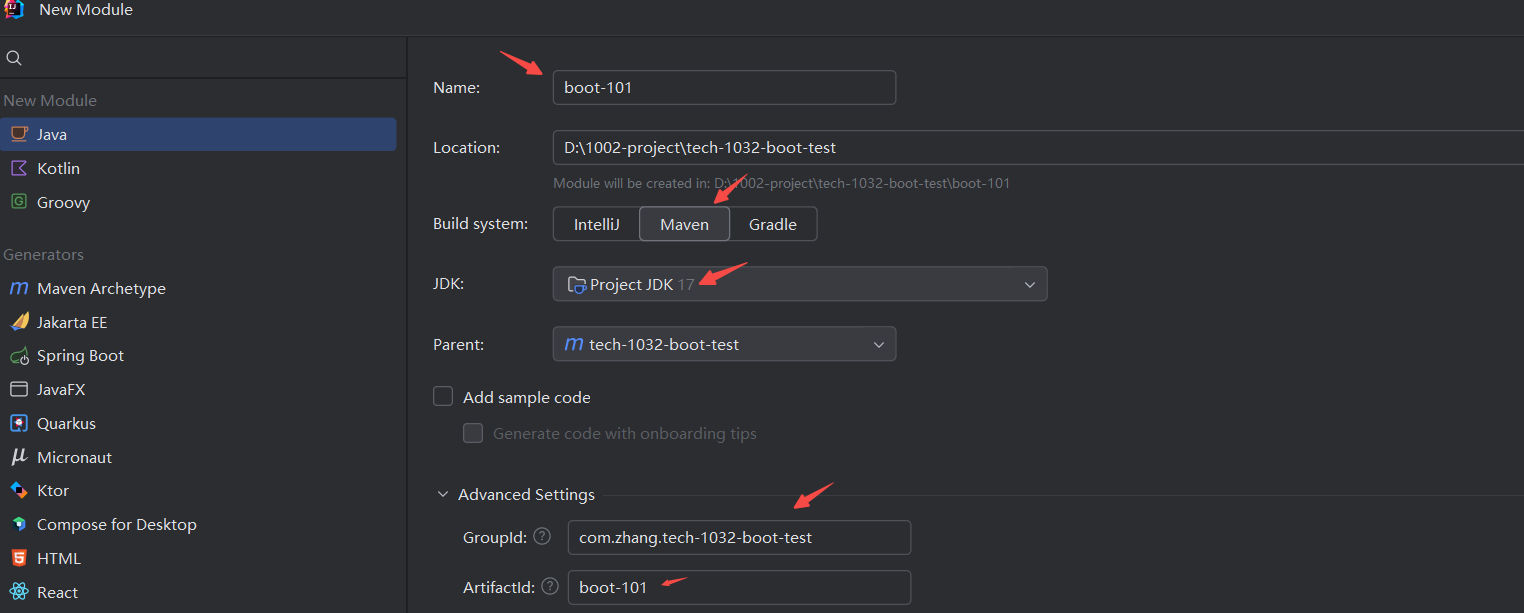
1、创建module
【右击项目名称】->【New】->【Module】

2、填写module信息
3、查看module的pom文件信息
<?xml version="1.0" encoding="UTF-8"?>
<project xmlns="http://maven.apache.org/POM/4.0.0"
         xmlns:xsi="http://www.w3.org/2001/XMLSchema-instance"
         xsi:schemaLocation="http://maven.apache.org/POM/4.0.0 http://maven.apache.org/xsd/maven-4.0.0.xsd">
    <modelVersion>4.0.0</modelVersion>
    <parent>
        <groupId>com.zhang.tech-1032-boot-test</groupId>
        <artifactId>tech-1032-boot-test</artifactId>
        <version>1.0-SNAPSHOT</version>
    </parent>

    <artifactId>boot-101-test</artifactId>

    <properties>
        <maven.compiler.source>17</maven.compiler.source>
        <maven.compiler.target>17</maven.compiler.target>
        <project.build.sourceEncoding>UTF-8</project.build.sourceEncoding>
    </properties>

</project>
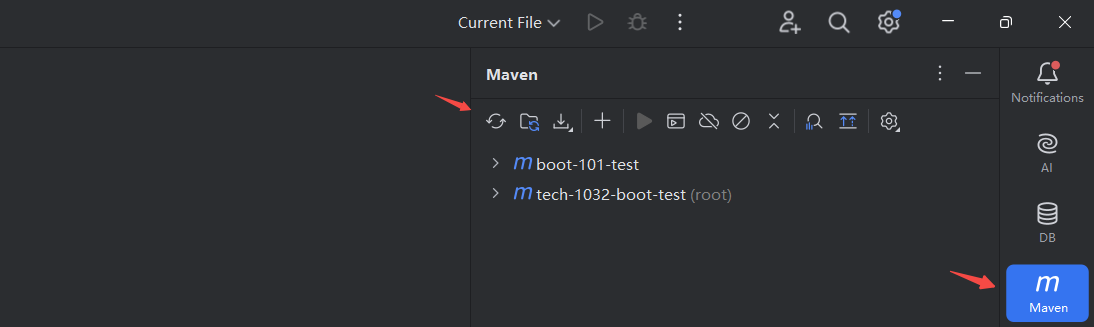
4、添加后注意刷新maven
四、查看工程pom信息
<?xml version="1.0" encoding="UTF-8"?>
<project xmlns="http://maven.apache.org/POM/4.0.0"
         xmlns:xsi="http://www.w3.org/2001/XMLSchema-instance"
         xsi:schemaLocation="http://maven.apache.org/POM/4.0.0 http://maven.apache.org/xsd/maven-4.0.0.xsd">
    <modelVersion>4.0.0</modelVersion>

    <!--spring-boot-starter-parent这个父项目里面几乎声明了开发springBoot所有常用依赖项的版本号-->
    <parent>
        <groupId>org.springframework.boot</groupId>
        <artifactId>spring-boot-starter-parent</artifactId>
        <version>2.7.9</version>
    </parent>

    <groupId>com.zhang.tech-1032-boot-test</groupId>
    <artifactId>tech-1032-boot-test</artifactId>
    <version>1.0-SNAPSHOT</version>
    <packaging>pom</packaging>
    <modules>
        <module>boot-101-test</module>
    </modules>

    <properties>
        <maven.compiler.source>17</maven.compiler.source>
        <maven.compiler.target>17</maven.compiler.target>
        <project.build.sourceEncoding>UTF-8</project.build.sourceEncoding>
    </properties>


    <dependencies>
        <!--https://docs.spring.io/spring-boot/docs/2.3.4.RELEASE/reference/html/using-spring-boot.html#using-boot-starter
            官方的starter命名规则是:spring-boot-starter-*, 这些starter都会依赖spring-boot-starter这个最基础的starter
            第三方的starter的命名规则都是:*-spring-boot-starter-->
        <dependency>
            <groupId>org.springframework.boot</groupId>
            <artifactId>spring-boot-starter-web</artifactId>
        </dependency>

        <dependency>
            <groupId>org.springframework.boot</groupId>
            <artifactId>spring-boot-starter-test</artifactId>
            <scope>test</scope>
        </dependency>

        <dependency>
            <groupId>com.mysql</groupId>
            <artifactId>mysql-connector-j</artifactId>
        </dependency>

        <dependency>
            <groupId>org.projectlombok</groupId>
            <artifactId>lombok</artifactId>
        </dependency>

        <!--这个依赖只是在添加yaml配置的时候可以自动提示,没有任何业务作用,建议在在打包的时候排除掉-->
        <dependency>
            <groupId>org.springframework.boot</groupId>
            <artifactId>spring-boot-configuration-processor</artifactId>
        </dependency>

        <dependency>
            <groupId>org.apache.commons</groupId>
            <artifactId>commons-lang3</artifactId>
        </dependency>

    </dependencies>

</project>
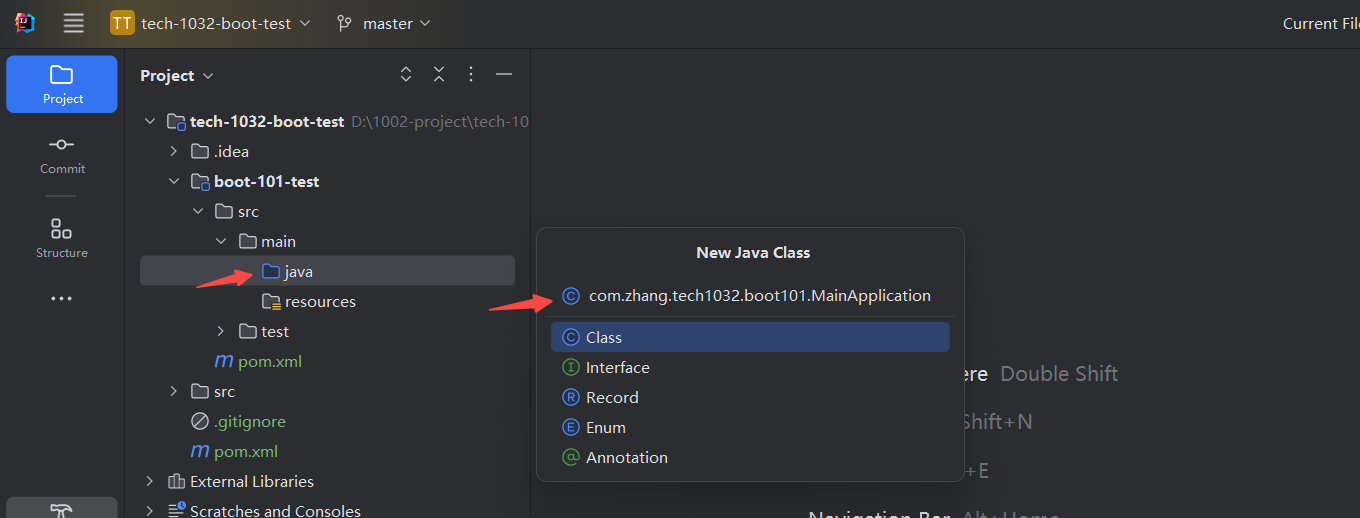
五、创建启动类
在module中创建启动类
package com.zhang.tech1032.boot101;

import org.springframework.boot.SpringApplication;
import org.springframework.boot.autoconfigure.SpringBootApplication;


@SpringBootApplication
public class MainApplication {

    public static void main(String[] args) {
        SpringApplication.run(MainApplication.class, args);
    }
}
六、创建测试controller
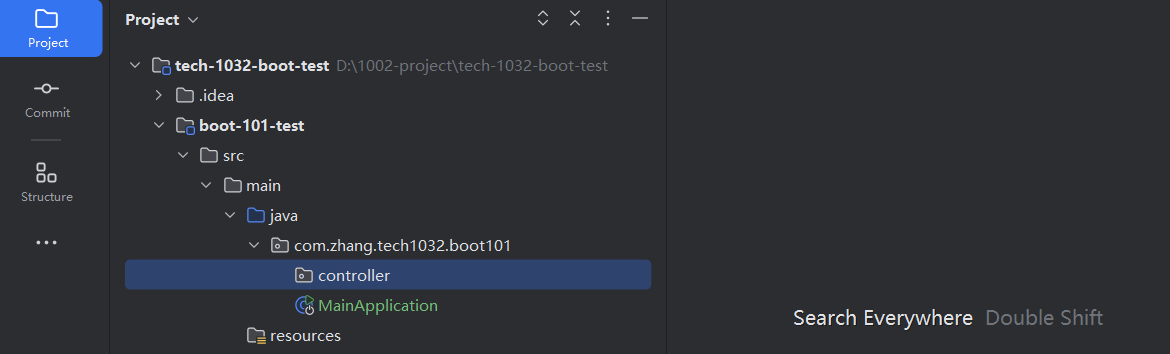
1、先创建一个controller包
注意创建在和启动类平行的位置
2、创建测试controller类
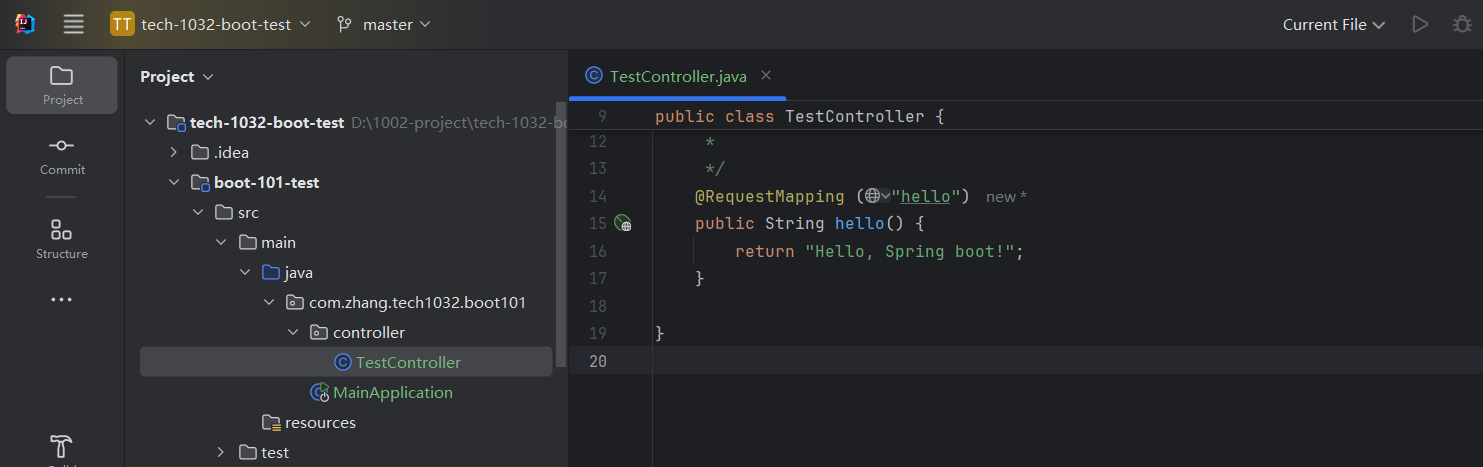
package com.zhang.boot.p10controller;

import org.springframework.web.bind.annotation.RequestMapping;
import org.springframework.web.bind.annotation.RestController;


@RestController
@RequestMapping("/boot")
public class HelloController {

    /**
     * http://localhost:8080/boot101/hello
     */
    @RequestMapping("hello")
    public String hello() {
        return "Hello, Spring boot2!";
    }
}
七、启动springboot应用
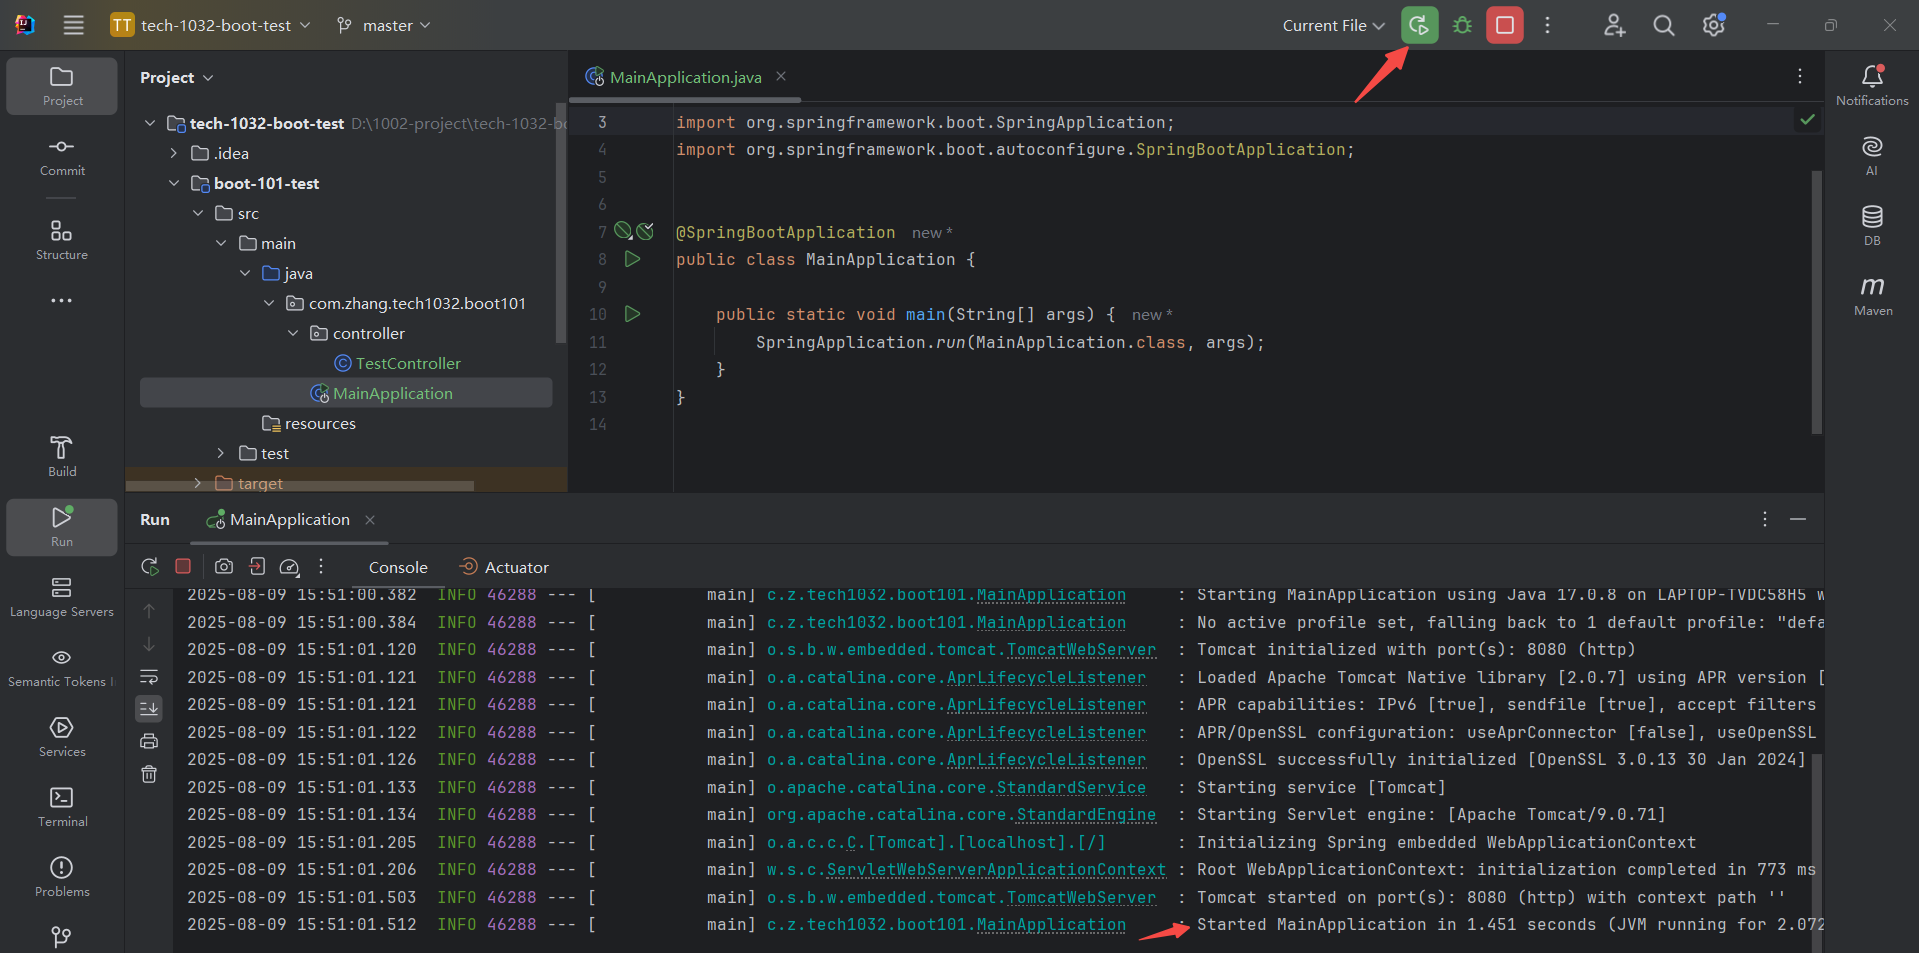
八、浏览器调用测试类
http://localhost:8080/boot101/hello


魔乐社区(Modelers.cn) 是一个中立、公益的人工智能社区,提供人工智能工具、模型、数据的托管、展示与应用协同服务,为人工智能开发及爱好者搭建开放的学习交流平台。社区通过理事会方式运作,由全产业链共同建设、共同运营、共同享有,推动国产AI生态繁荣发展。
更多推荐


 5
5 0
0- 0


 已为社区贡献1条内容

所有评论(0)