部署语音识别模型之SenseVoice
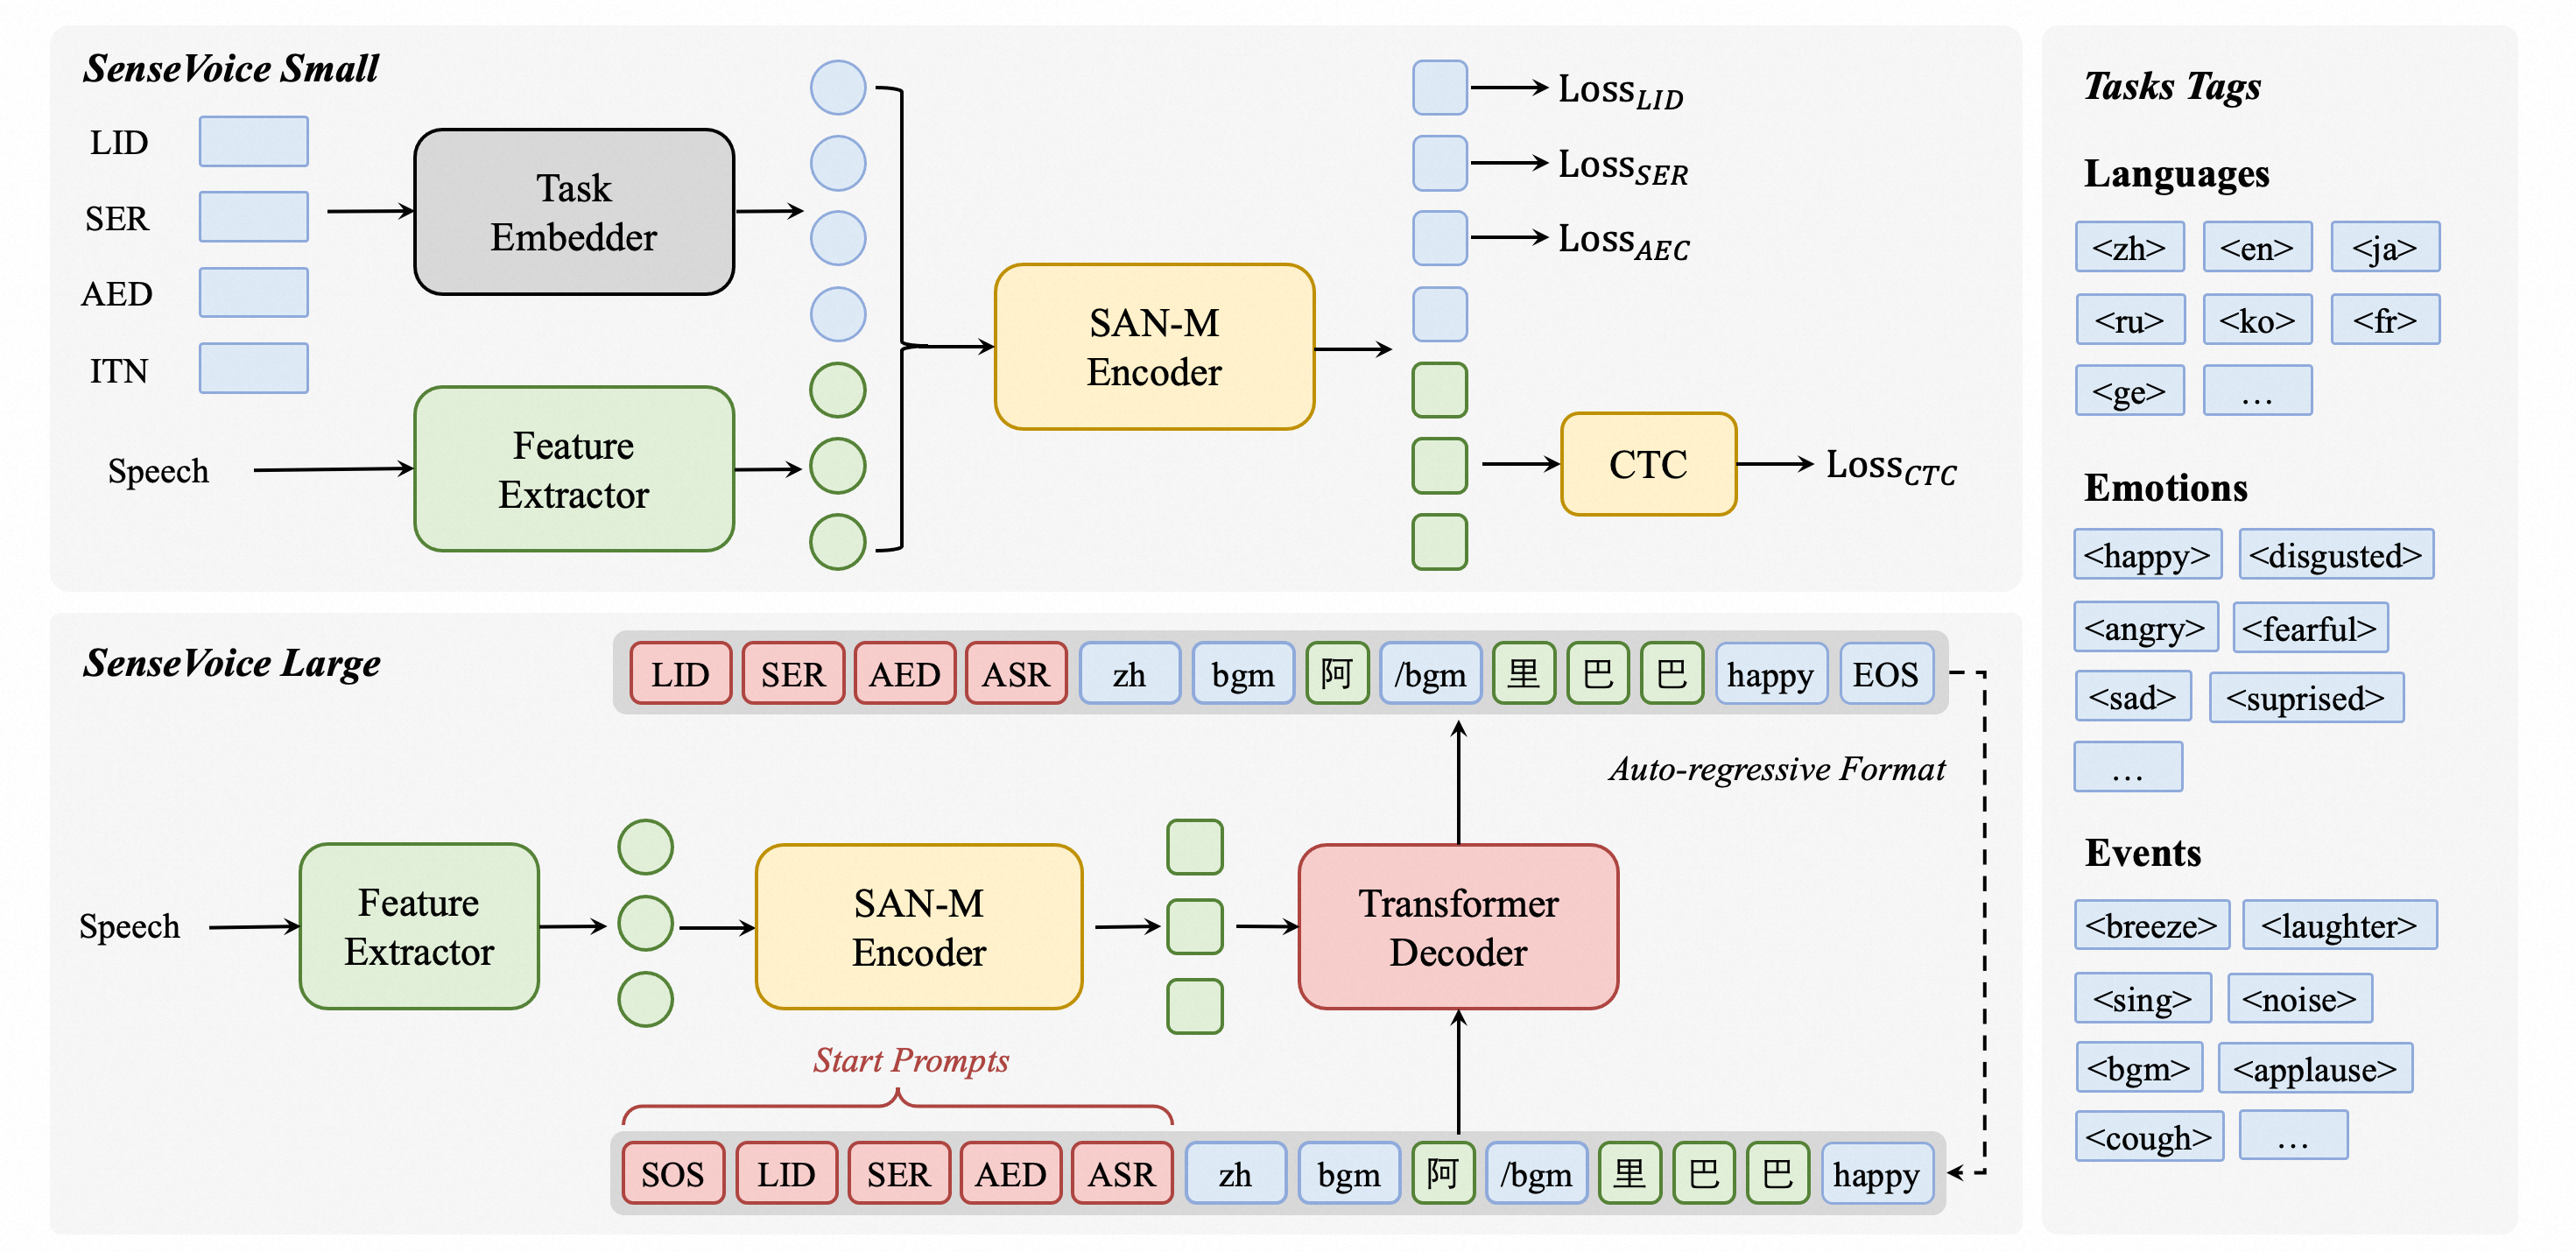
SenseVoice 是具有音频理解能力的音频基础模型,包括语音识别(ASR)、语种识别(LID)、语音情感识别(SER)和声学事件分类(AEC)或声学事件检测(AED)。它是 FunAudioLLM 框架中的核心组成部分之一,由阿里巴巴通义实验室及社区开源项目开发。
SenseVoice介绍
SenseVoice 是 FunAudioLLM 框架中的核心组成部分之一,由阿里巴巴通义实验室及社区开源项目开发,是具有音频理解能力的音频基础模型,包括语音识别(ASR)、语种识别(LID)、语音情感识别(SER)和声学事件分类(AEC)或声学事件检测(AED)。
核心功能
SenseVoice 专注于高精度多语言语音识别、情感辨识和音频事件检测
- 多语言识别: 采用超过 40 万小时数据训练,支持超过 50 种语言,识别效果上优于 Whisper 模型。
- 富文本识别:
- 具备优秀的情感识别,能够在测试数据上达到和超过目前最佳情感识别模型的效果。
- 支持声音事件检测能力,支持音乐、掌声、笑声、哭声、咳嗽、喷嚏等多种常见人机交互事件进行检测。
- 高效推理: SenseVoice-Small 模型采用非自回归端到端框架,推理延迟极低,10s 音频推理仅耗时 70ms,15 倍优于 Whisper-Large。
- 微调定制: 具备便捷的微调脚本与策略,方便用户根据业务场景修复长尾样本问题。
- 服务部署: 具有完整的服务部署链路,支持多并发请求,支持客户端语言有,python、c++、html、java 与 c# 等。
本文重点介绍语言识别功能
代码下载 / 环境配置 / 实例运行
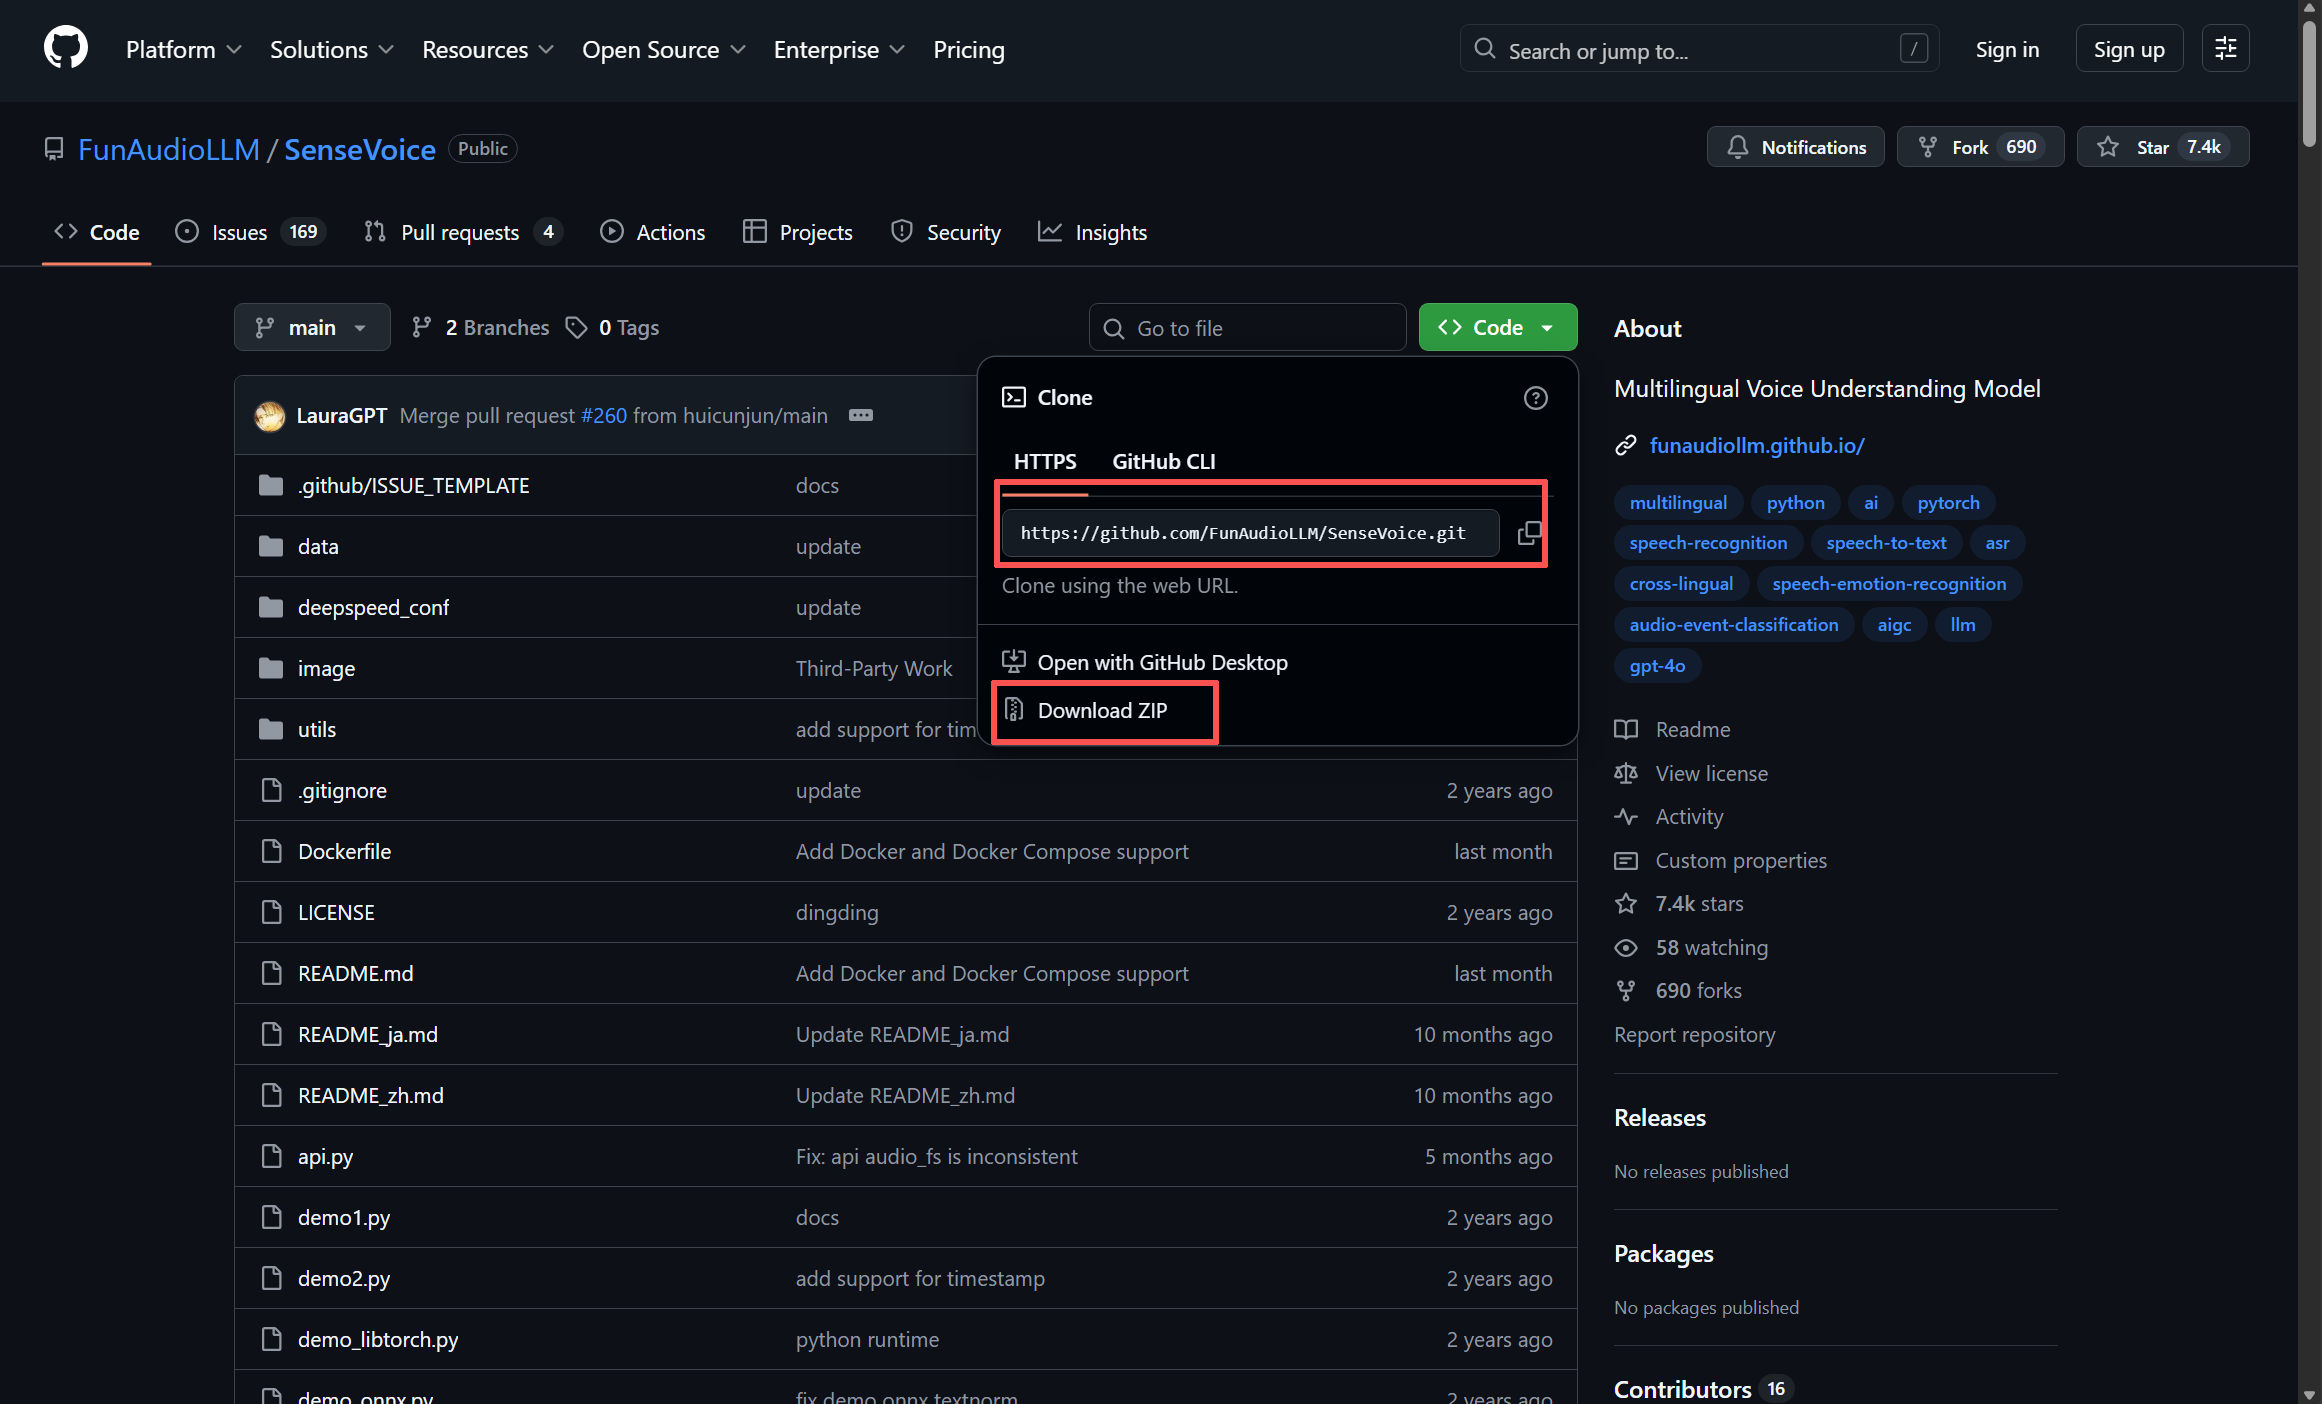
GItHub
源码地址:https://github.com/FunAudioLLM/SenseVoice
首先cd到项目目录,然后进行 git clone
(base) PS D:\A-Study\PythonFiles\LargeModel> git clone https://github.com/FunAudioLLM/SenseVoice.git
Cloning into 'SenseVoice'...
remote: Enumerating objects: 405, done.
remote: Counting objects: 100% (321/321), done.
remote: Compressing objects: 100% (107/107), done.
remote: Total 405 (delta 233), reused 214 (delta 214), pack-reused 84 (from 2)
Receiving objects: 100% (405/405), 6.69 MiB | 2.79 MiB/s, done.
Resolving deltas: 100% (250/250), done.
没有git的可以直接下载压缩包再解压到指定目录
环境配置
requirements.txt 文件中缺少ffmpeg库的安装,我们需要单独进行安装 ffmpeg
(base) PS D:\A-Study\PythonFiles\LargeModel> cd SenseVoice
(base) PS D:\A-Study\PythonFiles\LargeModel\SenseVoice> conda create -n SenseVoice python==3.9
(base) PS D:\A-Study\PythonFiles\LargeModel\SenseVoice> conda activate SenceVoice
(SenseVoice) PS D:\A-Study\PythonFiles\LargeModel\SenseVoice> pip install torch torchvision torchaudio --index-url https://download.pytorch.org/whl/cu118
(SenseVoice) PS D:\A-Study\PythonFiles\LargeModel\SenseVoice> pip install -r requirements.txt
(SenseVoice) PS D:\A-Study\PythonFiles\LargeModel\SenseVoice> conda install -c conda-forge ffmpeg
torch下载需要科学上网,若没有可以使用国内镜像源
下载其他的库也是一样的,在后面加: -i 镜像源地址
(SenseVoice) PS D:\A-Study\PythonFiles\LargeModel\SenseVoice> pip install torch torchvision torchaudio --index-url https://download.pytorch.org/whl/cu118 -i https://pypi.tuna.tsinghua.edu.cn/simple
(SenseVoice) PS D:\A-Study\PythonFiles\LargeModel\SenseVoice> pip install -r requirements.txt -i https://pypi.tuna.tsinghua.edu.cn/simple清华源:https://pypi.tuna.tsinghua.edu.cn/simple/
阿里源:https://mirrors.aliyun.com/pypi/simple/
中科大:https://pypi.mirrors.ustc.edu.cn/simple/
魔搭(ModelScope)
地址:http://https://www.modelscope.cn/models/iic/SenseVoiceSmall
1. 安装魔搭依赖
2. 在SenseVoice下创建icc文件夹
3. 进行icc文件夹进行 git clone
(SenseVoice) PS D:\A-Study\PythonFiles\LargeModel\SenseVoice> pip install -U funasr modelscope
(SenseVoice) PS D:\A-Study\PythonFiles\LargeModel\SenseVoice> cd icc
(SenseVoice) PS D:\A-Study\PythonFiles\LargeModel\SenseVoice\icc> git clone https://www.modelscope.cn/iic/SenseVoiceSmall.git
(SenseVoice) PS D:\A-Study\PythonFiles\LargeModel\SenseVoice\icc>git clone https://www.modelscope.cn/iic/speech_fsmn_vad_zh-cn-16k-common-pytorch.git
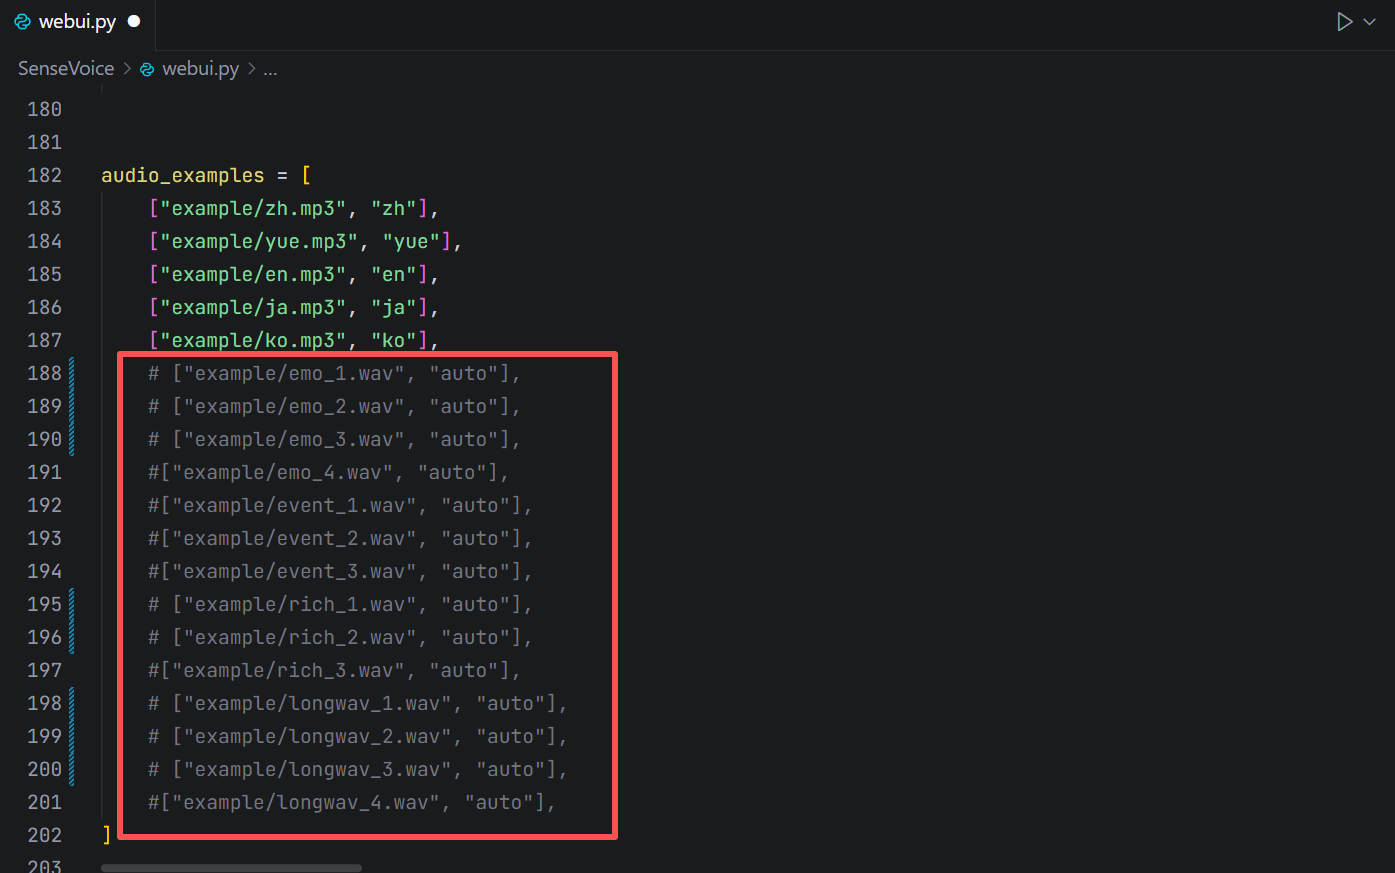
4. 在 SenseVoiceSmall 文件夹下找到 example文件夹(example中包含音频数据)
5. 将其复制到 SenseVoice 文件夹下
6. 在 SenseVoice 文件夹下找到 webui.py
7. 找到 audio_examples 并注释掉多余 examples
实例运行
1. 运行 webui.py (部分库可能会出现版本兼容问题,按照提示更新或者后退版本)
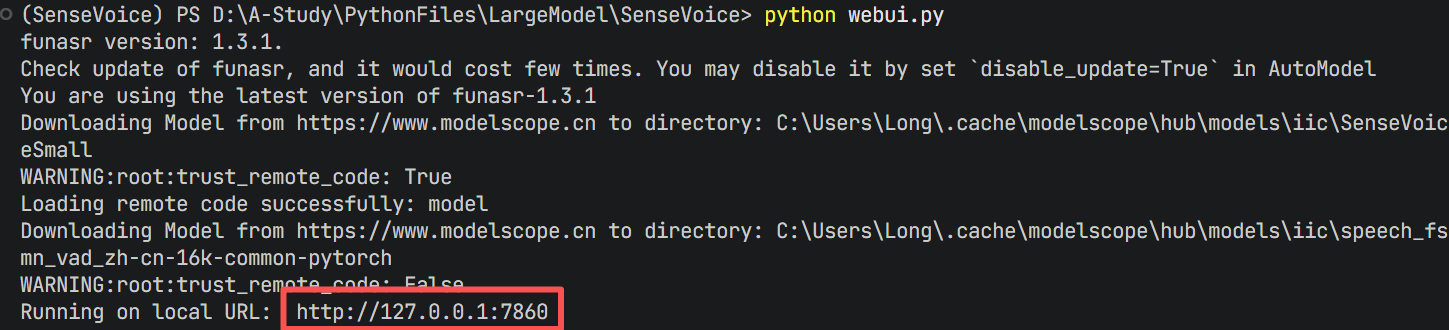
2. 出现URL链接就是运行成功了
3. 进入链接
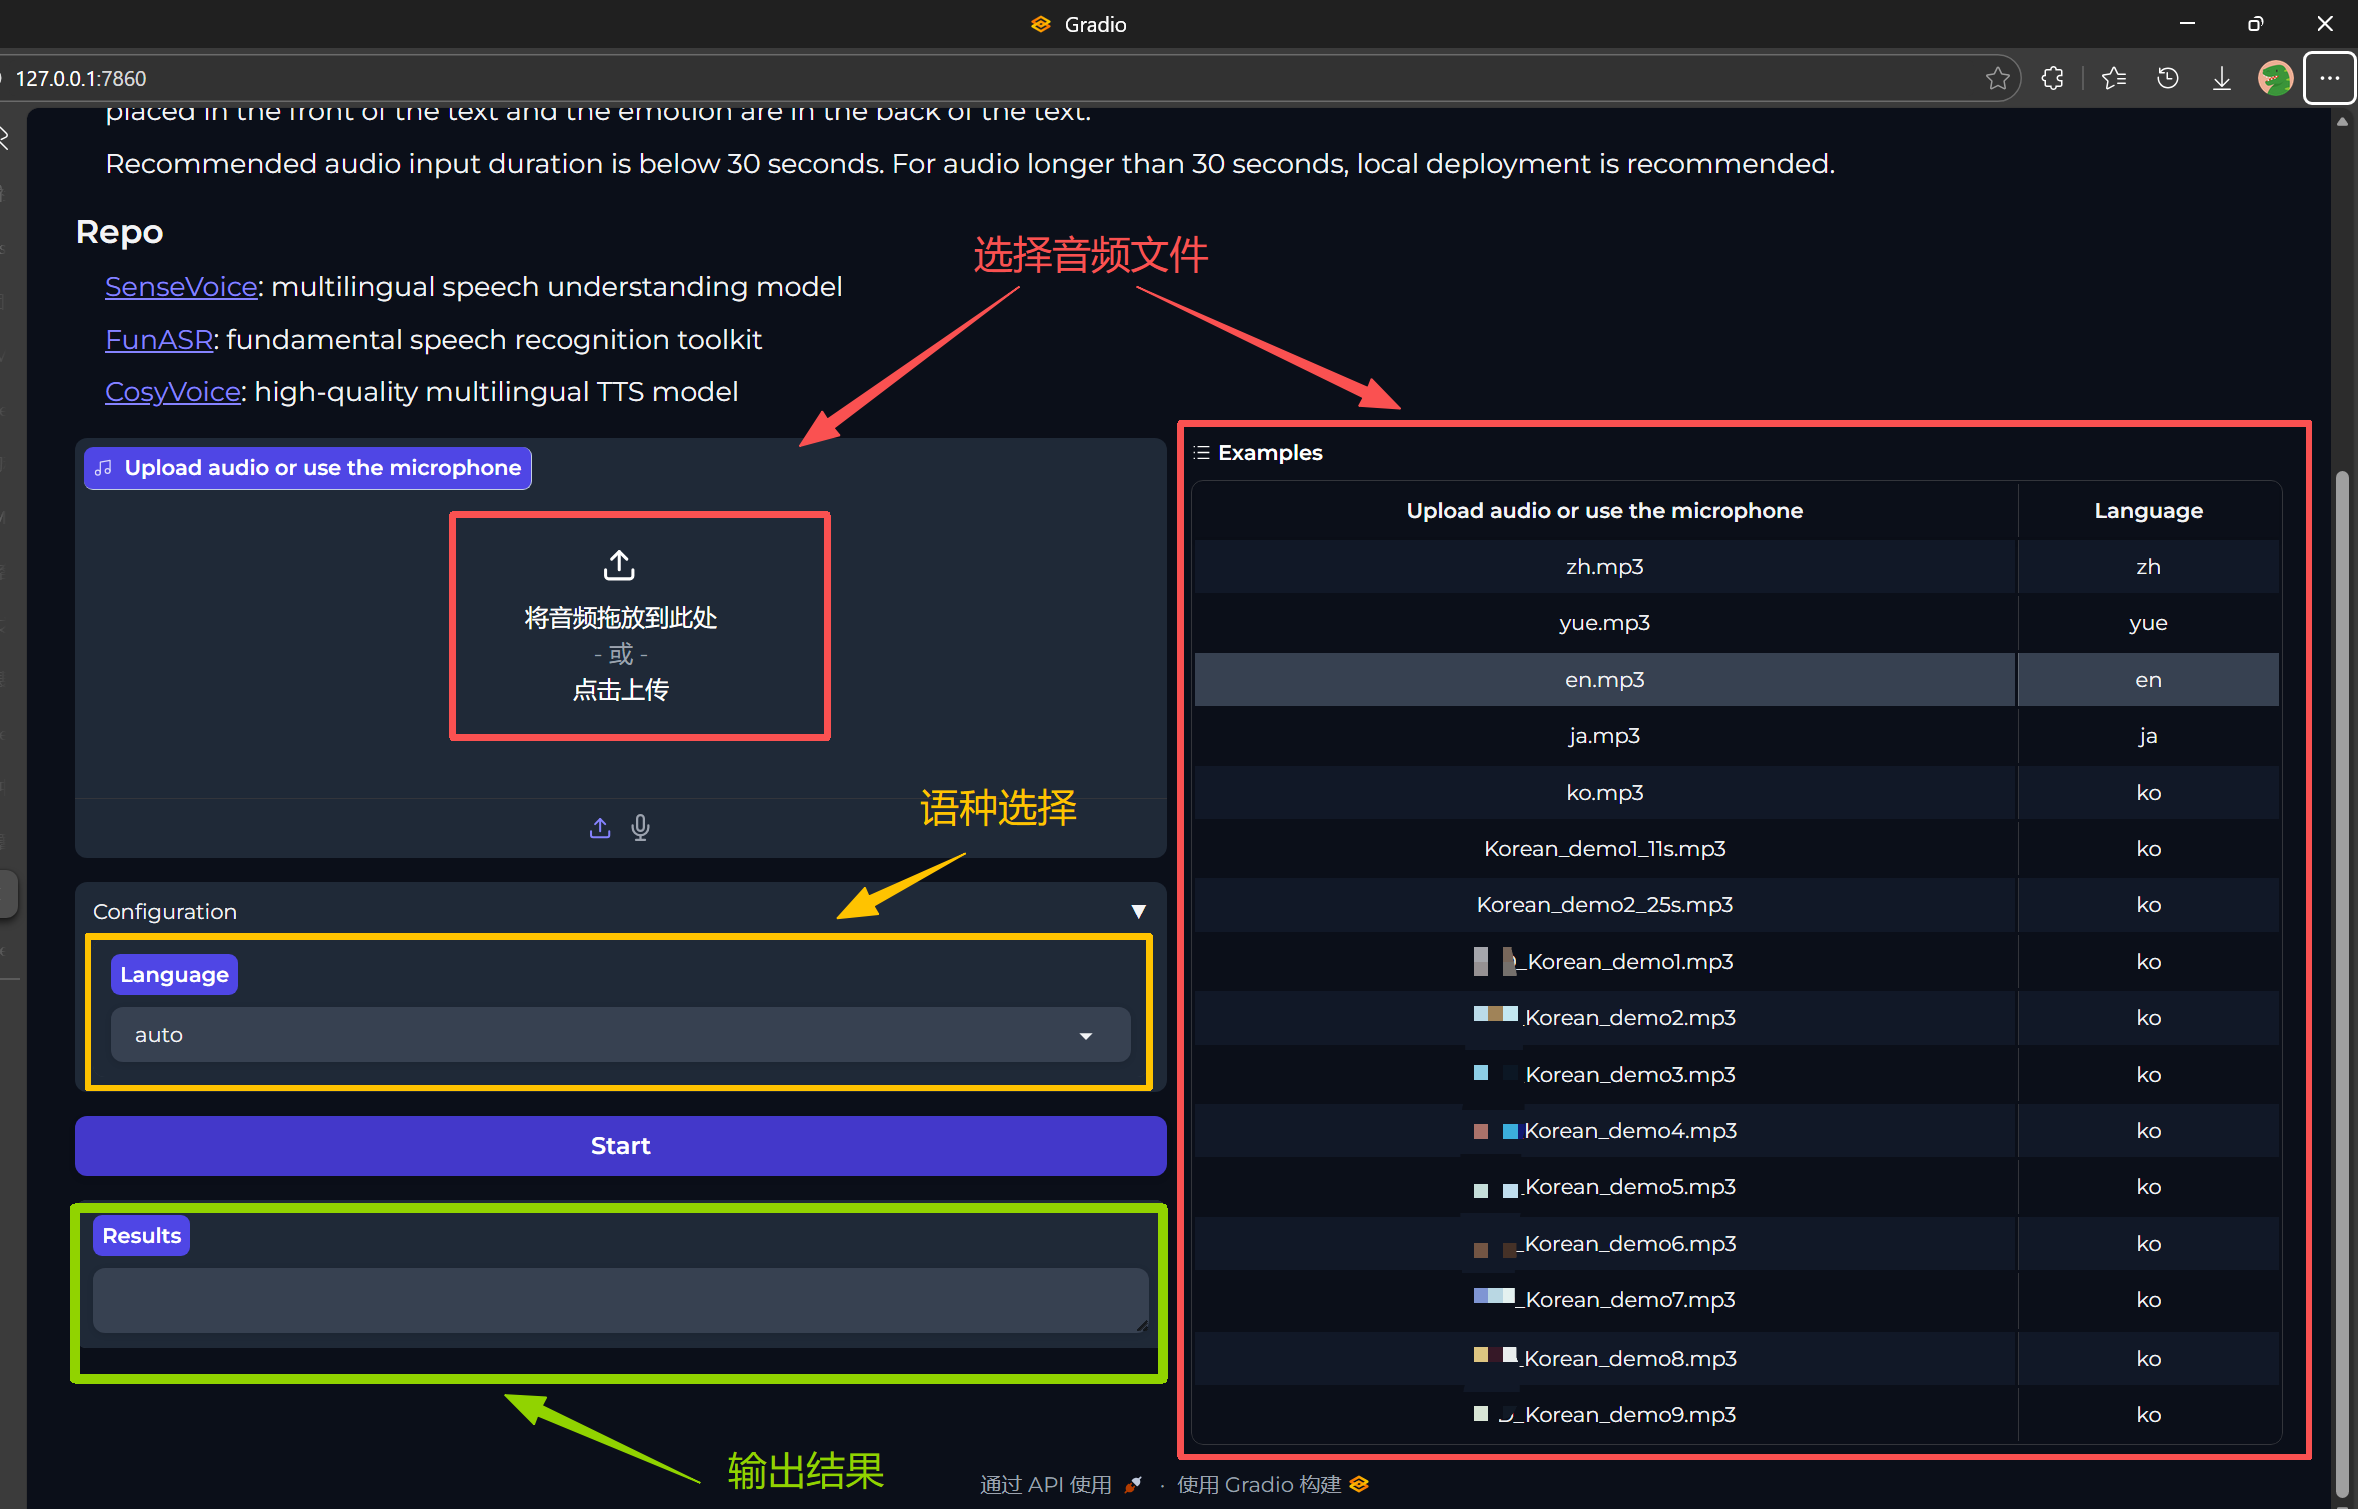
4. 运行结果
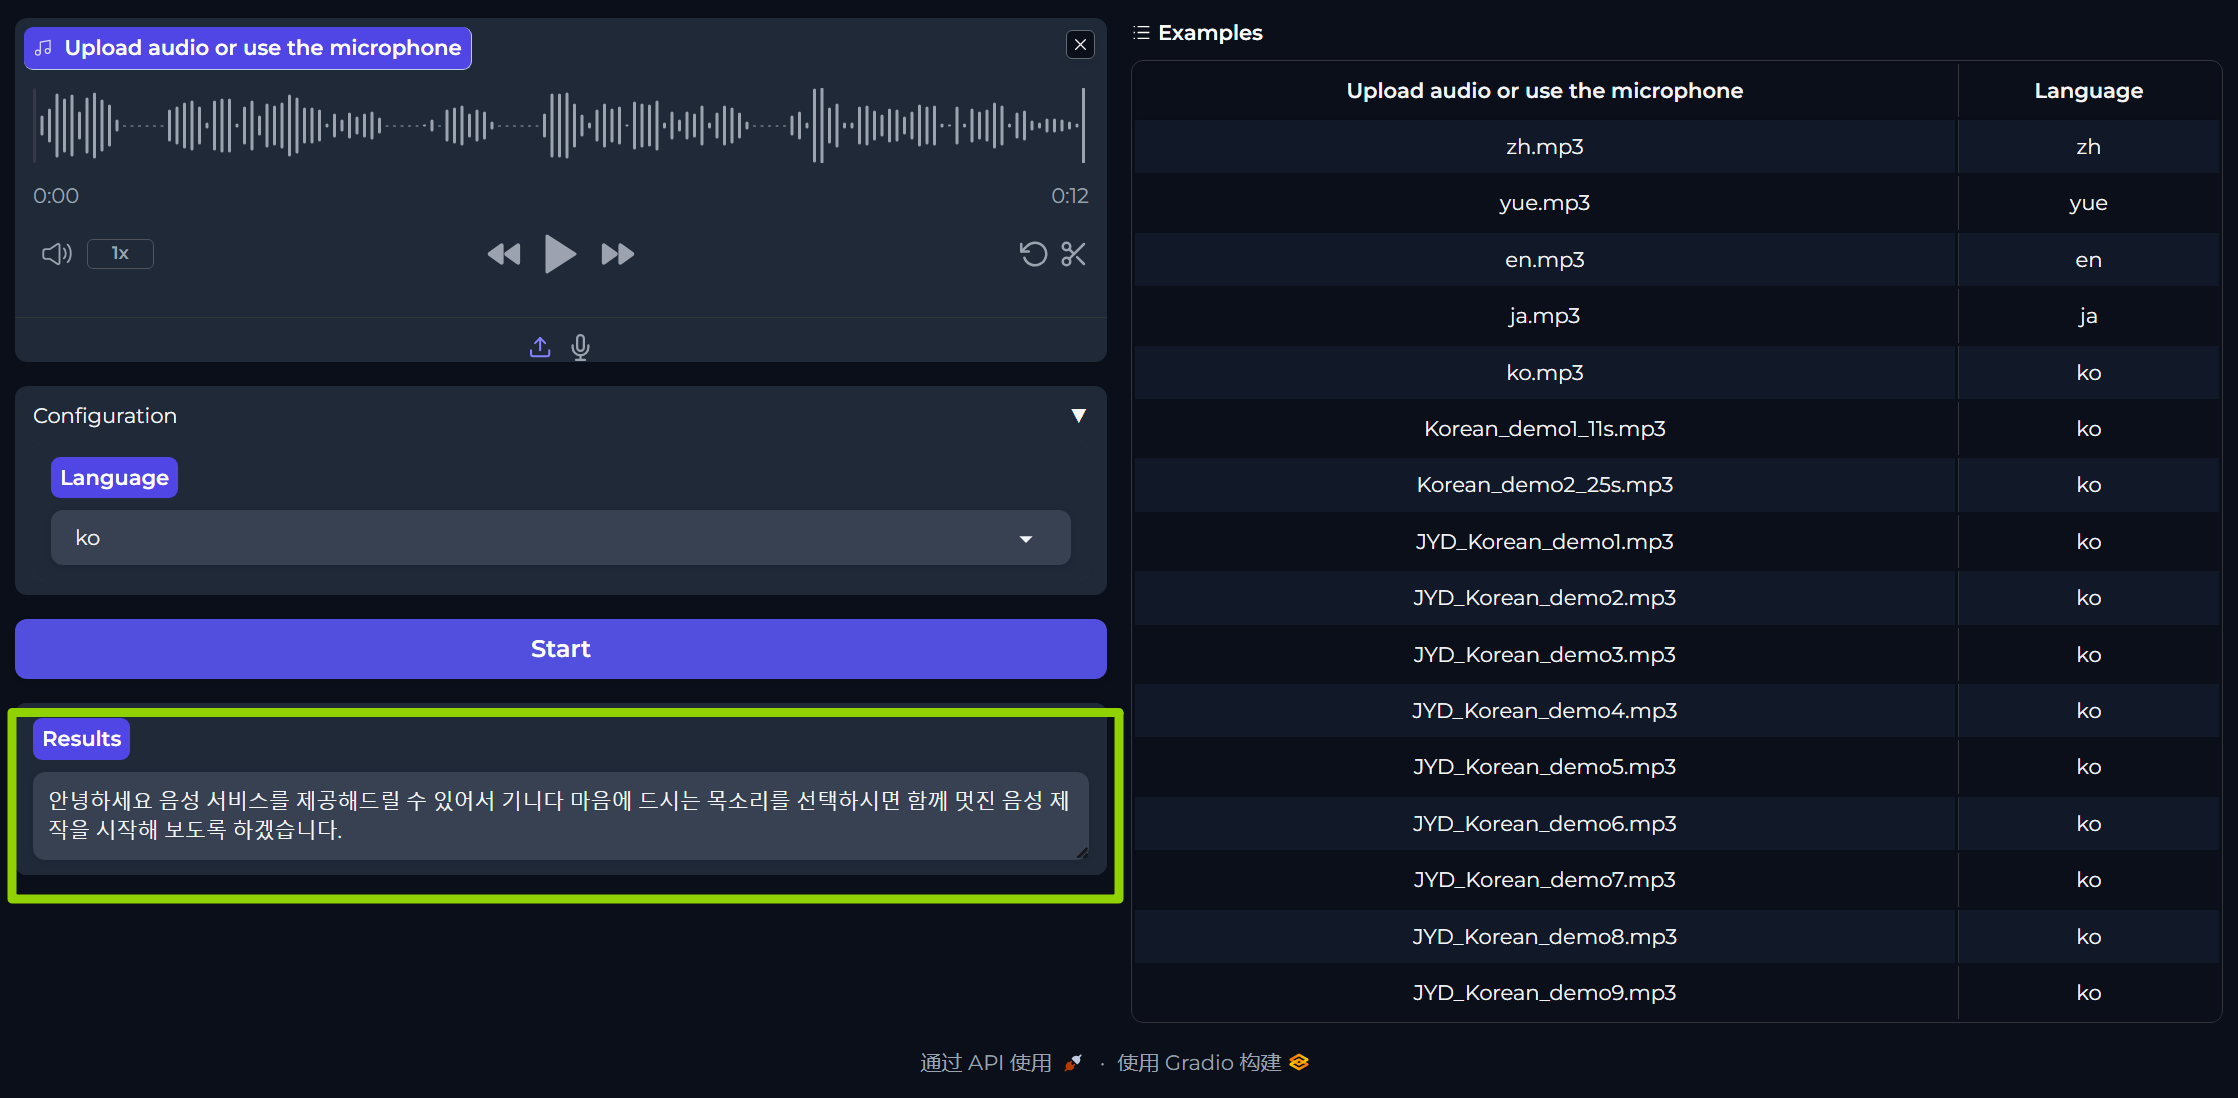
5. 同时终端同步输出结果


魔乐社区(Modelers.cn) 是一个中立、公益的人工智能社区,提供人工智能工具、模型、数据的托管、展示与应用协同服务,为人工智能开发及爱好者搭建开放的学习交流平台。社区通过理事会方式运作,由全产业链共同建设、共同运营、共同享有,推动国产AI生态繁荣发展。
更多推荐


 21
21 0
0- 0


 已为社区贡献1条内容

所有评论(0)