YOLO + MediaPipe在PiscCode 构建“NPC 化”的多脸感知系统
本文提出了一种实时人脸检测与状态分析系统,通过结合YOLO和MediaPipe实现多人脸检测与语义分析。系统采用分层架构:YOLO负责多人脸检测和追踪,MediaPipe处理单张人脸的关键点、表情和朝向信息,最后通过游戏化HUD界面直观展示NPC状态(包括置信度血条、头部朝向和表情)。创新性地解决了MediaPipe固定人脸数量的限制,通过ROI裁剪实现多人脸处理。系统支持稳定追踪(track_i
——从人脸检测到朝向、表情与 HUD 状态显示
关键词:YOLO、MediaPipe、FaceLandmarker、NPC HUD、人脸语义分析、实时视觉系统

一、背景:当“人脸检测”不再只是画框
在很多视觉项目中,人脸检测通常止步于三件事:
-
画一个框
-
标一个置信度
-
结束
但如果你做的是 互动系统 / 虚拟人 / 游戏化 UI / 实时感知,这远远不够。
你真正想要的是:
-
这个“人”在看哪里?
-
他有没有眨眼、张嘴?
-
多个人同时出现时,状态是否稳定?
-
能不能用 NPC HUD 的形式 展示这些信息?
这篇文章介绍一套 工程级方案,把“人脸检测”升级为:
多 NPC 的实时感知与状态展示系统
二、核心设计思想:职责拆分 + 语义叠加
整个系统遵循一个非常清晰的分层原则:
1️⃣ YOLO:负责“是谁 + 在哪”
-
多人脸检测
-
动态数量
-
自带 tracking(
track_id)
2️⃣ MediaPipe:负责“这个人在做什么”
-
精细 landmark(468 点)
-
表情(BlendShapes)
-
头部姿态(Transformation Matrix)
3️⃣ HUD 层:负责“如何让人看懂”
-
NPC 血条(置信度)
-
朝向状态
-
表情状态
-
游戏化 UI 风格
三、为什么必须是 YOLO + MediaPipe 组合?
MediaPipe 的硬限制
MediaPipe FaceLandmarker 有一个绕不开的问题:
人脸数量必须在初始化时固定(
num_faces)
这在多脸场景中非常致命。
正确解法不是“强行调参数”
而是 架构层面的职责分离:
-
YOLO 决定“有几张脸”
-
MediaPipe 永远只处理一张脸(ROI)
整帧 → YOLO 多脸检测 ↓ Face ROI × N ↓ MediaPipe(num_faces=1)
这样做的好处:
-
不浪费算力
-
不漏脸
-
不需要多实例 MediaPipe
-
工程稳定、可扩展
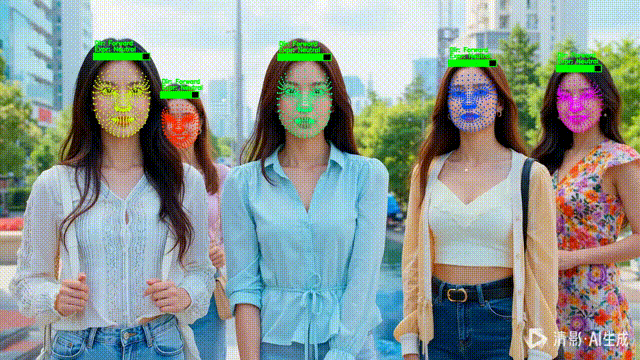
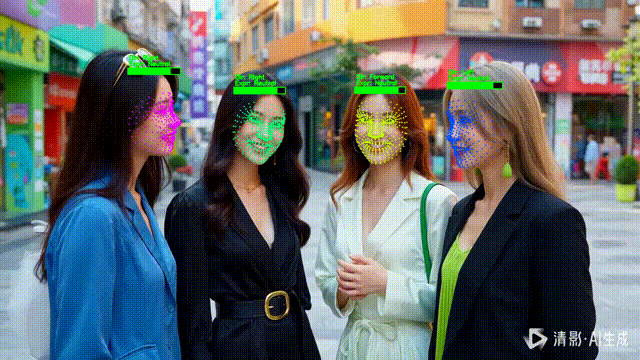
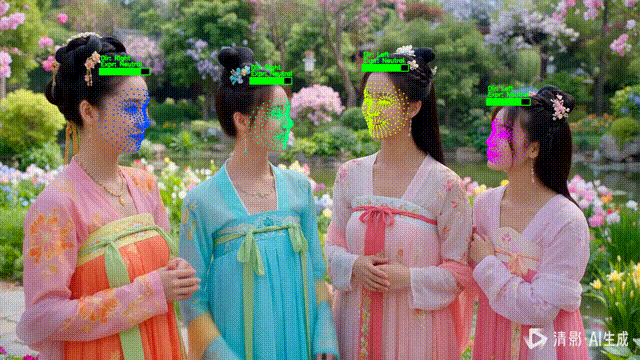
四、NPC 化 HUD:把检测结果变成“状态条”
1️⃣ 为什么用“血条”表示置信度?
置信度是一个 [0,1] 的连续值,天然适合映射成:
-
血量
-
能量条
-
状态强度
在 HUD 中,它比数字更直观。
HUD 设计规则
-
宽度 = 检测框宽度
-
高度固定(20px)
-
黑底 + 绿色填充
-
2px 边框
-
不画检测框(去工程感)
五、语义分析:让 NPC “活起来”
1️⃣ 头部朝向(Direction)
通过 MediaPipe 输出的 Facial Transformation Matrix:
yaw = mat[0][2] pitch = mat[1][2]简单阈值即可区分:
-
Left / Right
-
Up / Down
-
Forward
这已经足够用于:
-
注意力判断
-
互动触发
-
镜头引导
2️⃣ 表情状态(Expression)
使用 BlendShapes:
if blends.get("eyeBlinkLeft", 0) > 0.5: expression.append("Left Eye Closed")当前实现的状态包括:
-
左 / 右眼闭合
-
张嘴
-
Neutral(默认)
这是 “语义级信息”,不是几何数据。
六、稳定可读:track_id → 固定颜色
多人同时出现时,最怕的不是“检测不准”,而是人分不清。
解决方式很简单但非常关键:
同一个 track_id → 同一种满饱和度颜色
hue = int((track_id * 37) % 180)-
不随机
-
不闪烁
-
高区分度
-
跨帧一致
七、完整实现代码(工程级)
特点:
YOLO 多脸 + tracking
MediaPipe 单脸语义分析
NPC HUD 状态展示
原始画面不破坏
import cv2
import numpy as np
from ultralytics import YOLO

import mediapipe as mp
from mediapipe.tasks import python
from mediapipe.tasks.python import vision


class YOLOFaceNPCAnalyzer:
    """
    YOLO 多脸检测 + MediaPipe 语义分析(二合一)

    HUD:
    - NPC 血条(黑底 + 绿色填充 + 2px 边框)
    - 两行状态文字(朝向 / 表情)
    """

    def __init__(
        self,
        yolo_model_path="yolov11l-face.pt",
        mp_model_path="文件地址/face_landmarker.task",
        device="cuda"
    ):
        # ---------- YOLO ----------
        self.yolo = YOLO(yolo_model_path).to(device)
        self.device = device

        # ---------- MediaPipe ----------
        base_options = python.BaseOptions(model_asset_path=mp_model_path)
        options = vision.FaceLandmarkerOptions(
            base_options=base_options,
            output_face_blendshapes=True,
            output_facial_transformation_matrixes=True,
            num_faces=1
        )
        self.detector = vision.FaceLandmarker.create_from_options(options)

    # =====================================================
    # MediaPipe detect
    # =====================================================
    def _detect_face(self, face_bgr):
        mp_image = mp.Image(
            image_format=mp.ImageFormat.SRGB,
            data=cv2.cvtColor(face_bgr, cv2.COLOR_BGR2RGB)
        )
        return self.detector.detect(mp_image)

    # =====================================================
    # track_id → 满饱和度颜色
    # =====================================================
    def _color_by_track_id(self, track_id):
        hue = int((track_id * 37) % 180) if track_id is not None else 0
        hsv = np.uint8([[[hue, 255, 255]]])
        bgr = cv2.cvtColor(hsv, cv2.COLOR_HSV2BGR)[0][0]
        return int(bgr[0]), int(bgr[1]), int(bgr[2])

    # =====================================================
    # landmark 映射绘制(只画点)
    # =====================================================
    def _draw_landmarks(self, frame, face_landmarks, box, color):
        x1, y1, x2, y2 = box
        w, h = x2 - x1, y2 - y1

        for lm in face_landmarks:
            px = int(x1 + lm.x * w)
            py = int(y1 + lm.y * h)
            cv2.circle(frame, (px, py), 2, color, -1, cv2.LINE_AA)

    # =====================================================
    # 语义分析(朝向 + 表情)
    # =====================================================
    def _analyze_semantics(self, result):
        direction = "Forward"
        expression = []

        # ---------- 头部朝向 ----------
        if result.facial_transformation_matrixes:
            mat = result.facial_transformation_matrixes[0]
            yaw = mat[0][2]
            pitch = mat[1][2]

            if yaw > 0.15:
                direction = "Right"
            elif yaw < -0.15:
                direction = "Left"

            if pitch > 0.15:
                direction += " Down"
            elif pitch < -0.15:
                direction += " Up"

        # ---------- 表情 ----------
        if result.face_blendshapes:
            blends = {b.category_name: b.score for b in result.face_blendshapes[0]}

            if blends.get("eyeBlinkLeft", 0) > 0.5:
                expression.append("Left Eye Closed")
            if blends.get("eyeBlinkRight", 0) > 0.5:
                expression.append("Right Eye Closed")
            if blends.get("jawOpen", 0) > 0.4:
                expression.append("Mouth Open")

        expr_text = ", ".join(expression) if expression else "Neutral"
        return direction, expr_text

    # =====================================================
    # HUD(血条 + 边框 + 状态文本)
    # =====================================================
    def _draw_hud(self, frame, box, conf, direction, expression):
        x1, y1, x2, _ = box
        bar_h = 20
        border = 2

        bar_y2 = y1
        bar_y1 = max(0, y1 - bar_h)

        # ---------- 黑色背景 ----------
        cv2.rectangle(
            frame,
            (x1, bar_y1),
            (x2, bar_y2),
            (0, 0, 0),
            -1
        )

        # ---------- 绿色填充(血量) ----------
        inner_w = x2 - x1 - border * 2
        hp_w = int(inner_w * conf)

        cv2.rectangle(
            frame,
            (x1 + border, bar_y1 + border),
            (x1 + border + hp_w, bar_y2 - border),
            (0, 255, 0),
            -1
        )

        # ---------- 2px 边框 ----------
        cv2.rectangle(
            frame,
            (x1, bar_y1),
            (x2, bar_y2),
            (0, 255, 0),
            border
        )

        # ---------- 文本 ----------
        font = cv2.FONT_HERSHEY_SIMPLEX
        scale = 0.6
        thickness = 2

        cv2.putText(
            frame,
            f"Dir: {direction}",
            (x1 + 4, bar_y1 - 24),
            font,
            scale,
            (0, 255, 0),
            thickness,
            cv2.LINE_AA
        )

        cv2.putText(
            frame,
            f"Expr: {expression}",
            (x1 + 4, bar_y1 - 6),
            font,
            scale,
            (0, 255, 0),
            thickness,
            cv2.LINE_AA
        )

    # =====================================================
    # 对外入口(device 必须存在)
    # =====================================================
    def do(self, frame, device):
        if frame is None:
            return None

        output = frame.copy()
        h, w, _ = frame.shape

        results = self.yolo.track(
            frame,
            persist=True,
            verbose=False,
            device=device
        )[0]

        if results.boxes is None:
            return output

        boxes = results.boxes.xyxy.cpu().numpy()
        confs = results.boxes.conf.cpu().numpy()
        track_ids = (
            results.boxes.id.cpu().numpy()
            if results.boxes.id is not None
            else [None] * len(boxes)
        )

        for box, conf, track_id in zip(boxes, confs, track_ids):
            x1, y1, x2, y2 = map(int, box)
            x1, y1 = max(0, x1), max(0, y1)
            x2, y2 = min(w, x2), min(h, y2)

            face_crop = frame[y1:y2, x1:x2]
            if face_crop.size == 0:
                continue

            result = self._detect_face(face_crop)
            if not result.face_landmarks:
                continue

            color = self._color_by_track_id(track_id)

            self._draw_landmarks(
                output,
                result.face_landmarks[0],
                (x1, y1, x2, y2),
                color
            )

            direction, expression = self._analyze_semantics(result)

            self._draw_hud(
                output,
                (x1, y1, x2, y2),
                conf,
                direction,
                expression
            )

        return output
👉 实际项目中建议直接模块化复用此类结构
八、系统能力边界
✅ 已实现
-
多人脸稳定追踪
-
朝向判断
-
表情识别
-
NPC HUD 可视化
-
工程级稳定性
🔜 可自然扩展
-
表情权重条(情绪值)
-
注视目标判断
-
NPC 敌我阵营 UI
-
行为触发(看你 / 对你眨眼)
-
状态平滑(OneEuro / EMA)
九、总结
这套系统并不是“把几个库拼起来”,而是一个明确的感知架构:
-
YOLO = 世界感知
-
MediaPipe = 个体理解
-
HUD = 人类可读接口
当你开始用 NPC 的视角 看待“人脸检测”,
你做的就已经不是 CV Demo,而是交互系统。
对 PiscTrace or PiscCode感兴趣?更多精彩内容请移步官网看看~🔗 PiscTrace

魔乐社区(Modelers.cn) 是一个中立、公益的人工智能社区,提供人工智能工具、模型、数据的托管、展示与应用协同服务,为人工智能开发及爱好者搭建开放的学习交流平台。社区通过理事会方式运作,由全产业链共同建设、共同运营、共同享有,推动国产AI生态繁荣发展。
更多推荐


 15
15 0
0- 0


 已为社区贡献3条内容

所有评论(0)