Opencv-python项目:图像轮廓检测
·
原图:

结果图:
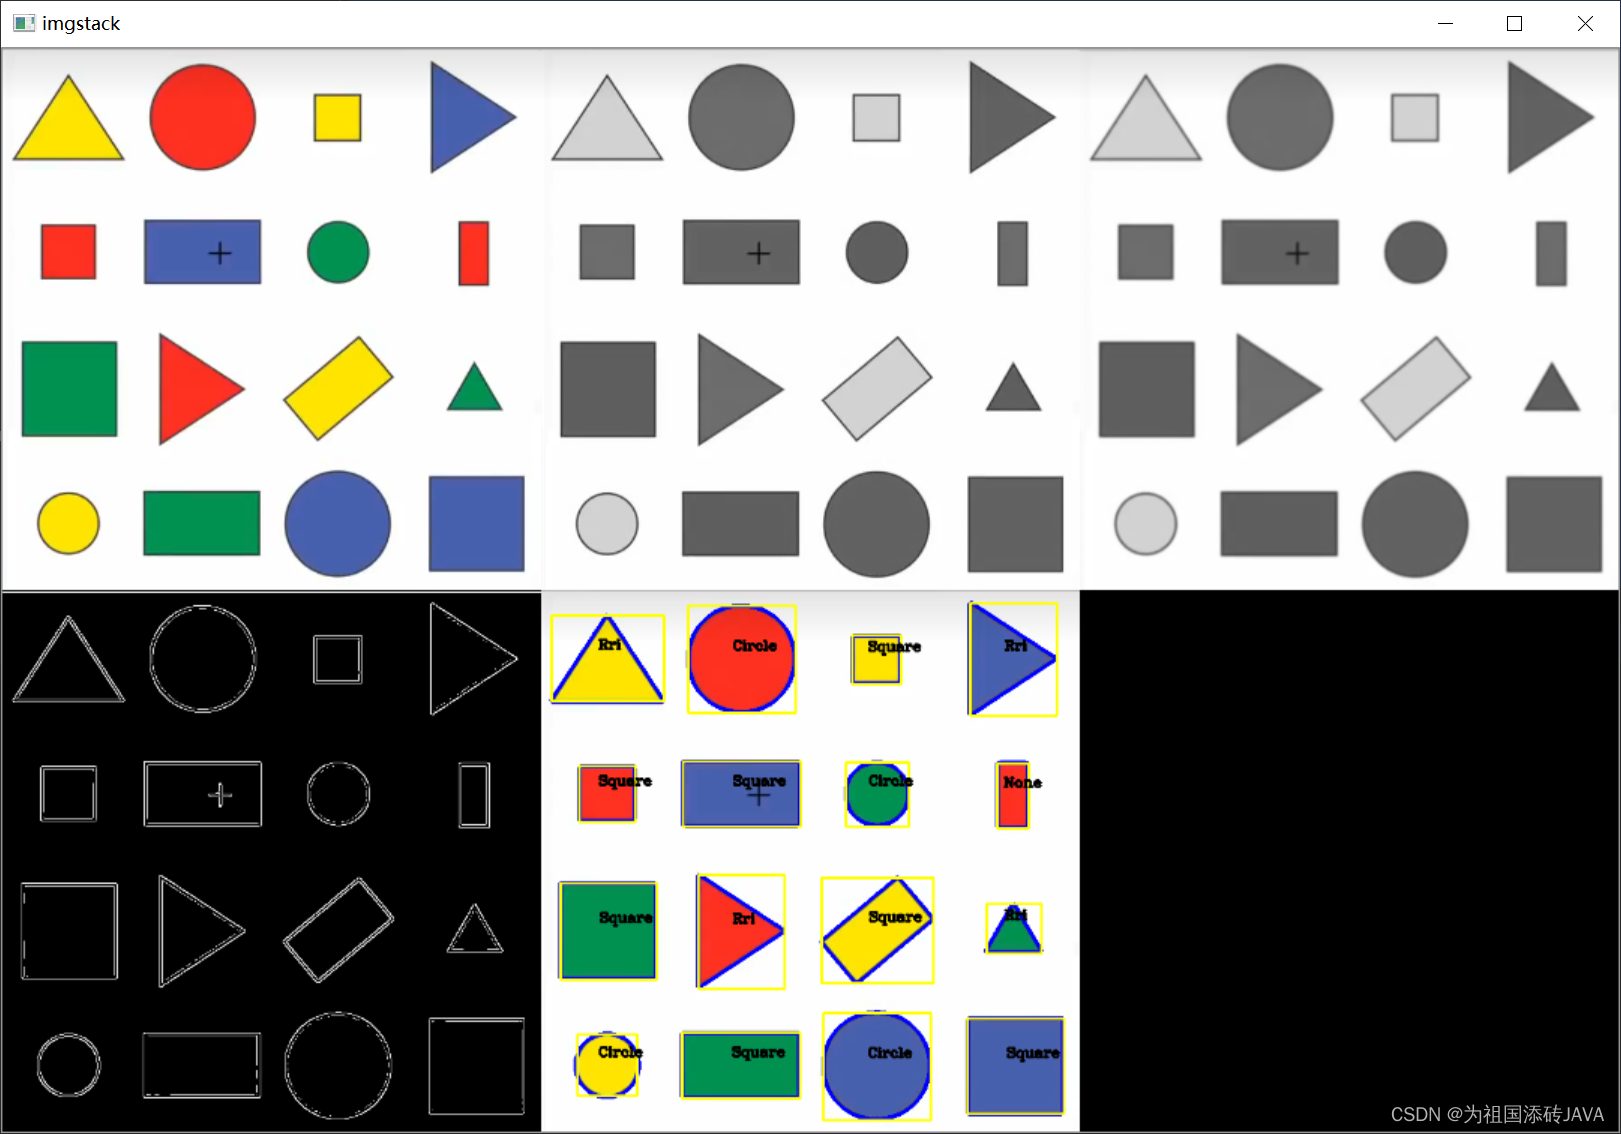
整体代码:
import cv2
import numpy as np


def stackImages(scale, imgArray):
    '''图像堆叠函数'''
    rows = len(imgArray)
    cols = len(imgArray[0])
    # & 输出一个 rows * cols 的矩阵(imgArray)
    print(rows, cols)
    # & 判断imgArray[0] 是不是一个list
    rowsAvailable = isinstance(imgArray[0], list)
    # & imgArray[][] 是什么意思呢?
    # & imgArray[0][0]就是指[0,0]的那个图片(我们把图片集分为二维矩阵,第一行、第一列的那个就是第一个图片)
    # & 而shape[1]就是width,shape[0]是height,shape[2]是
    width = imgArray[0][0].shape[1]
    height = imgArray[0][0].shape[0]

    # & 例如,我们可以展示一下是什么含义
    cv2.imshow("img", imgArray[0][1])

    if rowsAvailable:
        for x in range(0, rows):
            for y in range(0, cols):
                # & 判断图像与后面那个图像的形状是否一致,若一致则进行等比例放缩;否则,先resize为一致,后进行放缩
                if imgArray[x][y].shape[:2] == imgArray[0][0].shape[:2]:
                    imgArray[x][y] = cv2.resize(imgArray[x][y], (0, 0), None, scale, scale)
                else:
                    imgArray[x][y] = cv2.resize(imgArray[x][y], (imgArray[0][0].shape[1], imgArray[0][0].shape[0]),
                                                None, scale, scale)
                # & 如果是灰度图,则变成RGB图像(为了弄成一样的图像)
                if len(imgArray[x][y].shape) == 2: imgArray[x][y] = cv2.cvtColor(imgArray[x][y], cv2.COLOR_GRAY2BGR)
        # & 设置零矩阵
        imageBlank = np.zeros((height, width, 3), np.uint8)
        hor = [imageBlank] * rows
        hor_con = [imageBlank] * rows
        for x in range(0, rows):
            hor[x] = np.hstack(imgArray[x])
        ver = np.vstack(hor)
    # & 如果不是一组照片,则仅仅进行放缩 or 灰度转化为RGB
    else:
        for x in range(0, rows):
            if imgArray[x].shape[:2] == imgArray[0].shape[:2]:
                imgArray[x] = cv2.resize(imgArray[x], (0, 0), None, scale, scale)
            else:
                imgArray[x] = cv2.resize(imgArray[x], (imgArray[0].shape[1], imgArray[0].shape[0]), None, scale, scale)
            if len(imgArray[x].shape) == 2: imgArray[x] = cv2.cvtColor(imgArray[x], cv2.COLOR_GRAY2BGR)
        hor = np.hstack(imgArray)
        ver = hor
    return ver


def getContours(img):
    '''获取边界轮廓函数'''
    # mode=cv2.RETR_EXTERNAL 检测外部(outer detail)
    # method=cv2.CHAIN_APPROX_NONE (返回的相邻两个点的像素位置差不超过1)
    conters, hierarchy = cv2.findContours(image=img, mode=cv2.RETR_EXTERNAL, method=cv2.CHAIN_APPROX_NONE)
    # conters中的轮廓是list类型
    for cnt in conters:
        # cnt_image = cnt
        ares = cv2.contourArea(contour=cnt)
        # print('cnts_shape', cnt_image.shape)
        print('cnts', ares)
        if ares > 500:
            # 绘制边界
            cv2.drawContours(image=imgContour, contours=cnt, contourIdx=-1, color=(255, 0, 0), thickness=3)
            # 弧 True表示闭合
            peri = cv2.arcLength(cnt, True)
            print(peri)
            # 轮廓近似函数
            approx = cv2.approxPolyDP(cnt, 0.02 * peri, True)
            # print('approx', approx)
            print('approx_len:', len(approx))
            objCor = len(approx)
            # 用最小的矩形绘制边框
            # (中心点坐标x,y,宽度,高度)
            x, y, w, h = cv2.boundingRect(approx)
            # defind type
            if objCor == 3:
                '''三角形'''
                objectTypte = 'Rri'
            elif objCor == 4 and w // float(h) > 0.95 and w // float(h) < 1.05:
                '''通过数目和纵横比来确定是否为正方形'''
                objectTypte = 'Square'
            elif objCor > 4:
                objectTypte = 'Circle'
            else:
                objectTypte = 'None'
            cv2.rectangle(imgContour, (x, y), (x + w, y + h), (0, 255, 255), 2)
            cv2.putText(imgContour, objectTypte, (x + (w // 2) - 10, y + (h // 2) - 10), cv2.FONT_HERSHEY_COMPLEX,
                        0.5,
                        (0, 0, 0), 2)


path = 'Resource/image_shape.png'
# image
img = cv2.imread(path)
# copy image
imgContour = img.copy()

# gray image
img_gray = cv2.cvtColor(img, cv2.COLOR_BGR2GRAY)
# blur image
img_blur = cv2.GaussianBlur(img_gray, (7, 7), 1)
# Canny检测
img_canny = cv2.Canny(img_blur, 50, 50)
img_black = np.zeros_like(img)
# 轮廓
getContours(img_canny)
# stack image show
imgstack = stackImages(0.6, ([img, img_gray, img_blur],
                             [img_canny, imgContour, img_black]))
# image show
# cv2.imshow('image', img)
# cv2.imshow('img_gray', img_gray)
# cv2.imshow('img_blur', img_blur)
cv2.imshow('imgstack', imgstack)

cv2.waitKey(0)

魔乐社区(Modelers.cn) 是一个中立、公益的人工智能社区,提供人工智能工具、模型、数据的托管、展示与应用协同服务,为人工智能开发及爱好者搭建开放的学习交流平台。社区通过理事会方式运作,由全产业链共同建设、共同运营、共同享有,推动国产AI生态繁荣发展。
更多推荐


 0
0 0
0- 0


 已为社区贡献4条内容

所有评论(0)