

tf lite 模型量化
In Part 1 of this series, we learned how we can train a DeepLab-v3 model with pasal-voc dataset and export that model as frozen_inference_graph.pb file with an input size of 257x257. In this part, we will find out how we can convert this frozen graph into a TfLite model that can be used in an android app for image segmentation.
在 本系列的第1部分中 ,我们学习了如何使用pasal-voc数据集训练DeepLab-v3模型,并将该模型导出为输入大小为257x257的 frozen_inference_graph.pb文件。 在这一部分中,我们将找到如何将冻结的图转换为可在android应用中用于图像分割的TfLite模型的方法。
1.安装先决条件 (1. Install Prerequisites)
- TensorFlow v2.2.0 TensorFlow v2.2.0
- Numpy 脾气暴躁的
In a python 3.6.8 environment install them with pip
在python 3.6.8环境中使用pip安装它们
$ pip install tensorflow==2.2.0$ pip install numpyNow we will use the trained pb model from Part 1. Or you can also download the same model using this bash script. Download the script and run it in your project root.
现在,我们将使用第1部分中训练有素的铅模型。 或者,您也可以使用此bash脚本下载相同的模型。 下载脚本并在项目根目录中运行它。
$ bash download.shThis downloads the zip file containing the model and extracts it in the project root.
这将下载包含模型的zip文件,并将其提取到项目根目录中。
2.转换的负载模型 (2. Load Model for Conversion)
Now let’s create a python script named convert.py and import the packages required
现在让我们创建一个名为convert.py的python脚本,并导入所需的包
Then Specify the model path we downloaded on the last step.
然后指定我们在最后一步下载的模型路径。
MODEL_FILE = "frozen_inference_graph_257.pb"We will use the TensorFlow TFLite Converter to convert our graph Def frozen_inference_graph_257.pb TensorFlow model into model.tflite
我们将使用TensorFlow TFLite Converter将我们的图Def frozen_inference_graph_257.pb TensorFlow模型转换为model.tflite
Let’s load the TensorFlow model into the converter using the following function
让我们使用以下函数将TensorFlow模型加载到转换器中
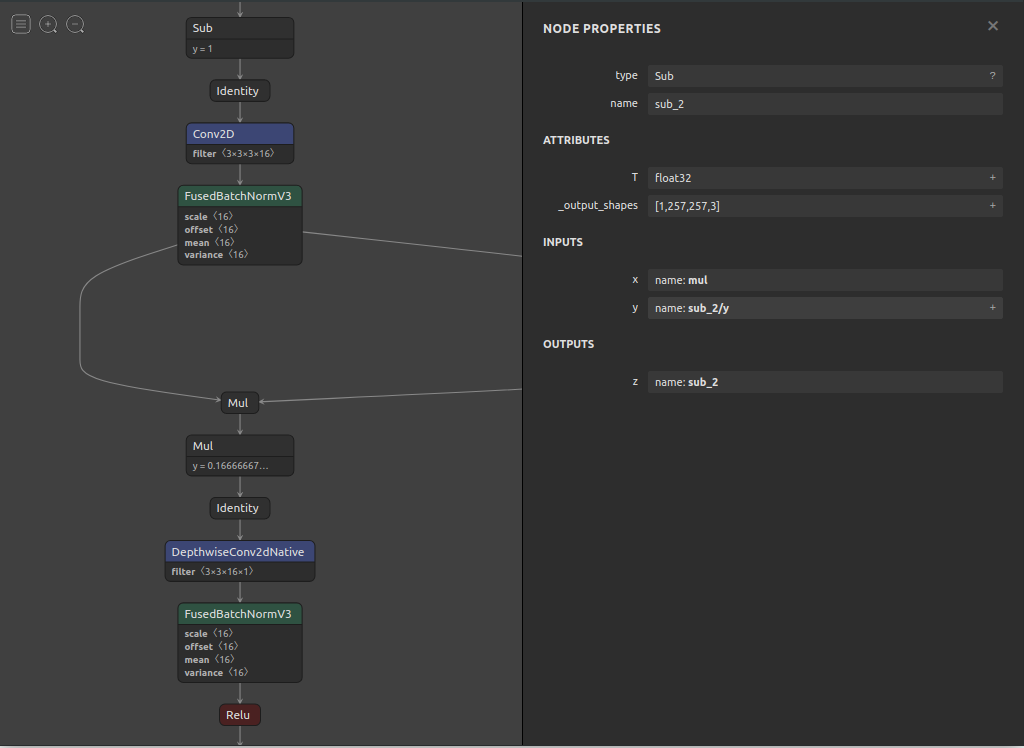
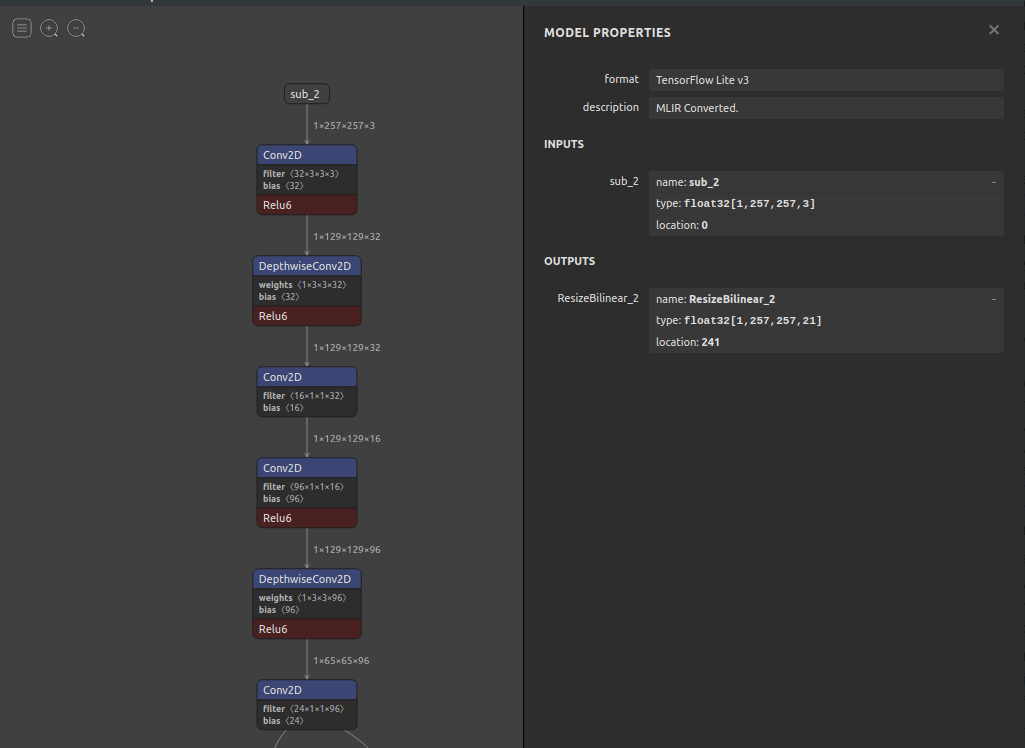
The input_arrays is set sub_2 as it is the input layer name of the model we trained. For the conversion to work properly, we have to specify the input layer name and also the output layer name, which is ResizeBilinear_2 for our model. We can also inspect our model’s input and output layer name using Netron Model Viewer. (If you want to know why we are specifying it, this issue on TensorFlow Repo discusses at length)
input_arrays被设置为sub_2因为它是我们训练的模型的输入层名称。 为了使转换正常工作,我们必须指定输入层名称和输出层名称,对于我们的模型,该名称为ResizeBilinear_2 。 我们还可以使用Netron Model Viewer检查模型的输入和输出层名称。 (如果您想知道为什么要指定它,请在TensorFlow Repo上详细讨论此问题 )
input_shapes of our model is set to [1,257,257,3] where 1 signifies the batch size of the input, 257 is the input image shape, 3 is the number of color channels in the input image. 257x257 input image size is chosen because the tflite android interpreter currently throws buffer overflow error if a larger image is given as input for inference.
我们模型的input_shapes设置为[1,257,257,3] ,其中1表示输入的批处理大小, 257表示输入图像的形状, 3表示输入图像中的颜色通道数。 选择257x257输入图片大小是因为,如果将较大的图片作为推断输入,则tflite android解释器当前会引发缓冲区溢出错误。
frozen_inference_graph_257.pb model input layer frozen_inference_graph_257.pb model input layer
3.转换并保存模型 (3. Convert and Save Model)
After the model is loaded, we can now convert the model and save it as deeplabv3_mnv2_custom_257.tflite
加载模型后,我们现在可以转换模型并将其另存为deeplabv3_mnv2_custom_257.tflite
While conversion, we have chosen the default parameter for the post-training optimization and quantization. If you want to learn more, please go through the following docs:
转换时,我们为训练后的优化和量化选择了默认参数。 如果您想了解更多信息,请阅读以下文档:
After the converted model is saved, use Netron to inspect if the input and output layer names and model input_shapes are correct.
保存转换后的模型后,使用Netron检查输入和输出层名称以及模型input_shapes是否正确。
Now our model is ready to be deployed as an android app for inference.[converted model link]
现在我们的模型已准备好被部署为用于推理的android应用。[ 转换模型链接 ]
The following Notebook contains the whole conversion code along with a python inference & visualization code for testing the model.
4.建立Android应用程式 (4. Build Android App)
To simply and easily deploy the model for inference, we are going to use an existing code base that the TensorFlow team has already provided in the following link:
为了简单,轻松地部署模型进行推理,我们将使用TensorFlow团队已在以下链接中提供的现有代码库:
步骤4.1克隆TensorFlow示例源代码 (Step 4.1 Clone the TensorFlow examples source code)
Clone the TensorFlow examples GitHub repository to your computer to get the demo application.
将TensorFlow示例GitHub存储库克隆到您的计算机以获取演示应用程序。
git clone https://github.com/tensorflow/examples步骤4.2将示例应用程序导入Android Studio (Step 4.2 Import the sample app to Android Studio)
Open the TensorFlow source code in Android Studio. To do this, open Android Studio and select Import Projects (Gradle, Eclipse ADT, etc.), setting the folder to examples/lite/examples/image_segmentation/android
在Android Studio中打开TensorFlow源代码。 为此,请打开Android Studio并选择Import Projects (Gradle, Eclipse ADT, etc.) ,然后将文件夹设置为examples/lite/examples/image_segmentation/android
步骤4.3运行Android应用 (Step 4.3 Run the Android app)
Connect the Android device to the computer and be sure to approve any ADB permission prompts that appear on your phone. Select Run -> Run app. Select the deployment target in the connected devices to the device on which the app will be installed. This will install the app on the device.
将Android设备连接到计算机,并确保批准手机上显示的所有ADB权限提示。 选择Run -> Run app. 在已连接该应用程序的设备的已连接设备中选择部署目标。 这会将应用程序安装在设备上。
To test the app, open the app called TFL Image Segmentation on your device. Re-installing the app may require you to uninstall the previous installations.
要测试该应用,请在您的设备上打开名为TFL Image Segmentation的应用。 重新安装该应用程序可能需要您卸载以前的安装。
As we can now verify that the app runs properly with the default model provided with the app, we will now add our custom trained and converted model in this app.
现在,我们可以使用应用程序随附的默认模型来验证该应用程序可以正常运行,因此,我们现在将在此应用程序中添加经过自定义训练和转换的模型。
5.将我们训练有素并转换后的模型部署到应用程序 (5. Deploy our Trained and converted Model to the app)
Put the converted deeplabv3_mnv2_custom_257.tflite model file into the following directory [app_root]/app/src/main/assets
将转换后的deeplabv3_mnv2_custom_257.tflite模型文件放入以下目录[app_root] / app / src / main / assets
The default model in the app is named as deeplabv3_mnv2_dm10_257.tflite, as our converted model has a different file name, it has to be changed to match the name in the app.
该应用程序中的默认模型名为deeplabv3_mnv2_dm10_257.tflite,因为我们转换后的模型具有不同的文件名,因此必须对其进行更改以匹配该应用程序中的名称。
If your model has different classes of trained objects, change Class label text and Number of class. Afterward, build the application and test run it.
如果您的模型具有不同类别的训练对象,请更改“ 类别标签”文本和“类别数” 。 之后,构建应用程序并测试运行它。
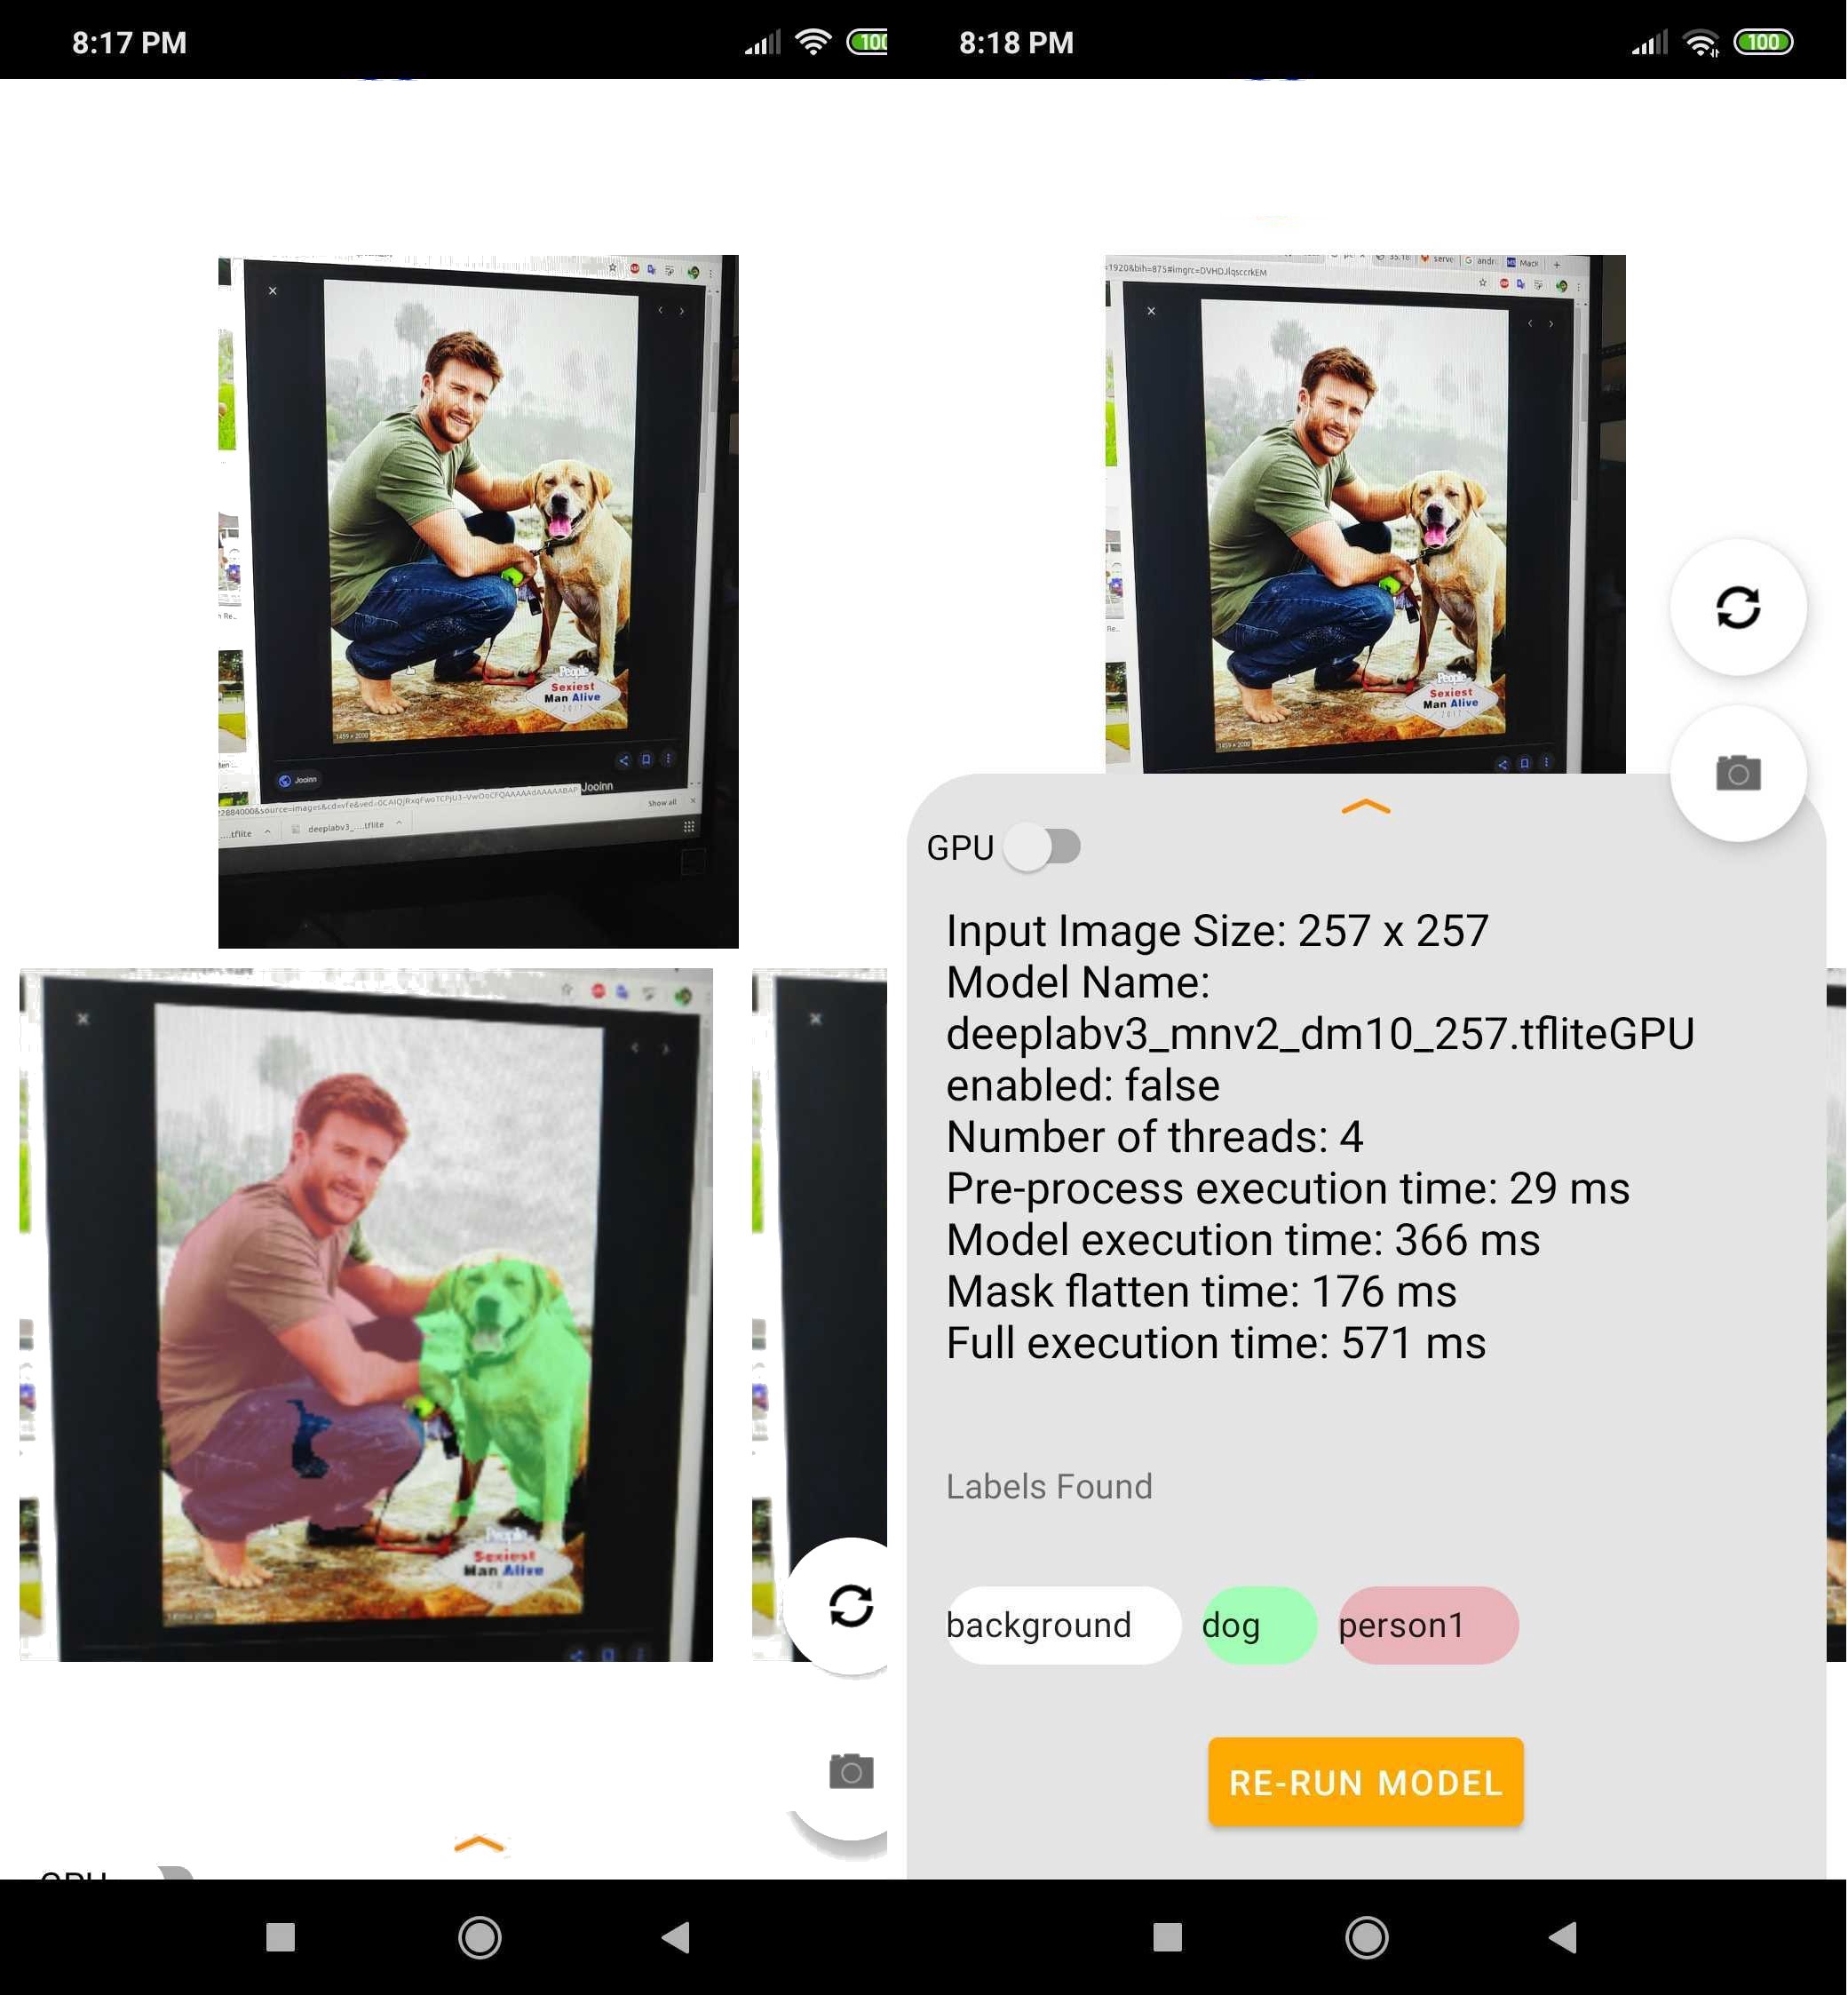
Our app can now capture images with the camera and show the inference result in the screen with class labels and their respective color-coded masked regions.
我们的应用程序现在可以使用相机捕获图像,并在屏幕上显示带有类标签及其各自颜色编码的蒙版区域的推理结果。
tf lite 模型量化


 已为社区贡献6条内容

所有评论(0)