大数据平台 ambari
·
(hadoop+hbase+hive+spark+doris+presto+kafka+kudu+storm+clickhouse+flink+kylin+flume+griffin集成)
ambari
ambari安装
Ambari-2.7.0.3安装向导
1.操作系统
Centos7 x86_64
2.安装包
ambari-2.7.3.0-centos7.tar.gz
http://public-repo-1.hortonworks.com/ambari/centos7/2.x/updates/2.7.3.0/ambari-2.7.3.0-centos7.tar.gz
http://public-repo-1.hortonworks.com/HDP/centos7/2.x/updates/2.7.3.0/HDP-3.1.0.1-centos7-rpm.tar.gz
http://public-repo-1.hortonworks.com/HDP-UTILS-1.1.0.22/repos/centos7/HDP-UTILS-1.1.0.22-centos7.tar.gz
3.Ambari安装准备工作(所有机器)
3.1配置主机名
配置主机名hostnamectl set-hostname master01
安装操作系统时已配置好主机名(注:最好在安装系统的时候配置主机名):
XX.XX.XX.81 hdp01
XX.XX.XX.82 master01
XX.XX.XX.83 hdp03
XX.XX.XX.84 master01
XX.XX.XX.87 master02
[root@hdp01 yum.repos.d]# vi /etc/hosts #添加下面配置(所有机器)
XX.XX.XX.81 hdp01
XX.XX.XX.82 hdp02
XX.XX.XX.83 hdp03
XX.XX.XX.84 master01
XX.XX.XX.87 master02
主机信息拷贝到其他机器节点
3.2关闭防火墙&&Selinux(所有机器)
[root@hdp01 bin]# systemctl stop firewalld.service
[root@hdp01 bin]# systemctl disable firewalld.service
禁用selinux:
[root@hdp03 yum.repos.d]# vi /etc/selinux/config
SELINUX=disabled
SELINUXTYPE=targeted
3.3配置主节点到所有节点的无密码登录(所有机器)
[root@master01 local]# mkdir ~/.ssh
[root@master01 .ssh]# chmod -R 700 ~/.ssh
[root@master01 .ssh]# ssh-keygen -t rsa
[root@master01 .ssh]# cat ~/.ssh/id_rsa.pub >> ~/.ssh/authorized_keys
在第一台机器(hdp01)把其它机器的authorized_keys文件内容追加到第一台机器上
[root@hdp01 .ssh]# ssh master01 cat ~/.ssh/authorized_keys >> ~/.ssh/authorized_keys
The authenticity of host 'master01 (172.192.10.master01)' can't be established.
ECDSA key fingerprint is f0:f1:7f:86:e5:2c:58:57:88:8a:1b:da:a3:23:78:4c.
Are you sure you want to continue connecting (yes/no)? yes
Warning: Permanently added 'master01,172.192.10.master01' (ECDSA) to the list of known hosts.
root@master01's password:
[root@hdp01 .ssh]# ssh hdp03 cat ~/.ssh/authorized_keys >> ~/.ssh/authorized_keys
The authenticity of host 'hdp03 (172.192.10.hdp03)' can't be established.
ECDSA key fingerprint is 21:15:ae:4d:ed:ef:bb:7c:9f:75:94:f3:92:78:6c:cc.
Are you sure you want to continue connecting (yes/no)? yes
Warning: Permanently added 'hdp03,172.192.10.hdp03' (ECDSA) to the list of known hosts.
root@hdp03's password:
最重要的是,不要忘记将我们刚刚在hdp01上生成的authorized_keys文件scp到其它机器
[root@hdp01 .ssh]# scp ~/.ssh/authorized_keys hdp02:~/.ssh/authorized_keys
[root@hdp01 .ssh]# scp ~/.ssh/authorized_keys hdp03:~/.ssh/authorized_keys
[root@hdp01 .ssh]# scp ~/.ssh/authorized_keys master01:~/.ssh/authorized_keys
[root@hdp01 .ssh]# scp ~/.ssh/authorized_keys master02:~/.ssh/authorized_keys
3.4配置yum源(需要联网所有机器)【可选择项】
更换yum 源:
[root@hdp01 yum.repos.d]# cd /etc/yum.repos.d/
[root@hdp01 yum.repos.d]# rm –f *
上传Centos-7.repo 到/etc/yum.repos.d/ 目录下 #我这里用的是阿里源
[root@master01 /]# yum clean all
3.5升级openssl及必要插件(所有机器)【centos6.5需要】
yum install openssl ruby* redhat-lsb* snappy*
3.6 JDK安装(所有机器)
上传安装包并解压配置环境变量:
[root@hdp01 local]# tar -zxvf jdk-8u11-linux-x64.tar.gz
[root@hdp01 local]# mv jdk1.8.0_11 jdk1.8
[root@hdp01 local]# vi /etc/profile
export JAVA_HOME=/usr/local/jdk1.8
export JAVA_BIN=$JAVA_HOME/bin
export JRE_HOME=$JAVA_HOME/jre
export PATH=$JAVA_HOME/bin:$PATH
export CLASSPATH=./:$JAVA_HOME/lib:$JAVA_HOME/jre/lib
[root@master01 local]# source /etc/profile #使环境变量生效
3.7启动ntpd服务,同步时间
选择局域网中的一台机器作为ntp服务器,以hdp01机器为例
[root@hdp01 local]#
[root@hdp01 local]# systemctl enable ntpd.service
[root@hdp01 local]# ntpstat
其他机器必须关闭ntpd,并安装ntpdate
CentOS7上ntpd,ntpdate这两个软件都是自带的,只需根据需要打开或关闭
修改hdp01机器上的ntp服务器文件
[root@hdp01 local]# vim /etc/ntp.conf
server 127.127.1.0
fudge 127.127.1.0 stratum 8
配置局域网内的其他机器:
[root@master01 ~]# vim /etc/ntp.conf
server 172.192.10.hdp01
[root@hdp03 ~]# vim /etc/ntp.conf
server 172.192.10.hdp01
hdp01机器上重启ntpd服务
[root@hdp01 local]# systemctl restart ntpd.service
等几分钟,让ntpd完成自身的时间同步
可通过以下命令查看状态
[root@hdp01 local]# watch ntpq –p
注意:第6列reach达到17时就可以了,等待的时间是第5列poll的秒数乘以5
其他机器上手动执行:
[root@master01 ~]# ntpdate 172.192.10.hdp01
[root@hdp03 .ssh]# ntpdate 172.192.10.hdp01
3.8最大打开文件数检查(所有机器)
在每台机器上使用如下命令检查:
ulimit -Sn
ulimit -Hn
如果这两个命令都小于10000,则使用如下命令来设置:
ulimit -n 10000
3.9 重启机器使某些配置生效(所有机器)
init 6
4.安装mysql (这里选择master01 机器安装mysql)
上传安装包mysql-5.7.10-linux-glibc2.5-x86_64.tar.gz
4.1解压缩包
[root@master01 local]# tar -zxvf mysql-5.7.10-linux-glibc2.5-x86_64.tar.gz
[root@master01 local]# mv mysql-5.7.10-linux-glibc2.5-x86_64 mysql
4.2创建mysql的用户组和用户,并对mysql目录设置用户组和用户
[root@master01 local]# groupadd mysql
[root@master01 local]# useradd mysql -g mysql
[root@master01 local]# cd /usr/local/mysql/
[root@master01 mysql]# chown -R mysql .
[root@master01 mysql]# chgrp -R mysql .
4.3初始化mysql并启动mysql服务
[root@master01 bin]# cd /usr/local/mysql/bin/
[root@master01 bin]# ./mysqld --initialize --user=mysql --basedir=/usr/local/mysql/ --datadir=/mydata/data
2017-07-18T02:22:23.125512Z 0 [Warning] TIMESTAMP with implicit DEFAULT value is deprecated. Please use --explicit_defaults_for_timestamp server option (see documentation for more details).
2017-07-18T02:22:23.331794Z 0 [Warning] InnoDB: New log files created, LSN=45790
2017-07-18T02:22:23.374498Z 0 [Warning] InnoDB: Creating foreign key constraint system tables.
2017-07-18T02:22:23.431840Z 0 [Warning] No existing UUID has been found, so we assume that this is the first time that this server has been started. Generating a new UUID: ef063d50-6b5f-11e7-9a67-801844e33fe4.
2017-07-18T02:22:23.433258Z 0 [Warning] Gtid table is not ready to be used. Table 'mysql.gtid_executed' cannot be opened.
2017-07-18T02:22:23.434896Z 1 [Note] A temporary password is generated for root@localhost: *E!SuEJ63tfU #这里有root账户的初始密码
4.4将mysql/support-files下的my-default.cnf改名为my.cnf,拷到/etc下
[root@master01 mysql]# cd /usr/local/mysql/support-files/
[root@master01 support-files]# cp mysql.server /etc/init.d/mysql
[root@master01 support-files]# cp my-default.cnf /etc/my.cnf
[root@master01 support-files]# vi /etc/my.cnf
basedir =/usr/local/mysql
datadir =/mydata/data
port = 3306
server_id=121
socket=/tmp/mysql.sock
4.5配置环境变量
[root@master01 support-files]# vim /etc/profile
export MYSQL_HOME="/usr/local/mysql"
export PATH="$PATH:$MYSQL_HOME/bin"
[root@master01 etc]# source /etc/profile
4.6启动mysql服务
[root@master01 support-files]# /etc/init.d/mysql start
Starting MySQL. SUCCESS!
4.7修改初始密码
[root@master01 etc]# mysql -uroot -p
Enter password: #这里输入上面的初始密码
Welcome to the MySQL monitor. Commands end with ; or \g.
Your MySQL connection id is 2
Server version: 5.7.10
Copyright (c) 2000, 2015, Oracle and/or its affiliates. All rights reserved.
Oracle is a registered trademark of Oracle Corporation and/or its
affiliates. Other names may be trademarks of their respective
owners.
Type 'help;' or '\h' for help. Type '\c' to clear the current input statement.
mysql> set password='123456';
Query OK, 0 rows affected (0.00 sec)
mysql> quit;
Bye
[root@master01 etc]# mysql -uroot –p123456 #密码是否修改成功
4.8开启远程连接
[root@master01 etc]# mysql -uroot -p123456
mysql: [Warning] Using a password on the command line interface can be insecure.
Welcome to the MySQL monitor. Commands end with ; or \g.
Your MySQL connection id is 4
Server version: 5.7.10 MySQL Community Server (GPL)
Copyright (c) 2000, 2015, Oracle and/or its affiliates. All rights reserved.
Oracle is a registered trademark of Oracle Corporation and/or its
affiliates. Other names may be trademarks of their respective
owners.
Type 'help;' or '\h' for help. Type '\c' to clear the current input statement.
mysql> use mysql;
Reading table information for completion of table and column names
You can turn off this feature to get a quicker startup with -A
Database changed
mysql> select host,user from user;
+-----------+-----------+
| host | user |
+-----------+-----------+
| localhost | mysql.sys |
| localhost | root |
+-----------+-----------+
2 rows in set (0.00 sec)
mysql> grant all privileges on *.* to 'root'@'%'identified by '123456';
mysql> FLUSH PRIVILEGES;
mysql> quit;
4.9添加自启动服务
[root@master01 etc]chkconfig --add mysql
[root@master01 etc]chkconfig mysql on
4.10创建用户和数据库:
create database ambari default charset utf8 collate utf8_general_ci;
CREATE USER 'ambari'@'%' IDENTIFIED BY '123456';
GRANT ALL PRIVILEGES ON *.* TO 'ambari'@'%';
CREATE USER 'ambari'@'localhost' IDENTIFIED BY '123456';
GRANT ALL PRIVILEGES ON *.* TO 'ambari'@'localhost';
CREATE USER 'ambari'@'master01' IDENTIFIED BY '123456';
GRANT ALL PRIVILEGES ON *.* TO 'ambari'@'master01';
FLUSH PRIVILEGES;
create database hive default charset utf8 collate utf8_general_ci;
CREATE USER 'hive'@'%' IDENTIFIED BY '123456';
GRANT ALL PRIVILEGES ON *.* TO 'hive'@'%';
CREATE USER 'hive'@'master01' IDENTIFIED BY '123456';
GRANT ALL PRIVILEGES ON *.* TO 'hive'@'master01';
FLUSH PRIVILEGES;
create database oozie;
CREATE USER 'oozie'@'%' IDENTIFIED BY '123456';
GRANT ALL PRIVILEGES ON *.* TO 'oozie'@'%';
FLUSH PRIVILEGES;
Create database ranger;
CREATE USER 'ranger'@'%' IDENTIFIED BY '123456';
CREATE USER 'rangeradmin'@'%' IDENTIFIED BY '123456';
GRANT ALL PRIVILEGES ON *.* TO 'rangeradmin'@'%';
FLUSH PRIVILEGES;
Create database rangerkms;
CREATE USER 'rangerkms'@'%' IDENTIFIED BY '123456';
GRANT ALL PRIVILEGES ON *.* TO 'rangerkms'@'%';
FLUSH PRIVILEGES;
5. 制作ambari和hadoop本地源
5.1创建本地源目录
选取一台服务器master01,安装http服务(系统安装过了),安装完后会自动创建 /var/www/html 目录
[root@master01 yum.repos.d]# systemctl start httpd.service
[root@master01 yum.repos.d]# systemctl enable httpd.service
创建两个目录:
[root@master01 html]# mkdir /var/www/html/ambari
[root@master01 html]# mkdir /var/www/html/hdp
解压HDP-UTILS-1.1.0.21-centos7.tar.gz到目录 /var/www/html/ambari
[root@master01 home]# tar -zxvf HDP-UTILS-1.1.0.21-centos7.tar.gz -C /var/www/html/ambari/
[root@master01 ambari]# tar -zxvf ambari-2.5.0.3-centos7.tar.gz
进入/var/www/html/ambari 目录,执行命令:createrepo ./
[root@master01 ambari]# createrepo ./
[root@master01 hdp]# tar -zxvf HDP-2.6.0.3-centos7a-rpm.tar.gz
进入/var/www/html/hdp 目录,执行命令:createrepo ./
[root@master01 hdp]# createrepo ./
重启httpd 服务
[root@master01 hdp]# systemctl restart httpd.service
hadoop本地源制作完成
5.2安装与配置ambari服务
hdp01 机器上配置:
[root@hdp01 yum.repos.d]# vim /etc/yum.repos.d/ambari.repo
[ambari-2.7.3.0]
name=Ambari 2.7.3.0
baseurl=http://XX.XX.XX.81/ambari/
gpgcheck=0
enabled=1
[HDP-UTILS-1.1.0.22]
name=Hortonworks Data Platform Utils Version - HDP-UTILS-1.1.0.22
baseurl=http://XX.XX.XX.81/HDP-UTILS-1.1.0.22/
gpgcheck=0
enabled=1
执行安装ambari 命令:yum -y install ambari-serv[root@hdp01 yum.repos.d]# yum -y install ambari-server
[root@hdp01 java]# yum install mysql-connector-java
[root@hdp01java]#
ambari-server setup --jdbc-db=mysql --jdbc-driver=/usr/share/java/mysql-connector-java.jar
开始配置ambari 服务:ambari-server setup
[root@master01 java]# ambari-server setup
Using python /usr/bin/python
Setup ambari-server
Checking SELinux...
SELinux status is 'disabled'
Customize user account for ambari-server daemon [y/n] (n)? y
Enter user account for ambari-server daemon (root):
Adjusting ambari-server permissions and ownership...
Checking firewall status...
Checking JDK...
Do you want to change Oracle JDK [y/n] (n)? y
[1] Oracle JDK 1.8 + Java Cryptography Extension (JCE) Policy Files 8
[2] Oracle JDK 1.7 + Java Cryptography Extension (JCE) Policy Files 7
[3] Custom JDK
==============================================================================
Enter choice (1): 3
WARNING: JDK must be installed on all hosts and JAVA_HOME must be valid on all hosts.
WARNING: JCE Policy files are required for configuring Kerberos security. If you plan to use Kerberos,please make sure JCE Unlimited Strength Jurisdiction Policy Files are valid on all hosts.
Path to JAVA_HOME: /usr/local/jdk1.8
Validating JDK on Ambari Server...done.
Completing setup...
Configuring database...
Enter advanced database configuration [y/n] (n)? y
Configuring database...
==============================================================================
Choose one of the following options:
[1] - PostgreSQL (Embedded)
[2] - Oracle
[3] - MySQL / MariaDB
[4] - PostgreSQL
[5] - Microsoft SQL Server (Tech Preview)
[6] - SQL Anywhere
[7] - BDB
==============================================================================
Enter choice (3): 3
Hostname (172.192.10.master01):
Port (3060):
Database name (ambari):
Username (ambari):
Enter Database Password (123456):
Configuring ambari database...
Copying JDBC drivers to server resources...
Configuring remote database connection properties...
WARNING: Before starting Ambari Server, you must run the following DDL against the database to create the schema: /var/lib/ambari-server/resources/Ambari-DDL-MySQL-CREATE.sql
Proceed with configuring remote database connection properties [y/n] (y)? y
Extracting system views...
ambari-admin-2.5.0.3.7.jar
...........
Adjusting ambari-server permissions and ownership...
Ambari Server 'setup' completed successfully.
[root@master01 java]#
[root@master01 web]# ambari-server start
Using python /usr/bin/python
Starting ambari-server
Ambari Server running with administrator privileges.
Organizing resource files at /var/lib/ambari-server/resources...
Ambari database consistency check started...
Server PID at: /var/run/ambari-server/ambari-server.pid
Server out at: /var/log/ambari-server/ambari-server.out
Server log at: /var/log/ambari-server/ambari-server.log
Waiting for server start...................
Server started listening on 8080
DB configs consistency check: no errors and warnings were found.
Ambari Server 'start' completed successfully.
浏览器打开:http://XX.XX.XX.84:8080 用户admin 密码admin
主页面
创建集群:
集群名称:
一步一步跟着写
安装
ambari报错
Ambari某台主机失去心跳,重启ambar-server和ambari-agent都不生效

 "IOError: Request to https://localhost:8441/agent/v1/register/namenode.exterrocloud.info failed due to EOF occurred in violation of protocol (_ssl.c:661)" when starting an Ambari agent

查看/var/log/ambari-agent/ambari-agent.log日志打印:

File "/usr/lib/python2.6/site-packages/ambari_agent/Controller.py", line 545, in sendRequest
raise IOError('Request to {0} failed due to {1}'.format(url, str(exception)))
IOError: Request to https://localhost:8441/agent/v1/register/namenode.exterrocloud.info
failed due to EOF occurred in violation of protocol (_ssl.c:661)
ERROR 2018-04-09 07:09:38,185 Controller.py:227 -
Error:Request to https://localhost:8441/agent/v1/register/namenode.exterrocloud.info
failed due to EOF occurred in violation of protocol (_ssl.c:661)
WARNING 2018-04-09 07:09:38,185 Controller.py:228 - Sleeping for 27 seconds and
then trying again

原因:可能是python升级或安装了某些模块导致

解决办法:vim /etc/ambari-agent/conf/ambari-agent.ini

在[security] 新增如下一行

[security]
force_https_protocol=PROTOCOL_TLSv1_2

重启ambari-agent,# ambari-agent restart


Centos 7安装 ambari-agent报错NetUtil.py-[SSL: CERTIFICATE_VERIFY_FAILED]

Centos 7安装 ambari通过Ambari部署系统时,ambari-agent注册失败,在/var/log/ambari-agent的log中可以看到日志显示:

ERROR 2018-03-08 15:02:25,223 NetUtil.py:88 - [SSL: CERTIFICATE_VERIFY_FAILED] certificate verify failed (_ssl.c:579)
ERROR 2018-03-08 15:02:25,223 NetUtil.py:89 - SSLError: Failed to connect. Please check openssl library versions.

从字面上看为openssl版本的问题,实际是因为python版本的问题。
在python 2.7.5及以上版本时,增加了certificate verification,正是因为这个特性导致ambari-agent无法连接server。

解决方法:
修改/etc/python/cert-verification.cfg配置文件:
# cat /etc/python/cert-verification.cfg


# Possible values are:
# 'enable' to ensure HTTPS certificate verification is enabled by default
# 'disable' to ensure HTTPS certificate verification is disabled by default
# 'platform_default' to delegate the decision to the redistributor providing this particular Python version

# For more info refer to https://www.python.org/dev/peps/pep-0493/
[https]
verify=platform_default ###(这是默认配置)12345678


修改为verify=disable,然后重启ambari agent,就可以正常注册。
Hadoop
# 1 查看 fsimage
hdfs oiv -p XML -i fsimage_0000000000003988739 -o fsimage.xml

# 2 查看 edits 文件
hdfs oev -i edits_0000000000003988740-0000000000003989326 -o edit.xml


# 3 管理
## dfs信息
hdfs dfsadmin -report
## 比如新加节点 重新通信
hdfs dfsadmin –refreshNodes
## 进入安全模式
hdfs dfsadmin -safemode enter
## 查看安全模式状态
hdfs dfsadmin -safemode get
## 保存内存信息到磁盘
hadoop dfsadmin -saveNamespace
## 离开安全模式
hdfs dfsadmin -safemode leave
## 滚动日志
hdfs dfsadmin -rollEdits
权限管理
[root@bdm1 ~]# usermod -a -G impala,kudu,hadoop,hive,hdfs impala
[root@bdm1 ~]# usermod -a -G impala,kudu,hadoop,hive,hdfs kudu
添加超级管理员用户组
[root@bdm1 ~]# groupadd supergroup
[root@bdm1 ~]# usermod -a -G supergroup impala
[root@bdm1 ~]# usermod -a -G supergroup kudu
[root@bdm1 ~]# su - hdfs -s /bin/bash -c "hdfs dfsadmin -refreshUserToGroupsMappings"
hdfs
数据块修复
hadoop 之hdfs数据块修复方法:
1、手动修复
hdfs fsck / #检查集群的健康状态
hdfs debug recoverLease -path 文件位置 -retries 重试次数 #修复指定的hdfs数据块。也就是关闭打开的文件。
检查坏块:
hadoop fsck /user -files -blocks -locations
检查是否有数据块正在写入:
hadoop fsck /user openforwrite
2.删除坏块
hdfs fsck / -delete
配置
- 控制NameNode 合并edits 文件到 fsimage 的配置(hdfs-default.xml)
-
- dfs.namenode.checkpoint.period
YARN
- yarn.scheduler.minimum-allocation-mb=1024:单个Container可申请的最小内存资源
- yarn.scheduler.maximum-allocation-mb=8192:单个Container可申请的最多内存资源。必须大于等于map.memory.mb、reduce.memory.mb值
- yarn.scheduler.minimum-allocation-vcores=1:单个Container可申请的最小虚拟 CPU 个数
- yarn.scheduler.maximum-allocation-vcores=4:单个Container可申请的最大虚拟 CPU 个数
- arn.nodemanager.resource.memory-mb=-1:总共可以分配的内存大小给container。如果该值为 -1 时,并且配置项yarn.nodemanager.resource.detect-hardware-capabilities=true,则会自动计算,其他情况下默认值为 8192MB。
- yarn.nodemanager.resource.cpu-vcores=-1:可以为容器分配的 vcore (续集 CPU)个数,如果该值为 -1,并且配置项 yarn.nodemanager.resource.detect-hardware-capabilities=true,则会自动从硬件确定它,其他默认情况下为 8
- mapreduce.map.memory.mb:每个map任务调用的内存大小
- mapreduce.reduce.memory.mb:一个reduce调用的内存的大小
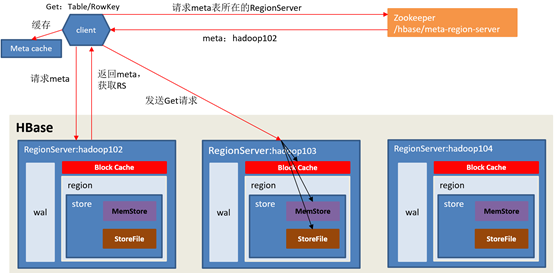
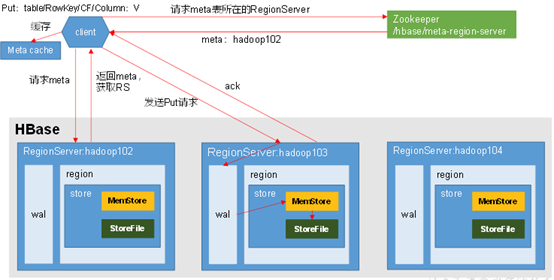
HBase
hbase 读操作
hbase写操作

hbck
重启
hbase hbck -fixMeta
hbase hbck -fixAssignments
hbase hbck -fixTableOrphones
hbase hbck -fixHdfsOrphones
hbase hbck -fixHdfsOverlaps
hbase hbck -repair A_title_info
hbase hbck -fixTableOrphones
hbase hbck -checkCorruptHFiles
hadoop fs -ls /hbase/data/default

----------------------------------------------------------------------- hbase hbck -help
Datafile Repair options: (expert features, use with caution!)
   -checkCorruptHFiles     Check all Hfiles by opening them to make sure they are valid
   -sidelineCorruptHFiles  Quarantine corrupted HFiles.  implies -checkCorruptHFiles
 Replication options
   -fixReplication   Deletes replication queues for removed peers
  Metadata Repair options supported as of version 2.0: (expert features, use with caution!)
   -fixVersionFile   Try to fix missing hbase.version file in hdfs.
   -fixReferenceFiles  Try to offline lingering reference store files
   -fixHFileLinks  Try to offline lingering HFileLinks
   -noHdfsChecking   Don't load/check region info from HDFS. Assumes hbase:meta region info is good. Won't check/fix any HDFS issue, e.g. hole, orphan, or overlap
   -ignorePreCheckPermission  ignore filesystem permission pre-check

-----------------------------
hbase hbck -fixAssignments


create 'A_title_info','$AS$','ent','supp','vis'
put 'A_title_info','100','ent:name','xingliang'
count 'A_title_info'
scan 'hbase:meta' , {LIMIT=>10,FILTER=>"PrefixFilter('A_title_info')"}
-- delete 'hbase:meta','A_title_info,,1601168827694.04b5133af66afdb34d548182a363b608.','info:regioninfo'
hbck2
cdh 文档 Using the HBCK2 Tool to Remediate HBase Clusters | 6.3.x | Cloudera Documentation
git clone https://github.com/apache/hbase-operator-tools.git
cd hbase-operator-tools
mvn clean package -Dmaven.test.skip=true -Dmaven.javadoc.skip=true
ls hbase-hbck2/target/
cp hbase-hbck2/target/hbase-hbck2-1.1.0-SNAPSHOT.jar /var/lib/hbase/
su - hbase
# 命令格式为
hbase hbck -j <jar包地址> <命令>

# 检查hbase block 数据是否完整
hbase hbck -j hbase-hbck2-1.1.0-SNAPSHOT.jar addFsRegionsMissingInMeta default:A_title_info


------------hbase-meta-repair
git clone https://github.com/DarkPhoenixs/hbase-meta-repair.git
cd hbase-meta-repair/
# 配置 src/main/resources/ 。
# 注意 application.properties 文件中 hdfs.root.dir=hdfs://192.168.xx.xx:8020/hbase
# 如果是 CDH 环境
#  cp /etc/hbase/conf/core-site.xml src/main/resources/
#  cp /etc/hbase/conf/hdfs-site.xml src/main/resources/

# 编译,最好跳过测试
mvn install -Dmaven.test.skip=true
java -jar -Drepair.tableName=A_title_info target/hbase-meta-repair-0.0.1.jar
修复成功后显示如下
[root@cdh2 hbase-meta-repair]# java -jar -Drepair.tableName=A_title_info target/hbase-meta-repair-0.0.1.jar
  .   ____          _            __ _ _
 /\\ / ___'_ __ _ _(_)_ __  __ _ \ \ \ \
( ( )\___ | '_ | '_| | '_ \/ _` | \ \ \ \
 \\/  ___)| |_)| | | | | || (_| |  ) ) ) )
  '  |____| .__|_| |_|_| |_\__, | / / / /
 =========|_|==============|___/=/_/_/_/
 :: Spring Boot ::        (v2.2.0.RELEASE)
2020-10-21 11:20:36.816  WARN 27097 --- [           main] o.d.hbase.repair.HbaseRepairRunner       : {}
2020-10-21 11:20:37.712  WARN 27097 --- [           main] org.apache.hadoop.util.NativeCodeLoader  : Unable to load native-hadoop library for your platform... using builtin-java classes where applicable
2020-10-21 11:20:38.065  WARN 27097 --- [           main] o.d.hbase.repair.HbaseRepairRunner       : ["A_title_info,,1601168827694.04b5133af66afdb34d548182a363b608."]
2020-10-21 11:20:38.066  WARN 27097 --- [           main] o.d.hbase.repair.HbaseRepairRunner       : Delete hbase Metadata:{}
2020-10-21 11:20:38.191  WARN 27097 --- [           main] o.d.hbase.repair.HbaseRepairRunner       : [{"hostAndPort":"cdh2.yore.com:16020","hostname":"cdh2.yore.com","hostnameLowerCase":"cdh2.yore.com","port":16020,"serverName":"cdh2.yore.com,16020,1603247045392","startcode":1603247045392,"versionedBytes":"AABjZGgyLnlnYnguY29tLDE2MDIwLDE2MDMyNDcwNDUzOTI="},{"hostAndPort":"cdh3.yore.com:16020","hostname":"cdh3.yore.com","hostnameLowerCase":"cdh3.yore.com","port":16020,"serverName":"cdh3.yore.com,16020,1603247044440","startcode":1603247044440,"versionedBytes":"AABjZGgzLnlnYnguY29tLDE2MDIwLDE2MDMyNDcwNDQ0NDA="}]
[root@cdh2 hbase-meta-repair]#
Hive
!connect jdbc:hive2://localhost:10000
# 建表
drop table if exists type_test;
create table type_test(
    eid int,
    name VARCHAR(10),
    salary float,
    resp string,
    num double,
    come timestamp
)
ROW FORMAT DELIMITED FIELDS TERMINATED BY ','
STORED AS TEXTFILE;

# 导入数据
LOAD DATA LOCAL INPATH '/home/yore/data/sample.txt'  OVERWRITE INTO TABLE type_test;

create table tmp_test(
id string,
name string
)ROW FORMAT DELIMITED FIELDS TERMINATED BY '║'
--clustered by(id) into 2 buckets
stored as orc
TBLPROPERTIES('transactional'='true');

# inser
>  insert into table tmp_test values(2, "two");

# update
>  update tmp_test set name="TWO" where id=2;

# DELETE
delete from tmp_test where id=2


# Impala 同步hive元数据
 invalidate metadata;
1101,Gopal,45000.1,Technical manager,1.213999987,2017-11-13 12:00:00
1102,Manisha,45000.2,Proof reader,0.243000001,2017-11-14 12:01:00
1103,Masthanvali,40000.33,Technical writer,0.145400003,2017-11-15 12:02:00
1104,Kiran,40000.4,Hr Admin,1.414999962,2017-11-15 12:02:00
1105,Kranthi,30000,Op Admin,0.611999989,2017-11-16 12:03:00Hive 中的日期函数
-- 1 转为日期类型(去掉时分秒时间信息)
select to_date('2018-11-21 09:00:03');

-- 2 获取当前unix时间戳(返回时间戳,例如输出:1540083603)
select unix_timestamp();
select unix_timestamp('2018-11-21 09:00:03');
--  两个日期相差多少小时
select (unix_timestamp('2018-11-21 18:00:03') - unix_timestamp('2018-11-21 09:00:03'))/3600;
--  两个日期相差多少分钟
select (unix_timestamp('2018-11-21 09:30:03') - unix_timestamp('2018-11-21 09:03:03'))/60;

-- 3 转化unix时间戳到当前时区的时间格式
select from_unixtime(1540083603, 'yyyy-MM-dd HH:mm:ss');

-- 4 返回日期中的信息
--  年
select year('2018-10-21 09:00:03');
--  月
select month('2018-10-21 09:00:03');
--  日
select day('2018-10-21 09:00:03');
--  时
select hour('2018-10-21 09:00:03');
--  分
select minute('2018-10-21 09:00:03');
--  秒
select second('2018-10-21 09:00:03');
--  返回日期在一年中的周数
select weekofyear('2018-10-21 09:00:03');

-- 5 返回开始日期减去结束日期的天数
select datediff('2020-10-01', '2018-10-21 09:00:03');
--  Hive中取最近30天数据
select datediff(CURRENT_TIMESTAMP , '2020-09-21')<=30 ;


-- 6 返回日期后n天的日期
select date_add('2018-10-21', 3);

-- 7 yyyymmdd和yyyy-mm-dd日期之间的切换
select from_unixtime(unix_timestamp('20181021', 'yyyyMMdd'), 'yyyy-MM-dd');

-- 8 计算某一个日期属于星期几,如2018-11-21 是星期日
SELECT IF(pmod(datediff('2018-11-21', '1920-01-01') - 3, 7)='0', 7, pmod(datediff('2018-11-21', '1920-01-01') - 3, 7)) ;

-- 9 回上个月第一天和最后一天
--  上个月第一天
select trunc(add_months(CURRENT_TIMESTAMP, -1), 'MM');
select concat(substr(add_months(from_unixtime(unix_timestamp(),'yyyy-MM-dd'),-1),1,7),'-01');
--  上个月最后一天
select date_sub(trunc(CURRENT_TIMESTAMP,'MM'),1);
数据函数
-- 1 四舍五入取整截取
select round(54.56, 0);

-- 向下取整
SELECT FLOOR(54.56);
-- 向上取整
SELECT CEILING(54.56);
hive 配置
- hiveserver2 HA 配置项
-
- hive.server2.support.dynamic.service.discovery = true (default is false)
- hive.server2.zookeeper.namespace = hiveserver2
- hive.zookeeper.quorum=
- hive.zookeeper.client.port = 2181
- hive 严格模式报错解决(Table is marked as a managed table but is not transactional.)
-
- hive.default.fileformat = TextFile
- hive.default.fileformat.managed = TextFile
- hive.strict.managed.tables = false
- hive.txn.strict.locking.mode = false
- insert 或 overwrite 时数据的临时文件问题
-
- hive.insert.into.multilevel.dirs=true 允许生成多级目录,否则父级目录必须存在
- hive.exec.stagingdir=tmp/hive/.hive-staging 临时文件暂放目录
spark
安装spark

sudo tar -zxf ~/spark-2.0.0/spark-2.0.0-bin-without-hadoop.tgz -C /usr/local/
cd /usr/local
sudo mv ./spark-1.6.0-bin-without-hadoop/ ./spark
sudo chown -R hadoop:hadoop ./spark          # 此处的 hadoop为用户名

配置spark
安装后,需要在 ./conf/spark-env.sh 中修改 Spark 的 Classpath,执行如下命令拷贝一个配置文件:

cd /usr/local/spark
cp ./conf/spark-env.sh.template ./conf/spark-env.sh

编辑 ./conf/spark-env.sh(vim ./conf/spark-env.sh) ,在最后面加上如下一行:

export SPARK_DIST_CLASSPATH=$(/usr/local/hadoop/bin/hadoop classpath)

保存后,Spark 就可以启动了。
presto
- insert into tmp_test values (1, 'first');
- 不支持:update tmp_test set name='FIRST' where id=1;
支持 create 、insert、、
不支持:update、delete
Kafka
- cdh
# 启动:
bin/kafka-server-start.sh -daemon config/server.properties

#-----------------------------
# 列表
	kafka-topics.sh --list --zookeeper cdh1:2181,cdh2:2181,cdh3:2181

# 创建
	kafka-topics.sh --create --zookeeper cdh1:2181,cdh2:2181,cdh3:2181 --partitions 3 --replication-factor 1 --topic bh-personal-storm-0301

# 描述,查看Topic详细信息
	kafka-topics.sh --describe --zookeeper cdh1:2181,cdh2:2181,cdh3:2181 --topic bh-personal-storm-0301

# 生产者
	kafka-console-producer.sh --broker-list cdh1:9092,cdh2:9092,cdh3:9092 --producer-property max.request.size=6048576 --topic bh-personal-storm-0301 < /home/yore/20190430_ss_data3.json
  kafka-console-producer.sh --broker-list cdh1:9092,cdh2:9092,cdh3:9092 --topic bh-personal-storm-0301

# 查询Topic的offside, time为-1时表示最大值,time为-2时表示最小值
	kafka-run-class.sh kafka.tools.GetOffsetShell --broker-list cdh1:9092 --time -1 --topic bh-personal-storm-0301

# 消费者
	# bin/kafka-console-consumer.sh --zookeeper localhost:2181 --topic test --from-beginning
	kafka-console-consumer.sh --bootstrap-server localhost:9092 --from-beginning --topic bh-personal-storm

# 删除
	kafka-topics.sh --delete --zookeeper cdh1:2181,cdh2:2181,cdh3:2181 --topic performance-test-kafka
    rmr /brokers/topics/canal-outputtest
    rmr /admin/delete_topics/canal-outputtest
查看kafka消费组
# bin/kafka-consumer-groups.sh  --bootstrap-server cdh1:9092 --describe --group new
Kudu
kudu写操作
基础命令
创建外部表
假设已经通过Java client等其他方式在kudu中创建了某个表,要想对该表进行操作,需要在impala中创建外部表,将其映射到impala当中,例如:
CREATE EXTERNAL TABLE my_test_table

STORED AS KUDU

          TBLPROPERTIES(

               'kudu.table_name' = 'my_kudu_table');

创建内部表

       假设要通过impala创建一个新的kudu表,需要在impala中创建一个内部表,例如:

          CREATE TABLE  testinkudu(…………)

          partition  by hash  partitions  8

          STORED AS  KUDU [AS SELECT * FROM OTHER_TABLE];
Kudu中的分区方法主要有两种:partition by hash 和 partition by range
	kudu表基于其partition方法被拆分成多个分区,每个分区就是一个tablet,一张kudu表所属的所有tablets均匀分布并存储在tablet servers的磁盘上。
	因此在创建kudu表的时候需要声明该表的partition方法,同时要指定primary key作为partition的依据。

基于hash的分区方法的基本原理是:
	基于primary key的hash值将每个row(行)划分到相应的tablet当中,分区的个数即tablet的个数必须在创建表语句中指定,建表语句示例如下:
	注:如果未指定基于某个字段的hash值进行分区,默认以主键的hash值进行分区。
		create table test
		(
			name string,
			age int,
			primary key (name)
		)
		partition by hash (name) partitions 8
		stored as kudu;

基于range的分区方法的基本原理是:
	基于指定主键的取值范围将每个row(行)划分到相应的tablet当中,用于range分区的主键以及各个取值范围都必须在建表语句中声明,建表语句示例如下:
	例子:有班级、姓名、年龄三个字段,表中的每个row将会根据其所在的班级划分成四个分区,每个分区就代表一个班级。
		create table test
		(
			classes int,
			name string,
			age int,
			primary key (classes,name)
		)
		partition by range (classes)
		(
			partition value = 1,
			partition value = 2,
			partition value = 3,
			partition value = 4
		)
		stored as kudu;

kudu表还可以采用基于hash和基于range相结合的分区方式,使用方法与上述类似

kudu表支持3种insert语句:
	1.insert into test values(‘a’,12);
	2.insert into test values(‘a’,12),(‘b’,13),(‘c’,14);
	3.insert into test select * from other_table;

update语句
	kudu表的update操作不能更改主键的值,其他与标准sql语法相同。

upsert 语句
	对于 upsert into test values (‘a’,12)
	如果指定的values中的主键值 在表中已经存在,则执行update语义,反之,执行insert语义。
delete语句
	与标准sql语法相同。


    kudu数据表写入
    CREATE TABLE visit_kudu_test
PRIMARY KEY (uid)
PARTITION BY HASH (uid) PARTITIONS 3
STORED AS KUDU TBLPROPERTIES (
    'kudu.master_addresses'='cdp08'
)  AS SELECT * FROM visit_t02;
kudu日常维护
查看kudu状态
kudu cluster ksck kudu-master-1:7051,kudu-master-2:7151,kudu-master-3:7251
Storm
storm ui >/dev/null 2>&1 &
storm nimbus >/dev/null 2>&1 &
storm supervisor >/dev/null 2>&1 &

storm logviewer >/dev/null 2>&1 &
https://github.com/apache/storm/blob/master/conf/defaults.yaml
常用命令
(1)使用activate/deactivate控制Topology的Spout的状态。

./storm deactivate wordcount
1
(2)使用version命令,显示Storm的版本。

./storm version
1
(3)使用classpath命令,显示Storm的完整环境变量。

./storm classpath
1
(4)使用rebalance命令。

./storm  rebalance wordcount
clickhouse
安装
1. 安装

https://clickhouse.tech/#quick-start
sudo yum install yum-utils
sudo rpm --import https://repo.clickhouse.tech/CLICKHOUSE-KEY.GPG
sudo yum-config-manager --add-repo https://repo.clickhouse.tech/rpm/stable/x86_64
sudo yum install clickhouse-server clickhouse-client

sudo /etc/init.d/clickhouse-server start
clickhouse-client
如果在线安装很慢时,可以先下载得到rpm包,在安装:

 启动:sudo /etc/init.d/clickhouse-server start

2. 目录配置

Server config files are located in /etc/clickhouse-server/. Before going further, please notice the <path> element in config.xml. Path determines the location for data storage, so it should be located on volume with large disk capacity; the default value is /var/lib/clickhouse/.If you want to adjust the configuration, it’s not handy to directly edit config.xml file, considering it might get rewritten on future package updates. The recommended way to override the config elements is to create files in config.d directory which serve as “patches” to config.xml.

The default location for server logs is /var/log/clickhouse-server/. The server is ready to handle client connections once it logs the Ready for connections message.

修改目录:
          <path>/data/clickhouse/</path>
          <tmp_path>/data/clickhouse/tmp/</tmp_path>
          <user_files_path>/data/clickhouse/user_files/</user_files_path>
          <format_schema_path>/data/clickhouse/format_schemas/</format_schema_path>

 把数据存放目录都配置到 /data/clickhouse/ 目录下面。

3. 建表

先启动clickhouse:

sudo /etc/init.d/clickhouse-server start
clickhouse-client --query "CREATE DATABASE IF NOT EXISTS tutorial"
4. clickhouse-client 客户端工具
 clickhouse-client -m 可以支持多行SQL;
5. 导入数据

clickhouse-client --query "INSERT INTO tutorial.hits_v1 FORMAT TSV" --max_insert_block_size=100000 < hits_v1.tsv
6. 执行sql

clickhosue-client -m
flink
1. 在官网安装Flink,并解压到/usr/local/flink
sudo tar -zxf flink-1.6.2-bin-hadoop27-scala_2.11.tgz -C /usr/local
cd /usr/local
1. 修改文件名字,并设置权限
sudo mv ./flink-*/ ./flink
sudo chown -R hadoop:hadoop ./flink
修改配置文件
• Flink对于本地模式是开箱即用的,如果要修改Java运行环境,可修改conf/flink-conf.yaml中的env.java.home,设置为本地java的绝对路径
添加环境变量
vim ~/.bashrc
export FLINK_HOME=/usr/local/flink
export PATH=$FLINK_HOME/bin:$PATH
启动Flink
start-cluster.sh
• 可以通过观察logs目录下的日志来检测系统是否正在运行了
tail log/flink--jobmanager-.log
• JobManager同时会在8081端口上启动一个web前端,通过http://localhost:8081来访问
kylin
kylin安装
1.下载安装包解压
cd /home/kylin
wget http://www-us.apache.org/dist/kylin/apache-kylin-2.3.1/apache-kylin-2.3.1-hbase1x-bin.tar.gz
tar -zxvf apache-kylin-2.3.1-hbase1x-bin.tar.gz
cd apache-kylin-2.3.1-bin
2.配置环境变量,修改配置文件
export KYLIN_HOME=`pwd`

##
vim conf/kylin.properties
添加或更改如下
kylin.server.cluster-servers=192.168.13.55:7070
kylin.job.jar=$KYLIN_HOME/lib/kylin-job-2.3.2.jar
kylin.coprocessor.local.jar=$KYLIN_HOME/lib/kylin-coprocessor-2.3.2.jar

3.使用脚本检查环境,确认hadoop,hive,hbases shell等权限
$KYLIN_HOME/bin/check-env.sh
4.运行 $KYLIN_HOME/bin/kylin.sh start 脚本来启动 Kylin,服务器启动后,您可以通过查看 $KYLIN_HOME/logs/kylin.log 获得运行时日志。
5.查看web界面
开启 $KYLIN_HOME/bin/kylin.sh start
关闭 $KYLIN_HOME/bin/kylin.sh stop
http://hostname:7070/kylin(修改默认端口需要修改kylin自带的tomcat端口,conf/server.xml)
ADMIN/KYLIN


###集群模式
Kylin 实例是无状态的。其运行时状态存于存储在 HBase (由 conf/kylin.properties 中的 kylin.metadata.url 指定) 中的 metadata 中。出于负载均衡的考虑,建议运行多个共享一个 metadata 存储的 Kylin 实例,因此他们在表结构中共享同一个状态,job 状态, Cube 状态, 等等。
每一个 Kylin 实例在 conf/kylin.properties 中都有一个 “kylin.server.mode” entry,指定了运行时的模式,有 3 个选项:
job : 在实例中运行 job engine; Kylin job engine 管理集群 的 jobs;
query : 只运行 query engine; Kylin query engine 接收和回应你的 SQL 查询;
all : 在实例中既运行 job engine 也运行 query engines。
注意只有一个实例可以运行 job engine (“all” 或 “job” 模式), 其他必须是 “query” 模式。

配置多个 Kylin 服务器

当在拥有多个 Kylin 服务器实例的集群运行 Kylin 时, 请确保您为每一个实例在 conf/kylin.properties 中正确的配置了以下属性。
kylin.rest.servers
使用中的服务器列表, 当事件变化时,让一个实例去通知其他服务器。例如:
kylin.rest.servers=host1:7070,host2:7070
kylin.server.mode
确保只有一个实例的 kylin.server.mode 设置为 “all” 或 “job”, 其余的应该为 “query”
kylin.server.mode=all

##########对于Kylin的部署架构,一般都四种典型部署方式,从简单到复杂。
flume
下载及安装
2.1 JDK下载及环境配置
Java SE Development Kit 8u162,按照Linux下安装JDK修改环境变量将JDK环境配置好。

2.2 Flume下载及安装
下载apache-flume-1.8.0-bin.tar.gz,将其放入“/opt/flume/”目录并解压缩,解压后的完整路径为:

/opt/flume/apache-flume-1.8.0-bin

测试Flume是否安装成功,进入安装目录:

cd /opt/flume/apache-flume-1.8.0-bin

输入命令查看安装版本信息:

./bin/flume-ng version
Flume 1.8.0
Source code repository: https://git-wip-us.apache.org/repos/asf/flume.git
Revision: 99f591994468633fc6f8701c5fc53e0214b6da4f
Compiled by denes on Fri Sep 15 14:58:00 CEST 2017
From source with checksum fbb44c8c8fb63a49be0a59e27316833d

3 测试实例
3.1 实例1:使用telnet引入source源
这个例子参照官网中Flume 1.8.0 User Guide#Setup中的例子测试Flume的使用。

3.1.1 新建1个agent配置文件
在“conf”目录下创建“flume-conf.properties.example”文件并编辑:

vi conf/flume-conf.properties.example

加入内容:

# example.conf: A single-node Flume configuration

# Name the components on this agent
a1.sources = r1
a1.sinks = k1
a1.channels = c1

# Describe/configure the source
a1.sources.r1.type = netcat
a1.sources.r1.bind = localhost
a1.sources.r1.port = 44444

# Describe the sink
a1.sinks.k1.type = logger

# Use a channel which buffers events in memory
a1.channels.c1.type = memory
a1.channels.c1.capacity = 1000
a1.channels.c1.transactionCapacity = 100

# Bind the source and sink to the channel
a1.sources.r1.channels = c1
a1.sinks.k1.channel = c1

3.1.2 启动1个agent:
./bin/flume-ng agent --conf conf --conf-file conf/flume-conf.p
Griffin
一、集群基础环境
1.JDK (1.8 or later versions)
2.PostgreSQL(version 10.4) or MySQL(version 8.0.11)
3.Hadoop (2.6.0 or later)
4.Hive (version 2.x),安装参考 :https://www.cnblogs.com/caoxb/p/11333741.html
5.Spark (version 2.2.1) 安装参考: https://blog.csdn.net/k393393/article/details/92440892
6.Livy 安装参考:https://www.cnblogs.com/students/p/11400940.html
7.ElasticSearch (5.0 or later versions). 参考https://blog.csdn.net/fiery_heart/article/details/85265585
8.Scala
二、安装Grigffin
1、MySQL:
1)在MySQL中创建数据库quartz,
2)然后执行Init_quartz_mysql_innodb.sql脚本初始化表信息:
mysql -u <username> -p <password> quartz < Init_quartz_mysql_innodb.sql
2、Hadoop和Hive:
从Hadoop服务器拷贝配置文件到Livy服务器上,这里假设将配置文件放在/usr/data/conf目录下。
在Hadoop服务器上创建/home/spark_conf目录,并将Hive的配置文件hive-site.xml上传到该目录下:
#创建/home/spark_conf目录hadoop fs -mkdir -p /home/spark_conf#上传hive-site.xmlhadoop fs -put hive-site.xml /home/spark_conf/
3、设置环境变量:
#!/bin/bashexport JAVA_HOME=/data/jdk1.8.0_192
#spark目录 export SPARK_HOME=/usr/data/spark-2.1.1-bin-2.6.3 #livy命令目录 export LIVY_HOME=/usr/data/livy/bin #hadoop配置文件目录 export HADOOP_CONF_DIR=/usr/data/conf
4、Livy配置:
更新livy/conf下的livy.conf配置文件:
livy.server.host = 127.0.0.1livy.spark.master = yarnlivy.spark.deployMode = clusterlivy.repl.enable-hive-context = true
启动livy:
livy-server start
5、Elasticsearch配置:
在ES里创建griffin索引:
curl -H "Content-Type: application/json" -XPUT http://es:9200/griffin?include_type_name=true '
{
    "aliases": {},
    "mappings": {
        "accuracy": {
            "properties": {
                "name": {
                    "fields": {
                        "keyword": {
                            "ignore_above": 256,
                            "type": "keyword"
                        }
                    },
                    "type": "text"
                },
                "tmst": {
                    "type": "date"
                }
            }
        }
    },
    "settings": {
        "index": {
            "number_of_replicas": "2",
            "number_of_shards": "5"
        }
    }
}'
源码打包部署
在这里我使用源码编译打包的方式来部署Griffin,Griffin的源码地址是:https://github.com/apache/griffin.git,这里我使用的源码tag是griffin-0.4.0

Griffin的源码结构很清晰,主要包括griffin-doc、measure、service和ui四个模块,其中griffin-doc负责存放Griffin的文档,measure负责与spark交互,执行统计任务,service使用spring boot作为服务实现,负责给ui模块提供交互所需的restful api,保存统计任务,展示统计结果。
源码导入构建完毕后,需要修改配置文件,具体修改的配置文件如下:
1、service/src/main/resources/application.properties:
# Apache Griffin应用名称spring.application.name=griffin_service# MySQL数据库配置信息spring.datasource.url=jdbc:mysql://10.xxx.xx.xxx:3306/griffin_quartz?useSSL=falsespring.datasource.username=xxxxxspring.datasource.password=xxxxxspring.jpa.generate-ddl=truespring.datasource.driver-class-name=com.mysql.jdbc.Driverspring.jpa.show-sql=true# Hive metastore配置信息hive.metastore.uris=thrift://namenode.test01.xxx:9083hive.metastore.dbname=defaulthive.hmshandler.retry.attempts=15hive.hmshandler.retry.interval=2000ms# Hive cache timecache.evict.hive.fixedRate.in.milliseconds=900000# Kafka schema registry,按需配置kafka.schema.registry.url=http://namenode.test01.xxx:8081# Update job instance state at regular intervalsjobInstance.fixedDelay.in.milliseconds=60000# Expired time of job instance which is 7 days that is 604800000 milliseconds.Time unit only supports millisecondsjobInstance.expired.milliseconds=604800000# schedule predicate job every 5 minutes and repeat 12 times at most#interval time unit s:second m:minute h:hour d:day,only support these four unitspredicate.job.interval=5mpredicate.job.repeat.count=12# external properties directory locationexternal.config.location=# external BATCH or STREAMING envexternal.env.location=# login strategy ("default" or "ldap")login.strategy=default# ldap,登录策略为ldap时配置ldap.url=ldap://hostname:portldap.email=@example.comldap.searchBase=DC=org,DC=exampleldap.searchPattern=(sAMAccountName={0})# hdfs default namefs.defaultFS=# elasticsearch配置elasticsearch.host=griffindq02-test1-rgtj1-tj1elasticsearch.port=9200elasticsearch.scheme=http# elasticsearch.user = user# elasticsearch.password = password# livy配置livy.uri=http://10.104.xxx.xxx:8998/batches# yarn url配置yarn.uri=http://10.104.xxx.xxx:8088# griffin event listenerinternal.event.listeners=GriffinJobEventHook
2、service/src/main/resources/quartz.properties
## Licensed to the Apache Software Foundation (ASF) under one# or more contributor license agreements.  See the NOTICE file# distributed with this work for additional information# regarding copyright ownership.  The ASF licenses this file# to you under the Apache License, Version 2.0 (the# "License"); you may not use this file except in compliance# with the License.  You may obtain a copy of the License at# #   http://www.apache.org/licenses/LICENSE-2.0# # Unless required by applicable law or agreed to in writing,# software distributed under the License is distributed on an# "AS IS" BASIS, WITHOUT WARRANTIES OR CONDITIONS OF ANY# KIND, either express or implied.  See the License for the# specific language governing permissions and limitations# under the License.#org.quartz.scheduler.instanceName=spring-boot-quartzorg.quartz.scheduler.instanceId=AUTOorg.quartz.threadPool.threadCount=5org.quartz.jobStore.class=org.quartz.impl.jdbcjobstore.JobStoreTX# If you use postgresql as your database,set this property value to org.quartz.impl.jdbcjobstore.PostgreSQLDelegate# If you use mysql as your database,set this property value to org.quartz.impl.jdbcjobstore.StdJDBCDelegate# If you use h2 as your database, it's ok to set this property value to StdJDBCDelegate, PostgreSQLDelegate or othersorg.quartz.jobStore.driverDelegateClass=org.quartz.impl.jdbcjobstore.StdJDBCDelegateorg.quartz.jobStore.useProperties=trueorg.quartz.jobStore.misfireThreshold=60000org.quartz.jobStore.tablePrefix=QRTZ_org.quartz.jobStore.isClustered=trueorg.quartz.jobStore.clusterCheckinInterval=20000
3、service/src/main/resources/sparkProperties.json:
{
  "file": "hdfs:///griffin/griffin-measure.jar",
  "className": "org.apache.griffin.measure.Application",
  "name": "griffin",
  "queue": "default",
  "numExecutors": 2,
  "executorCores": 1,
  "driverMemory": "1g",
  "executorMemory": "1g",
  "conf": {
    "spark.yarn.dist.files": "hdfs:///home/spark_conf/hive-site.xml"
  },
  "files": [
  ]
}
4、service/src/main/resources/env/env_batch.json:
{
  "spark": {
    "log.level": "INFO"
  },
  "sinks": [
    {
      "type": "CONSOLE",
      "config": {
        "max.log.lines": 10
      }
    },
    {
      "type": "HDFS",
      "config": {
        "path": "hdfs://namenodetest01.xx.xxxx.com:9001/griffin/persist",
        "max.persist.lines": 10000,
        "max.lines.per.file": 10000
      }
    },
    {
      "type": "ELASTICSEARCH",
      "config": {
        "method": "post",
        "api": "http://10.xxx.xxx.xxx:9200/griffin/accuracy",
        "connection.timeout": "1m",
        "retry": 10
      }
    }
  ],
  "griffin.checkpoint": []
}
配置文件修改好后,在idea里的terminal里执行如下maven命令进行编译打包:
mvn -Dmaven.test.skip=true clean install
命令执行完成后,会在service和measure模块的target目录下分别看到service-0.4.0.jar和measure-0.4.0.jar两个jar,将这两个jar分别拷贝到服务器目录下。这两个jar的使用方式如下:
1、使用如下命令将measure-0.4.0.jar这个jar上传到HDFS的/griffin文件目录里:
#改变jar名称mv measure-0.4.0.jar griffin-measure.jar
mv service-0.4.0.jar griffin-service.jar#上传griffin-measure.jar到HDFS文件目录里hadoop fs -put measure-0.4.0.jar /griffin/
这样做的目的主要是因为spark在yarn集群上执行任务时,需要到HDFS的/griffin目录下加载griffin-measure.jar,避免发生类org.apache.griffin.measure.Application找不到的错误。
2、运行service-0.4.0.jar,启动Griffin管理后台:
nohup java -jar service-0.4.0.jar>service.out 2>&1 &
几秒钟后,我们可以访问Apache Griffin的默认UI(默认情况下,spring boot的端口是8080)。
http://IP:8080
hue
1、介绍
HUE是一个开源的Apache Hadoop UI系统,早期由Cloudera开发,后来贡献给开源社区。它是基于Python Web框架Django实现的。通过使用Hue我们可以通过浏览器方式操纵Hadoop集群。例如put、get、执行MapReduce Job等等。
2、安装
2.1 安装hue依赖的第三方包
#安装xml软件包
$>sudo yum install -y libxml2-devel.x86_64
#安装其他软件包
$>sudo yum install -y libxslt-devel.x86_64 python-devel openldap-devel asciidoc cyrus-sasl-gssapi
1527152006500
3、 配置hue
hue与hadoop连接,即访问hadoop文件,可以使用两种方式。
WebHDFS
提供高速数据传输,client可以直接和DataNode通信。
HttpFS
一个代理服务,方便于集群外部的系统进行集成。注意:HA模式下只能使用该中方式。
3.1 配置hadoop的hue代理用户
[/soft/hadoop/etc/hadoop/core-site.xml]
注意:hadoop的代理用户配置方式是:hadoop.proxyuser.${superuser}.hosts,这里我的superuser是centos。
<property>
<name>hadoop.proxyuser.centos.hosts</name>
<value>*</value>
</property>
<property>
<name>hadoop.proxyuser.centos.groups</name>
<value>*</value>
</property>
[/soft/hadoop/etc/hadoop/hdfs-site.xml]
<property>
<name>dfs.webhdfs.enabled</name>
<value>true</value>
</property>
[/soft/hadoop/etc/hadoop/httpfs-site.xml]
<property>
<name>httpfs.proxyuser.centos.hosts</name>
<value>*</value>
</property>
<property>
<name>httpfs.proxyuser.centos.groups</name>
<value>*</value>
</property>
分发配置文件
$>cd /soft/hadoop/etc/hadoop
$>xsync.sh core-site.xml
$>xsync.sh hdfs-site.xml
$>xsync.sh httpfs-site.xml
3.2 重启hadoop和yarn进程
$>stop-dfs.sh
$>stop-dfs.sh
$>start-dfs.sh
$>start-yarn.sh
3.3 启动httpfs进程
3.3.1 启动进程
$>/soft/hadoop/sbin/httpfs.sh start
3.3.2 检查14000端口
$>netstat -anop |grep 14000
1527152006500
3.4 配置hue文件
这里我们使用的是hadoop的namenode HA模式,因此只能配置httpfs方式访问hdfs文件。需要注意的是webhdfs_url指定的是14000的端口,具体如下所示。
[/home/centos/hue-3.12.0/desktop/conf/hue.ini]
...
[[[default]]]
# Enter the filesystem uri
fs_defaultfs=hdfs://mycluster:8020
# NameNode logical name.
logical_name=mycluster
# Use WebHdfs/HttpFs as the communication mechanism.
# Domain should be the NameNode or HttpFs host.
# Default port is 14000 for HttpFs.
webhdfs_url=http://s101:14000/webhdfs/v1
# Change this if your HDFS cluster is Kerberos-secured
## security_enabled=false
# In secure mode (HTTPS), if SSL certificates from YARN Rest APIs
# have to be verified against certificate authority
## ssl_cert_ca_verify=True
# Directory of the Hadoop configuration
hadoop_conf_dir=/soft/hadoop/etc/hadoop
3.5 配置hue的数据库为mysql
...
[[database]]
# Database engine is typically one of:
# postgresql_psycopg2, mysql, sqlite3 or oracle.
#
# Note that for sqlite3, 'name', below is a path to the filename. For other backends, it is the database name
# Note for Oracle, options={"threaded":true} must be set in order to avoid crashes.
# Note for Oracle, you can use the Oracle Service Name by setting "host=" and "port=" and then "name=<host>:<port>/<service_name>".
# Note for MariaDB use the 'mysql' engine.
engine=mysql
host=192.168.231.1
port=3306
user=root
password=root
# Execute this script to produce the database password. This will be used when 'password' is not set.
## password_script=/path/script
name=hue
## options={}
# Database schema, to be used only when public schema is revoked in postgres
## schema=
4、初始化mysql库,生成表
4.1 创建hue库
因为我们在hue.ini文件中指定的数据库名为hue,因此需要先创建hue数据库。
msyql>create database hue ;
4.2 初始化数据表
该步骤是创建表和插入部分数据。hue的初始化数据表命令由hue/bin/hue syncdb完成,创建期间,需要输入用户名和密码。如下所示:
#同步数据库
$>~/hue-3.12.0/build/env/bin/hue syncdb
#导入数据,主要包括oozie、pig、desktop所需要的表
$>~/hue-3.12.0/build/env/bin/hue migrate
1527152006500
4.3 查看mysql中是否生成表
查看是否在mysql中生成了所需要的表,截图如下所示:
msyql>show tables ;
1527152006500
5、启动hue进程
$>~/hue-3.12.0/build/env/bin/supervisor
启动过程如下图所示:
1527152006500
6、检查webui
http://s101:8888/
打开登录界面,输入前文创建的账户即可。
1527152006500
7、访问hdfs
点击右上角的hdfs链接,进入hdfs系统画面。
1527152006500
1527152006500
8、配置ResourceManager
8.1 修改hue.ini配置文件
[[yarn_clusters]]
...
# [[[ha]]]
# Resource Manager logical name (required for HA)
logical_name=cluster1
# Un-comment to enable
## submit_to=True
# URL of the ResourceManager API
resourcemanager_api_url=http://s101:8088
8.2 查看job执行情况
1527152006500
9、配置hive
9.1 编写hue.ini文件
[beeswax]
# Host where HiveServer2 is running.
# If Kerberos security is enabled, use fully-qualified domain name (FQDN).
hive_server_host=s101
# Port where HiveServer2 Thrift server runs on.
hive_server_port=10000
# Hive configuration directory, where hive-site.xml is located
hive_conf_dir=/soft/hive/conf
9.2 安装依赖软件包
如果不安装以下的依赖包,会导致sasl方面的错误,说hiveserver2没有启动。
$>sudo yum install -y cyrus-sasl-plain cyrus-sasl-devel cyrus-sasl-gssapi
9.3 启动hiveserver2服务器
$>/soft/hive/bin/hiveserver2
9.4 查看webui
1527152006500
10、配置hbase
10.1 修改hue.ini配置文件
hbase配置的是thriftserver2服务器地址,不是master地址,而且需要用小括号包起来。thriftserver需要单独启动。
[hbase]
# Comma-separated list of HBase Thrift servers for clusters in the format of '(name|host:port)'.
# Use full hostname with security.
# If using Kerberos we assume GSSAPI SASL, not PLAIN.
hbase_clusters=(s101:9090)
# HBase configuration directory, where hbase-site.xml is located.
hbase_conf_dir=/soft/hbase/conf
10.2 启动thriftserver服务器
注意:thriftserver服务器启动的名称是thrift。切记:有些文档上写的是thrit2,这里是thrfit。
$>hbase-daemon.sh start thrift
10.3 查看端口9090
1527152006500
10.4 查看hue中hbase
1527152006500
11、配置spark
11.1 介绍
hue与spark的集成使用livy server进行中转,livy server类似于hive server2。提供一套基于restful风格的服务,接受client提交http的请求,然后转发给spark集群。livy server不在spark的发行包中,需要单独下载。
注意:hue中通过netebook编写scala或者python程序,要确保notebook可以使用,需要启动hadoop的httpfs进程--切记!
注意下载使用较高的版本,否则有些类找不到。下载地址如下:
http://mirrors.tuna.tsinghua.edu.cn/apache/incubator/livy/0.5.0-incubating/livy-0.5.0-incubating-bin.zip
11.2 解压
$>unzip livy-server-0.2.0.zip -d /soft/
11.3 启动livy服务器
$>/soft/livy-server-0.2.0/bin/live-server
1527152006500
1527152006500
11.4 配置hue
推荐使用local或yarn模式启动job,这里我们配置成spark://s101:7077。
[spark]
# Host address of the Livy Server.
livy_server_host=s101
# Port of the Livy Server.
livy_server_port=8998
# Configure Livy to start in local 'process' mode, or 'yarn' workers.
livy_server_session_kind=spark://s101:7077
魔乐社区(Modelers.cn) 是一个中立、公益的人工智能社区,提供人工智能工具、模型、数据的托管、展示与应用协同服务,为人工智能开发及爱好者搭建开放的学习交流平台。社区通过理事会方式运作,由全产业链共同建设、共同运营、共同享有,推动国产AI生态繁荣发展。
更多推荐


 26
26 0
0- 0


 已为社区贡献1条内容

所有评论(0)