Jquery插件ajaxFileUpload文件上传与Bootstrap之fileinput插件上传文件的使用与MultipartFile使用与导入Excel和导出Excel
目录
Jquery插件ajaxFileUpload文件上传
前端页面
引入相关的js文件和css文件
<script src="${request.contextPath}/public/adminlte/bower_components/jquery/ajaxfileupload.js"></script>
按钮
<button id="btn_import" type="button" class="btn btn-default">
	<span class="glyphicon glyphicon-download-alt" aria-hidden="true"></span>导入
</button>
<input type="file" id="file1" name="file">
<!--
<button id="btn_import" type="button" class="btn btn-default">
   <span class="glyphicon glyphicon-import" aria-hidden="true"></span>导入
</button>
-->
js代码
<script type="application/javascript">
	$(function(){
		$("#btn_import").click(function () {
		            $.ajaxFileUpload({
		                //处理文件上传操作的服务器端地址(可以传参数,已亲测可用)
		                url: base_url + '/adminv2/dmpBigScreen/import?file=',
		                secureuri:false,                       //是否启用安全提交,默认为false
		                fileElementId:'file1',                  //文件选择框的id属性
		                dataType:'json',                       //服务器返回的格式,可以是json或xml等
		                success:function(data, status){        //服务器响应成功时的处理函数
		                    if (data.result) {
		                        layer.msg("导入成功!");
		                        initBootStrapTable(base_url+'/adminv2/dmpBigScreen/getListScreen');
		                    } else {
		                        layer.msg(data.msg);
		                    }
		                },
		                error:function(data, status, e){ //服务器响应失败时的处理函数
		                    layer.msg(data.msg, {icon: 2});
		                }
		            });

		        });
	})
</script>
Bootstrap之fileinput插件上传文件的使用
前端页面
引入相关的js文件和css文件
<!--bootstrap-fileinput-->
<script src="${request.contextPath}/public/adminlte/bower_components/bootstrap-fileinput/js/fileinput.min.js"></script>
<script src="${request.contextPath}/public/adminlte/bower_components/bootstrap-fileinput/js/zh.js"></script>
<link rel="stylesheet" href="${request.contextPath}/public/adminlte/bower_components/bootstrap-fileinput/css/fileinput.min.css">
按钮和js代码
<#--<button id="btn_import" type="button" class="btn btn-default">-->
<#--<span class="glyphicon glyphicon-download-alt" aria-hidden="true"></span>导入-->
<#--</button>-->
<#--<input type="file" id="file1" name="file">-->
<button id="btn_import" type="button" class="btn btn-default">
<span class="glyphicon glyphicon-import" aria-hidden="true"></span>导入
</button>
-----------------------模态框------------------------------
<!--上传文件模态框-->
<form>
<div class="modal fade" id="myModal" tabindex="-1" role="dialog" aria-labelledby="myModalLabel">
<div class="modal-dialog" role="document">
<div class="modal-content">
<div class="modal-header">
<button type="button" class="close" data-dismiss="modal" aria-label="Close"><span aria-hidden="true">×</span></button>
<h4 class="modal-title" id="myModalLabel">请选择Excel文件</h4>
</div>
<div class="modal-body">
<a href="~/Data/ExcelTemplate/Order.xlsx" class="form-control" style="border:none;">下载导入模板</a>
<input type="file" name="txt_file" id="txt_file" multiple class="file-loading" />
</div>
</div>
</div>
</div>
</form>
----=----------------------script---------------------
<script type="application/javascript">
$(function(){
//初始化fileinput
var FileInput = function () {
var oFile = new Object();
//初始化fileinput控件(第一次初始化)
//ctrlName:input标签对用的id,uploadUrl:请求的地址
oFile.Init = function(ctrlName, uploadUrl) {
var control = $('#' + ctrlName);
//初始化上传控件的样式
control.fileinput({
language: 'zh', //设置语言
uploadUrl: uploadUrl, //上传的地址
allowedFileExtensions: ['jpg', 'gif', 'png', 'xlsx'],//接收的文件后缀
showUpload: true, //是否显示上传按钮
showCaption: false,//是否显示标题
browseClass: "btn btn-primary", //按钮样式
//dropZoneEnabled: false,//是否显示拖拽区域
//minImageWidth: 50, //图片的最小宽度
//minImageHeight: 50,//图片的最小高度
//maxImageWidth: 1000,//图片的最大宽度
//maxImageHeight: 1000,//图片的最大高度
//maxFileSize: 0,//单位为kb,如果为0表示不限制文件大小
//minFileCount: 0,
maxFileCount: 10, //表示允许同时上传的最大文件个数
enctype: 'multipart/form-data', //上传的类型
validateInitialCount:true,
previewFileIcon: "<i class='glyphicon glyphicon-king'></i>",
msgFilesTooMany: "选择上传的文件数量({n}) 超过允许的最大数值{m}!",
});
//fileuploaded此事件仅针对ajax上传触发,并在每个缩略图文件上传完成后触发。此事件仅针对ajax上传并在以下情况下触发:当点击每个预览缩略图中的上传图标并且文件上传成功时,或者当你有 uploadAsync设置为true您已触发批量上传。在这种情况下,fileuploaded每一个人选择的文件被上传成功后,触发事件。,并创建多个线程。
//导入文件上传完成之后的事件
$("#txt_file").on("fileuploaded", function (event, data, previewId, index) {
// alert(JSON.stringify(data));
// alert(data.responseJSON);
// alert(data.response);
// alert(JSON.stringify(data.response));
// alert(previewId);
// alert(index);
//data.response 获取后台返回的数据
$("#myModal").modal("hide");
$(".fileinput-remove-button").click();
if (data.response.result) {
layer.msg("导入成功!");
initBootStrapTable(base_url+'/adminv2/dmpBigScreen/getListScreen');
} else {
layer.msg(data.responseJSON.msg);
}
});
//上传成功后
$("#txt_file").on("fileclear",function(event, data, msg){
// alert('111');
// $('#txt_file').fileinput('clear');
// $('#txt_file').fileinput('destroy');
});
}
return oFile;
};
//1.初始化fileinput
var oFileInput = new FileInput();
//txt_file:input标签的id,base_url + '/adminv2/dmpBigScreen/import?file=':请求的后台地址
oFileInput.Init("txt_file", base_url + '/adminv2/dmpBigScreen/import?file=');
//2.注册导入按钮的事件,显示模态框
$("#btn_import").click(function () {
$("#myModal").modal();
});
})
</script>
当上传文件成功之后,再打开上传,清空模板中已经上传文件的信息
( " . f i l e i n p u t − r e m o v e − b u t t o n " ) . c l i c k ( ) ; 使 用 b o o t s t r a p − f i l e i n p u t 上 传 组 件 , 在 上 传 文 件 后 , 发 现 没 有 提 供 方 法 可 以 清 空 文 件 选 择 框 , f o r m r e s e t 也 不 行 , 在 网 上 查 了 半 天 也 没 有 找 到 相 关 的 资 料 , 想 到 一 个 变 通 的 方 法 , 就 是 模 拟 点 击 文 件 选 择 框 的 移 除 按 钮 , 该 按 钮 在 选 择 文 件 后 会 出 现 , 并 且 带 有 样 式 f i l e i n p u t − r e m o v e − b u t t o n , 所 以 可 以 在 表 单 提 交 后 调 用 (".fileinput-remove-button").click(); 使用bootstrap-fileinput上传组件,在上传文件后,发现没有提供方法可以清空文件选择框,form reset也不行,在网上查了半天也没有找到相关的资料,想到一个变通的方法,就是模拟点击文件选择框的移除按钮,该按钮在选择文件后会出现,并且带有样式fileinput-remove-button,所以可以在表单提交后调用 (".fileinput−remove−button").click();使用bootstrap−fileinput上传组件,在上传文件后,发现没有提供方法可以清空文件选择框,formreset也不行,在网上查了半天也没有找到相关的资料,想到一个变通的方法,就是模拟点击文件选择框的移除按钮,该按钮在选择文件后会出现,并且带有样式fileinput−remove−button,所以可以在表单提交后调用(".fileinput-remove-button").click();来清空文件选择框。
效果图
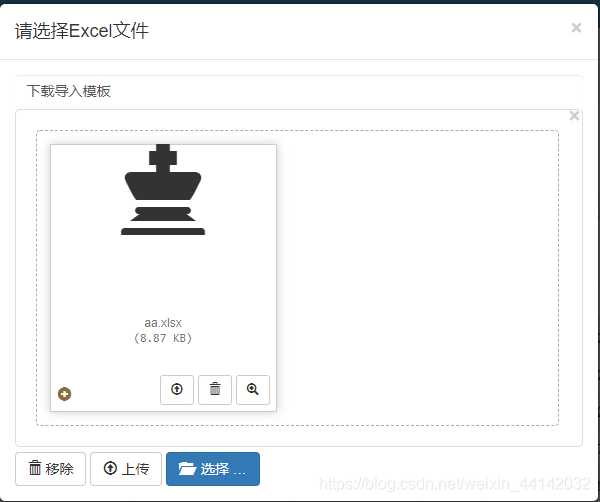
公共后台页面
@RequestParam(“txt_file”)要与input标签中的name属性一致
@RequestMapping(value = "/import", method = RequestMethod.POST)
@ResponseBody
public ResultMsg importScreen(@RequestParam("txt_file") MultipartFile file, HttpServletRequest request) {
   //获取当前用户名
   String user = adminUserController.getCurrentUsername(request).getData().toString();
   ResultMsg resultMsg = new ResultMsg();
   try {
       String contentType = file.getContentType();  //文件内容
       String fileName = file.getOriginalFilename(); //获取文件名
       if (file.isEmpty()) {
           resultMsg.setMsg("文件为空");
           resultMsg.setResult(false);
           return resultMsg;
       }
       //根据路径获取这个操作excel的实例
       XSSFWorkbook workbook = new XSSFWorkbook(file.getInputStream());
       //根据页面index 获取sheet页
       XSSFSheet sheetAt = workbook.getSheetAt(0);
       XSSFRow row = null;
       List<Map<String, Object>> mapList = new ArrayList<>();
       Map<String, Object> map = null;
       //循环sesheet页中数据从第二行开始,第一行是标题
       for (int i = 1; i < sheetAt.getPhysicalNumberOfRows(); i++) {
           map = new HashMap<>();
           //获取每一行数据
           row = sheetAt.getRow(i);
           XSSFCell cell1 = row.getCell(0);
           cell1.setCellType(CellType.STRING); //将其转换为string类型
           XSSFCell cell2 = row.getCell(1);
           cell2.setCellType(CellType.STRING);
           XSSFCell cell3 = row.getCell(2);
           cell3.setCellType(CellType.STRING);

           map.put("screenName", cell1.getStringCellValue());
           map.put("screenDesc", cell2.getStringCellValue());
           map.put("status", cell3.getStringCellValue());
           map.put("creator",user);
           mapList.add(map);
       }
       ResultMsg dmpResult = dmpService.batchAddScreenInfo(mapList);
       if (!dmpResult.getResult()) {
           return dmpResult;
       }
       resultMsg.setResult(true);
       resultMsg.setMsg("导入成功!");
       return resultMsg;
   } catch (Exception e) {
       logger.error("==DmpVmBigDataScreenController==importScreen --> e: " + e);
       resultMsg.setMsg("导入失败!");
       resultMsg.setResult(false);
       e.printStackTrace();
       return resultMsg;
   }
}
读取文件使用MultipartFile,该类是springmvc提供的操作文件的方法。可以在springmvc.xml默认配置文件中设置上传文件的大小等等
<!-- 文件上传 -->
    <bean id="multipartResolver" class="org.springframework.web.multipart.commons.CommonsMultipartResolver">
        <!--上传文件的大小,单位是B,value=10KB-->
        <property name="maxUploadSize" value="10485760"/> <!-- 10m -->
        <!--在内存分配的空间-->
        <property name="maxInMemorySize" value="4096" />
        <property name="defaultEncoding" value="UTF-8"></property>
    </bean>
MultipartFile类的具体使用
@Service("iFileService")
public class FileServiceImpl implements IFileService {

    private Logger logger = LoggerFactory.getLogger(FileServiceImpl.class);

    public String upload(MultipartFile file,String path){
        //获取文件的原始文件名
        String fileName = file.getOriginalFilename();
        //获得扩展名jpg, lastIndexOf(".")获得当前的索引。substring(5),从当前索引5开始,获得之后的字符串。
        String fileExtensionName = fileName.substring(fileName.lastIndexOf(".")+1);
        //将要上传的文件的名字
        String uploadFileName = UUID.randomUUID().toString()+"."+fileExtensionName;
        logger.info("开始上传文件,上传文件的文件名{ },上传的路径:{ },新文件名:{ }",fileName,path,uploadFileName);


        //创建路径,为特定路径名创建一个File对象,这里的路径名可以是一个目录也可以是一个文件
        File fileDir = new File(path);
        if(!fileDir.exists()){
            //不存在该路径,或不存在该文件
            //创建
            fileDir.setWritable(true); //允许写访问权限
            fileDir.mkdirs();//创建多层目录
        }
        //创建的目标文件对象
        // File(String parent,String child)为目录parent下的child创建一个File对象,这个child可以是一个文件名也可以是一个目录
        File targetFile = new File(path,uploadFileName);

        try {
            file.transferTo(targetFile);
            //文件已经上传成功了

            //将targetFile上传到ftp服务器上
            FTPUtil.uploadFile(Lists.newArrayList(targetFile));

            //上传完成后,删除upload下面的文件
            targetFile.delete();

        } catch (IOException e) {
            e.printStackTrace();
        }
        return targetFile.getName();//a.jpg
    }

}
上传Excel文件的时候,也是使用MultipartFile类接收,所有的文件图片都是,但是操作Excel文件使用POI提供的API
[POI的API具体使用](https://github.com/Wangxy9527/ExcelToDatabase/blob/master/src/main/java/com/wxy/excel/service/ExcelServiceImpl.java)
添加maven依赖
<dependency>
   <groupId>org.apache.poi</groupId>
    <artifactId>poi</artifactId>
    <version>4.0.0</version>
</dependency>

<dependency>
    <groupId>org.apache.poi</groupId>
    <artifactId>poi-ooxml</artifactId>
    <version>4.0.0</version>
</dependency>
//根据路径获取这个操作excel的实例
XSSFWorkbook workbook = new XSSFWorkbook(file.getInputStream());
//根据页面index 获取sheet页
XSSFSheet sheetAt = workbook.getSheetAt(0);
XSSFRow row = null;
List<Map<String, Object>> mapList = new ArrayList<>();
Map<String, Object> map = null;
//循环sesheet页中数据从第二行开始,第一行是标题
for (int i = 1; i < sheetAt.getPhysicalNumberOfRows(); i++) {
    map = new HashMap<>();
    //获取每一行数据
    row = sheetAt.getRow(i);
    XSSFCell cell1 = row.getCell(0);
    cell1.setCellType(CellType.STRING); //将其转换为string类型
    XSSFCell cell2 = row.getCell(1);
    cell2.setCellType(CellType.STRING);
    XSSFCell cell3 = row.getCell(2);
    cell3.setCellType(CellType.STRING);

    map.put("screenName", cell1.getStringCellValue());
    map.put("screenDesc", cell2.getStringCellValue());
    map.put("status", cell3.getStringCellValue());
    map.put("creator",user);
    mapList.add(map);
}
将表格中的数据导出到Excel表格中,也要使用poi依赖
前端js,注意当根据条件筛选到几条数据,就将几条数据导出,所以后台查询数据要根据条件,然后不能分页
<script>
//导出操作
		$("#btn_export").click(function () {
			var userId = $('#userId').val();
			var plugSn = $('#plugSn').val();

			var query ={
				"userId":userId,
				"plugSn":plugSn
			};
			$.ajax({
				//按照条件查询数据的总条数
				url: base_url+'/adminv2/stp/use/pageListOnline', //当大于10000条不能导出
				type:'post',
				dataType:'json',
				data: query,
				success:function (data) {
					if (data.result){
						var count = data.total;
						if(count<10000 && count>0){
							//导出数据的操作
							window.location.href = setQueryAddr(base_url+'/adminv2/stp/use/excelExport',query);
						}else if(count == 0){
							layer.msg("不能导出空数据!",{icon:2});
						}else if(count > 10000){
							layer.msg("导出数据大于1万条,请筛选后再进行导出!",{icon:2});
						}else{
							layer.msg("数据导出失败!",{icon:2});
						}
					} else{
						layer.msg(data.msg,{icon:2});
					}
				}
			});

		});
</script>
后端实现代码
//获取某条件下的数据的总条数,
	@RequestMapping("/use/pageListOnline")
    @ResponseBody
    public ResultMsg pageListOnline(@RequestParam(value = "start", defaultValue = "0") int start,
                                    @RequestParam(value = "start", defaultValue = "0") int length,
                                    String userId, String plugSn) {
        ResultMsg resultMsg = stpService.queryPduUseOnline(userId, plugSn,start,length);
        return resultMsg;
    }

//将数据导出到Excel表格,主要逻辑是将导出的数据日期格式化一下,然后状态写成对应表示的意思。主要导出逻辑使用ExcelExportUtil类
	@RequestMapping("/use/excelExport")
    @ResponseBody
    public ResultMsg pageListExcelExport(@RequestParam(value = "start", defaultValue = "0") int start,
                                         @RequestParam(value = "start", defaultValue = "0") int length,
                                         String userId, String plugSn, HttpServletResponse response) {
        ResultMsg resultMsg = new ResultMsg();
        try {
            ResultMsg result = stpService.queryPduUse(userId, plugSn,start,length);
            String[] fieldTitle = new String[]{"会员号","控制器Mac","插孔编号","开始时间","结束时间","使用时长(单位为分)","创建时间","使用状态","支付状态"};
            String[] fields = new String[]{"userId","plugSn","jackCode","startTimeString","endTimeString","useHours","createTimeString","equipmentState","payState"};
            List<PduUse> list = JSONArray.parseArray(JSON.toJSONString(result.getRows()), PduUse.class);

            for(PduUse pduUse : list){
                SimpleDateFormat simpleDateFormat = new SimpleDateFormat("yyyy-MM-dd hh:mm:ss");
                pduUse.setStartTimeString(simpleDateFormat.format(pduUse.getStartTime()));
                pduUse.setEndTimeString(simpleDateFormat.format(pduUse.getEndTime()));
                pduUse.setCreateTimeString(simpleDateFormat.format(pduUse.getCreateTime()));
                if(pduUse.getEquipmentState().equals("0") ){
                    pduUse.setEquipmentState("未使用");
                }else if(pduUse.getEquipmentState().equals("1")){
                    pduUse.setEquipmentState("使用中");
                }else if (pduUse.getEquipmentState().equals("2")){
                    pduUse.setEquipmentState("已完成");
                }
                if(pduUse.getPayState().equals("0")){
                    pduUse.setPayState("未支付");
                }else if(pduUse.getPayState().equals("1")){
                    pduUse.setPayState("已支付");
                }else if(pduUse.getPayState().equals("12")){
                    pduUse.setPayState("处理中");
                }else if(pduUse.getPayState().equals("2")){
                    pduUse.setPayState("已完成");
                }

            }

            ExcelExportUtil.exportStyleExcel(response,list,"控制器使用情况统计表",fieldTitle,fields);
        }catch (Exception e){
            logger.error("==pageListExcelExport=error,",e);
        }
        return resultMsg;
    }
导出数据到Excel表格的Util
package com.sunbox.igsadmin.util;


import net.sf.json.JSONNull;
import net.sf.json.JSONObject;
import org.apache.poi.hssf.usermodel.HSSFCellStyle;
import org.apache.poi.hssf.usermodel.HSSFFont;
import org.apache.poi.hssf.usermodel.HSSFSheet;
import org.apache.poi.hssf.usermodel.HSSFWorkbook;
import org.apache.poi.ss.usermodel.*;
import org.slf4j.Logger;
import org.slf4j.LoggerFactory;

import javax.servlet.http.HttpServletResponse;
import java.io.OutputStream;
import java.util.HashMap;
import java.util.List;
import java.util.Map;

public class ExcelExportUtil {

    private final static Logger logger = LoggerFactory.getLogger(ExcelExportUtil.class);

    /**
     * 导出带样式的excel
     *
     * @param excelContentList 数据列表
     * @param fileTitle       文件名
     * @param titleKeys        如:"订单日期","油品名称"
     * @param valueKeys        如:"OrderDate","OilName"
     * @param <T>
     * @return
     * @throws Exception
     */
    public static <T> void exportStyleExcel(
            HttpServletResponse response,
            List<T> excelContentList
            , String fileTitle
            , String[] titleKeys
            , String[] valueKeys) {
        try {
            logger.info("HelpUtil_reportExcel_list:" + excelContentList.size());
            //excel名称
            String fileName = fileTitle + ".xls";
            // 清空输出流
            response.reset();
            // 设定输出文件头
            response.setHeader("Content-disposition", "attachment; filename=" + new String(fileName.getBytes("gb2312"), "ISO8859-1"));
            // 定义输出类型
            response.setContentType("application/msexcel");
            // 取得输出流
            OutputStream os = response.getOutputStream();
            // 建立excel文件
            HSSFWorkbook wbook = new HSSFWorkbook();
            // 工作表检索信息
            HSSFSheet wsheet = wbook.createSheet(fileTitle);
            //设置样式
            HSSFCellStyle cellStyle = wbook.createCellStyle();
            //设置自动换行
            cellStyle.setWrapText(true);
            wsheet.setDefaultColumnWidth(35);
            //存储列宽
            Map<Integer, Integer> maxWidth = new HashMap<>();

            int rowIndex = 0;
            Row row = wsheet.createRow(rowIndex++);
            for (int m = 0; m < titleKeys.length; m++) {
                HSSFFont font =  wbook.createFont();
                font.setFontHeightInPoints((short) 12);
                font.setBold(true);
                cellStyle.setFont(font);

                Cell cell = row.createCell((short) m);
                cell.setCellStyle(cellStyle);
                row.createCell(m).setCellValue(titleKeys[m] == null ? "" : titleKeys[m]);

            }
            for (int i = 0; i < excelContentList.size(); i++) {
                row = wsheet.createRow(rowIndex++);
                Map<String, Object> map = JSONObject.fromObject(excelContentList.get(i));
                for (int k = 0; k < valueKeys.length; k++) {
                    String value = JSONNull.getInstance().equals(map.get(valueKeys[k])) ? "" : map.get(valueKeys[k]).toString();
                    //如果json格式的字符串里面有的字段为null,在将其转成json后,再进行解析,为null的字段得到的并不是java里的null,
                    // 而是JSONNull对象。所以要进行null值判断的话要和JSONNull.getInstance()进行equals比较,才可以判断出当前是否为null。
                    row.createCell(k).setCellValue(value);//创建一行中的每一列,并设置值
                }
            }
            wbook.write(os); // 写入文件
            wbook.close();
            os.close();
        } catch (Exception e) {
            e.printStackTrace();
            logger.info("HelpUtil_reportExcel_e:" + e);
        }


    }
}

魔乐社区(Modelers.cn) 是一个中立、公益的人工智能社区,提供人工智能工具、模型、数据的托管、展示与应用协同服务,为人工智能开发及爱好者搭建开放的学习交流平台。社区通过理事会方式运作,由全产业链共同建设、共同运营、共同享有,推动国产AI生态繁荣发展。
更多推荐


 0
0 0
0- 0


 已为社区贡献3条内容

所有评论(0)