springboot学习日记:基础篇
springboot笔记
springboot在我看来是spring的进阶版,之前想应该不是太难,谁知里面对于spring的注解应用的出神入化,所以springbooot第一次学习之后脑子里空空一片,然后决定再来学习一边,终于算是摸到了springboot的门槛。
一、自动装配原理
pom
- spring-boot-dependencies:springboot的核心类在父工程中
- 在引入指定依赖的时候不需要指定版本,因为springboot已经规定了版本库
启动器
 		<dependency>
            <groupId>org.springframework.boot</groupId>
            <artifactId>spring-boot-starter</artifactId>
        </dependency>
- 启动器:就是springboot的启动场景。
- 比如spring-boot-starter-web。他就是自动导入了web的yilai
- springboot将所有的场景都变成了一个个启动器
- 如果要使用什么场景,就要导入什么启动器
主程序:
@SpringBootApplication
public class SpringbootResulfcrudApplication {

    public static void main(String[] args) {
        SpringApplication.run(SpringbootResulfcrudApplication.class, args);
    }
}
-
注解:
-
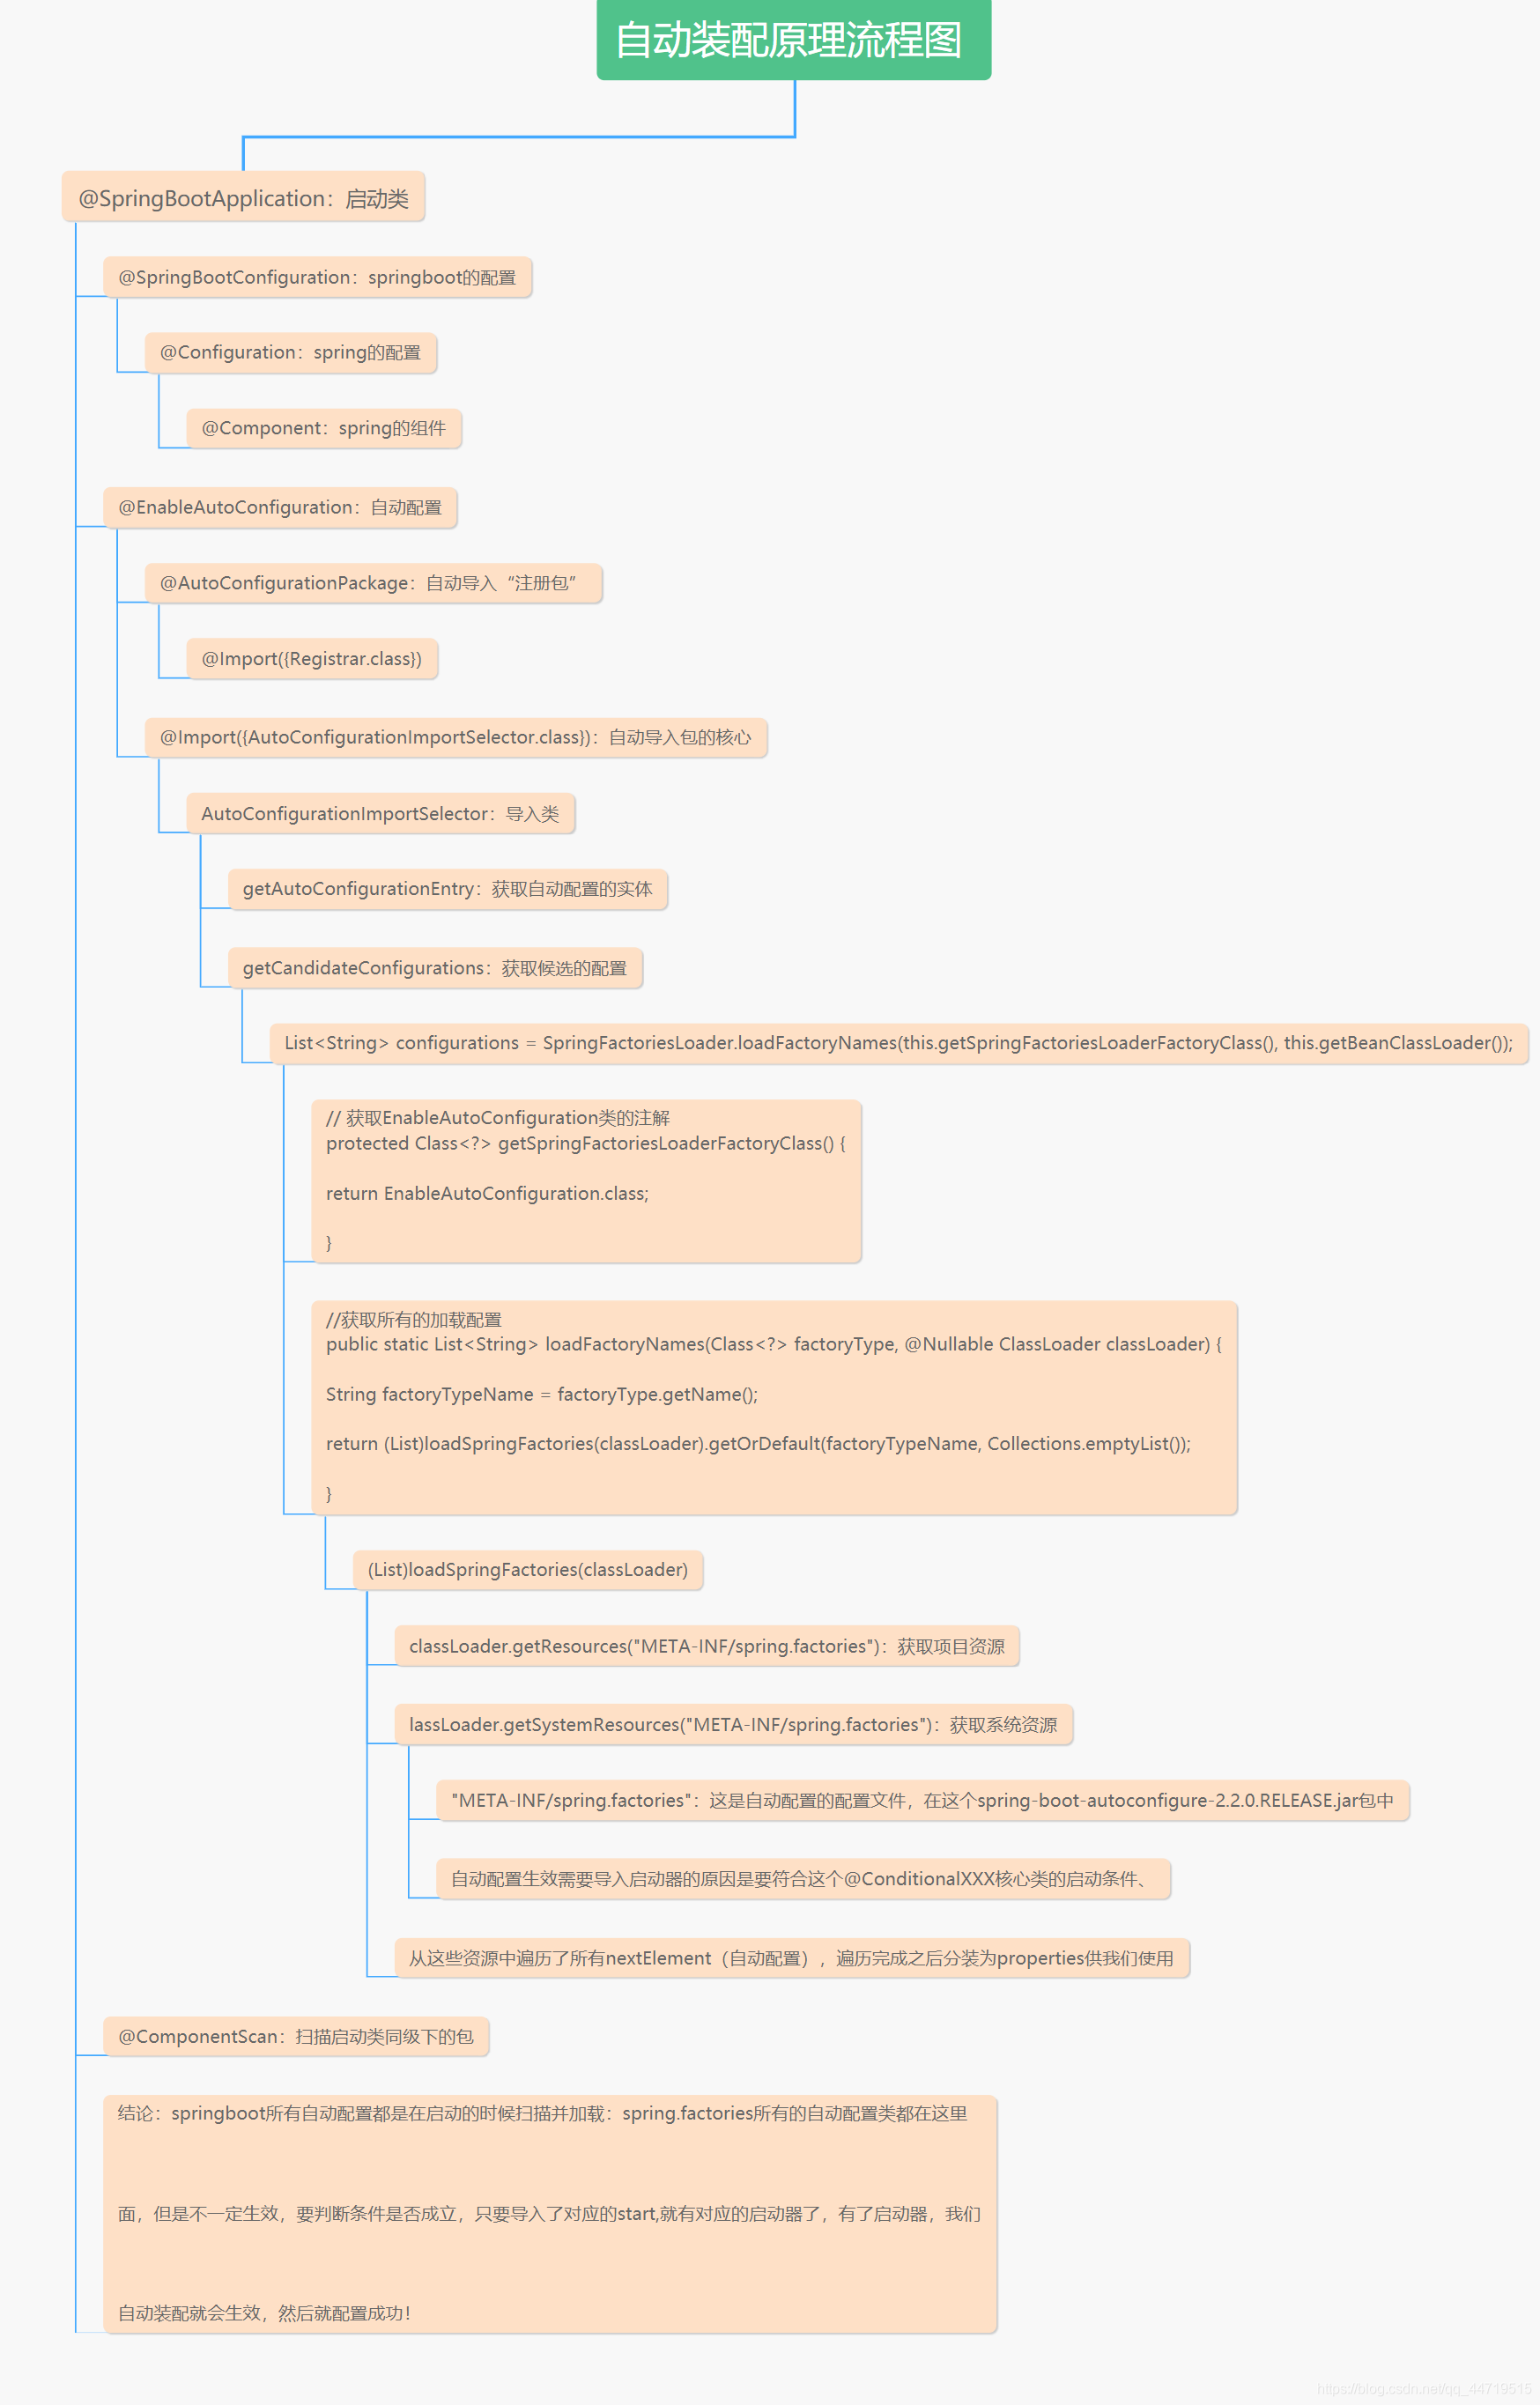
@ComponentScan  //扫描当前启动类同级的包
@SpringBootApplication	 	  // springboot的启动入口注解
    @SpringBootConfiguration  //springboot的配置
		@Configuration 		  //spring中的注解,代表这是一个配置类
    		@Component     	  //说明这是一个spring的组件

	@EnableAutoConfiguration  //springboot的自动配置
		@AutoConfigurationPackage //自动配置包
			@Import({Registrar.class}) //自动配置“包注册”
		@Import({AutoConfigurationImportSelector.class}) //自动配置选择
	@ComponentScan  //扫描当前启动类同级的包

//获取所有的配置
  List<String> configurations = this.getCandidateConfigurations(annotationMetadata, attributes);
-
-
获取候选的配置
protected List<String> getCandidateConfigurations(AnnotationMetadata metadata, AnnotationAttributes attributes) {
    List<String> configurations = SpringFactoriesLoader.loadFactoryNames(this.getSpringFactoriesLoaderFactoryClass(), this.getBeanClassLoader());
    Assert.notEmpty(configurations, "No auto configuration classes found in META-INF/spring.factories. If you are using a custom packaging, make sure that file is correct.");
    return configurations;
}
二、配置文件和yaml语法讲解
1、配置文件
SpringBoot使用一个全局的配置文件,配置文件名是固定的;
-
application.properties
-
application.yml
-
配置文件的作用:修改SpringBoot自动配置的默认值;SpringBoot在底层都给我们自动配置好;
-
YAML(YAML Ain’t Markup Language)
- YAML A Markup Language:是一个标记语言
- YAML isn’t Markup Language:不是一个标记语言;
-
标记语言:
- 以前的配置文件;大多都使用的是 xxxx.xml文件;
- YAML:以数据为中心,比json、xml等更适合做配置文件;
-
YAML:配置例子
server:
  port: 8081
- XML:
<server>
	<port>8081</port>
</server>
2、YAML语法:
基本语法
k:(空格)v:表示一对键值对(空格必须有);
以空格的缩进来控制层级关系;只要是左对齐的一列数据,都是同一个层级的
server:
    port: 8081
    context-path: /hello
属性和值也是大小写敏感;
值的写法
字面量:普通的值(数字,字符串,布尔)
k: v:字面直接来写;
字符串默认不用加上单引号或者双引号;
“”:双引号;不会转义字符串里面的特殊字符;特殊字符会作为本身想表示的意思
name: “zhangsan \n lisi”:输出;zhangsan 换行 lisi
‘’:单引号;会转义特殊字符,特殊字符最终只是一个普通的字符串数据
name: ‘zhangsan \n lisi’:输出;zhangsan \n lisi
对象、Map(属性和值)(键值对):
k: v:在下一行来+
写对象的属性和值的关系;注意缩进
对象还是k: v的方式
friends:
		 lastName: zhangsan
		age: 20
行内写法:
friends: {lastName: zhangsan,age: 18}
数组(List、Set):
用- 值表示数组中的一个元素
pets:
 - cat
 - dog
 - pig
行内写法
pets: [cat,dog,pig]
3、配置文件值注入
配置文件
person:
    lastName: hello
    age: 18
    boss: false
    birth: 2017/12/12
    maps: {k1: v1,k2: 12}
    lists:
      - lisi
      - zhaoliu
    dog:
      name: 小狗
      age: 12
javaBean:
/**
 * 将配置文件中配置的每一个属性的值,映射到这个组件中
 * @ConfigurationProperties:告诉SpringBoot将本类中的所有属性和配置文件中相关的配置进行绑定;
 *      prefix = "person":配置文件中哪个下面的所有属性进行一一映射
 *
 * 只有这个组件是容器中的组件,才能容器提供的@ConfigurationProperties功能;
 *
 */
@Component
@ConfigurationProperties(prefix = "person")
public class Person {

    private String lastName;
    private Integer age;
    private Boolean boss;
    private Date birth;

    private Map<String,Object> maps;
    private List<Object> lists;
    private Dog dog;
我们可以导入配置文件处理器,以后编写配置就有提示了
<!--导入配置文件处理器,配置文件进行绑定就会有提示-->
		<dependency>
			<groupId>org.springframework.boot</groupId>
			<artifactId>spring-boot-configuration-processor</artifactId>
			<optional>true</optional>
		</dependency>
1、properties配置文件在idea中默认utf-8可能会乱码
调整

2、@Value获取值和@ConfigurationProperties获取值比较
| @ConfigurationProperties | @Value | |
|---|---|---|
| 功能 | 批量注入配置文件中的属性 | 一个个指定 |
| 松散绑定(松散语法) | 支持 | 不支持 |
| SpEL | 不支持 | 支持 |
| JSR303数据校验 | 支持 | 不支持 |
| 复杂类型封装 | 支持 | 不支持 |
配置文件yml还是properties他们都能获取到值;
如果说,我们只是在某个业务逻辑中需要获取一下配置文件中的某项值,使用@Value;
如果说,我们专门编写了一个javaBean来和配置文件进行映射,我们就直接使用@ConfigurationProperties;
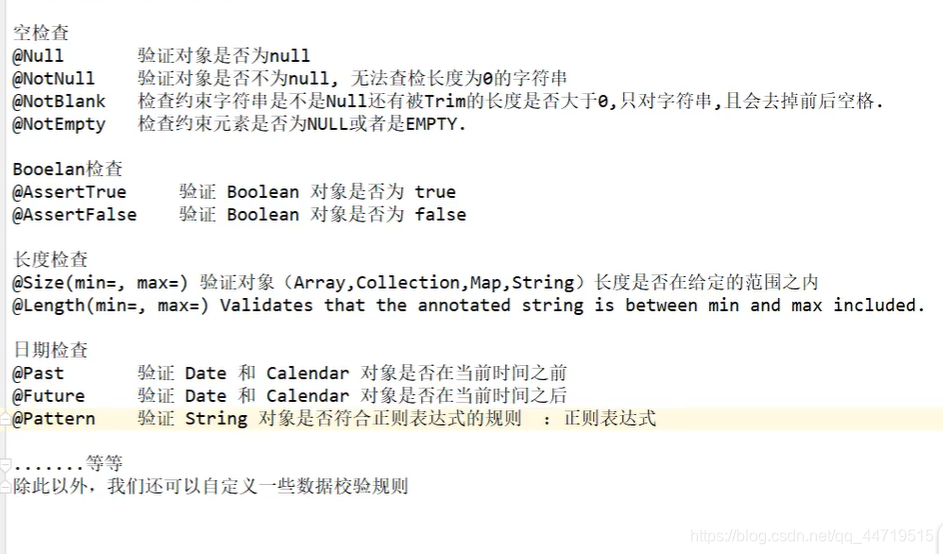
3、配置文件注入值数据校验(JSR303校验)
@Component
@ConfigurationProperties(prefix = "person")
@Validated
public class Person {

    /**
     * <bean class="Person">
     *      <property name="lastName" value="字面量/${key}从环境变量、配置文件中获取值/#{SpEL}"></property>
     * <bean/>
     */

   //lastName必须是邮箱格式
    @Email
    //@Value("${person.last-name}")
    private String lastName;
    //@Value("#{11*2}")
    private Integer age;
    //@Value("true")
    private Boolean boss;

    private Date birth;
    private Map<String,Object> maps;
    private List<Object> lists;
    private Dog dog;
4、@PropertySource&@ImportResource&@Bean
@PropertySource:加载指定的配置文件;
/**
 * 将配置文件中配置的每一个属性的值,映射到这个组件中
 * @ConfigurationProperties:告诉SpringBoot将本类中的所有属性和配置文件中相关的配置进行绑定;
 *      prefix = "person":配置文件中哪个下面的所有属性进行一一映射
 *
 * 只有这个组件是容器中的组件,才能容器提供的@ConfigurationProperties功能;
 *  @ConfigurationProperties(prefix = "person")默认从全局配置文件中获取值;
 *
 */
@PropertySource(value = {"classpath:person.properties"})
@Component
@ConfigurationProperties(prefix = "person")
//@Validated
public class Person {

    /**
     * <bean class="Person">
     *      <property name="lastName" value="字面量/${key}从环境变量、配置文件中获取值/#{SpEL}"></property>
     * <bean/>
     */

   //lastName必须是邮箱格式
   // @Email
    //@Value("${person.last-name}")
    private String lastName;
    //@Value("#{11*2}")
    private Integer age;
    //@Value("true")
    private Boolean boss;
@ImportResource:导入Spring的配置文件,让配置文件里面的内容生效;
Spring Boot里面没有Spring的配置文件,我们自己编写的配置文件,也不能自动识别;
想让Spring的配置文件生效,加载进来;@ImportResource标注在一个配置类上
@ImportResource(locations = {"classpath:beans.xml"})
导入Spring的配置文件让其生效
不来编写Spring的配置文件
<?xml version="1.0" encoding="UTF-8"?>
<beans xmlns="http://www.springframework.org/schema/beans"
       xmlns:xsi="http://www.w3.org/2001/XMLSchema-instance"
       xsi:schemaLocation="http://www.springframework.org/schema/beans http://www.springframework.org/schema/beans/spring-beans.xsd">


    <bean id="helloService" class="com.atguigu.springboot.service.HelloService"></bean>
</beans>
SpringBoot推荐给容器中添加组件的方式;推荐使用全注解的方式
1、配置类**@Configuration**------>Spring配置文件
2、使用**@Bean**给容器中添加组件
/**
 * @Configuration:指明当前类是一个配置类;就是来替代之前的Spring配置文件
 *
 * 在配置文件中用<bean><bean/>标签添加组件
 *
 */
@Configuration
public class MyAppConfig {

    //将方法的返回值添加到容器中;容器中这个组件默认的id就是方法名
    @Bean
    public HelloService helloService02(){
        System.out.println("配置类@Bean给容器中添加组件了...");
        return new HelloService();
    }
}
4、配置文件占位符
1、随机数
${random.value}、${random.int}、${random.long}
${random.int(10)}、${random.int[1024,65536]}
2、占位符获取之前配置的值,如果没有可以是用:指定默认值
person.last-name=张三${random.uuid}
person.age=${random.int}
person.birth=2017/12/15
person.boss=false
person.maps.k1=v1
person.maps.k2=14
person.lists=a,b,c
person.dog.name=${person.hello:hello}_dog
person.dog.age=15
5、Profile
1、多Profile文件
我们在主配置文件编写的时候,文件名可以是 application-{profile}.properties/yml
默认使用application.properties的配置;
2、yml支持多文档块方式
server:
  port: 8081
spring:
  profiles:
    active: prod

---
server:
  port: 8083
spring:
  profiles: dev


---

server:
  port: 8084
spring:
  profiles: prod  #指定属于哪个环境
3、激活指定profile
1、在配置文件中指定 spring.profiles.active=dev
2、命令行:
java -jar spring-boot-02-config-0.0.1-SNAPSHOT.jar --spring.profiles.active=dev;
可以直接在测试的时候,配置传入命令行参数
3、虚拟机参数;
-Dspring.profiles.active=dev
6、配置文件加载位置
springboot 启动会扫描以下位置的application.properties或者application.yml文件作为Spring boot的默认配置文件
–file:./config/
–file:./
–classpath:/config/
–classpath:/
优先级由高到底,高优先级的配置会覆盖低优先级的配置;
SpringBoot会从这四个位置全部加载主配置文件;互补配置;
我们还可以通过spring.config.location来改变默认的配置文件位置
项目打包好以后,我们可以使用命令行参数的形式,启动项目的时候来指定配置文件的新位置;指定配置文件和默认加载的这些配置文件共同起作用形成互补配置;
java -jar spring-boot-02-config-02-0.0.1-SNAPSHOT.jar --spring.config.location=G:/application.properties
7、外部配置加载顺序
SpringBoot也可以从以下位置加载配置; 优先级从高到低;高优先级的配置覆盖低优先级的配置,所有的配置会形成互补配置
1.命令行参数
所有的配置都可以在命令行上进行指定
java -jar spring-boot-02-config-02-0.0.1-SNAPSHOT.jar --server.port=8087 --server.context-path=/abc
多个配置用空格分开; --配置项=值
2.来自java:comp/env的JNDI属性
3.Java系统属性(System.getProperties())
4.操作系统环境变量
5.RandomValuePropertySource配置的random.*属性值
由jar包外向jar包内进行寻找;
优先加载带profile
6.jar包外部的application-{profile}.properties或application.yml(带spring.profile)配置文件
7.jar包内部的application-{profile}.properties或application.yml(带spring.profile)配置文件
再来加载不带profile
8.jar包外部的application.properties或application.yml(不带spring.profile)配置文件
9.jar包内部的application.properties或application.yml(不带spring.profile)配置文件
10.@Configuration注解类上的@PropertySource
11.通过SpringApplication.setDefaultProperties指定的默认属性
所有支持的配置加载来源
8、对比小结
@Value这个使用起来并不友好!我们需要为每个属性单独注解赋值,比较麻烦;我们来看个功能对比图
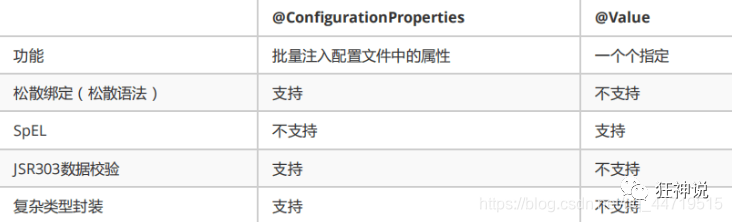
1、@ConfigurationProperties只需要写一次即可 , @Value则需要每个字段都添加
2、松散绑定:这个什么意思呢? 比如我的yml中写的last-name,这个和lastName是一样的, - 后面跟着的字母默认是大写的。这就是松散绑定。可以测试一下
3、JSR303数据校验 , 这个就是我们可以在字段是增加一层过滤器验证 , 可以保证数据的合法性
4、复杂类型封装,yml中可以封装对象 , 使用value就不支持
结论:
配置yml和配置properties都可以获取到值 , 强烈推荐 yml;
如果我们在某个业务中,只需要获取配置文件中的某个值,可以使用一下 @value;
如果说,我们专门编写了一个JavaBean来和配置文件进行一一映射,就直接使用@configurationProperties。
三、Thymelea模板引擎
1、模板引擎
-
JSP、Velocity、Freemarker、Thymeleaf
-
SpringBoot推荐的Thymeleaf;语法更简单,功能更强大;
2、引入thymeleaf;
		<dependency>
			<groupId>org.springframework.boot</groupId>
			<artifactId>spring-boot-starter-thymeleaf</artifactId>
          	2.1.6
		</dependency>
切换thymeleaf版本
<properties>
		<thymeleaf.version>3.0.9.RELEASE</thymeleaf.version>
		<!-- 布局功能的支持程序  thymeleaf3主程序  layout2以上版本 -->
		<!-- thymeleaf2   layout1-->
		<thymeleaf-layout-dialect.version>2.2.2</thymeleaf-layout-dialect.version>
  </properties>
3、Thymeleaf使用
@ConfigurationProperties(prefix = "spring.thymeleaf")
public class ThymeleafProperties {

	private static final Charset DEFAULT_ENCODING = Charset.forName("UTF-8");

	private static final MimeType DEFAULT_CONTENT_TYPE = MimeType.valueOf("text/html");

	public static final String DEFAULT_PREFIX = "classpath:/templates/";

	public static final String DEFAULT_SUFFIX = ".html";
  	//
只要我们把HTML页面放在classpath:/templates/,thymeleaf就能自动渲染;
使用:
1、导入thymeleaf的名称空间
<html lang="en" xmlns:th="http://www.thymeleaf.org">
2、使用thymeleaf语法;
<!DOCTYPE html>
<html lang="en" xmlns:th="http://www.thymeleaf.org">
<head>
    <meta charset="UTF-8">
    <title>Title</title>
</head>
<body>
    <h1>成功!</h1>
    <!--th:text 将div里面的文本内容设置为 -->
    <div th:text="${hello}">这是显示欢迎信息</div>
</body>
</html>
4、语法规则
-
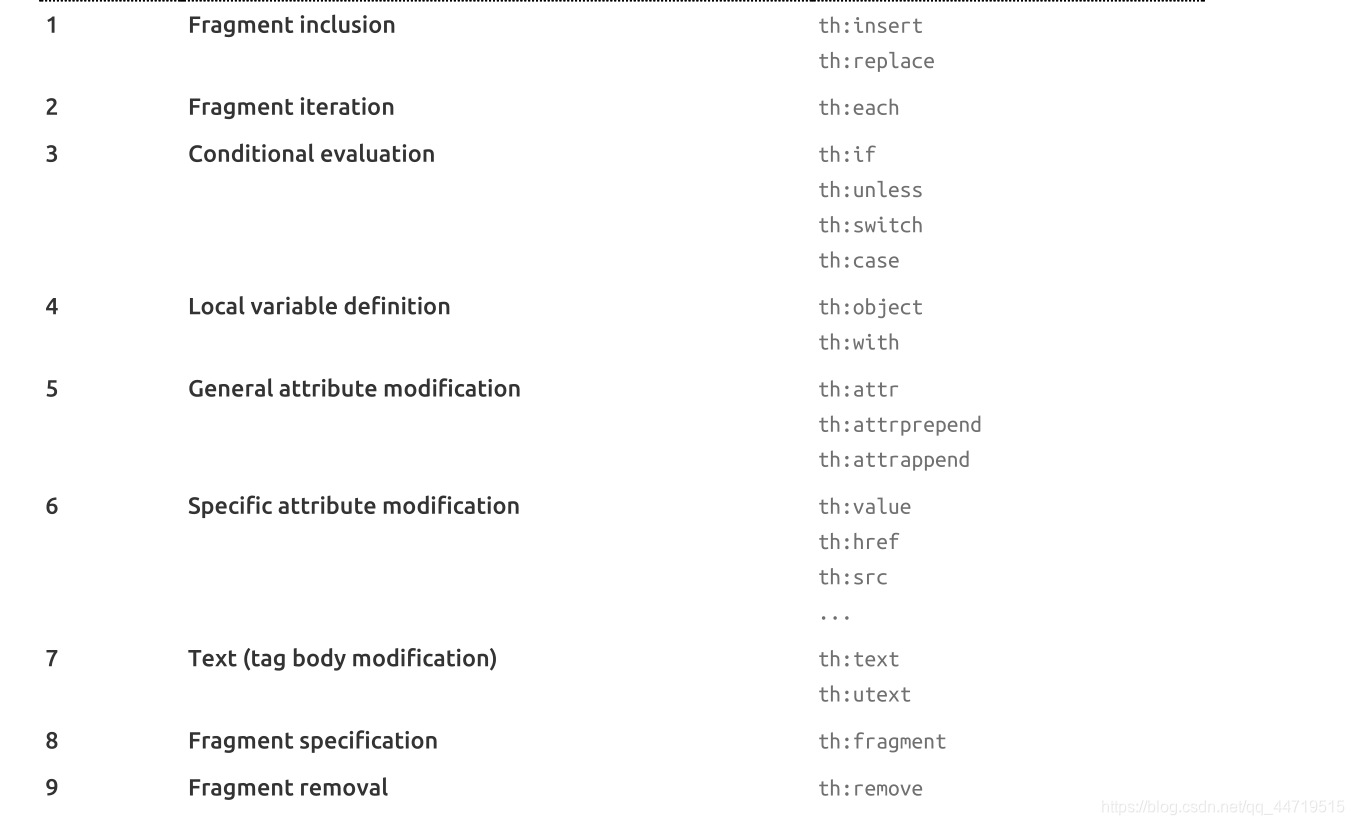
1)、th:text;改变当前元素里面的文本内容;
th:任意html属性;来替换原生属性的值
- 2)、表达式:
Simple expressions:(表达式语法)
    Variable Expressions: ${...}:获取变量值;OGNL;
    		1)、获取对象的属性、调用方法
    		2)、使用内置的基本对象:
    			#ctx : the context object.
    			#vars: the context variables.
                #locale : the context locale.
                #request : (only in Web Contexts) the HttpServletRequest object.
                #response : (only in Web Contexts) the HttpServletResponse object.
                #session : (only in Web Contexts) the HttpSession object.
                #servletContext : (only in Web Contexts) the ServletContext object.

                ${session.foo}
            3)、内置的一些工具对象:
#execInfo : information about the template being processed.
#messages : methods for obtaining externalized messages inside variables expressions, in the same way as they would be obtained using #{…} syntax.
#uris : methods for escaping parts of URLs/URIs
#conversions : methods for executing the configured conversion service (if any).
#dates : methods for java.util.Date objects: formatting, component extraction, etc.
#calendars : analogous to #dates , but for java.util.Calendar objects.
#numbers : methods for formatting numeric objects.
#strings : methods for String objects: contains, startsWith, prepending/appending, etc.
#objects : methods for objects in general.
#bools : methods for boolean evaluation.
#arrays : methods for arrays.
#lists : methods for lists.
#sets : methods for sets.
#maps : methods for maps.
#aggregates : methods for creating aggregates on arrays or collections.
#ids : methods for dealing with id attributes that might be repeated (for example, as a result of an iteration).

    Selection Variable Expressions: *{...}:选择表达式:和${}在功能上是一样;
    	补充:配合 th:object="${session.user}:
   <div th:object="${session.user}">
    <p>Name: <span th:text="*{firstName}">Sebastian</span>.</p>
    <p>Surname: <span th:text="*{lastName}">Pepper</span>.</p>
    <p>Nationality: <span th:text="*{nationality}">Saturn</span>.</p>
    </div>

    Message Expressions: #{...}:获取国际化内容
    Link URL Expressions: @{...}:定义URL;
    		@{/order/process(execId=${execId},execType='FAST')}
    Fragment Expressions: ~{...}:片段引用表达式
    		<div th:insert="~{commons :: main}">...</div>

Literals(字面量)
      Text literals: 'one text' , 'Another one!' ,…
      Number literals: 0 , 34 , 3.0 , 12.3 ,…
      Boolean literals: true , false
      Null literal: null
      Literal tokens: one , sometext , main ,…
Text operations:(文本操作)
    String concatenation: +
    Literal substitutions: |The name is ${name}|
Arithmetic operations:(数学运算)
    Binary operators: + , - , * , / , %
    Minus sign (unary operator): -
Boolean operations:(布尔运算)
    Binary operators: and , or
    Boolean negation (unary operator): ! , not
Comparisons and equality:(比较运算)
    Comparators: > , < , >= , <= ( gt , lt , ge , le )
    Equality operators: == , != ( eq , ne )
Conditional operators:条件运算(三元运算符)
    If-then: (if) ? (then)
    If-then-else: (if) ? (then) : (else)
    Default: (value) ?: (defaultvalue)
Special tokens:
    No-Operation: _
四、springMvc扩展
1、自动配置在Spring的默认值之上扩充了了以下功能:
- 包含
ContentNegotiatingViewResolver和BeanNameViewResolverbeans。 - 支持提供静态资源,包括对WebJars的支持( 本文档稍后介绍))。
- 自动注册
Converter,GenericConverter和Formatterbeans。 - 支持
HttpMessageConverters( 本文档稍后部分)。 - 自动注册
MessageCodesResolver( 本文档后面部分)。 - 静态
index.html支持。 - 自定义
Favicon支持(本文档稍后介绍)。 - 自动使用
ConfigurableWebBindingInitializerbean(本文 后面会介绍)。
2、怎么扩展
如果你想保留Spring Boot MVC功能,并且你想添加额外的 MVC配置(拦截器,格式化程序,视图控制器和其他功能),你可以添加自己的@Configuration类WebMvcConfigurer类但没有 @EnableWebMvc。如果您希望提供RequestMappingHandlerMapping,RequestMappingHandlerAdapter或ExceptionHandlerExceptionResolver的自定义实例,则可以声明WebMvcRegistrationsAdapter实例以提供此类组件。
如果您想完全控制Spring MVC,可以添加自己的@Configuration注释@EnableWebMvc。
- 继承WebMvcConfigurer接口
//
// Source code recreated from a .class file by IntelliJ IDEA
// (powered by Fernflower decompiler)
//

package org.springframework.web.servlet.config.annotation;

import java.util.List;
import org.springframework.format.FormatterRegistry;
import org.springframework.http.converter.HttpMessageConverter;
import org.springframework.lang.Nullable;
import org.springframework.validation.MessageCodesResolver;
import org.springframework.validation.Validator;
import org.springframework.web.method.support.HandlerMethodArgumentResolver;
import org.springframework.web.method.support.HandlerMethodReturnValueHandler;
import org.springframework.web.servlet.HandlerExceptionResolver;

public interface WebMvcConfigurer {
    default void configurePathMatch(PathMatchConfigurer configurer) {
    }

    default void configureContentNegotiation(ContentNegotiationConfigurer configurer) {
    }

    default void configureAsyncSupport(AsyncSupportConfigurer configurer) {
    }

    default void configureDefaultServletHandling(DefaultServletHandlerConfigurer configurer) {
    }

    //格式化
    default void addFormatters(FormatterRegistry registry) {
    }

    //拦截器
    default void addInterceptors(InterceptorRegistry registry) {
    }

    //静态资源过滤
    default void addResourceHandlers(ResourceHandlerRegistry registry) {
    }


    default void addCorsMappings(CorsRegistry registry) {
    }

    //视图控制
    default void addViewControllers(ViewControllerRegistry registry) {
    }

    //视图解析器
    default void configureViewResolvers(ViewResolverRegistry registry) {
    }

    default void addArgumentResolvers(List<HandlerMethodArgumentResolver> resolvers) {
    }

    default void addReturnValueHandlers(List<HandlerMethodReturnValueHandler> handlers) {
    }

    default void configureMessageConverters(List<HttpMessageConverter<?>> converters) {
    }

    default void extendMessageConverters(List<HttpMessageConverter<?>> converters) {
    }

    default void configureHandlerExceptionResolvers(List<HandlerExceptionResolver> resolvers) {
    }

    default void extendHandlerExceptionResolvers(List<HandlerExceptionResolver> resolvers) {
    }

    @Nullable
    default Validator getValidator() {
        return null;
    }

    @Nullable
    default MessageCodesResolver getMessageCodesResolver() {
        return null;
    }
}
- 自定义视图解析器
package com.atyldy.config;

import org.springframework.beans.factory.annotation.Configurable;
import org.springframework.context.annotation.Bean;
import org.springframework.web.servlet.View;
import org.springframework.web.servlet.ViewResolver;
import org.springframework.web.servlet.config.annotation.WebMvcConfigurer;
import java.util.Locale;
/**
 * @author shkstart
 * @create 2020-08-02 23:05
 */
@Configurable
public class MyMvcConfig implements WebMvcConfigurer {

    /**
     * 注册组件
     * ViewResolver s实现了视图解析器类的接口,在这里就可以把它看作视图解析器
     * @return
     */
    @Bean
    public  ViewResolver MyConfigViewResolve(){
        return new MyViewResolve();
    }

    /**
     * 自定义一个视图解析器的类
     */
    public  static  class  MyViewResolve implements ViewResolver{

        @Override
        public View resolveViewName(String s, Locale locale) throws Exception {
            return null;
        }
    }

}
- 视图控制—指定跳转
package com.atyldy.config;

import org.springframework.beans.factory.annotation.Configurable;
import org.springframework.context.annotation.Bean;
import org.springframework.context.annotation.Configuration;
import org.springframework.web.servlet.View;
import org.springframework.web.servlet.ViewResolver;
import org.springframework.web.servlet.config.annotation.ViewControllerRegistry;
import org.springframework.web.servlet.config.annotation.WebMvcConfigurer;
import java.util.Locale;
/**
 * @author shkstart
 * @create 2020-08-02 23:05
 */
@Configuration
public class MyMvcConfig implements WebMvcConfigurer {

    /**
     * 视图控制
     * @param registry
     */
    @Override
    public void addViewControllers(ViewControllerRegistry registry) {
        registry.addViewController("/login.html").setViewName("index");
        registry.addViewController("/").setViewName("index");
    }
}
五、springboot练习案例
1、页面国际化
-
在application.properties中指定国际化文件路径
# 指定国际化文件的路径
spring.messages.basename=i18n.login
[外链图片转存失败,源站可能有防盗链机制,建议将图片保存下来直接上传(img-vfDugAiD-1597138558221)(D:\NULL\学习资源\md笔记\images\sprtingboot国际化.png)]
-
在html页面获取国际化消息
<-- Message Expressions: #{...}:获取国际化内容--> <label> <input type="checkbox" > [[#{login.remember}]] </label> -
设置参数,实现国际化
<a class="btn btn-sm" th:href="@{/index.html(l='zh_CN')}">中文</a> <a class="btn btn-sm" th:href="@{/index.html(l='en_US')}">English</a> -
java代码实现中英文切换
LocaleResolver接口中solveLocale(HttpServletRequest request)的方法是定制国际化的方法,自定义国际化需要实现LocaleResolver接口,重写solveLocale(HttpServletRequest request)方法
package com.atyldy.config;


import org.springframework.web.servlet.LocaleResolver;
import org.thymeleaf.util.StringUtils;

import javax.servlet.http.HttpServletRequest;
import javax.servlet.http.HttpServletResponse;
import java.util.Locale;

/**
 * @author shkstart
 * @create 2020-08-08 18:01
 */
public class MyLocaleResolver implements LocaleResolver {

//    解析请求
    @Override
    public Locale resolveLocale(HttpServletRequest request) {
//        获取国际化连接参数l
        String language = request.getParameter("l");

//        设置默认国际化方法,如果没有就是用默认值
        Locale locale = Locale.getDefault();
//         判断参数是否为空
        if (!StringUtils.isEmpty(language)) {

//            分割参数
            String[] split = language.split("_");

//            国家,地区
            locale=new Locale(split[0],split[1]);
        }

        return locale;
    }

    @Override
    public void setLocale(HttpServletRequest httpServletRequest, HttpServletResponse httpServletResponse, 		Locale locale) {

    }
}
2、拦截器-登录拦截
- 自定义拦截器
自定义拦截器,继承HandlerInterceptor接口,实现preHandle(HttpServletRequest request, HttpServletResponse response, Object handler) 方法
package com.atyldy.config;

import org.springframework.web.servlet.HandlerInterceptor;

import javax.servlet.http.HttpServletRequest;
import javax.servlet.http.HttpServletResponse;

/**
 * @author shkstart
 * @create 2020-08-09 7:19
 */
public class MyInterceptors implements HandlerInterceptor {

    @Override
    public boolean preHandle(HttpServletRequest request, HttpServletResponse response, Object handler) throws Exception {

//        获取session,判断用户是否登录
        Object loginUsername = request.getSession().getAttribute("loginUsername");

//        判断是否获取到了session的值,若为空则不放行
        if (loginUsername==null){
            request.setAttribute("msg","权限不足,请重新登录!");
//            请求转发
            request.getRequestDispatcher("/index.html").forward(request,response);
            return false;
        }else {
            return true;
        }
    }
}
-
加入到扩展Mvc中
    @Override
    public void addInterceptors(InterceptorRegistry registry) {
        registry.addInterceptor(new MyInterceptors()) //加入自定义拦截器
            .addPathPatterns("/**")// 需要拦截
           .excludePathPatterns("/index.html","/user/login","login.html","/","/css/*","/js/*","/img/*");
        	//不需要拦截
    }
3、公共页面的使用和错误页面的定制、thymeleaf日期格式化
-
提取公共页面
<!DOCTYPE html> <html lang="en" xmlns:th="http://www.thymeleaf.org"> <head> <meta charset="UTF-8"> <title>公共部分</title> <!-- Bootstrap core CSS --> <link th:href="@{/css/bootstrap.min.css}" rel="stylesheet"> <!-- Custom styles for this template --> <link th:href="@{/css/dashboard.css}" rel="stylesheet"> </head> <body> <!--头部 th:fragment="bartip --> <nav class="navbar navbar-dark sticky-top bg-dark flex-md-nowrap p-0" th:fragment="bartip"> <a class="navbar-brand col-sm-3 col-md-2 mr-0" href="http://getbootstrap.com/docs/4.0/examples/dashboard/#">[[${session.loginUsername}]]</a> <input class="form-control form-control-dark w-100" type="text" placeholder="Search" aria-label="Search"> <ul class="navbar-nav px-3"> <li class="nav-item text-nowrap"> <a class="nav-link" th:href="@{/user/logout}">注销</a> </li> </ul> </nav> <!--侧边栏 th:fragment="sidebar" --> <nav class="col-md-2 d-none d-md-block bg-light sidebar" th:fragment="sidebar"> <div class="sidebar-sticky"> <ul class="nav flex-column"> <li class="nav-item"> <a th:class="${active=='main.html'?'nav-link active':'nav-link'}" th:href="@{/main.html}"> <svg xmlns="http://www.w3.org/2000/svg" width="24" height="24" viewBox="0 0 24 24" fill="none" stroke="currentColor" stroke-width="2" stroke-linecap="round" stroke-linejoin="round" class="feather feather-home"> <path d="M3 9l9-7 9 7v11a2 2 0 0 1-2 2H5a2 2 0 0 1-2-2z"></path> <polyline points="9 22 9 12 15 12 15 22"></polyline> </svg> Dashboard <span class="sr-only">(current)</span> </a> </li> <li class="nav-item"> <a class="nav-link" th:href="@{/main.html}"> <svg xmlns="http://www.w3.org/2000/svg" width="24" height="24" viewBox="0 0 24 24" fill="none" stroke="currentColor" stroke-width="2" stroke-linecap="round" stroke-linejoin="round" class="feather feather-file"> <path d="M13 2H6a2 2 0 0 0-2 2v16a2 2 0 0 0 2 2h12a2 2 0 0 0 2-2V9z"></path> <polyline points="13 2 13 9 20 9"></polyline> </svg> Orders </a> </li> <li class="nav-item"> <a class="nav-link" href="http://getbootstrap.com/docs/4.0/examples/dashboard/#"> <svg xmlns="http://www.w3.org/2000/svg" width="24" height="24" viewBox="0 0 24 24" fill="none" stroke="currentColor" stroke-width="2" stroke-linecap="round" stroke-linejoin="round" class="feather feather-shopping-cart"> <circle cx="9" cy="21" r="1"></circle> <circle cx="20" cy="21" r="1"></circle> <path d="M1 1h4l2.68 13.39a2 2 0 0 0 2 1.61h9.72a2 2 0 0 0 2-1.61L23 6H6"></path> </svg> Products </a> </li> <li class="nav-item"> <a th:class="${active=='emps'?'nav-link active':'nav-link'}" th:href="@{/emps}"> <svg xmlns="http://www.w3.org/2000/svg" width="24" height="24" viewBox="0 0 24 24" fill="none" stroke="currentColor" stroke-width="2" stroke-linecap="round" stroke-linejoin="round" class="feather feather-users"> <path d="M17 21v-2a4 4 0 0 0-4-4H5a4 4 0 0 0-4 4v2"></path> <circle cx="9" cy="7" r="4"></circle> <path d="M23 21v-2a4 4 0 0 0-3-3.87"></path> <path d="M16 3.13a4 4 0 0 1 0 7.75"></path> </svg> 员工管理 </a> </li> <li class="nav-item"> <a class="nav-link" href="http://getbootstrap.com/docs/4.0/examples/dashboard/#"> <svg xmlns="http://www.w3.org/2000/svg" width="24" height="24" viewBox="0 0 24 24" fill="none" stroke="currentColor" stroke-width="2" stroke-linecap="round" stroke-linejoin="round" class="feather feather-bar-chart-2"> <line x1="18" y1="20" x2="18" y2="10"></line> <line x1="12" y1="20" x2="12" y2="4"></line> <line x1="6" y1="20" x2="6" y2="14"></line> </svg> Reports </a> </li> <li class="nav-item"> <a class="nav-link" href="http://getbootstrap.com/docs/4.0/examples/dashboard/#"> <svg xmlns="http://www.w3.org/2000/svg" width="24" height="24" viewBox="0 0 24 24" fill="none" stroke="currentColor" stroke-width="2" stroke-linecap="round" stroke-linejoin="round" class="feather feather-layers"> <polygon points="12 2 2 7 12 12 22 7 12 2"></polygon> <polyline points="2 17 12 22 22 17"></polyline> <polyline points="2 12 12 17 22 12"></polyline> </svg> Integrations </a> </li> </ul> <h6 class="sidebar-heading d-flex justify-content-between align-items-center px-3 mt-4 mb-1 text-muted"> <span>Saved reports</span> <a class="d-flex align-items-center text-muted" href="http://getbootstrap.com/docs/4.0/examples/dashboard/#"> <svg xmlns="http://www.w3.org/2000/svg" width="24" height="24" viewBox="0 0 24 24" fill="none" stroke="currentColor" stroke-width="2" stroke-linecap="round" stroke-linejoin="round" class="feather feather-plus-circle"><circle cx="12" cy="12" r="10"></circle><line x1="12" y1="8" x2="12" y2="16"></line><line x1="8" y1="12" x2="16" y2="12"></line></svg> </a> </h6> <ul class="nav flex-column mb-2"> <li class="nav-item"> <a class="nav-link" href="http://getbootstrap.com/docs/4.0/examples/dashboard/#"> <svg xmlns="http://www.w3.org/2000/svg" width="24" height="24" viewBox="0 0 24 24" fill="none" stroke="currentColor" stroke-width="2" stroke-linecap="round" stroke-linejoin="round" class="feather feather-file-text"> <path d="M14 2H6a2 2 0 0 0-2 2v16a2 2 0 0 0 2 2h12a2 2 0 0 0 2-2V8z"></path> <polyline points="14 2 14 8 20 8"></polyline> <line x1="16" y1="13" x2="8" y2="13"></line> <line x1="16" y1="17" x2="8" y2="17"></line> <polyline points="10 9 9 9 8 9"></polyline> </svg> Current month </a> </li> <li class="nav-item"> <a class="nav-link" href="http://getbootstrap.com/docs/4.0/examples/dashboard/#"> <svg xmlns="http://www.w3.org/2000/svg" width="24" height="24" viewBox="0 0 24 24" fill="none" stroke="currentColor" stroke-width="2" stroke-linecap="round" stroke-linejoin="round" class="feather feather-file-text"> <path d="M14 2H6a2 2 0 0 0-2 2v16a2 2 0 0 0 2 2h12a2 2 0 0 0 2-2V8z"></path> <polyline points="14 2 14 8 20 8"></polyline> <line x1="16" y1="13" x2="8" y2="13"></line> <line x1="16" y1="17" x2="8" y2="17"></line> <polyline points="10 9 9 9 8 9"></polyline> </svg> Last quarter </a> </li> <li class="nav-item"> <a class="nav-link" href="http://getbootstrap.com/docs/4.0/examples/dashboard/#"> <svg xmlns="http://www.w3.org/2000/svg" width="24" height="24" viewBox="0 0 24 24" fill="none" stroke="currentColor" stroke-width="2" stroke-linecap="round" stroke-linejoin="round" class="feather feather-file-text"> <path d="M14 2H6a2 2 0 0 0-2 2v16a2 2 0 0 0 2 2h12a2 2 0 0 0 2-2V8z"></path> <polyline points="14 2 14 8 20 8"></polyline> <line x1="16" y1="13" x2="8" y2="13"></line> <line x1="16" y1="17" x2="8" y2="17"></line> <polyline points="10 9 9 9 8 9"></polyline> </svg> Social engagement </a> </li> <li class="nav-item"> <a class="nav-link" href="http://getbootstrap.com/docs/4.0/examples/dashboard/#"> <svg xmlns="http://www.w3.org/2000/svg" width="24" height="24" viewBox="0 0 24 24" fill="none" stroke="currentColor" stroke-width="2" stroke-linecap="round" stroke-linejoin="round" class="feather feather-file-text"> <path d="M14 2H6a2 2 0 0 0-2 2v16a2 2 0 0 0 2 2h12a2 2 0 0 0 2-2V8z"></path> <polyline points="14 2 14 8 20 8"></polyline> <line x1="16" y1="13" x2="8" y2="13"></line> <line x1="16" y1="17" x2="8" y2="17"></line> <polyline points="10 9 9 9 8 9"></polyline> </svg> Year-end sale </a> </li> </ul> </div> </nav> </body> </html> -
使用公共部分
<!--头部 th:replace:替换 th:inset:插入 --> <div th:replace="~{comons/comons::bartip}"></div> <!-- 侧边栏--> <div th:replace="~{comons/comons::sidebar(active='emps')}"></div> -
转换日期格式
<!-- #dates.format():转换日期格式 --> <td th:text="${#dates.format(emp.getBirth(),'yyyy-MM-dd HH:mm')}"></td> -
定制错误页面
1、在templates文件夹下新建error文件夹
2、在error文件夹里新建404.html或500.html、5xxx.html,springboot会自动识别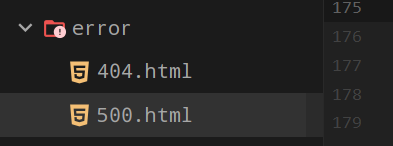

魔乐社区(Modelers.cn) 是一个中立、公益的人工智能社区,提供人工智能工具、模型、数据的托管、展示与应用协同服务,为人工智能开发及爱好者搭建开放的学习交流平台。社区通过理事会方式运作,由全产业链共同建设、共同运营、共同享有,推动国产AI生态繁荣发展。
更多推荐


 1
1 0
0- 0


 已为社区贡献1条内容

所有评论(0)