【mybatisPlus】mybatis、mybatisPlus、JPA使用过程
mybatisPlus
mybatis
JPA
mybatisPlus
MyBatis-Plus(简称 MP)是一个 MyBatis 的增强工具,在 MyBatis 的基础上只做增强不做改变,为简化开发、提高效率而生。
引入依赖:不再引入MyBatis 以及 MyBatis-Spring依赖,避免版本冲突
3.0 版本基于 JDK8,提供了 lambda 形式的调用
<!-- mybatis-plus 依赖 -->
<dependency>
    <groupId>com.baomidou</groupId>
    <artifactId>mybatis-plus-boot-starter</artifactId>
    <version>3.5.1</version>
</dependency>
在application.properties添加数据库配置
server.port=9001
# 数据库相关配置
spring.datasource.url=jdbc:mysql://localhost:3306/test?rewriteBatchedStatements=true&useUnicode=true&serverTimezone=Asia/Shanghai&autoReconnect=true&zeroDateTimeBehavior=convertToNull&allowMultiQueries=true
spring.datasource.username=root
spring.datasource.password=123456
spring.datasource.driver-class-name=com.mysql.cj.jdbc.Driver
spring.datasource.hikari.connection-test-query=SELECT 1 FROM DUAL
spring.datasource.hikari.minimum-idle=10
spring.datasource.hikari.maximum-pool-size=100
spring.datasource.hikari.connection-init-sql=set names utf8mb4
spring.datasource.hikari.connection-timeout=7200
在SpringBoot启动类上,添加扫描Mapper的注解@MapperScan。减少每次新增mapper文件都需要添加扫码的麻烦。(Mapper包自己创建,与Controller同级)
@MapperScan("com.example.Mapper")
@SpringBootApplication
public class Application {
    public static void main(String[] args) {
        SpringApplication.run(Application.class, args);
    }
}
使用步骤:
1.创建entity实体类
2.在创建的Mapper包下,创建mapper接口继承BaseMapper接口
3.创建测试类
1.创建entity实体类Goods
添加@TableName注解并指定表名,不然会出现找不到表名的错误,默认会使用类名按照下划线进行拆分去寻找数据表
@Data
@TableName(value = "t_goods")
public class Goods {
    /**
     * 主键id
     */
    private Long id;

    /**
     * 商品名称
     */
    private String name;

    /**
     * 商品价格
     */
    private Integer price;

    /**
     * 商品描述
     */
    private String description;

    /**
     * 创建时间
     */
    private Date createTime;

    /**
     * 更新时间
     */
    private Date updateTime;
}
2.在创建的Mapper包下,创建mapper接口继承BaseMapper接口
public interface GoodsMapper extends BaseMapper<Goods> {
}
3.创建测试类
@Slf4j
@SpringBootTest
@RunWith(SpringRunner.class)
public class FirstDemoTest {
    @Autowired
    private GoodsMapper goodsMapper;

    @Test
    public void testSelectList() {
        List<Goods> goodsList = goodsMapper.selectList(null);

        System.out.println(JSON.toJSONString(goodsList));
    }
}
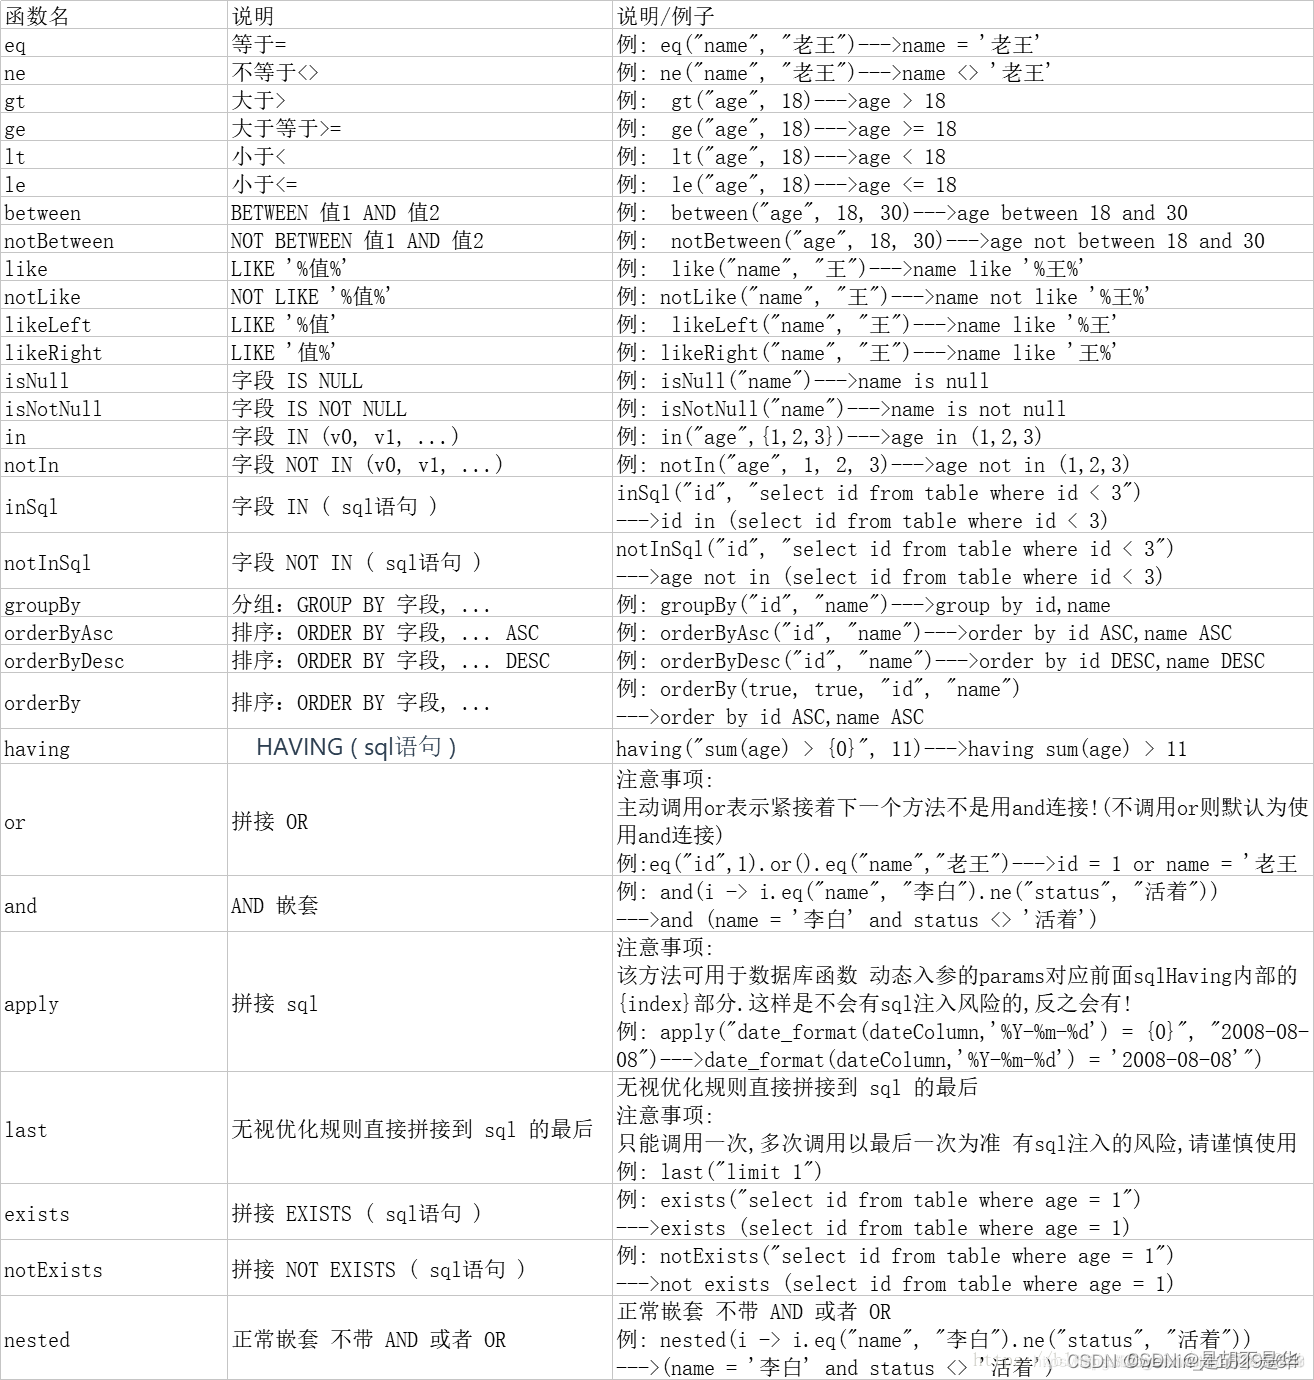
条件构造器 Wrapper类的使用:
1.查询id等于2
@Test
public void testSelectListByWrapper() {
    LambdaQueryWrapper<Goods> queryWrapper = new LambdaQueryWrapper<>();
    //查询id等于2
    //2. 其中Goods::getId的意思就相当于:
		// 1.1 实例化一个Goods对象
		//Goods goods = new Goods;
	//1.2 调用对象Goods的get方法,这里调用的是getId:
	// Goods.getId();
	//3.eq方法相当于赋值“=”
	//即将Id的值为参数id,注意此时使用的是get方法而不是set方法

    queryWrapper.eq(Goods::getId, 2);
    List<Goods> goodsList = goodsMapper.selectList(queryWrapper);
    System.out.println(JSON.toJSONString(goodsList));


}
自定义sql:
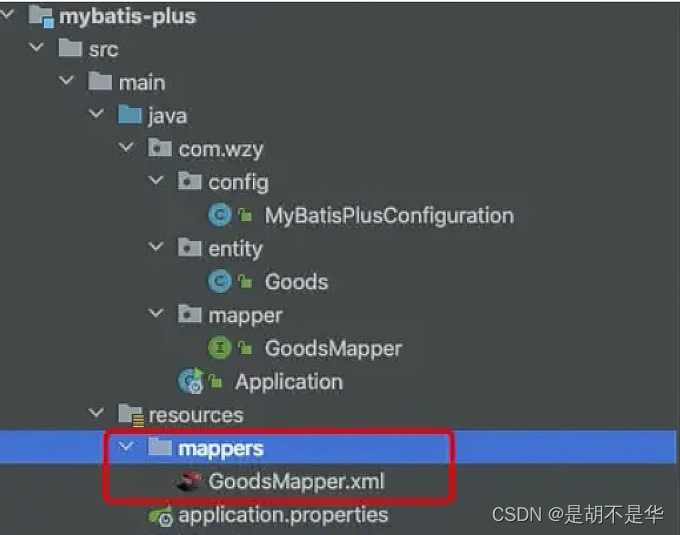
1.在application.properties文件里添加配置,声明xml存放的位置
2.在Mapper包下创建GoodsMapper接口,添加自定义方法
3.在resources下的mappers文件夹编写一个自定义查询Mapper.xml
4.编写测试类测试
1.在application.properties文件里添加配置,声明xml存放的位置
#MybatisPlus配置
mybatis-plus.mapper-locations=classpath*:/mappers/**/*Mapper.xml
2.在Mapper包下创建GoodsMapper接口,添加自定义方法
根据商品分类id分页查询商品信息.
定义返回的对象GoodsCategoryVO
创建GoodsMapper接口,在文件中添加自定义查询方法。
@Data
public class GoodsCategoryVO {

    private Long goodsId;

    private String spuName;

    private Long categoryId;

    private String categoryName;

    private Integer price;

    private Date createTime;

    private Date updateTime;
}
public interface GoodsMapper extends BaseMapper<Goods> {
/**
 * 通过商品分类id查询商品信息
 *
 * @param page       分页参数
 * @param categoryId 分类id
 * @return 商品列表
 */
GoodsCategoryVO selectGoodsByCategoryId(@RequestParam("categoryId") Long categoryId);
}
3.在resources下的mappers文件夹编写一个自定义查询Mapper.xml
创建GoodsMapper.xml文件,在文件中,编写自定义的查询语句,和MyBatis没有任何区别。
<?xml version="1.0" encoding="UTF-8"?>
<!DOCTYPE mapper PUBLIC "-//mybatis.org//DTD Mapper 3.0//EN" "http://mybatis.org/dtd/mybatis-3-mapper.dtd">
<mapper namespace="com.wzy.mapper.GoodsMapper">

    <!-- 通用查询映射结果 -->
    <resultMap id="BaseResultMap" type="com.wzy.entity.Goods">
        <id column="id" property="id"/>
        <result column="name" property="name"/>
        <result column="price" property="price"/>
        <result column="description" property="description"/>
        <result column="create_time" property="createTime"/>
        <result column="update_time" property="updateTime"/>
    </resultMap>

    <select id="selectGoodsByCategoryId" resultType="com.wzy.vo.GoodsCategoryVO">
        select g.id          as goodsId,
               g.name        as spuName,
               r.category_id as categoryId,
               c.name        as categoryName,
               g.price,
               g.create_time as createTime,
               g.update_time as udpateTime
        from t_goods g
                 left join t_goods_category_relation r
                           on g.id = r.goods_id
                 left join t_category c on r.category_id = c.id
        where r.category_id = #{categoryId}
    </select>

</mapper>
4.编写测试类测试
@Test
public void testSelectGoodsByCategoryId() {
    // 查询分类为1的商品,即分类为手机
    selectGoodsByCategoryId(1L);
}
分页
使用插件PageHelper
1.引入依赖
注意:
1.引入了mybatis-plus可能会与PageHelper 依赖 冲突,exclusion去掉mybatis
2.springboot版本2.6以上 pagehelper 1.4.1以上,否则报错依赖循环
3.引入的是pagehelper-spring-boot-starter
<!-- PageHelper 分页插件 -->
 <dependency>
     <groupId>com.github.pagehelper</groupId>
     <artifactId>pagehelper-spring-boot-starter</artifactId>
     <version>1.4.1</version>
     <exclusions>
         <exclusion>
             <groupId>org.mybatis</groupId>
             <artifactId>mybatis</artifactId>
         </exclusion>
         <exclusion>
             <groupId>mybatis-spring</groupId>
             <artifactId>org.mybatis</artifactId>
         </exclusion>
     </exclusions>
 </dependency>
2. server类
public interface UserService {

    /**
     * 分页
     * @param pageNum
     * @param pageTotal
     * @return
     */
    PageInfo getUserListPage(Integer pageNum , Integer pageTotal);

}
3.serviceImpl类
@Service
public class UserServiceImpl implements UserService {

    @Resource
    private UserDao userDao;

    public PageInfo getUserListPage(Integer pageNum,Integer pageSize){
        //开启分页
        //wrapper条件构造器为null
        PageHelper.startPage(pageNum,pageSize);
        PageInfo page=new PageInfo(userDao.selectList(null));
        return  page;
    }
}

魔乐社区(Modelers.cn) 是一个中立、公益的人工智能社区,提供人工智能工具、模型、数据的托管、展示与应用协同服务,为人工智能开发及爱好者搭建开放的学习交流平台。社区通过理事会方式运作,由全产业链共同建设、共同运营、共同享有,推动国产AI生态繁荣发展。
更多推荐


 0
0 0
0- 0


 已为社区贡献2条内容

所有评论(0)