springBoot 实现 QQ扫码登录
springBoot 实现 QQ扫码登录
·
1.qq互联网站申请注册账号信息
https://connect.qq.com/
2. 创建应用
账号创建通过后创建应用
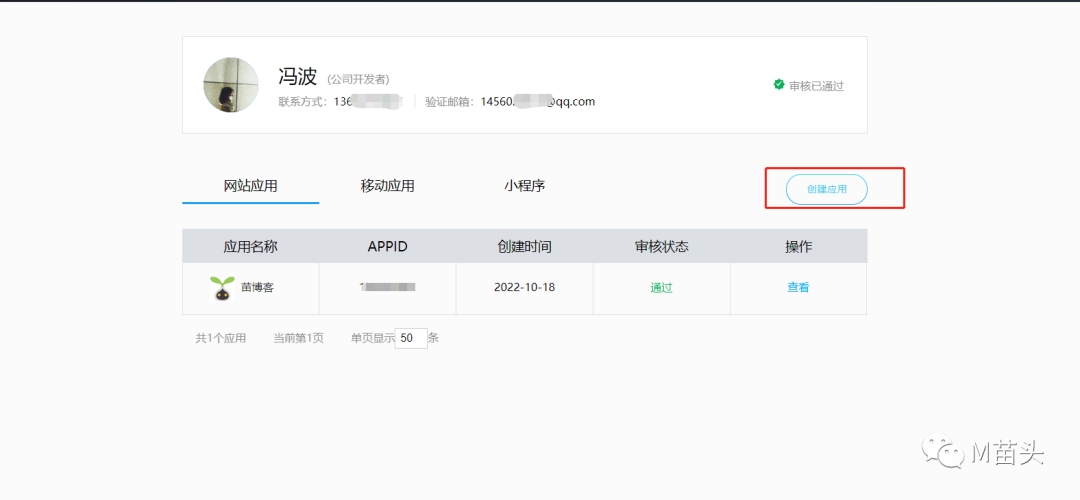
网站回调地址就是登录成功后回调的页面
1: 注: 这样需要注意,您需要先将你的网站接入了QQ登录之后,他的审核才会通过,创建应用后,就会有 APP ID 和APP Key
通过 appid 和appkey 就可以接入qq
https://graph.qq.com/oauth2.0/authorize?response_type=code&client_id{appid}&redirect_uri={回调地址}&state={appkey}"
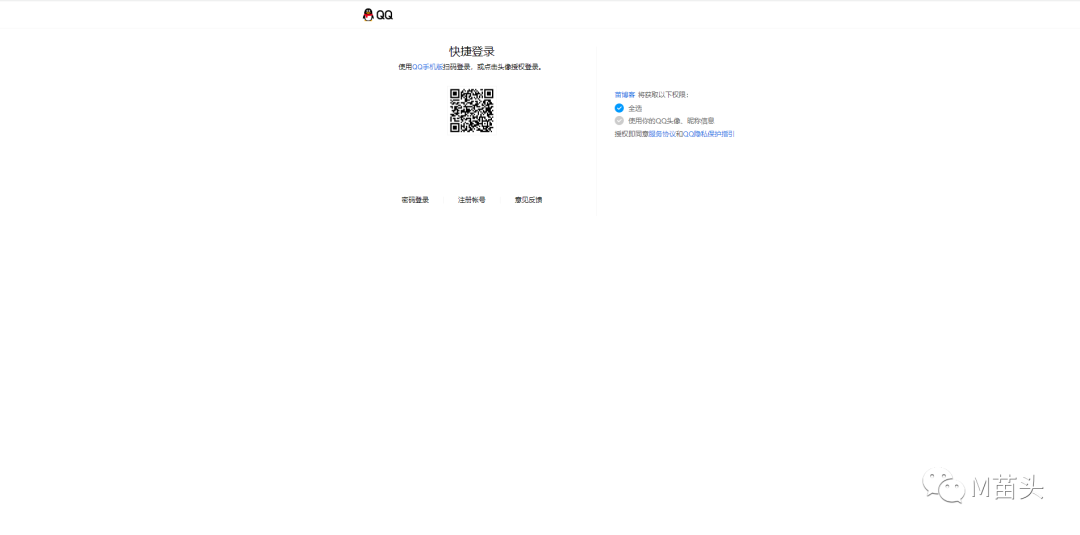
3. 在网站的qq登录设置点击事件
在当前窗口打开上面的链接
// 页面部分
<svg class="icondx" @click="qqlogin"  aria-hidden="true">
       <use   xlink:href="#icon-QQ1"></use>
</svg>


// ts 部分
const qqlogin =() =>{
  location.href="https://graph.qq.com/oauth2.0/authorize?response_type=code&client_id=102024981&redirect_uri=http://huchunlin.cn/loginserver/wxlogin&state=Vr12qQmurwoRYeV7"
}
4.扫码登录后回调的页面
这是一个空白页面,qq扫码登录后,回调到该页面,在该页面拿到code,去后端接口拿到当前用户的用户信息,以及返回用户登录的token,放到localStorage ,放入后,通过路由跳转到你登录后的页面,从本地的localStorage 拿到用户信息进行渲染用户信息
<template>
  <span  v-loading.fullscreen.lock="this.loading"></span>
</template>
<script>
import {onBeforeMount, onBeforeUnmount, ref} from "vue";
import axios, {AxiosError, AxiosRequestConfig, AxiosRequestHeaders} from 'axios'
export default {
  name: "loginLoading",
  setup() {
    onBeforeMount(() => {
      document.body.setAttribute("style", "background: #fff");
    });
    onBeforeUnmount(() => {
      document.body.removeAttribute("style");
    });
  },

  // data() 返回的属性将会成为响应式的状态
  // 并且暴露在 `this` 上
  data() {
    return {
      loading: true
    }
  },

  // methods 是一些用来更改状态与触发更新的函数
  // 它们可以在模板中作为事件监听器绑定
  methods: {
    getLoginDate(){
      const code = this.$route.query.code
      const state =  this.$route.query.state
      axios.get(
          "http://43.142.28.53:1001/loginserver/wxlogin?code="+code+"&state="+state,
          null,
          {headers: { 'Content-Type': 'multipart/form-data' } }
      ).then((res) => {
        localStorage.setItem('tokenDL',res.data.data.token)
        localStorage.setItem("avatar",res.data.data.avatar);
        localStorage.setItem("login","-1");
        localStorage.setItem("name",res.data.data.name);
        this.$router.push({path:'/'});
      }).catch((res) => {
      })
    }
  },

  // 生命周期钩子会在组件生命周期的各个不同阶段被调用
  // 例如这个函数就会在组件挂载完成后被调用
  mounted() {
    this.getLoginDate();
  }
}
</script>
<style scoped>
</style>
5.后端接口拿到用户信息
1.引入maven
<!-- 实现qq扫码登录 -->
        <dependency>
            <groupId>net.gplatform</groupId>
            <artifactId>Sdk4J</artifactId>
            <version>2.0</version>
        </dependency>
2.配置文件参数
app_ID = 你的appid
app_KEY = 你的appkey
redirect_URI = 你的回调地址
scope = get_user_info,add_topic,add_one_blog,add_album,upload_pic,list_album,add_share,check_page_fans,add_t,add_pic_t,del_t,get_repost_list,get_info,get_other_info,get_fanslist,get_idollist,add_idol,del_ido,get_tenpay_addr
baseURL = https://graph.qq.com/
getUserInfoURL = https://graph.qq.com/user/get_user_info
accessTokenURL = https://graph.qq.com/oauth2.0/token
authorizeURL = https://graph.qq.com/oauth2.0/authorize
getOpenIDURL = https://graph.qq.com/oauth2.0/me
addTopicURL = https://graph.qq.com/shuoshuo/add_topic
addBlogURL = https://graph.qq.com/blog/add_one_blog
addAlbumURL = https://graph.qq.com/photo/add_album
uploadPicURL = https://graph.qq.com/photo/upload_pic
listAlbumURL = https://graph.qq.com/photo/list_album
addShareURL = https://graph.qq.com/share/add_share
checkPageFansURL = https://graph.qq.com/user/check_page_fans
addTURL = https://graph.qq.com/t/add_t
addPicTURL = https://graph.qq.com/t/add_pic_t
delTURL = https://graph.qq.com/t/del_t
getWeiboUserInfoURL = https://graph.qq.com/user/get_info
getWeiboOtherUserInfoURL = https://graph.qq.com/user/get_other_info
getFansListURL = https://graph.qq.com/relation/get_fanslist
getIdolsListURL = https://graph.qq.com/relation/get_idollist
addIdolURL = https://graph.qq.com/relation/add_idol
delIdolURL = https://graph.qq.com/relation/del_idol
getTenpayAddrURL = https://graph.qq.com/cft_info/get_tenpay_addr
getRepostListURL = https://graph.qq.com/t/get_repost_list
version = 2.0.0.0
3.接口返回用户信息
**
     * 回调
     *
     * @param request
     * @param response
     * @throws Exception
     */
    @RequestMapping("wxlogin")
    public ResultUtil connect(HttpServletRequest request, HttpServletResponse response, RedirectAttributes attributes) throws Exception {
        response.setContentType("text/html; charset=utf-8");
        try {
            //根据登录的状态获取AccessToken
            Oauth oauth = new Oauth();
            request.getSession().setAttribute("qq_connect_state","你的appkey");
            AccessToken accessTokenObj = oauth.getAccessTokenByRequest(request);
            String accessToken = null,
                    openID = null;
            long tokenExpireIn = 0L;
            if (accessTokenObj.getAccessToken().equals("")) {
                return new  ResultUtil(false,"没有获取到响应参数");
            } else {
                accessToken = accessTokenObj.getAccessToken();  //授权令牌
                tokenExpireIn = accessTokenObj.getExpireIn();   //过期时间

                // 利用获取到的accessToken 去获取当前用的openid -------- start
                //通过accessToken获取openId;(底层分析,这步请求的是https://graph.qq.com/oauth2.0/me 接口 );
                //然后得到数据后 放session,放数据库 以及判断啥的 根据自己的业务来搞即可;
                //这里的openId是每个用户的唯一标识,所以肯定得处理好;
                OpenID openIDObj = new OpenID(accessToken);
                openID = openIDObj.getUserOpenID();
                //过accessToken和openId得到用户信息;(底层分析,这步请求是https://graph.qq.com/user/get_user_info接口)
                UserInfo qzoneUserInfo = new UserInfo(accessToken, openID);
                UserInfoBean userInfoBean = qzoneUserInfo.getUserInfo();

                System.out.println("用户信息: " + userInfoBean);

                if (userInfoBean.getRet() == 0) {   //getRet() 返回状态码 0成功 0<失败
                    /*用户昵称可能带有表情解决方法参考:
                    *   修改数据库编码格式 :utf8改成了“utf8mb4”
                        将昵称进行Base64加密存储,解密输出
                        存储昵称时进行昵称判断编写过滤emoji工具
                        引入第三方依赖包:emoji-java
                    * */
                    //获取QQ昵称
                    String nickname = userInfoBean.getNickname();   //用户昵称可能带有表情,存不进数据库,对其进行转码
                    //获取QQ性别
                    String gender = userInfoBean.getGender();
                    //获取QQ头像
                    String avatar = userInfoBean.getAvatar().getAvatarURL100();
                    // 判断是否用用户信息,如果没有注册,如果有,直接登录
                    UUser uUser = iUUserService.selectByOpid(openID);
                    UUserPO uUserPO = new UUserPO();
                    if (uUser == null){
                        // 注册 qq扫码用户
                        UUser build = UUser.builder().name(nickname).avatar(avatar).opid(openID).crType("2").build();
                        iUUserService.save(build);
                        BeanUtils.copyProperties(build,uUserPO);
                    } else {
                        BeanUtils.copyProperties(uUser,uUserPO);
                    }
                    //生成token
                    HashMap<String, String> objectObjectHashMap = new HashMap<>();
                    objectObjectHashMap.put("id",openID);
                    objectObjectHashMap.put("name",nickname);
                    String string = JSONObject.toJSONString(objectObjectHashMap);
                    String token = JwtUtil.createJwt("miaotou", "", string);
                    redistemplate.opsForValue().set(token,openID, enumData.USER_LOGIN_DATE.getLoginData(), TimeUnit.SECONDS);
                    uUserPO.setToken(token);
                    return new ResultUtil(true,uUserPO);
                } else {
                    return new ResultUtil(false);
                }
            }
        } catch (QQConnectException e) {
            return new ResultUtil(false,e);
        }
    }
6.前端从本地localStorage 拿到用户信息
loginUsre.value = <string>localStorage.getItem("login");
  loginData.avatar = <string>localStorage.getItem("avatar");
  loginData.name = <string>localStorage.getItem("name");
7.效果


魔乐社区(Modelers.cn) 是一个中立、公益的人工智能社区,提供人工智能工具、模型、数据的托管、展示与应用协同服务,为人工智能开发及爱好者搭建开放的学习交流平台。社区通过理事会方式运作,由全产业链共同建设、共同运营、共同享有,推动国产AI生态繁荣发展。
更多推荐


 0
0 0
0- 0


 已为社区贡献1条内容

所有评论(0)