小车AI视觉交互--3.人脸追踪
·
一、实验目标
结合摄像头云台实现人脸追踪。通过对人脸对象进行识别,并检测识别到的人脸的外切圆的圆形的x,y坐标与画面中心的差值,运用PID算法控制舵机运动使识别目标位于画面中心位置。
二、实验源码
#bgr8转jpeg格式 bgr8 to jpeg format
import enum
import cv2
def bgr8_to_jpeg(value, quality=75):
return bytes(cv2.imencode('.jpg', value)[1])
import sys
#导入Raspbot驱动库 Import the Raspbot library
from Raspbot_Lib import Raspbot
# 创建Rosmaster对象 bot Create the Rosmaster object bot
bot = Raspbot()
import cv2
import mediapipe as mp
import ipywidgets.widgets as widgets
import threading
import time
import sys
import math
image_widget = widgets.Image(format='jpeg', width=640, height=480)
global face_x, face_y, face_w, face_h
face_x = face_y = face_w = face_h = 0
global target_valuex
target_valuex = 2048
global target_valuey
target_valuey = 2048
import PID
xservo_pid = PID.PositionalPID(1.1, 0.4, 0.01)#1.1 0.4 0.01
yservo_pid = PID.PositionalPID(0.8, 0.2, 0.01)
# 定义 target_servox 和 target_servoy 在外部 Define target_servox and target_servoy externally
target_servox = 90
target_servoy = 25
def servo_reset():
bot.Ctrl_Servo(1,90)
bot.Ctrl_Servo(2,40)
servo_reset()
# 线程功能操作库 Thread function operation library
import inspect
import ctypes
def _async_raise(tid, exctype):
"""raises the exception, performs cleanup if needed"""
tid = ctypes.c_long(tid)
if not inspect.isclass(exctype):
exctype = type(exctype)
res = ctypes.pythonapi.PyThreadState_SetAsyncExc(tid, ctypes.py_object(exctype))
if res == 0:
raise ValueError("invalid thread id")
elif res != 1:
# """if it returns a number greater than one, you're in trouble,
# and you should call it again with exc=NULL to revert the effect"""
ctypes.pythonapi.PyThreadState_SetAsyncExc(tid, None)
def stop_thread(thread):
_async_raise(thread.ident, SystemExit)
class FaceDetector:
def __init__(self, minDetectionCon=0.5):
self.mpFaceDetection = mp.solutions.face_detection
self.mpDraw = mp.solutions.drawing_utils
self.facedetection = self.mpFaceDetection.FaceDetection(min_detection_confidence=minDetectionCon)
def findFaces(self, frame):
img_RGB = cv2.cvtColor(frame, cv2.COLOR_BGR2RGB)
self.results = self.facedetection.process(img_RGB)
bboxs = []
bbox=0,0,0,0
if self.results.detections:
for id, detection in enumerate(self.results.detections):
bboxC = detection.location_data.relative_bounding_box
ih, iw, ic = frame.shape
bbox = int(bboxC.xmin * iw), int(bboxC.ymin * ih), \
int(bboxC.width * iw), int(bboxC.height * ih)
bboxs.append([id, bbox, detection.score])
frame= self.fancyDraw(frame, bbox)
# cv2.putText(frame, f'{int(detection.score[0] * 100)}%',
# (bbox[0], bbox[1] - 20), cv2.FONT_HERSHEY_PLAIN,
# 3, (255, 0, 255), 2)
return frame, bboxs, self.results.detections, bbox
def fancyDraw(self, frame, bbox, l=30, t=5):
x, y, w, h = bbox
x1, y1 = x + w, y + h
cv2.rectangle(frame, (x, y),(x + w, y + h), (0,255,0), 2)
# Top left x,y
cv2.line(frame, (x, y), (x + l, y), (0,255,0), t)
cv2.line(frame, (x, y), (x, y + l), (0,255,0), t)
# Top right x1,y
cv2.line(frame, (x1, y), (x1 - l, y), (0,255,0), t)
cv2.line(frame, (x1, y), (x1, y + l), (0,255,0), t)
# Bottom left x1,y1
cv2.line(frame, (x, y1), (x + l, y1), (0,255,0), t)
cv2.line(frame, (x, y1), (x, y1 - l), (0,255,0), t)
# Bottom right x1,y1
cv2.line(frame, (x1, y1), (x1 - l, y1), (0,255,0), t)
cv2.line(frame, (x1, y1), (x1, y1 - l), (0,255,0), t)
return frame
image = cv2.VideoCapture(0)
image.set(3,320)
image.set(4,240)
# image.set(cv2.CAP_PROP_FOURCC, cv2.VideoWriter.fourcc('M', 'J', 'P', 'G'))
# image.set(cv2.CAP_PROP_BRIGHTNESS, 62) #设置亮度 -64 - 64 0.0 Set Brightness -64 - 64 0.0
# image.set(cv2.CAP_PROP_CONTRAST, 63) #设置对比度 -64 - 64 2.0 Set Contrast -64 - 64 2.0
# image.set(cv2.CAP_PROP_EXPOSURE, 4800) #设置曝光值 1.0 - 5000 156.0 Set the exposure value 1.0 - 5000 156.0
#csi
# from picamera2 import Picamera2, Preview
# import libcamera
# picam2 = Picamera2()
# camera_config = picam2.create_preview_configuration(main={"format":'RGB888',"size":(320,240)})
# camera_config["transform"] = libcamera.Transform(hflip=1, vflip=1)
# picam2.configure(camera_config)
# picam2.start()
1. 无死区控制,实时性高,舵机会一直工作,抖动频繁;
def Face_Recongnize():
face_detector = FaceDetector(0.75)
while image.isOpened():
ret, frame = image.read()
#frame = picam2.capture_array()
faces,_,descore,bbox= face_detector.findFaces(frame)
x,y,w,h = bbox
if descore:
#Proportion-Integration-Differentiation算法 PID algorithm
# 输入X轴方向参数PID控制输入 Input X-axis direction parameter PID control input
xservo_pid.SystemOutput = x + w/2
xservo_pid.SetStepSignal(300)
xservo_pid.SetInertiaTime(0.01, 0.1)
#print(xservo_pid.SystemOutput)
target_valuex = int(1600+xservo_pid.SystemOutput)
target_servox = int((target_valuex-500)/10)
# 将云台转动至PID调校位置 Turn the gimbal to the PID adjustment position
if target_servox > 180:
target_servox = 180
if target_servox < 0:
target_servox = 0
# 输入Y轴方向参数PID控制输入 Input Y-axis direction parameter PID control input
yservo_pid.SystemOutput = y + h/2
yservo_pid.SetStepSignal(280)
yservo_pid.SetInertiaTime(0.01, 0.1)
target_valuey = int(1150+yservo_pid.SystemOutput)
target_servoy = int((target_valuey-500)/10)
#print("target_servoy %d", target_servoy)
if target_servoy > 110:
target_servoy = 110
if target_servoy < 0:
target_servoy = 0
# 将云台转动至PID调校位置 Turn the gimbal to the PID adjustment position
#robot.Servo_control(target_valuex,target_valuey)
bot.Ctrl_Servo(1, target_servox)
bot.Ctrl_Servo(2, target_servoy)
try:
image_widget.value = bgr8_to_jpeg(frame)
except:
continue
2, 带死区控制,跟随实时性差一些,舵机在死区范围内不运动,抖动较稳定;
def Face_Recongnize2():
global x,w,y,h
face_detector = FaceDetector(0.75)
while 1:
ret, frame = image.read()
#frame = picam2.capture_array()
faces,_,descore,bbox= face_detector.findFaces(frame)
x,y,w,h = bbox
if descore:
#Proportion-Integration-Differentiation算法 pid algorithm
# 输入X轴方向参数PID控制输入 Input X-axis direction parameter PID control input
if math.fabs(180 - (x + w/2)) > 40:
xservo_pid.SystemOutput = x + w/2
xservo_pid.SetStepSignal(280)
xservo_pid.SetInertiaTime(0.01, 0.05)
#print(xservo_pid.SystemOutput)
target_valuex = int(1600+xservo_pid.SystemOutput)
target_servox = int((target_valuex-500)/10)
# 将云台转动至PID调校位置 Turn the gimbal to the PID adjustment position
if target_servox > 180:
target_servox = 180
if target_servox < 0:
target_servox = 0
bot.Ctrl_Servo(1, target_servox)
# 输入Y轴方向参数PID控制输入 Input Y-axis direction parameter PID control input
if math.fabs(180 - (y + h/2)) > 40:
yservo_pid.SystemOutput = y + h/2
yservo_pid.SetStepSignal(280)
yservo_pid.SetInertiaTime(0.01, 0.05)
target_valuey = int(1150+yservo_pid.SystemOutput)
target_servoy = int((target_valuey-500)/10)
#print("target_servoy %d", target_servoy)
if target_servoy > 100:
target_servoy = 100
if target_servoy < 0:
target_servoy = 0
bot.Ctrl_Servo(2, target_servoy)
try:
image_widget.value = bgr8_to_jpeg(faces)
except:
continue
display(image_widget)
thread1 = threading.Thread(target=Face_Recongnize2)
thread1.daemon=True
thread1.start()
#picam2.stop()
#picam2.close()
#结束进程,释放摄像头,需要结束时执行 End the process, release the camera, and execute when it is finished
stop_thread(thread1)
#释放摄像头资源 Release camera resources
image.release()
#复位舵机 Reset servo
bot.Ctrl_Servo(1,90)
bot.Ctrl_Servo(2,25)
三、实验现象
代码块运行后,我们将人脸出现在摄像头前,摄像头识别人脸后会控制云台跟人脸移动方向移动。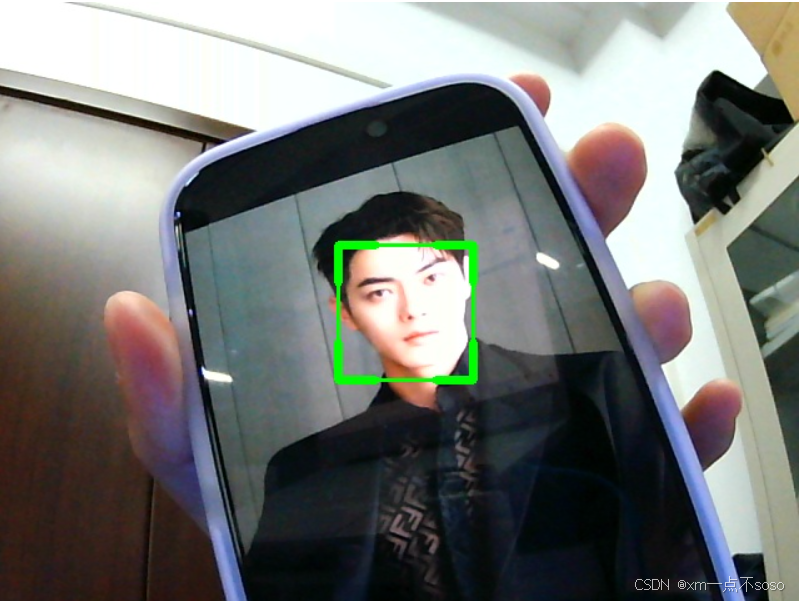

魔乐社区(Modelers.cn) 是一个中立、公益的人工智能社区,提供人工智能工具、模型、数据的托管、展示与应用协同服务,为人工智能开发及爱好者搭建开放的学习交流平台。社区通过理事会方式运作,由全产业链共同建设、共同运营、共同享有,推动国产AI生态繁荣发展。
更多推荐


 8
8 0
0- 0


 已为社区贡献4条内容

所有评论(0)