记录校赛比赛视觉思路
引言
学校在四月份准备了一场校赛让我们提前适应电赛
题目为小车
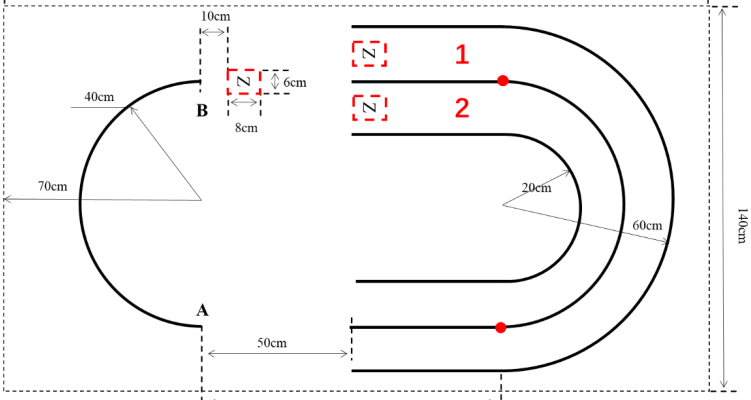
大致规则:
从B跑到A,不能踩线,视觉识别数字再跑对应的道,加个弯道A到A
限高限宽限长202015
难点:
从B开始到跑道上有一段距离如何进入并且不踩到线,双线如何转大弯,定点停车,并且稳定出错率少。
解决方案
一.数字识别:
1.数字识别本质是多物体检测,我们可以使用目标检测算法yolov11模型来实现,我们的硬件中有对神经网路算法的硬件加速,因此使用时不会减缓摄像头其他算法以及对下位机的操控。
数字识别相对的视觉我们有成熟的解决方案
神经网络秒杀
二.双道识别巡线与大弯
1.双道巡线
,第一时间我们团队想到智能驾驶上存在双线行驶,通过过滤视野中不需要的部分,再对图像帧中双线进行双滑动窗口拟合曲线,运用曲率来控制驱动程序跑动,但是由于小车限制高度,摄像头高位视野中双线视野过窄,容易丢失单线,造成算法误差大,以及大弯处距离短,速度快,曲率瞬时变化过大,下位pid难度巨大以及参数难以线性拟合等问题我们暂定放弃该方案。
第一种解决方案设计是参考网上的开源程序
链接: https://github.com/kemfic/Curved-Lane-Lines/blob/master/P4.ipynb
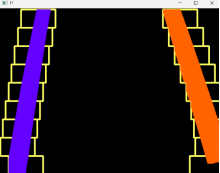
2.单线算法
双线都检测,在转弯处大概率会丢失内线,因此我们团队,运用斜沿算法,锁定外道,来进行弯道以及入道以后的巡线,经过测试,该算法有较为良好的线性变化,适合下位机操作,但是该算法计算量较大,帧率仅仅2~~3帧,经过优化也只有5~10帧,因此存在实时性滞后的风险,因此我们将方案放在备选方案中。
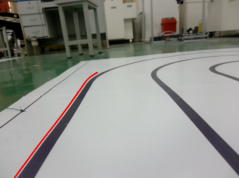
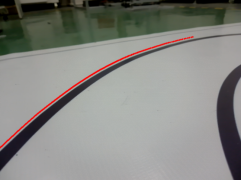
核心思路二值化后寻找左下角点向上爬线
想到这个方法是看到别人智能车代码里有八邻域方法 感觉效果嘎嘎好
但是我们追求稳定没有太多的时间调所以没有深入修改,从而放弃了这个方法
#------------------------------------
'''
斜沿线法
'''
def find_black_points(binary):
    height, width = binary.shape
    black_points = []
    x_time= time()
    # 从左下角开始找第一个x坐标小于320的黑点
    for y in range(height - 1, -1, -1):
        for x in range(100):
            if binary[y, x] == 0:
                black_points.append((x, y))
                break
        if black_points:
            break
    y_time = time()
    print(y_time-x_time)
    if not black_points:
        print("没有找到黑点")
        return np.array([])

    # 继续找其他黑点
    while True:
        x, y = black_points[-1]
        new_x = x
        new_y = y - 1
        min_x = width
        found = False

        # 扩大搜索范围到左右各5个像素
        for offset_x in range(-1, 6):
            check_x = new_x + offset_x
            if 0 <= check_x < width and 0 <= new_y < height:
                if binary[new_y, check_x] == 0:
                    found = True
                    min_x = min(min_x, check_x)

        if found:
            black_points.append((min_x, new_y))
        else:
            break
    return np.array(black_points)
3.侧摄像头巡外线
由于我们团队在开始时调整pid过程中发现单线巡线算法耗时低且控制简单,出错率低,在对前置摄像头单线方案不满意时我们试了试侧摄像头巡线,不需要多复杂的算法,简单的对黑线中点的拟合,对数据处理以及小车控制的稳定性,都有极大提升,大弯甚至都不需要修改任何参数,轻轻松松通过。
**这个思路就最简单仅仅取黑线的某个x轴比如500行时的值看他与中间这条线的偏移量 **
还有强调这个时我们装侧面的摄像头,他的x和y对于前面的摄像头是反的,也就是说你要用到前置摄像头就好把他的y和x改过来
#-------------------------------------------------------------------------------------------------
#测摄像头寻线
def black_line_y(cnm):
    global mode
    global rechange
    global end_flag
    global double_kill_flag
    huidu_img = cv2.cvtColor(cnm, cv2.COLOR_RGB2GRAY)
    #threshold_value = 30
    #_, black_regions = cv2.threshold(huidu_img, threshold_value, 255, cv2.THRESH_BINARY)
    #retval, dst = cv2.threshold(huidu_img, 0, 255, cv2.THRESH_OTSU)
    #二值化
    retval, dst = cv2.threshold(huidu_img, 170, 255, cv2.THRESH_BINARY)
    #print("数值")
    #print(retval)
    # 膨胀,白区域变大
    dst = cv2.dilate(dst, None, iterations=2)
    # # 腐蚀,白区域变小
    # dst = cv2.erode(dst, None, iterations=6)
    # 显示结果
    # cv2.imshow('Black Regions', dst)
    # 对调x与y,这里取第350列的数据
    color = dst[:, 500]
    # 找到黑色的像素点个数
    black_count = np.sum(color == 0)
    # 找到黑色的像素点索引
    black_index = np.where(color == 0)
    # 防止black_count=0的报错
    if black_count == 0:
        black_count = 1
    if black_index[0].size == 0:
        # 你可以设置默认返回的值
        black_index = (np.array([240]), np.array([240]))  # 假设图像高度为480,默认返回图像垂直中心位置
    # 找到黑色像素的中心点位置
    center = (black_index[0][black_count - 1] + black_index[0][0]) / 2
    # 计算出center与标准中心点的偏移量,因为图像高度是480,因此标准中心是240
    direction = (center - 240)+280
    #param = str(direction)+'\r\n'
    print(int(direction))
    Serial_port_sending_xy(int(direction), 0, 0)
    # ser.write(param.encode('utf-8'))
    # print(center)
    color = dst[:,639]
    black_head = np.sum(color == 0)
    print("black_head",black_head)
    if black_head == 0:
        double_kill_flag+=1
    if double_kill_flag == 2:
        mode = 0
        end_flag= 1
        rechange = 0
        #Serial_port_sending_xy(320,0,4)
    return dst
#-------------------------------------------------------------------------
三.起步,进入双道
我们团队在起步阶段发现,开环进入双线道路极有可能压线,以及侧摄像头无法得到正确的图像(小车偏移过多)的问题,因此需要对进入赛道时进行一个身位调整。
1.视野投影+最长白列法,调整小车入道时的身位。
#-------------------------------------------------------------------------
#视野变化从平视变成垂直看
def perspective_warp(img,
                     dst_size=(640,480),
                     src=np.float32([(0.0,0),(1,0),(0.0,0.5),(1,0.5)]),
                     dst=np.float32([(0,0), (1, 0), (0,1), (1,1)])):
    img_size = np.float32([(img.shape[1],img.shape[0])])
    src = src* img_size
    # For destination points, I'm arbitrarily choosing some points to be
    # a nice fit for displaying our warped result
    # again, not exact, but close enough for our purposes
    dst = dst * np.float32(dst_size)
    # Given src and dst points, calculate the perspective transform matrix
    M = cv2.getPerspectiveTransform(src, dst)
    # Warp the image using OpenCV warpPerspective()
    warped = cv2.warpPerspective(img, M, dst_size)
    return warped
#-------------------------------------------------------------------------
#-------------------------------------------------------------------------
#最长白列算法
def longest_white_column_from_middle(image):
    # 1. 图像预处理
    # 将图像转换为灰度图
    gray = cv2.cvtColor(image, cv2.COLOR_BGR2GRAY)
    # 进行二值化处理,将像素值大于 170 的设为 255,小于等于 170 的设为 0
    retval, binary = cv2.threshold(gray, 170, 255, cv2.THRESH_BINARY)
    # 膨胀,白区域变大
    #cv2.imshow('nb',binary)
    #binary = perspective_warp(binary)
    binary = cv2.dilate(binary, None, iterations=2)
    binary = cv2.erode(binary, None, iterations=6)
    height, width = binary.shape
    middle_col = width // 2

    # 3. 从中间向两边统计白色像素数量
    left_counts = []
    right_counts = []

    # 向左统计
    for col in range(middle_col, -1, -1):
        white_count = np.count_nonzero(binary[:, col] == 255)
        left_counts.append(white_count)

    # 向右统计
    for col in range(middle_col, width):
        white_count = np.count_nonzero(binary[:, col] == 255)
        right_counts.append(white_count)

    # 4. 找出左右两侧的最长白列
    left_longest_index = np.argmax(left_counts)
    right_longest_index = np.argmax(right_counts)

    left_longest_col = middle_col - left_longest_index
    right_longest_col = middle_col + right_longest_index

    left_longest_count = left_counts[left_longest_index]
    right_longest_count = right_counts[right_longest_index]

    return binary,left_longest_col, left_longest_count, right_longest_col, right_longest_count
#------------------------------------------------------------------------------
四.单线巡线
1.前置摄像头过滤二值化后拟合黑线(和前面的那个侧摄像头大差不差)
#--------------------------------------------------------------------------------------------------------------------
#直线单线寻线
def black_line(frame):
    global rechange
    global shibie_flag
    huidu_img = cv2.cvtColor(frame, cv2.COLOR_RGB2GRAY)
    threshold_value = 30
    _, black_regions = cv2.threshold(huidu_img, threshold_value, 255, cv2.THRESH_BINARY)
    retval, dst = cv2.threshold(huidu_img, 0, 255, cv2.THRESH_OTSU)
    #二值化其实只用了下面这个
    retval, dst = cv2.threshold(huidu_img, 170,255 , cv2.THRESH_BINARY)

    # 膨胀,白区域变大
    dst = cv2.dilate(dst, None, iterations=2)
    # # 腐蚀,白区域变小
    # dst = cv2.erode(dst, None, iterations=6)
    # 显示结果
    #cv2.imshow('Black Regions', dst)
    color = dst[479]
    # 找到白色的像素点个数,如寻黑色,则改为0
    white_count = np.sum(color == 0)
    # 找到白色的像素点索引,如寻黑色,则改为0
    white_index = np.where(color == 0)
    # 防止white_count=0的报错
    if white_count == 0:
        shibie_flag =3

    if white_count != 0 :
        if white_index[0].size == 0:
        # 你可以设置默认返回的值
            white_index = (np.array([320]), np.array([320]))  # 默认返回 -1
        # 找到黑色像素的中心点位置
        # 计算方法应该是边缘检测,计算黑色边缘的位置和/2,即是白色的中央位置。
        center = (white_index[0][white_count - 1] + white_index[0][0]) / 2
        # 计算出center与标准中心点的偏移量,因为图像大小是640,因此标准中心是320,因此320不能改。
        direction = center - 320
        param = str(direction)+'\r\n'
        Serial_port_sending_xy(int(center),0,1 )
        #ser.write(param.encode('utf-8'))
        print(center)
#------------------------------------------------------------------------------------------------
五.出道停车
由于单下位机出道停车存在一定的偏移,因此需要通过视觉来简单的纠正。
同四的代码
总结
还得靠队友的超强PID


魔乐社区(Modelers.cn) 是一个中立、公益的人工智能社区,提供人工智能工具、模型、数据的托管、展示与应用协同服务,为人工智能开发及爱好者搭建开放的学习交流平台。社区通过理事会方式运作,由全产业链共同建设、共同运营、共同享有,推动国产AI生态繁荣发展。
更多推荐


 21
21 0
0- 0


 已为社区贡献2条内容

所有评论(0)