ROS2软件架构全面解析-rclpy软件框架
本章是详细介绍ROS2通信中间件中rclpy模块软件框架。
前言
本章是详细介绍ROS2通信中间件中rclpy模块软件框架。
不了解背景的同学请先看:
- ROS2软件架构全面解析-学习如何设计通信中间件框架: link
rclpy软件框架
rclpy :ROS Client Library for the Python language.
上面这句话清楚的描述rclpy对于ROS的功能定位。
ROS2提供三种通信模式:Topics、Services、Actions,我们就以这三种视角进行代码架构学习
总体软件层级
下面展示我划分的rclpy 软件架构图,先以Services的通信方式为例(后面我会把所有模块补上)进行讲解
我把rclpy module划分三层,Application API、API Python Business、API C++ Business。
- Application API:上面对接User Application,对其提供直接调用的接口、比如:create_client。其中__init__比较特殊代表__init__.py文件,这个文件主要功能包含:提供 init 函数,用于初始化 ROS 2 通信,包括设置上下文、处理命令行参数、设置信号处理程序。当写User Application代码时必须写到这样一行代码:
rclpy.init(args=args)
这行代码的目的就是对__init__.py文件中init函数接口初始化。
- API Python Business:支撑Application API功能层级
- API C++ Business:通过C++方式实现支撑整个python API功能层级。提供的方式是把整个C++模块编译为_rclpy_pybind11 库让Python使用。其中在_rclpy_pybind11.cpp文件中将 ROS 2 的 C++ 接口绑定到 Python,从而使得 Python 用户可以使用 C++实现业务功能。
// Provide singleton access to the rclpy C modules.
rclpy_implementation = import_c_library('._rclpy_pybind11', package)
Services框架
Services通信方式的功能主要是由Server端和Client端发送和接收数据实现功能,
User Application层级中Server和Client主干逻辑代码:
//Client.py
class adderClient(Node):
    def __init__(self, name):
        super().__init__(name)                                                    # ROS2节点父类初始化
        self.client = self.create_client(AddTwoInts, 'add_two_ints')              # 创建服务客户端对象(服务接口类型,服务名)
        while not self.client.wait_for_service(timeout_sec=1.0):                  # 循环等待服务器端成功启动
            self.get_logger().info('service not available, waiting again...')
        self.request = AddTwoInts.Request()                                       # 创建服务请求的数据对象
    def send_request(self):                                                       # 创建一个发送服务请求的函数
        self.request.a = int(sys.argv[1])
        self.request.b = int(sys.argv[2])
        self.future = self.client.call_async(self.request)                        # 异步方式发送服务请求

//Server.py
class adderServer(Node):
    def __init__(self, name):
        super().__init__(name)                                                             # ROS2节点父类初始化
        self.srv = self.create_service(AddTwoInts, 'add_two_ints', self.adder_callback)    # 创建服务器对象(接口类型、服务名、服务器回调函数)
    def adder_callback(self, request, response):                                           # 创建回调函数,执行收到请求后对数据的处理
        response.sum = request.a + request.b                                               # 完成加法求和计算,将结果放到反馈的数据中
        self.get_logger().info('Incoming request\na: %d b: %d' % (request.a, request.b))   # 输出日志信息,提示已经完成加法求和计算
        return response                                                                    # 反馈应答信息
其中有有几个重要的接口函数:create_client、create_service、call_async,再加创建Server对象之后会调用的函数接口rclpy.spin(参数为:Server class对象)。三个函数下面会在讲解调用流程图中使用到。
Client 调用Server流程

- User Application调用create_client创建出真正实现功能的class Client,然后再调用call_async发送消息到Server,其中send_request接口会调用到_rclpy_pybind11 C++ lib中实现的C++ class CLient对象,最后再通过rcl_send_request接口调用进入rcl 层级。
Server回复CLient流程

- User Application调用create_service创建出class Service,并且在Service中注册回调函数(如上面代码中的:adder_callback),当执行完回调函数处理数据逻辑之后,return response就会调用send_response、继续调用service_send_response到C++ class Service,最后调用rcl_send_response进入rcl module。
Server回调函数触发流程
这个时候我们就会想弄清楚Server注册的回调函数是怎么样被触发的?接下来我们就来继续探究!
- Server在创建完对象之后会调用spin,这个接口功能是在init中实现,get_global_executor获取到SingleThreadedExecutor实例调用spin_once、_spin_once_impl
- 再调用wait_for_ready_callbacks进入到基类Executor,最后的主干逻辑是在_wait_for_ready_callbacks函数中实现,其中会调用_rclpy.WaitSet,这个函数实现是在API C++ Business中class WaitSet。
- class WaitSet会调用rcl_wait_set_init进入到rcl Layer,会对rcl wait实例化分配空间创建初始化为subscriptions(DDS 概念),并且创建一个item加入到wait队列中,去真正的等待Client发送call请求。
当wait被回调函数唤醒之后,会去遍历收到哪个实例的消息:
# get ready entities
subs_ready = wait_set.get_ready_entities('subscription')
guards_ready = wait_set.get_ready_entities('guard_condition')
timers_ready = wait_set.get_ready_entities('timer')
clients_ready = wait_set.get_ready_entities('client')
services_ready = wait_set.get_ready_entities('service')
当Server接收到clients发送的消息,会解析其中的内容:
for srv in node.services:
    if srv.handle.pointer in services_ready:
        if srv.callback_group.can_execute(srv):
            handler = self._make_handler(
                srv, node, self._take_service, self._execute_service)
            yielded_work = True
            yield handler, srv, node
执行_execute_service函数体,其中会触发Server callback函数调用,返回之后调用send_response进入到Server给Client发送消息的熟悉环节。
#使用await_or_execute触发Server callback执行完毕,接收到response之后把response作为参数,调用send_response发送response到Client
async def _execute_service(self, srv, request_and_header):
    if request_and_header is None:
        return
    (request, header) = request_and_header
    if request:
        response = await await_or_execute(srv.callback, request, srv.srv_type.Response())
        srv.send_response(response, header)
上面内容展示Service通信模式中Server端注册的回调函数是怎么被触发的,并且串联到Server发送消息到Client接口。
Topics框架
Topics框架主要是由publisher和subscriber实现通信逻辑。
User Application层级中publisher和subscriber主干逻辑代码:
Publisher.py
class PublisherNode(Node):
    def __init__(self, name):
        super().__init__(name)                                    # ROS2节点父类初始化
        qos_profile = QoSProfile(                                 # 创建一个QoS原则
            reliability=QoSReliabilityPolicy.BEST_EFFORT,
            history=QoSHistoryPolicy.KEEP_LAST,
            depth=1 )
        self.pub = self.create_publisher(String, "chatter", qos_profile)   # 创建发布者对象(消息类型、话题名、QoS原则)
        self.timer = self.create_timer(0.5, self.timer_callback)           # 创建一个定时器(单位为秒的周期,定时执行的回调函数)
    def timer_callback(self):                                     # 创建定时器周期执行的回调函数
        msg = String()                                            # 创建一个String类型的消息对象
        msg.data = 'Hello World'                                  # 填充消息对象中的消息数据
        self.pub.publish(msg)                                     # 发布话题消息
        self.get_logger().info('Publishing: "%s"' % msg.data)     # 输出日志信息,提示已经完成话题发布

Subscriber.py
class SubscriberNode(Node):
    def __init__(self, name):
        super().__init__(name)                                    # ROS2节点父类初始化
        qos_profile = QoSProfile(                                 # 创建一个QoS原则
            reliability=QoSReliabilityPolicy.RELIABLE,
            history=QoSHistoryPolicy.KEEP_LAST,
            depth=1 )
        self.sub = self.create_subscription(\
            String, "chatter", self.listener_callback, qos_profile) # 创建订阅者对象(消息类型、话题名、订阅者回调函数、QoS原则)
    def listener_callback(self, msg):                               # 创建回调函数,执行收到话题消息后对数据的处理
        self.get_logger().info('I heard: "%s"' % msg.data)          # 输出日志信息,提示订阅收到的话题消息
实现功能主要是几个函数接口:create_publisher、create_timer、publish、create_subscription,下面讲解函数调用流程。
Publisher发送消息到Subscriber
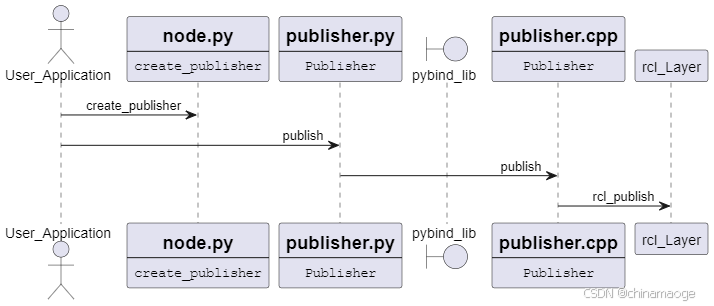
- User Application调用create publisher创建出python class instance Publisher作为功能真正的实现者。然后user application再调用publish发送数据的时候通过_rclpy_pybind11 C++ lib库,把消息通过publish接口发送到C++ class publisher,最后调用rcl_Layer。
- create_publisher中讲解一个参数:qos_profile。这个参数是设置node之间传输数据质量QoS( Quality of Service),QoS最原始的概念来至于DDS,ROS2也是通过qos_profile参数对DDS中的QoS选项进行设置。
- 基本概念可以参考(ROS2 Quality of Service settings Introduction),这里说明几点:
- publish和subscribe设置qos_profile是独立的,参数设置可以不一样,但是相互之间参数需要规则匹配
- Server和client模型也是可以自主配置QoS,如果向上面Client and Server实例一样没有设置就使用默认参数
#Client、Server 默认QOS参数
qos_profile = QoSProfile(
    reliability=QoSReliabilityPolicy.RELIABLE,
    durability=QoSDurabilityPolicy.VOLATILE,
    liveliness=QoSLivelinessPolicy.AUTOMATIC
    history=QoSHistoryPolicy.KEEP_LAST,
    depth=10 )
create_timer创建定时器
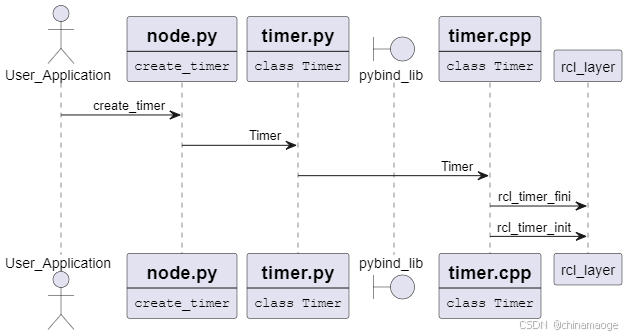
- timer真正实例是在python class Timer和C++ class Timer。初始化rcl Layer中的Timer会先调用清理之前的timer,在调用rcl_timer_init初始化一个rcl Layer timer。
- create_timer中注册timer_callback,会以period(代码中:0.5second)间隔不断调用。具体调用流程在rclpy layer 中没有看到,但是可以推断应该是rcl Layer在timer设置的period时间到之后,触发rclpy Layer调用callback。
//timer.cpp
  rcl_ret_t ret = rcl_timer_init(
    rcl_timer_.get(), clock_.rcl_ptr(), context.rcl_ptr(),
    period_nsec, NULL, allocator);
因为在调用rcl_timer_init的时候,callback=NULL,所以callback调用是rclpy Layer负责。
##node.py
def create_timer
	timer = Timer(callback, callback_group, timer_period_nsec, clock, context=self.context)
	callback_group.add_entity(timer)
	self._timers.append(timer)
	self._wake_executor()
并且Timer创建之后加入到callback group中。callback function回调方式和Server回调函数触发流程差不多一样,都是通过rclpy.spin(node)来触发,但是最后具体处理信息类型不一样:
//executors.py
def _wait_for_ready_callbacks
	timers_ready = wait_set.get_ready_entities('timer')
    # Process ready entities one node at a time
    for node in nodes_to_use:
        for tmr in node.timers:
            if tmr.handle.pointer in timers_ready:
                # Check timer is ready to workaround rcl issue with cancelled timers
                if tmr.handle.is_timer_ready():
                	# callback_group = _default_callback_group = MutuallyExclusiveCallbackGroup()
                    if tmr.callback_group.can_execute(tmr):
                        handler = self._make_handler(
                            tmr, node, self._take_timer, self._execute_timer)
                        yielded_work = True
                        yield handler, tmr, node

async def _execute_timer(self, tmr, _):
    await await_or_execute(tmr.callback)

async def await_or_execute(callback: Union[Callable, Coroutine], *args) -> Any:
    """Await a callback if it is a coroutine, else execute it."""
    if inspect.iscoroutinefunction(callback):
        # Await a coroutine
        return await callback(*args)
    else:
        # Call a normal function
        return callback(*args)
- 之前在Timer创建时加入callback_group,现在会先验证获取到的entity是否在之前加入,如果是就执行_make_handler,callback_group是class MutuallyExclusiveCallbackGroup实现,继承于CallbackGroup。
- 最后会调用到_execute_timer function,这个函数最后在await_or_execute中调用callback函数执行,就是timer_callback。
_make_handler调用_execute_timer流程
对, _make_handler怎么就能让_execute_timer执行?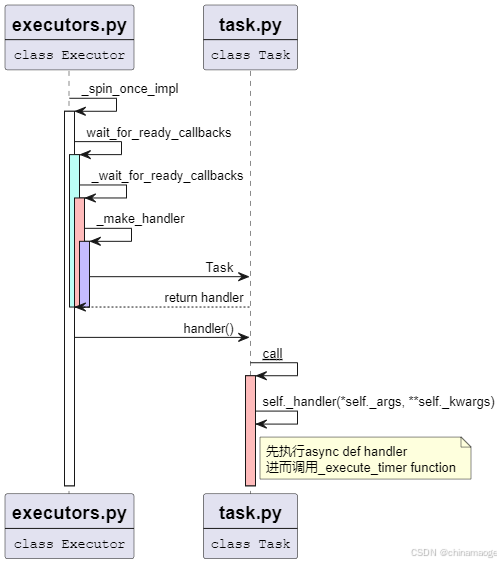
_make_handler会调用Task创建出class Task实例,其中传入handler参数
    def _make_handler(
        self,
        entity: WaitableEntityType,
        node: 'Node',
        take_from_wait_list: Callable,
        call_coroutine: Coroutine
    ) -> Task:
        # Mark this so it doesn't get added back to the wait list
        entity._executor_event = True
        async def handler(entity, gc, is_shutdown, work_tracker):
            if is_shutdown or not entity.callback_group.beginning_execution(entity):
                # Didn't get the callback, or the executor has been ordered to stop
                entity._executor_event = False
                gc.trigger()
                return
            with work_tracker:
                arg = take_from_wait_list(entity)
                # Signal that this has been 'taken' and can be added back to the wait list
                entity._executor_event = False
                gc.trigger()
                try:
                    await call_coroutine(entity, arg)
                finally:
                    entity.callback_group.ending_execution(entity)
                    # Signal that work has been done so the next callback in a mutually exclusive
                    # callback group can get executed
                    gc.trigger()
        task = Task(
            handler, (entity, self._guard, self._is_shutdown, self._work_tracker),
            executor=self)
        with self._tasks_lock:
            self._tasks.append((task, entity, node))
        return task
- handler是内部构建的函数,函数会执行call_coroutine(entity, arg),其中call_coroutine参数就是传入的_execute_timer。
- Task创建好之后会return回去作为handler本身,当_spin_once_impl最后调用handler() 的时候就是调用class Task中 def call。
- __call__会调用self._handler(*self._args, **self._kwargs),_handler在初始化被赋值为async def handler,这样就会执行_execute_timer,最后调用到create_timer中传入的timer_callback。
贴一点关键点代码:
##executors.py
    def _make_handler(
        self,
        entity: WaitableEntityType,
        node: 'Node',
        take_from_wait_list: Callable,
        call_coroutine: Coroutine
    ) -> Task:
        async def handler(entity, gc, is_shutdown, work_tracker):
                try:
                    await call_coroutine(entity, arg)
        task = Task(
            handler, (entity, self._guard, self._is_shutdown, self._work_tracker),
            executor=self)
        return task
#task.py
class Task(Future):
    def __init__(self, handler, args=None, kwargs=None, executor=None):
        super().__init__(executor=executor)
        # _handler is either a normal function or a coroutine
        self._handler = handler
    def __call__(self):
        try:
            self.set_result(self._handler(*self._args, **self._kwargs))
Subscriber接收publisher消息
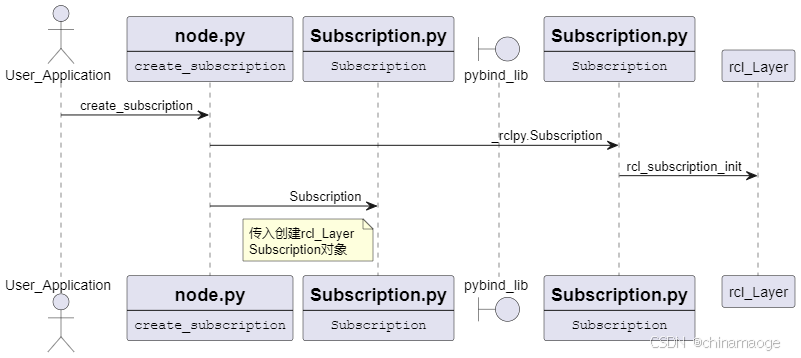
User Application 通过create subscription进入node之后,直接调用_rclpy.Subscription创建出rcl Layer的subscribtion实体然后返回,在创建python class Subscription的时候把rcl Layer subscribtion实体传入作为subscription_impl。
Actions框架
Action通信框架算是一种特殊的通信模式,是建立在Service和Topic的基础上,主要是由ActionClient和ActionServer来实现。
User Application主干代码如下:
#action_Client.py
class MoveCircleActionClient(Node):
    def __init__(self, name):
        super().__init__(name)                   # ROS2节点父类初始化
        self._action_client = ActionClient(      # 创建动作客户端(接口类型、动作名)
            self, MoveCircle, 'move_circle')

    def send_goal(self, enable):                 # 创建一个发送动作目标的函数
        goal_msg = MoveCircle.Goal()             # 创建一个动作目标的消息
        goal_msg.enable = enable                 # 设置动作目标为使能,希望机器人开始运动
        self._action_client.wait_for_server()    # 等待动作的服务器端启动
        self._send_goal_future = self._action_client.send_goal_async(   # 异步方式发送动作的目标
            goal_msg,                                                   # 动作目标
            feedback_callback=self.feedback_callback)                   # 处理周期反馈消息的回调函数
        self._send_goal_future.add_done_callback(self.goal_response_callback) # 设置一个服务器收到目标之后反馈时的回调函数

    def goal_response_callback(self, future):           # 创建一个服务器收到目标之后反馈时的回调函数
        goal_handle = future.result()                   # 接收动作的结果
        if not goal_handle.accepted:                    # 如果动作被拒绝执行
            self.get_logger().info('Goal rejected :(')
            return
        self.get_logger().info('Goal accepted :)')                            # 动作被顺利执行
        self._get_result_future = goal_handle.get_result_async()              # 异步获取动作最终执行的结果反馈
        self._get_result_future.add_done_callback(self.get_result_callback)   # 设置一个收到最终结果的回调函数

    def get_result_callback(self, future):                                    # 创建一个收到最终结果的回调函数
        result = future.result().result                                       # 读取动作执行的结果
        self.get_logger().info('Result: {%d}' % result.finish)                # 日志输出执行结果

    def feedback_callback(self, feedback_msg):                                # 创建处理周期反馈消息的回调函数
        feedback = feedback_msg.feedback                                      # 读取反馈的数据
        self.get_logger().info('Received feedback: {%d}' % feedback.state)

#action_server.py
class MoveCircleActionServer(Node):
    def __init__(self, name):
        super().__init__(name)                   # ROS2节点父类初始化
        self._action_server = ActionServer(      # 创建动作服务器(接口类型、动作名、回调函数)
            self,
            MoveCircle,
            'move_circle',
            self.execute_callback)

    def execute_callback(self, goal_handle):            # 执行收到动作目标之后的处理函数
        self.get_logger().info('Moving circle...')
        feedback_msg = MoveCircle.Feedback()            # 创建一个动作反馈信息的消息
        for i in range(0, 360, 30):                     # 从0到360度,执行圆周运动,并周期反馈信息
            feedback_msg.state = i                      # 创建反馈信息,表示当前执行到的角度
            self.get_logger().info('Publishing feedback: %d' % feedback_msg.state)
            goal_handle.publish_feedback(feedback_msg)  # 发布反馈信息
            time.sleep(0.5)

        goal_handle.succeed()                           # 动作执行成功
        result = MoveCircle.Result()                    # 创建结果消息
        result.finish = True
        return result                                   # 反馈最终动作执行的结果
其中有几个重要的函数接口:ActionClient、send_goal_async、get_result_async、add_done_callback、ActionServer、publish_feedback。我们接下来看一下,这些重要接口是怎么实现Action的通信模式。
Action Server创建执行流程
从上面User Application 实例代码所示Action Server比较特殊就在于他会实时的发送执行状态到Action Client。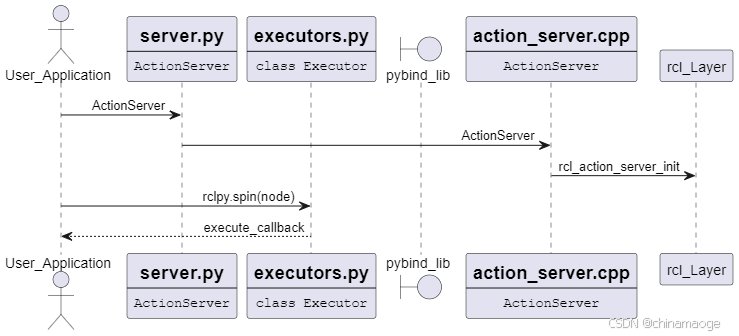
Action Server执行ActionServer注册execute_callback回调函数和之前流程差不多都一样,只是python class ActionServer实例化的时候继承class Waitable,然后加入到callback_group.add_entity(self)。
#server.py
class ActionServer(Waitable):
	def __init__():
        callback_group.add_entity(self)
        self._node.add_waitable(self)

#executors.py
	def _wait_for_ready_callbacks():
	    # Check waitables before wait set is destroyed
	    for node in nodes_to_use:
	        for wt in node.waitables:
	            # Only check waitables that were added to the wait set
	            if wt in waitables and wt.is_ready(wait_set):
	                if wt.callback_group.can_execute(wt):
	                    handler = self._make_handler(
	                        wt, node, lambda e: e.take_data(), self._execute_waitable)
	                    yielded_work = True
	                    yield handler, wt, node
Action 类别都是继承使用Waitable,并且使用_node.add_waitable(self),所以在调用callback function的时候就执行的node.waitables逻辑,和之前分析的Service和Topic模型不一样。
Action Client创建执行流程
Client执行的功能比较多,需要设置两个回调函数:feedback消息回调函数和result回调函数。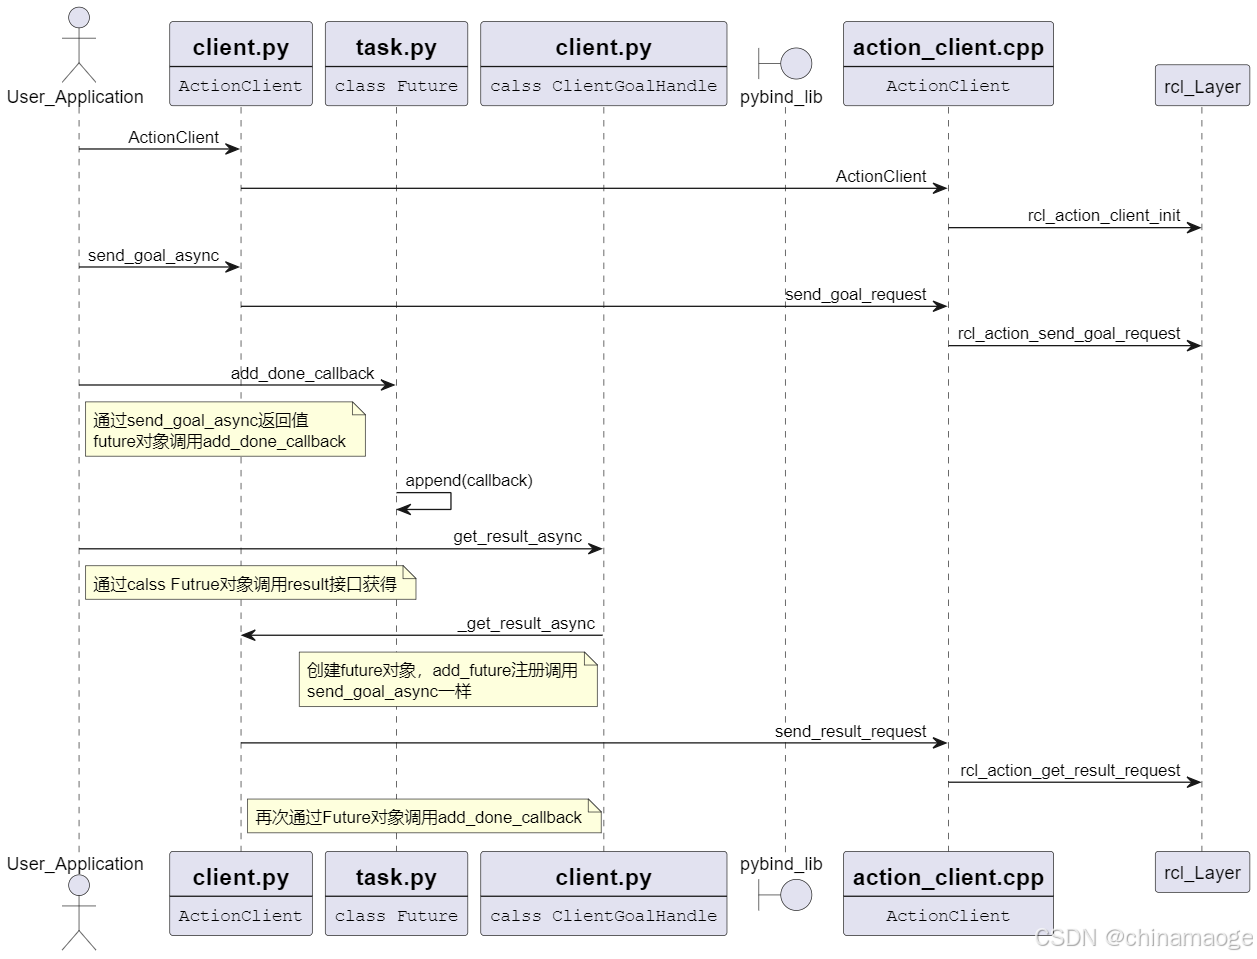
- User Application中通过ActionClient创建出class Client,使用send_goal_async发送Action开始指令,并且接收Action feedback的callback函数。add_done_callback函数功能只是通过send_goal_async创建出的future class append到callback队列中,这个过程send_goal_async也是存在的。
- ActionClient继承于Waitable,所以rclpy.spin(node)会触发在waitables中查找是否有callback function,这个逻辑和Action Server是一样的。set_result最终会调用到_schedule_or_invoke_done_callbacks
- goal_response_callback Function中还会get_result_async获取Server return result值。获取的方式也是通过返回实例化的class Future调用add_done_callback注册回调函数实现
future.result()接口返回值是什么?
先说结论是class ClientGoalHandle,接下来我们捋一下为什么是ClientGoalHandle对象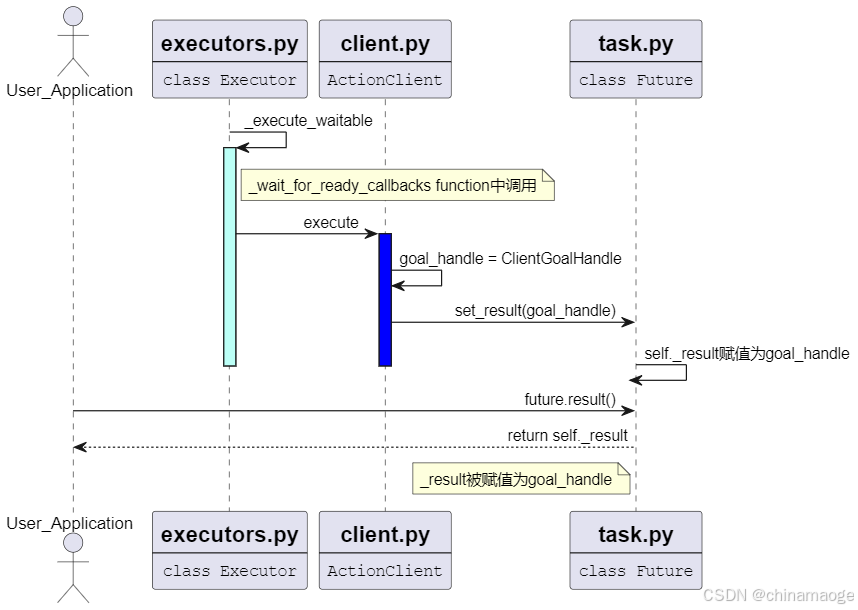
- rclpy.spin(node)触发的callback function流程中(上文中有讲述),Function _wait_for_ready_callback中会执行_execute_waitable。
- 会调用到class ActionClient,execute(self, taken_data) 函数,根据taken_data判断为goal。然后通过sequence_number找到对应的class Future,调用set_result设置self._result
- 当User Application中调用result()的时候就会获获取到之前设置的result ,也就是class ClientGoalHandle
#executors.py
async def _execute_waitable(self, waitable, data):
     for future in waitable._futures:
         future._set_executor(self)
     await waitable.execute(data)

#client.py
async def execute(self, taken_data):
    if 'goal' in taken_data:
        sequence_number, goal_response = taken_data['goal']
        if sequence_number in self._goal_sequence_number_to_goal_id:
            goal_handle = ClientGoalHandle(
                self,
                self._goal_sequence_number_to_goal_id[sequence_number],
                goal_response)

            if goal_handle.accepted:
                goal_uuid = bytes(goal_handle.goal_id.uuid)
                if goal_uuid in self._goal_handles:
                    raise RuntimeError(
                        'Two goals were accepted with the same ID ({})'.format(goal_handle))
                self._goal_handles[goal_uuid] = weakref.ref(goal_handle)
            self._pending_goal_requests[sequence_number].set_result(goal_handle)

#Task.py
def set_result(self, result):
    with self._lock:
        self._result = result
        self._done = True
        self._cancelled = False
    self._schedule_or_invoke_done_callbacks()

def result(self):
    if self._exception:
        raise self.exception()
    return self._result
- taken_data设置为goal,是通过is_ready(wait_set)接口对rcl底层完成的类型进行赋值,设置_is_goal_response_ready为1。
- _make_handler Function中通过lambda e: e.take_data()表达式作为参数传递为Callable对象,并且在调用的时候传入entity也就是waitables对象,对参数e进行实例化。
- 最后真正会执行的是class ActionClient take_data Function,在其中对taken_data关联为goal
#executors.py
handler = self._make_handler(
    wt, node, lambda e: e.take_data(), self._execute_waitable)

    def _make_handler(
        self,
        entity: WaitableEntityType,
        node: 'Node',
        take_from_wait_list: Callable,
        call_coroutine: Coroutine
    ) -> Task:
        entity._executor_event = True
        async def handler(entity, gc, is_shutdown, work_tracker):
            if is_shutdown or not entity.callback_group.beginning_execution(entity):
                entity._executor_event = False
                gc.trigger()
                return
            with work_tracker:
                arg = take_from_wait_list(entity)
                entity._executor_event = False
                gc.trigger()
                try:
                    await call_coroutine(entity, arg)
#client.py
    def take_data(self):
        data = {}
        if self._is_goal_response_ready:
            taken_data = self._client_handle.take_goal_response(
                self._action_type.Impl.SendGoalService.Response)
            if all(taken_data):
                data['goal'] = taken_data
学习心得
看到现在目前感觉rclpy Layer大部分逻辑都是在python Layer实现的,C++ Layer主要是作为调用rcl C语言的桥梁。
看了ROS2的代码真是是见识到什么叫逻辑复杂,但是思路清晰,业务逻辑和功能函数高度解耦,接口高度复用,而且可以非常精美的使用python语言特性
这篇博客就算写完了,欢迎大家留言评论
目前我还很好奇,既然Action的实现方式使用Service和publish模式就可以实现,为什么在class node中要单独增加waitables callback类型,原因目前没有发现,后面发现再补吧。。。☺
参考文献
- User Application代码都是参考:ROS2入门21讲

魔乐社区(Modelers.cn) 是一个中立、公益的人工智能社区,提供人工智能工具、模型、数据的托管、展示与应用协同服务,为人工智能开发及爱好者搭建开放的学习交流平台。社区通过理事会方式运作,由全产业链共同建设、共同运营、共同享有,推动国产AI生态繁荣发展。
更多推荐


 21
21 0
0- 0


 已为社区贡献5条内容

所有评论(0)