2025年最详细的项目部署Django+Vue+Docker,小白也能看懂!
本地端
首先要先配置好setting.py
# 默认是Ture
DEBUG = False

ALLOWED_HOSTS = ['*']
#如果有需要可以改

# CORS组的配置信息
CORS_ORIGIN_WHITELIST = (
    'http://127.0.0.1:8080',
)
CORS_ALLOW_CREDENTIALS = False  # 允许ajax跨域请求时携带cookie

CORS_ORIGIN_ALLOW_ALL = True
CORS_ALLOW_METHODS = (
    'DELETE',
    'GET',
    'OPTIONS',
    'PATCH',
    'POST',
    'PUT',
    'VIEW',
)

CORS_ALLOW_HEADERS = (
    'accept',
    'accept-encoding',
    'authorization',
    'content-type',
    'dnt',
    'origin',
    'user-agent',
    # 'x-csrftoken',
    'x-requested-with',
)
这是我的数据库的配置
DATABASES = {
    'default': {
        'ENGINE': 'django.db.backends.postgresql',
        'NAME': '数据库名称',
        'USER': 'postgres',
        'PASSWORD': '自己的密码',
        'HOST': 'db',  # 或者是你的数据库服务器的IP地址
        'PORT': '5432',       # 默认端口是5432
    }
}
redis:
CACHES = {
    "default": {
        "BACKEND": "django_redis.cache.RedisCache",
        "LOCATION": "redis://redis:6379/1",  # 连接 Redis,使用数据库索引 1
        "OPTIONS": {
            "CLIENT_CLASS": "django_redis.client.DefaultClient",
        }
    }
}
这是我本地的项目结构目录,我把我的docker-compose.yml和dockerfile以及uwsgi.ini还有前端打包后生成的dist文件夹(这个放在html下面)都放在同一个根目录下了.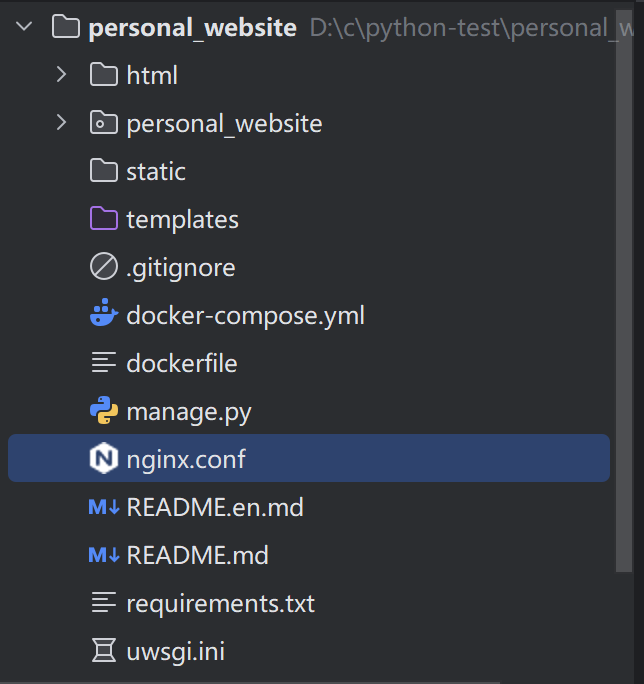
下面是我这几个的配置docker-compose.yml,因为我已经在服务器上面创建了app这个目录,所以我这样配置
version: '3.3'

services:
  db:
    image: postgres:13
    environment:
      POSTGRES_DB: 数据库名称
      POSTGRES_USER: postgres
      POSTGRES_PASSWORD: 密码
    volumes:
      - postgres_data:/var/lib/postgresql/data
    ports:
      - "5432:5432"

  redis:
    image: redis:6
    ports:
      - "6379:6379"

  web:
    build:
      context: .
      dockerfile: dockerfile
    command: uwsgi --ini uwsgi.ini
    volumes:
      - .:/app
      - ./html/dist:/app/personal_website/static  # 挂载前端dist到Django的静态目录
    ports:
      - "8000:8000"
    depends_on:
      - db
      - redis
    environment:
      - DEBUG=False

  nginx:
    image: nginx:latest
    ports:
      - "80:80"
    volumes:
      - ./nginx.conf:/etc/nginx/nginx.conf:ro
      - ./html/dist:/usr/share/nginx/html:ro
    depends_on:
      - web

volumes:
  postgres_data:
dockerfile:
# 使用 Python 官方镜像
FROM python:3.8-slim

# 更换为阿里云源加速
RUN sed -i 's|http://deb.debian.org/debian|http://mirrors.aliyun.com/debian|g' /etc/apt/sources.list && \
    sed -i 's|http://security.debian.org/debian-security|http://mirrors.aliyun.com/debian-security|g' /etc/apt/sources.list

# 安装依赖
RUN apt-get update && apt-get install -y \
    gcc \
    libpq-dev \
    && rm -rf /var/lib/apt/lists/*

# 设置工作目录
WORKDIR /app

# 复制依赖文件
COPY requirements.txt .

# 安装 Python 包
RUN pip install -r requirements.txt -i https://pypi.tuna.tsinghua.edu.cn/simple

# 复制项目代码
COPY . .

# 暴露端口
EXPOSE 8000

# 启动 uWSGI
CMD ["uwsgi", "--ini", "uwsgi.ini"]
uwsgi.ini:
[uwsgi]
# 启动端口
http = :8000

# 项目路径
chdir = /app

# Django WSGI
wsgi-file = personal_website/wsgi.py

# 主进程管理
master = true
processes = 4
threads = 8
vacuum = true

# 请求超时
http-timeout = 120

# 静态文件映射 (如需要)
 static-map = /static=/app/personal_website/static
这是我的nginx.conf:
worker_processes auto;

events {
    worker_connections 1024;
}

http {
    include       mime.types;
    default_type  application/octet-stream;
    sendfile        on;
    keepalive_timeout 65;

    server {
        listen 80;
        #server_name 服务器ip或者域名; 因为服务器ip会变,所以我注释掉,使用默认的 localhost

        location / {
            root /usr/share/nginx/html;
            index index.html;
            try_files $uri $uri/ /index.html;
        }

        location ~* \.(?:ico|css|js|gif|jpe?g|png|woff2?|eot|ttf|otf|svg|mp4|webm|wav|mp3|m4a|aac|oga|json)$ {
            root /usr/share/nginx/html;
            expires max;
            access_log off;
        }

        location /api/ {
            proxy_pass http://web:8000;
            proxy_set_header Host $host;
            proxy_set_header X-Real-IP $remote_addr;
            proxy_set_header X-Forwarded-For $proxy_add_x_forwarded_for;
            proxy_set_header X-Forwarded-Proto $scheme;
        }

        location /login/ {
            proxy_pass http://web:8000;
            proxy_set_header Host $host;
            proxy_set_header X-Real-IP $remote_addr;
            proxy_set_header X-Forwarded-For $proxy_add_x_forwarded_for;
            proxy_set_header X-Forwarded-Proto $scheme;
        }

        location /static/ {
            root /app/personal_website/static/;
            autoindex on;
        }
    }
}
然后我在D:\c\python-test\personal_website,先生成自己环境的依赖。
pip freeze > requirements.txt 请确保你们的项目环境是没有其他的杂乱的包
然后上传到的gitee的personal_website仓库,执行命令:
git add .git commit -m "注释"git push当然你要先从git上面拉取代码,然后切换到自己的分支。
服务器端
来到服务器的时候,里面是什么都没有的。我们先下载docker、docker-compose、git
sudo yum install docker
# 启动和启用Docker服务开机自启
sudo systemctl start docker
sudo systemctl enable docker

sudo yum install docker-compose

sudo yum install git
启用镜像加速:
vi /etc/docker/daemon.json键盘点击"i"插入数据,最后点击"esc",再输入":wq"保存并且退出
{
  "registry-mirrors": ["https://<你的ID>.mirror.aliyuncs.com"]
}
#重新加载
sudo systemctl daemon-reload
sudo systemctl restart docker关于“id”我们要来到阿里云的容器镜像服务
点击“镜像工具”就能看到了。
然后创建app目录:
mkdir app

cd app
然后拉取代码:
git clone https://gitee.com/你们的用户名/仓库名.git因为我的是私有仓库,后面还需要输入用户名和密码。
拉完代码后,我们的目录是这样的,当然app目录下只有personal_website这一个文件夹
app
└── personal_website
    ├── docker-compose.yml
    ├── dockerfile
    ├── html
    │   └── dist
    │       ├── assets
    │       │   ├── index-230431f8.js
    │       │   └── index-8394a1f2.css
    │       └── index.html
    ├── manage.py
    ├── nginx.conf
    ├── personal_website
    │   ├── Apps
    │   │   ├── api
    │   │   │   ├── admin.py
    │   │   │   ├── apps.py
    │   │   │   ├── __init__.py
    │   │   │   ├── migrations
    │   │   │   │   ├── 0001_initial.py
    │   │   │   │   ├── __init__.py
    │   │   │   │   └── __pycache__
    │   │   │   │       ├── 0001_initial.cpython-311.pyc
    │   │   │   │       └── __init__.cpython-311.pyc
    │   │   │   ├── models.py
    │   │   │   ├── __pycache__
    │   │   │   │   ├── apps.cpython-311.pyc
    │   │   │   │   ├── apps.cpython-38.pyc
    │   │   │   │   ├── __init__.cpython-311.pyc
    │   │   │   │   ├── __init__.cpython-38.pyc
    │   │   │   │   ├── models.cpython-311.pyc
    │   │   │   │   ├── models.cpython-38.pyc
    │   │   │   │   ├── serializers.cpython-311.pyc
    │   │   │   │   ├── serializers.cpython-38.pyc
    │   │   │   │   ├── urls.cpython-311.pyc
    │   │   │   │   ├── urls.cpython-38.pyc
    │   │   │   │   ├── views.cpython-311.pyc
    │   │   │   │   └── views.cpython-38.pyc
    │   │   │   ├── serializers.py
    │   │   │   ├── tests.py
    │   │   │   ├── urls.py
    │   │   │   └── views.py
    │   │   ├── __init__.py
    │   │   ├── login
    │   │   │   ├── admin.py
    │   │   │   ├── apps.py
    │   │   │   ├── __init__.py
    │   │   │   ├── migrations
    │   │   │   │   ├── 0001_initial.py
    │   │   │   │   ├── __init__.py
    │   │   │   │   └── __pycache__
    │   │   │   │       └── __init__.cpython-311.pyc
    │   │   │   ├── models.py
    │   │   │   ├── __pycache__
    │   │   │   │   ├── apps.cpython-311.pyc
    │   │   │   │   ├── apps.cpython-38.pyc
    │   │   │   │   ├── __init__.cpython-311.pyc
    │   │   │   │   ├── __init__.cpython-38.pyc
    │   │   │   │   ├── models.cpython-311.pyc
    │   │   │   │   ├── models.cpython-38.pyc
    │   │   │   │   ├── serializers.cpython-38.pyc
    │   │   │   │   ├── urls.cpython-38.pyc
    │   │   │   │   └── views.cpython-38.pyc
    │   │   │   ├── serializers.py
    │   │   │   ├── tests.py
    │   │   │   ├── urls.py
    │   │   │   └── views.py
    │   │   └── __pycache__
    │   │       ├── __init__.cpython-311.pyc
    │   │       └── __init__.cpython-38.pyc
    │   ├── __init__.py
    │   ├── __pycache__
    │   │   ├── __init__.cpython-311.pyc
    │   │   ├── __init__.cpython-38.pyc
    │   │   ├── settings.cpython-311.pyc
    │   │   ├── settings.cpython-38.pyc
    │   │   ├── urls.cpython-311.pyc
    │   │   ├── urls.cpython-38.pyc
    │   │   └── wsgi.cpython-311.pyc
    │   ├── settings.py
    │   ├── static
    │   ├── urls.py
    │   └── wsgi.py
    ├── README.en.md
    ├── README.md
    ├── requirements.txt
    └── uwsgi.ini
然后我们cd到personal_website。一键启动,刚开始要等几分钟,后面就一会儿就行了。
docker-compose up --build -d
docker ps
#查看容器状态
进入容器迁移。
docker exec -it <web容器ID或名字> /bin/bash
python manage.py makemigrations
python manage.py migrate
最终目录:
app
└── personal_website
    ├── docker-compose.yml
    ├── dockerfile
    ├── html
    │   └── dist
    │       ├── assets
    │       │   ├── index-230431f8.js
    │       │   └── index-8394a1f2.css
    │       └── index.html
    ├── manage.py
    ├── nginx.conf
    ├── personal_website
    │   ├── Apps
    │   │   ├── api
    │   │   │   ├── admin.py
    │   │   │   ├── apps.py
    │   │   │   ├── __init__.py
    │   │   │   ├── migrations
    │   │   │   │   ├── 0001_initial.py
    │   │   │   │   ├── __init__.py
    │   │   │   │   └── __pycache__
    │   │   │   │       ├── 0001_initial.cpython-311.pyc
    │   │   │   │       └── __init__.cpython-311.pyc
    │   │   │   ├── models.py
    │   │   │   ├── __pycache__
    │   │   │   │   ├── apps.cpython-311.pyc
    │   │   │   │   ├── apps.cpython-38.pyc
    │   │   │   │   ├── __init__.cpython-311.pyc
    │   │   │   │   ├── __init__.cpython-38.pyc
    │   │   │   │   ├── models.cpython-311.pyc
    │   │   │   │   ├── models.cpython-38.pyc
    │   │   │   │   ├── serializers.cpython-311.pyc
    │   │   │   │   ├── serializers.cpython-38.pyc
    │   │   │   │   ├── urls.cpython-311.pyc
    │   │   │   │   ├── urls.cpython-38.pyc
    │   │   │   │   ├── views.cpython-311.pyc
    │   │   │   │   └── views.cpython-38.pyc
    │   │   │   ├── serializers.py
    │   │   │   ├── tests.py
    │   │   │   ├── urls.py
    │   │   │   └── views.py
    │   │   ├── __init__.py
    │   │   ├── login
    │   │   │   ├── admin.py
    │   │   │   ├── apps.py
    │   │   │   ├── __init__.py
    │   │   │   ├── migrations
    │   │   │   │   ├── 0001_initial.py
    │   │   │   │   ├── __init__.py
    │   │   │   │   └── __pycache__
    │   │   │   │       └── __init__.cpython-311.pyc
    │   │   │   ├── models.py
    │   │   │   ├── __pycache__
    │   │   │   │   ├── apps.cpython-311.pyc
    │   │   │   │   ├── apps.cpython-38.pyc
    │   │   │   │   ├── __init__.cpython-311.pyc
    │   │   │   │   ├── __init__.cpython-38.pyc
    │   │   │   │   ├── models.cpython-311.pyc
    │   │   │   │   ├── models.cpython-38.pyc
    │   │   │   │   ├── serializers.cpython-38.pyc
    │   │   │   │   ├── urls.cpython-38.pyc
    │   │   │   │   └── views.cpython-38.pyc
    │   │   │   ├── serializers.py
    │   │   │   ├── tests.py
    │   │   │   ├── urls.py
    │   │   │   └── views.py
    │   │   └── __pycache__
    │   │       ├── __init__.cpython-311.pyc
    │   │       └── __init__.cpython-38.pyc
    │   ├── __init__.py
    │   ├── __pycache__
    │   │   ├── __init__.cpython-311.pyc
    │   │   ├── __init__.cpython-38.pyc
    │   │   ├── settings.cpython-311.pyc
    │   │   ├── settings.cpython-38.pyc
    │   │   ├── urls.cpython-311.pyc
    │   │   ├── urls.cpython-38.pyc
    │   │   └── wsgi.cpython-311.pyc
    │   ├── settings.py
    │   ├── static
    │   ├── urls.py
    │   └── wsgi.py
    ├── README.en.md
    ├── README.md
    ├── requirements.txt
    └── uwsgi.ini
到了这一步,我们项目基本上就部署成功了。
注意:
如果还是访问不了,你要看看你的服务器是否开放端口!阿里云是默认关闭80端口的,所以我们还需要手动添加入站规则。
至此,项目成功完成部署。

魔乐社区(Modelers.cn) 是一个中立、公益的人工智能社区,提供人工智能工具、模型、数据的托管、展示与应用协同服务,为人工智能开发及爱好者搭建开放的学习交流平台。社区通过理事会方式运作,由全产业链共同建设、共同运营、共同享有,推动国产AI生态繁荣发展。
更多推荐


 6
6 0
0- 0


 已为社区贡献2条内容

所有评论(0)