DevEco + Django 前后端数据连接 实验六
·
1.设计相关知识点
2.实验内容
2.1 实验目标
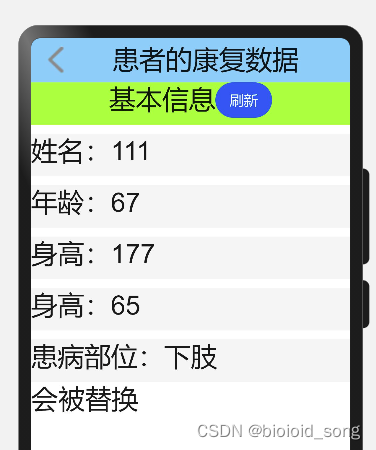
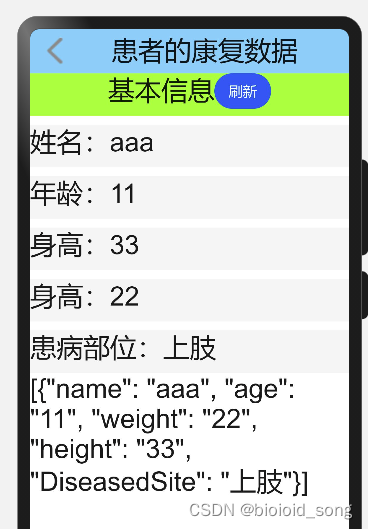
点击刷新按钮后,调用后端,用数据库的内容替换掉在前端中显示的data部分
2.2 相关代码
前端
<!--getNews2.hml-->
<div class="container">
    <div class="container1">
        <image class="image0" src="common/images/return.png" onclick="onClick"></image>
        <div class="title1">
            <text>患者的康复数据</text>
        </div>
    </div>
    <div class="container2">
        <div class="title2">
            <text>基本信息</text>
        </div>
        <button id="button1" type="capsule" onclick="onClick">刷新</button>
    </div>
    <div class="container3">
        <div class="detail1">
            <text class="name">
                姓名:
            </text>
            <text class="value">{{detail[0].name}}</text>
        </div>
        <div class="detail1">
            <text class="name">
                年龄:
            </text>
            <text class="value">{{detail[0].age}}</text>
        </div>
        <div class="detail1">
            <text class="name">
                身高:
            </text>
            <text class="value">{{detail[0].high}}</text>
        </div>
        <div class="detail1">
            <text class="name">
                身高:
            </text>
            <text class="value">{{detail[0].weight}}</text>
        </div>
        <div class="detail2">
            <text class="name2">
                患病部位:
            </text>
            <text class="value2">{{detail[0].DiseasedSite}}</text>
        </div>
    </div>

    <div class="back">
        <text>{{winfo}}</text>
    </div>
</div>
.container{
    display: flex;
    flex-direction: column;
    justify-content: center;
}
.container1{
    display:flex;
    flex-direction:row;
    justify-content:flex-start;
    width:100%;
    height:50px;
    background-color: lightskyblue;
}
.title1{
    margin-left: 10%;
    margin-top: 5px;;
    height:36px;
}
.image0{
    justify-content: flex-start;
    height:36px;
    width:36px;
    margin:10px;
}
.container2{
    display: flex;
    flex-direction: row;
    justify-content: center;
    height:48px;
    background-color: greenyellow;
}
.title2{

}
.container3{
    display: flex;
    flex-direction: column;
    justify-content: flex-start;
}
.detail1{
    background-color: whitesmoke;
    width:100%;
    height:48px;
    margin-top: 10px;
}
.detail2{
    background-color: whitesmoke;
    width:100%;
    height:48px;
    margin-top: 10px;
}
import fetch from '@system.fetch';
import qs from 'qs';
export default{
    data:{
        winfo:"会被替换",
        detail:[{
                    name:"111",
                    age:67,
                    high:177,
                    weight:65,
                    DiseasedSite:'下肢'
                },
                //这是默认的刚开始的显示数据,之后点击按钮数据后会进行更新
                {
                    name:"bbb",
                    age:33
                }]
    },
    onClick(){
        fetch.fetch({
            url:`http://127.0.0.1:8001/train/DocGetData/`,
            //发送数据,
            data:qs.stringify({'patientname':'aaa'}),
            responseType:"json",
            method:'POST',//传输方式,GET和POST区别

            success:(resp)=>{
                this.winfo = resp.data
                //resp.data是字符串

                //将JSON字符串装换位JSON对象
                // 因为要用字典对另一个字典进行整体的替换刷新
                // 而且这样的方法可以在用来替换的字典内容部分输入多个字典
                var getdata
                getdata= JSON.parse(resp.data)

                console.log(resp.data)//数据是否由后端传回到前端

                console.log(getdata)
                console.log(JSON.parse(resp.data))
                console.log(typeof(getdata))
                console.log(getdata[0])
                console.log(getdata[0].name)

                console.log(this.detail[0].name)
                //以下为用获取的数据替换原始数据
                this.detail[0].name = getdata[0].name
                this.detail[0].age = getdata[0].age
                this.detail[0].high = getdata[0].height
                this.detail[0].weight = getdata[0].weight
                this.detail[0].DiseasedSite = getdata[0].DiseasedSite

                console.log(this.detail[0].name)

                this.winfo = resp.data;//令后端获取到的数据赋给winfo,这是没有经过JSON.parse处理的
                console.log("返回的数据:" + this.winfo)//打印出数据

//                console.log("c:"+typeof(getdata))
//                console.log(getdata[0].age)
//                fail:(resp)=>{
//                    console.log("获取数据失败" + this.detail)
//                }
            }
        })
    }
}
后端
# view.py
class DocGetData(APIView):
    def post(self,request):
        try:
            patientname = request.data.get('patientname')
            print(patientname)
            result = models.Save.objects.filter(Name=patientname).last()
            # 在数据库中查询并导出最新数据
            # 在Save 表里面进行匹配
            name = result.Name
            age = result.Age
            weight = result.Weight
            height = result.Height
            diseasedSite = result.DiseasedSite
            alldata= []
            alldata.append({
                'name':name, 'age':age,'weight':weight,'height':height,
                'DiseasedSite':diseasedSite
            })# 将数据存入字典
            print(alldata)
            alldata_json = json.dumps(alldata, ensure_ascii=False)
            # json.dumps()来使中文正确显示
            print(alldata_json)
            return HttpResponse(alldata_json)
        except Save.DoesNotExist as e:
            print('跳转失败')
        else:
            return HttpResponse('请求失败')
数据库
# models.py
class Save(models.Model):
    userName = models.CharField(max_length=64)
    Name = models.CharField(max_length=64)
    Age = models.CharField(max_length=64)
    Weight = models.CharField(max_length=64)
    Height = models.CharField(max_length=64)
    DiseasedSite = models.CharField(max_length=64)
2.3 操作流程
需要进行数据库的迁移,迁移之前先 使用外部ip访问服务,这次代码中使用的是8001接口
python manage.py runsever 0.0.0.0:8001
2.4 实现效果
未点击刷新按钮前
点击刷新按钮后

魔乐社区(Modelers.cn) 是一个中立、公益的人工智能社区,提供人工智能工具、模型、数据的托管、展示与应用协同服务,为人工智能开发及爱好者搭建开放的学习交流平台。社区通过理事会方式运作,由全产业链共同建设、共同运营、共同享有,推动国产AI生态繁荣发展。
更多推荐


 0
0 0
0- 0


 已为社区贡献1条内容

所有评论(0)