蓝耘云智算|使用 Deepseek R1 模型优化代码在 cv 任务中的表现
·
DeepSeek R1概念

DeepSeek R1 是由杭州深度求索人工智能基础技术研究有限公司(DeepSeek)开发的一款高性能推理模型,于 2025 年 1 月 20 日正式发布。该模型基于 DeepSeek-V3-Base 构建,专注于数学、代码和自然语言推理任务,性能对标 OpenAI 的 o1 正式版,在某些测试中甚至实现了超越。以下是对 DeepSeek R1 的详细介绍:
核心特点
- 强化学习驱动:DeepSeek R1 通过大规模强化学习(Reinforcement Learning, RL)进行训练,无需预先进行监督微调(Supervised Fine-Tuning, SFT)。这种方法使模型能够自主探索和优化推理策略,类似于 AlphaZero 从零开始掌握围棋、将棋和国际象棋。
- 真实奖励机制:使用基于硬编码规则计算的真实奖励,避免了使用可被 RL 轻易“破解”的学习奖励模型。
- 冷启动数据:为了解决 DeepSeek-R1-Zero 的问题并进一步提升推理性能,DeepSeek-R1 在 RL 训练之前加入了冷启动数据。这些数据为模型的推理和非推理能力提供了初始种子。
- 多阶段训练:DeepSeek-R1 的训练过程分为多个阶段,包括冷启动阶段、强化学习阶段和蒸馏阶段。每个阶段都有特定的目标和方法,以逐步提升模型的推理能力。
性能表现
- 数学推理:在 AIME 测试中,DeepSeek R1 的得分率为 79.8%,超过了 OpenAI o1 的 79.2%。
- 代码生成:在代码生成任务中,DeepSeek R1 表现出色,能够生成高质量的代码。
- 自然语言推理:在自然语言推理任务中,DeepSeek R1 能够生成详细的推理过程,展现出自我验证、反思和生成长链思维(Chain of Thought, CoT)等能力。
应用场景
- 数学问题求解:DeepSeek R1 能够解决复杂的数学问题,提供详细的解题步骤和推理过程。
- 代码生成与优化:DeepSeek R1 可以生成高质量的代码,并对现有代码进行优化和调试。
- 自然语言推理:DeepSeek R1 能够处理复杂的自然语言推理任务,如文本生成、问答系统等。
开源与成本效益
- 开源特性:DeepSeek R1 遵循 MIT License,允许用户通过蒸馏技术借助 R1 训练其他模型。DeepSeek 团队还开源了 DeepSeek-R1-Zero 和 DeepSeek-R1 的模型权重,以及六个基于 Llama 和 Qwen 蒸馏出的密集模型(DeepSeek-R1-Distill 模型)。
- 低成本运行:DeepSeek R1 的 API 调用成本仅为 OpenAI o1 的 3.7%(输出 Token 每百万 16 元),训练总成本约 550 万美元,算力需求显著低于同类模型。
总结
DeepSeek R1 是一款具有突破性的推理模型,通过强化学习和真实奖励机制,展示了在无需人类干预的情况下实现复杂任务的能力。其开源特性和低成本运行使其在 AI 社区中具有广泛的应用前景和研究价值。
为了更方便的使用·DeepSeek R1,这里推荐使用蓝耘云智算直接使用已经部署好的平台
登录蓝耘元生代智算云平台,点击应用市场
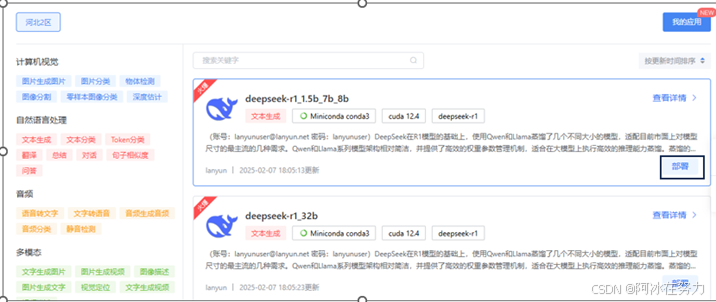
选择自己合适的显卡
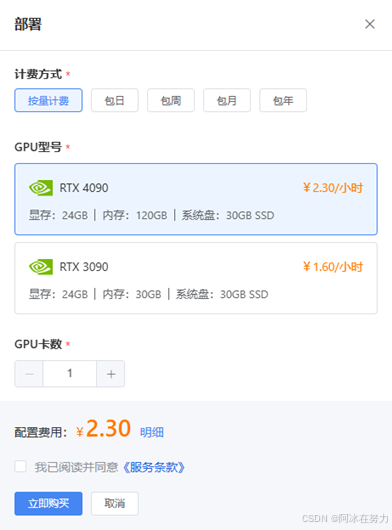
然后开机。下面是一段目标检测的代码。
import cv2
import numpy as np

# 加载目标检测模型和配置文件
YOLO_CONFIG = "path/to/yolov3.cfg"
YOLO_WEIGHTS = "path/to/yolov3.weights"
YOLO_CLASSES = "path/to/coco.names"

# 加载类别名称
with open(YOLO_CLASSES, 'r') as f:
    classes = f.read().strip().split('\n')

# 加载 YOLO 模型
net = cv2.dnn.readNet(YOLO_WEIGHTS, YOLO_CONFIG)
layer_names = net.getLayerNames()
output_layers = [layer_names[i - 1] for i in net.getUnconnectedOutLayers()]

# 读取输入图像
image_path = "path/to/input_image.jpg"
image = cv2.imread(image_path)
height, width, _ = image.shape

# 预处理图像
blob = cv2.dnn.blobFromImage(image, 1/255.0, (416, 416), swapRB=True, crop=False)
net.setInput(blob)
outs = net.forward(output_layers)

# 解析检测结果
class_ids = []
confidences = []
boxes = []
for out in outs:
    for detection in out:
        scores = detection[5:]
        class_id = np.argmax(scores)
        confidence = scores[class_id]
        if confidence > 0.5:  # 置信度阈值
            center_x = int(detection[0] * width)
            center_y = int(detection[1] * height)
            w = int(detection[2] * width)
            h = int(detection[3] * height)
            x = int(center_x - w / 2)
            y = int(center_y - h / 2)
            boxes.append([x, y, w, h])
            confidences.append(float(confidence))
            class_ids.append(class_id)

# 非极大值抑制
indexes = cv2.dnn.NMSBoxes(boxes, confidences, 0.5, 0.4)

# 绘制检测结果
colors = np.random.uniform(0, 255, size=(len(classes), 3))
if len(indexes) > 0:
    for i in indexes.flatten():
        x, y, w, h = boxes[i]
        label = f"{classes[class_ids[i]]}: {confidences[i]:.2f}"
        color = colors[class_ids[i]]
        cv2.rectangle(image, (x, y), (x + w, y + h), color, 2)
        cv2.putText(image, label, (x, y - 5), cv2.FONT_HERSHEY_SIMPLEX, 0.5, color, 2)

# 显示结果图
cv2.imshow("Object Detection", image)
cv2.waitKey(0)
cv2.destroyAllWindows()

# 保存结果图
cv2.imwrite("output.jpg", image)
下边是用DeepSeek R1优化之后的代码
import torch
import torchvision
from torchvision import transforms
from PIL import Image
import cv2

# 示例:使用 PyTorch 的预训练 Faster R-CNN 模型进行目标检测
def optimized_object_detection(image_path, model_name='fasterrcnn_resnet50_fpn', confidence_threshold=0.8):

    # 加载预训练模型(支持 CPU 或 GPU 加速)
    device = torch.device('cuda' if torch.cuda.is_available() else 'cpu')
    model = torchvision.models.detection.__dict__[model_name](pretrained=True)
    model.eval()
    model.to(device)

    # 读取图像
    input_image = Image.open(image_path).convert("RGB")
    transform = transforms.Compose([transforms.ToTensor()])
    input_tensor = transform(input_image).unsqueeze(0).to(device)

    # 前向传播
    with torch.no_grad():
        predictions = model(input_tensor)

    # 解析结果
    boxes = predictions[0]['boxes'].cpu().numpy()
    labels = predictions[0]['labels'].cpu().numpy()
    scores = predictions[0]['scores'].cpu().numpy()

    # 过滤结果
    valid_indices = [i for i, score in enumerate(scores) if score > confidence_threshold]
    valid_boxes = boxes[valid_indices]
    valid_labels = labels[valid_indices]

    # 绘制结果
    image_bgr = cv2.cvtColor(np.array(input_image), cv2.COLOR_RGB2BGR)
    for box, label in zip(valid_boxes, valid_labels):
        x1, y1, x2, y2 = map(int, box)
        cv2.rectangle(image_bgr, (x1, y1), (x2, y2), (0, 255, 0), 2)
        class_name = f"Class {label}"
        cv2.putText(image_bgr, class_name, (x1, y1 - 5), cv2.FONT_HERSHEY_SIMPLEX, 0.5, (0, 255, 0), 2)

    # 显示或保存结果
    cv2.imshow("Object Detection", image_bgr)
    cv2.waitKey(0)
    cv2.destroyAllWindows()
    cv2.imwrite("result.jpg", image_bgr)

# 替换为您的图片路径
image_path = "path/to/your/image.jpg"
optimized_object_detection(image_path, model_name='fasterrcnn_resnet50_fpn', confidence_threshold=0.8)
魔乐社区(Modelers.cn) 是一个中立、公益的人工智能社区,提供人工智能工具、模型、数据的托管、展示与应用协同服务,为人工智能开发及爱好者搭建开放的学习交流平台。社区通过理事会方式运作,由全产业链共同建设、共同运营、共同享有,推动国产AI生态繁荣发展。
更多推荐


 10
10 0
0- 0


 已为社区贡献1条内容

所有评论(0)