

android 入门app
Machine Learning is at its highest peak these days and most of the apps are now running ML within it.
如今,机器学习已达到最高峰,现在大多数应用程序都在其中运行ML。
In this article we will see how to integrate Machine Learning into Android app with TensorFlow by making a simple app alongside.
在本文中,我们将了解如何通过将TensorFlow集成到Android应用程序中,并通过制作一个简单的应用程序将其集成到Android应用程序中。
First we will create and train a TensorFlow model on Google Colab and then we will integrate that model into our Android App.
首先,我们将在Google Colab上创建并训练TensorFlow模型,然后将其集成到我们的Android应用中。
Now, let’s dive into the code..
现在,让我们深入研究代码。
First to all go to Google Colab and create a new notebook.
首先,请转到Google Colab并创建一个新笔记本。
Google colab saves your time from installing libraries and you can directly start coding.
Google colab节省了安装库的时间,您可以直接开始编码。
First we will import all the necessary libraries that are required.
首先,我们将导入所有必需的库。
import tensorflow as tf
import numpy as np
from tensorflow import keras
from tensorflow import lite
Now we will define two arrays, x and y for training the model using numpy, such that y = 2x-1. Here x will act as feature and y will be our label, i.e; to be determined.
现在我们将定义两个数组x和y,以使用numpy训练模型,从而y = 2x-1。 在这里x将作为特征,而y将成为我们的标签,即; 待定。
#y=2x-1
x=np.array([-1.0,0.0,1.0,2.0,3.0,4.0])
y=np.array([-3.0,-1.0,1.0,3.0,5.0,7.0])
Here comes the crucial part
关键部分来了
Now we will create our model. We will use Sequential() function from keras library.
现在,我们将创建模型。 我们将使用keras库中的Sequential()函数。
model = keras.Sequential(
  [keras.layers.Dense(units=1,input_shape=[1]),
   keras.layers.Dense(units=1, input_shape=[1])]
)
I have passed a list of hidden layers to this Sequential function, which contains 2 hidden layers. Both of them are fully connected layers. Here units = 1 which means that it contains one neuron only and input_shape = [1] which is the output_shape of previous layer. Since we have only one feature here (x) that’s why we have passed 1.
我已将隐藏层列表传递给此Sequential函数,其中包含2个隐藏层。 它们都是完全连接的层。 在这里,units = 1,表示仅包含一个神经元,input_shape = [1],即上一层的output_shape。 由于此处(x)仅具有一项功能,因此我们通过了1。
Now, it’s time to compile our model.
现在,该编译我们的模型了。
model.compile(
  optimizer="sgd",
  loss="mean_squared_error"
)
The compile function contains two parameters, optimizer and loss function. Here loss function means that how much our predicted value differs from the actual value. We want that the difference between predicted and actual result should be minimum. Here the optimizer will be used to minimize the loss function.
编译函数包含两个参数,优化器和损失函数。 这里的损失函数意味着我们的预测值与实际值相差多少。 我们希望预测结果与实际结果之间的差异应最小。 在这里,优化器将用于最小化损失函数。
After compiling, next step is to perform training.
编译后,下一步是进行培训。
model.fit(x,y,epochs=500)
print(model.predict([10]))
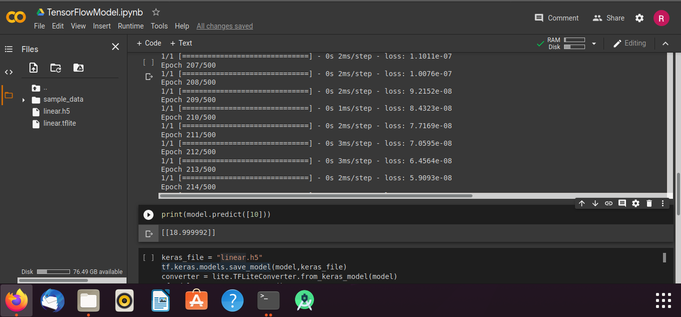
For training, we will use fit function which will contain our feature(x), label(y) and epochs = 500(no. of iterations). For 500 times feed forwarding and back propagation will be performed and our model will be trained. After training we will test our model to predict output. For 10, it gives me the output 18.999992 and according to our model, actual value should be 19(2*10–1). It means accuracy of our model is very high.
为了进行训练,我们将使用拟合函数,该函数将包含特征(x),标签(y)和纪元= 500(迭代次数)。 对于500次进料,将执行前进和后退传播,并将对我们的模型进行训练。 训练后,我们将测试模型以预测输出。 对于10,它给我输出18.999992,根据我们的模型,实际值应为19(2 * 10–1)。 这意味着我们模型的精度很高。
Now we will save our model to keras format first.
现在,我们将首先将模型保存为keras格式。
keras_file = "linear.h5"
tf.keras.models.save_model(
  model,
  keras_file
)
Now we will convert this model into tflite format.
现在,我们将该模型转换为tflite格式。
converter = lite.TFLiteConverter.from_keras_model(model)
tfmodel = converter.convert()
open("linear.tflite","wb").write(tfmodel)
After converting you will see linear.h5 and linear.tflite files on the left panel. Download the tflite file and this will be used in our android application.
将你会看到左侧面板上linear.h5和linear.tflite文件之后。 下载tflite文件,这将在我们的android应用程序中使用。
Next, we will implement this model in our android application.
接下来,我们将在我们的android应用程序中实现此模型。
Step 1 : Create an Android Project and open your app/build.gradle file.
步骤1 :创建一个Android项目并打开您的app / build.gradle文件。
Now add TensorFlow library in it.
现在在其中添加TensorFlow库。
dependencies {
    implementation fileTree(dir: "libs", include: ["*.jar"])
    implementation "org.jetbrains.kotlin:kotlin-stdlib:$kotlin_version"
    implementation 'androidx.core:core-ktx:1.3.0'
    implementation 'androidx.appcompat:appcompat:1.1.0'
    implementation 'androidx.constraintlayout:constraintlayout:1.1.3'


    implementation 'org.tensorflow:tensorflow-lite:+'


    testImplementation 'junit:junit:4.12'
    androidTestImplementation 'androidx.test.ext:junit:1.1.1'
    androidTestImplementation 'androidx.test.espresso:espresso-core:3.2.0'


}
Also add this in the same file to avoid compression of model files
还要将此添加到同一文件中,以避免压缩模型文件
android {
    compileSdkVersion 30
    buildToolsVersion "30.0.0"


    defaultConfig {
        applicationId "com.example.tensorflowexample"
        minSdkVersion 16
        targetSdkVersion 30
        versionCode 1
        versionName "1.0"


        testInstrumentationRunner "androidx.test.runner.AndroidJUnitRunner"
    }


    buildTypes {
        release {
            minifyEnabled false
            proguardFiles getDefaultProguardFile('proguard-android-optimize.txt'), 'proguard-rules.pro'
        }
    }


    aaptOptions{
        noCompress "tflite"
        noCompress "lite"
    }


}
Step 2 : Now create a layout file to enter the input and display the result.
步骤2 :现在创建一个布局文件以输入输入并显示结果。
<?xml version="1.0" encoding="utf-8"?>
<androidx.constraintlayout.widget.ConstraintLayout xmlns:android="http://schemas.android.com/apk/res/android"
    xmlns:app="http://schemas.android.com/apk/res-auto"
    xmlns:tools="http://schemas.android.com/tools"
    android:layout_width="match_parent"
    android:layout_height="match_parent"
    tools:context=".MainActivity">


    <EditText
        android:layout_width="300dp"
        android:layout_height="wrap_content"
        android:hint="Enter input"
        app:layout_constraintTop_toTopOf="parent"
        app:layout_constraintStart_toStartOf="parent"
        app:layout_constraintEnd_toEndOf="parent"
        android:layout_marginTop="50dp"
        android:textAlignment="center"
        android:id="@+id/et_input"
        android:gravity="center_horizontal" />


    <Button
        android:layout_width="wrap_content"
        android:layout_height="wrap_content"
        android:text="Predict"
        app:layout_constraintStart_toStartOf="parent"
        app:layout_constraintEnd_toEndOf="parent"
        app:layout_constraintTop_toBottomOf="@+id/et_input"
        android:layout_marginTop="50dp"
        android:id="@+id/btn_predict"/>


    <TextView
        android:layout_width="wrap_content"
        android:layout_height="wrap_content"
        app:layout_constraintStart_toStartOf="parent"
        app:layout_constraintEnd_toEndOf="parent"
        app:layout_constraintTop_toBottomOf="@+id/btn_predict"
        android:layout_marginTop="50dp"
        android:id="@+id/tv_result"/>


</androidx.constraintlayout.widget.ConstraintLayout>
Step 3 : Now put the linear.tflite file in assets folder
步骤3 :现在将linear.tflite文件放在资产文件夹中
Step 4 : Next we will load the model file from assets folder
步骤4 :接下来,我们将从资产文件夹中加载模型文件
private fun loadModelFile():MappedByteBuffer{
        val assetFileDescriptor = this.assets.openFd("linear.tflite")
        val fileInputStream = FileInputStream(assetFileDescriptor.fileDescriptor)
        val fileChannel = fileInputStream.channel
        val startOffSet = assetFileDescriptor.startOffset
        val length = assetFileDescriptor.length


        return fileChannel.map(FileChannel.MapMode.READ_ONLY, startOffSet,length)
    }
Step 5 : Now we will write a doInference() function to predict the output for a particular value.
步骤5 :现在我们将编写一个doInference()函数来预测特定值的输出。
private fun doInference(str:String):Float{
        val input = FloatArray(1)
        input[0] = str.toFloat()


        val output = Array(1) {FloatArray(1)}
        interpreter.run(input,output)
        return output[0][0]
    }
Step 6 : Next we will call these functions and display the results.
步骤6 :接下来,我们将调用这些函数并显示结果。
private lateinit var interpreter: Interpreter


override fun onCreate(savedInstanceState: Bundle?) {
    super.onCreate(savedInstanceState)
    setContentView(R.layout.activity_main)


    interpreter = Interpreter(loadModelFile(),null)


    btn_predict.setOnClickListener {
        val str = et_input.text.toString().trim()
        if (str.isNotEmpty()){
            tv_result.text = "result : ${doInference(str)}"
        }
    }
}
Here is the demo of the app which is predicting output for 10 and 25.
这是该应用程序的演示,它预测10和25的输出。

android 入门app




 已为社区贡献2条内容

所有评论(0)